接口自动化---简单的数据驱动框架ATP(基于excel)
Posted bendouyao
tags:
篇首语:本文由小常识网(cha138.com)小编为大家整理,主要介绍了接口自动化---简单的数据驱动框架ATP(基于excel)相关的知识,希望对你有一定的参考价值。
数据驱动测试:根据数据进行测试。将用例写入excel文件,用代码读取文件中的数据,从而实现自动化测试。
自动化框架实现步骤:
1、获取用例
2、调用接口
3、校验结果
4、发送测试报告
5、异常处理
6、日志
一、首先准备好用例
在excel文件中用例写好,格式如下:数据一定要填写正确。

二、编写框架结构
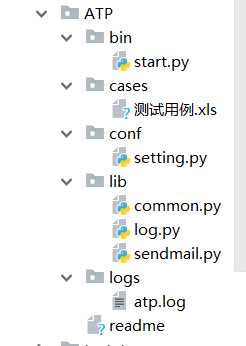
ATP框架结构搭建:lib目录下放一些处理操作,logs目录下存放日志文件,cof文件夹放一些配置文件,bin文件夹作为启动文件,cases目录下放我们准备好的用例

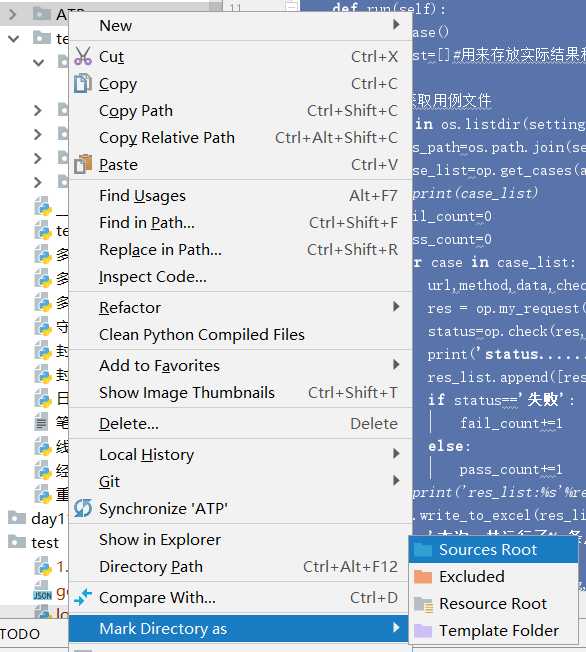
注意:文件目录建好以后,必须先把ATP整个目录sources root操作下。这样才可以跨文件夹引用模块进行使用

按照这些文件结构,填写代码内容。
三、填充代码
1、setting.py
将需要的配置信息写入setting.py文件中
import os
# print(os.path.dirname(os.path.abspath(__file__)))#当前文件的父路径:D:pythonyao_codeday10	estatpconf
#为了以后方便用到其他目录下的数据,所以要取其他目录的绝对路径。因为其他目录也都在testatp下,所以先获取到testatp
#先用abspath,获取到的绝对路径中,路径符都是,如果不用abspath,直接获取dirname,路径符是/

BASE_PATH=os.path.dirname(os.path.dirname(os.path.abspath(__file__)))#当前文件的父级conf的父级testatp
LOG_PATH=os.path.join(BASE_PATH,‘logs‘,‘atp.log‘)
LOG_LEVEL=‘debug‘
#logs文件夹的绝对路径。用base_path与logs拼接方法得到。因为join方法可以自动识别系统路径分隔符。不论在linux还是windows下都可以用系统自己的路径符拼接

CASE_PATH=os.path.join(BASE_PATH,‘cases‘)#原理同logs绝对路径拼接方法,用例存放的路径

#邮箱的相关参数
MAIL_HOST=‘smtp.qq.com‘
MAIL_USER=‘[email protected]‘#邮箱
MAIL_PASSWORD=‘fdfsfasfasfd‘#邮箱的授权码,注意,不是密码
TO=‘[email protected]‘#收件人邮箱,多个的话用[‘‘,‘‘]
2、lib目录下的log.py:用来封装写日志操作
#这里可以用nnlog模块,该模块已经对logging类进行过封装了
import nnlog
from conf import setting
atp_log=nnlog.Logger(setting.LOG_PATH,level=setting.LOG_LEVEL)#日志的保存路径和日志级别都在setting.py配置文件中配置好的,直接饮用
3、lib目录下的sendmail.py:封装发送邮件操作
import yagmail
from conf import setting
from lib.log import atp_log
def sendmail(title,content,attrs=None):
    try:
        m=yagmail.SMTP(host=setting.MAIL_HOST,user=setting.MAIL_USER,password=setting.MAIL_PASSWORD,smtp_ssl=True)#邮箱信息也在setting.py中配置
        m.send(to=setting.TO,
               subject=title,
               contents=content,
               attachments=attrs)
    except Exception as e:
        atp_log.error(‘邮件发送失败‘)
4、lib目录下的common.py:封装工具类,将相关操作函数写在这里面:获取excel中的用例,访问接口获取结果,检查结果,将测试结果写入excel
import xlrd,requests
from xlutils import copy
from lib.log import atp_log
class OpCase():
    def get_cases(self,filepath):
        cases=[]#保存用例
        print(‘filepath:%s‘%filepath)
        if filepath.endswith(‘.xls‘) or filepath.endswith(‘xlsx‘):
            try:
                book=xlrd.open_workbook(filepath)#打开文件
                sheet=book.sheet_by_index(0)#获取第一个sheet表
                nrows=sheet.nrows#获取表格行数(带标题,所以是比用例条数多一)
                for i in range(1,nrows):#从第2行循环读用例
                    row_data=sheet.row_values(i)#获取每行的数据,返回一个list
                    cases.append(row_data[4:8])#获取4,5,6,7列的数据放入cases:url,method,data,check
                atp_log.info(‘共有%s条用例‘%len(cases))
                self.filepath=filepath#这样,下面的函数就也可以用filepath
                # print(cases)
            except Exception as e:
                atp_log.error(‘文件打开失败:%s‘%e)
        else:
            atp_log.error(‘用例格式不合法,需要xls或xlsx:%s‘%filepath)
        return cases
    def my_request(self,url,data,method):
        method=method.upper()#统一请求方法为大写

        data=self.data_to_dic(data)
        print(‘data处理成字典后-------------%s‘%data)
        try:

            if method==‘GET‘:
                res=requests.get(url,params=data).text
            elif method==‘POST‘:
                res=requests.post(url,data).text
                # print(res)
            else:
                atp_log.warning(‘该请求方式暂不支持‘)
                res=‘该请求方式暂不支持‘
        except Exception as e:
            atp_log.error(‘接口不通url:%s
 错误信息:%s‘%e)
            res=‘接口不通‘

        return res

    def data_to_dic(self,data):#data格式是a=1,b=2
        print(data)
        data=data.split(‘,‘)#[a=1,b=2]
        res={}#用来保存转换后的请求数据
        for d in data:#d的值:a=1
            k,v=d.split(‘=‘)
            res[k]=v
        print(‘res------------------%s‘%res)
        return res


    def check(self,res,check):
        # print(‘------------‘+res)
        # print(check)
        res=res.replace(‘": ‘,‘=‘).replace(‘": ‘,‘=‘)
        for c in check.split(‘,‘):
            if c not in res:
                atp_log.error(‘失败,预期结果:%s,实际结果:%s‘%(c,res))
                return ‘失败‘
        return ‘成功‘

    def write_to_excel(self,cases_res):#cases_res格式[[接口返回数据,成功],[接口返回数据,失败]]
        book=xlrd.open_workbook(self.filepath)
        newbook=copy.copy(book)
        sheet=newbook.get_sheet(0)
        row=1
        for case_res in cases_res:
            sheet.write(row,8,case_res[0])#第8列是实际结果
            sheet.write(row,9,case_res[1])#第9列事测试结果
            row+=1
        newbook.save(self.filepath.replace(‘xlsx‘,‘xls‘))
5、bin目录下的start.py:启动程序
# #如果不在python运行,用命令方式运行,那么首先运行的是这个start文件。这时候文件目录都还不在环境变量中,所以要先把当前文件包加入环境变量

import os,sys
BASE_PATH=os.path.dirname(os.path.dirname(os.path.abspath(__file__)))#获取到testatp
sys.path.insert(0,BASE_PATH)#将testatp加入环境变量

from lib.common import OpCase
from conf import setting
from lib.sendmail import sendmail
class CaseRun():
    def run(self):
        op=OpCase()
        res_list=[]#用来存放实际结果和测试结果。写入excel

        #遍历获取用例文件
        for t in os.listdir(setting.CASE_PATH):
            abs_path=os.path.join(setting.CASE_PATH,t)#获取到用例文件的绝对路径
            case_list=op.get_cases(abs_path)#获取到所有用例,是个二维数组
            # print(case_list)
            fail_count=0
            pass_count=0
            for case in case_list:  #循环每条用例
                url,method,data,check=case#获取到用例对应的数据
                res = op.my_request(url,data,method)  # 请求数据,返回实际结果
                status=op.check(res,check)
                print(‘status............%s,res...............%s‘%(status,res))
                res_list.append([res,status])
                if status==‘失败‘:
                    fail_count+=1
                else:
                    pass_count+=1
            # print(‘res_list:%s‘%res_list)
            op.write_to_excel(res_list)
            msg=‘本次一共运行了%s条用例,失败%s条,成功%s条‘%(len(res_list),fail_count,fail_count)

            sendmail(‘测试结果‘,msg,abs_path)


# print(os.listdir(setting.CASE_PATH))
# print(BASE_PATH)
CaseRun().run()
四、运行start.py文件,会发送测试报告到邮箱。
以上是关于接口自动化---简单的数据驱动框架ATP(基于excel)的主要内容,如果未能解决你的问题,请参考以下文章