配置OSPF基本功能示例
Posted
tags:
篇首语:本文由小常识网(cha138.com)小编为大家整理,主要介绍了配置OSPF基本功能示例相关的知识,希望对你有一定的参考价值。

微信公众号: 网络民工
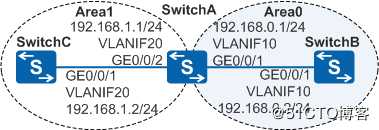
?组网图形

图1 配置OSPF基本功能组网图
OSPF简介
OSPF(Open Shortest Path First开放式最短路径优先)是IETF组织开发的一个基于链路状态的内部网关协议(Interior Gateway Protocol)。目前针对IPv4协议使用的是OSPF Version 2(RFC2328)。
OSPF具有适应范围广、收敛快、无自环、区域划分、等价路由、支持验证、组播发送等特点。由于OSPF具有以上优势,使得OSPF作为目前主流的IGP协议被广泛应用于各个行业,例如企业、运营商、政府、金融、教育、医疗等。
OSPF采用分层设计的结构,并且具有丰富的路由策略控制功能,能够适用于各种不同规模、不同组网结构的应用场景。因此在部署IGP协议的时候,OSPF经常是用户的首选方案。
配置注意事项
· 每个OSPF进程的Router ID要保证在OSPF网络中唯一,否则会导致邻居不能正常建立、路由信息不正确的问题。建议在OSPF设备上单独为每个OSPF进程配置全网唯一的Router ID。
· OSPF协议将自治系统划分成不同的区域(Area),其中区域号(Area ID)是0的称为骨干区域。OSPF要求所有非骨干区域必须与骨干区域保持连通,并且骨干区域的设备之间也要保持连通。
· 一般情况下,链路两端的OSPF接口的网络类型必须一致,否则双方不可以建立起邻居关系。但是,当链路两端的OSPF接口的网络类型一端是广播网而另一端是P2P时,双方仍可以正常的建立起邻居关系,但互相学不到路由信息。
· 一般情况下,链路两端的OSPF接口的IP地址的掩码必须一致,否则双方不能正常建立OSPF邻居关系。但在P2MP网络中,可以通过配置命令ospf p2mp-mask-ignore来使设备忽略对网络掩码的检查,从而正常建立OSPF邻居关系。
· 对于广播和NBMA类型网络,链路中至少要有一个OSPF接口的DR优先级不为0,这样才能正常选举出DR。否则两边的邻居状态只能达到2-Way。
组网需求
如图1所示,网络中有三台交换机。现在需要实现三台交换机之间能够互通,且以后能依据SwitchA和SwitchB为主要的业务设备来继续扩展整个网络。
配置思路
采用如下的思路配置OSPF基本功能:
- 在各交换机的VLANIF接口上配置IP地址并配置各接口所属VLAN,实现网段内的互通。
- 在各交换机上配置OSPF基本功能,并且以SwitchA为ABR将OSPF网络划分为Area0和Area1两个区域,实现后续以SwitchA和SwitchB所在区域为骨干区域来扩展整个OSPF网络。
操作步骤 - 配置各接口所属的VLAN
配置SwitchA。SwitchB和SwitchC的配置与SwitchA类似。
<HUAWEI> system-view
[HUAWEI] sysname SwitchA
[SwitchA] vlan batch 10 20
[SwitchA] interface gigabitethernet 0/0/1
[SwitchA-GigabitEthernet0/0/1] port link-type trunk
[SwitchA-GigabitEthernet0/0/1] port trunk allow-pass vlan 10
[SwitchA-GigabitEthernet0/0/1] quit
[SwitchA] interface gigabitethernet 0/0/2
[SwitchA-GigabitEthernet0/0/2] port link-type trunk
[SwitchA-GigabitEthernet0/0/2] port trunk allow-pass vlan 20
[SwitchA-GigabitEthernet0/0/2] quit - 配置各VLANIF接口的IP地址
配置SwitchA。SwitchB和SwitchC的配置与SwitchA类似。
[SwitchA] interface vlanif 10
[SwitchA-Vlanif10] ip address 192.168.0.1 24
[SwitchA-Vlanif10] quit
[SwitchA] interface vlanif 20
[SwitchA-Vlanif20] ip address 192.168.1.1 24
[SwitchA-Vlanif20] quit - 配置OSPF基本功能
配置SwitchA。
[SwitchA] ospf 1 router-id 10.1.1.1 //创建进程号为1,Router ID为10.1.1.1的OSPF进程
[SwitchA-ospf-1] area 0 //创建area 0区域并进入area 0视图
[SwitchA-ospf-1-area-0.0.0.0] network 192.168.0.0 0.0.0.255 //配置area 0所包含的网段
[SwitchA-ospf-1-area-0.0.0.0] quit
[SwitchA-ospf-1] area 1 //创建area 1区域并进入area 1视图
[SwitchA-ospf-1-area-0.0.0.1] network 192.168.1.0 0.0.0.255 //配置area 1所包含的网段
[SwitchA-ospf-1-area-0.0.0.1] return配置SwitchB。
[SwitchB] ospf 1 router-id 10.2.2.2
[SwitchB-ospf-1] area 0
[SwitchB-ospf-1-area-0.0.0.0] network 192.168.0.0 0.0.0.255
[SwitchB-ospf-1-area-0.0.0.0] return配置SwitchC。
[SwitchC] ospf 1 router-id 10.3.3.3
[SwitchC-ospf-1] area 1
[SwitchC-ospf-1-area-0.0.0.1] network 192.168.1.0 0.0.0.255
[SwitchC-ospf-1-area-0.0.0.1] return -
验证配置结果
查看SwitchA的OSPF邻居。
<SwitchA> display ospf peer
  OSPF Process 1 with Router ID 10.1.1.1
          Neighbors
Area 0.0.0.0 interface 192.168.0.1(Vlanif10)‘s neighbors
Router ID: 10.2.2.2 Address: 192.168.0.2
State: Full Mode:Nbr is Master Priority: 1
DR: 192.168.0.2 BDR: 192.168.0.1 MTU: 0
Dead timer due in 36 sec
Retrans timer interval: 5
Neighbor is up for 00:15:04
Authentication Sequence: [ 0 ]NeighborsArea 0.0.0.1 interface 192.168.1.1(Vlanif20)‘s neighbors
Router ID: 10.3.3.3 Address: 192.168.1.2
State: Full Mode:Nbr is Master Priority: 1
DR: 192.168.1.2 BDR: 192.168.1.1 MTU: 0
Dead timer due in 39 sec
Retrans timer interval: 5
Neighbor is up for 00:07:32
Authentication Sequence: [ 0 ]查看SwitchC的OSPF路由信息。
<SwitchC> display ospf routing
  OSPF Process 1 with Router ID 10.3.3.3
           Routing Tables
Routing for Network
Destination Cost Type NextHop AdvRouter Area
192.168.1.0/24 1 Transit 192.168.1.2 10.3.3.3 0.0.0.1
192.168.0.0/24 2 Inter-area 192.168.1.1 10.1.1.1 0.0.0.1Total Nets: 2
Intra Area: 1 Inter Area: 1 ASE: 0 NSSA: 0
由以上回显可以看出,SwitchC有到192.168.0.0/24网段的路由,且此路由被标识为区域间路由。查看SwitchB的路由表,并使用Ping测试SwitchB和SwitchC的连通性。
<SwitchB> display ospf routing
  OSPF Process 1 with Router ID 10.2.2.2
           Routing Tables
Routing for Network
Destination Cost Type NextHop AdvRouter Area
192.168.0.0/24 1 Transit 192.168.0.2 10.2.2.2 0.0.0.0
192.168.1.0/24 2 Inter-area 192.168.0.1 10.1.1.1 0.0.0.0Total Nets: 2
Intra Area: 1 Inter Area: 1 ASE: 0 NSSA: 0
由以上回显可以看出,SwitchB有到192.168.1.0/24网段的路由,且此路由被标识为区域间路由。在SwitchB上使用Ping测试SwitchB和SwitchC之间的连通性。
<SwitchB> ping 192.168.1.2
PING 192.168.1.2: 56 data bytes, press CTRL_C to break
Reply from 192.168.1.2: bytes=56 Sequence=1 ttl=254 time=62 ms
Reply from 192.168.1.2: bytes=56 Sequence=2 ttl=254 time=16 ms
Reply from 192.168.1.2: bytes=56 Sequence=3 ttl=254 time=62 ms
Reply from 192.168.1.2: bytes=56 Sequence=4 ttl=254 time=94 ms
Reply from 192.168.1.2: bytes=56 Sequence=5 ttl=254 time=63 ms--- 192.168.1.2 ping statistics ---
5 packet(s) transmitted
5 packet(s) received
0.00% packet loss
round-trip min/avg/max = 16/59/94 ms
配置文件
· SwitchA的配置文件
#
sysname SwitchA
#
vlan batch 10 20
#
interface Vlanif10
ip address 192.168.0.1 255.255.255.0
#
interface Vlanif20
ip address 192.168.1.1 255.255.255.0
#
interface GigabitEthernet0/0/1
port link-type trunk
port trunk allow-pass vlan 10
#
interface GigabitEthernet0/0/2
port link-type trunk
port trunk allow-pass vlan 20
#
ospf 1 router-id 10.1.1.1
area 0.0.0.0
network 192.168.0.0 0.0.0.255
area 0.0.0.1
network 192.168.1.0 0.0.0.255
#
return
· SwitchB的配置文件
#
sysname SwitchB
#
vlan batch 10
#
interface Vlanif10
ip address 192.168.0.2 255.255.255.0
#
interface GigabitEthernet0/0/1
port link-type trunk
port trunk allow-pass vlan 10
#
ospf 1 router-id 10.2.2.2
area 0.0.0.0
network 192.168.0.0 0.0.0.255
#
return
· SwitchC的配置文件
#
sysname SwitchC
#
vlan batch 20
#
interface Vlanif20
ip address 192.168.1.2 255.255.255.0
#
interface GigabitEthernet0/0/1
port link-type trunk
port trunk allow-pass vlan 20
#
ospf 1 router-id 10.3.3.3
area 0.0.0.1
network 192.168.1.0 0.0.0.255
#
return
微信公众号:网络民工
以上是关于配置OSPF基本功能示例的主要内容,如果未能解决你的问题,请参考以下文章