React 学习之路由HashRouter和BrowserRouter
Posted lyt0207
tags:
篇首语:本文由小常识网(cha138.com)小编为大家整理,主要介绍了React 学习之路由HashRouter和BrowserRouter相关的知识,希望对你有一定的参考价值。
React路由有两种实现方式:
- HashRouter:利用hash实现路由切换
- BrowserRouter:利用h5 Api实现路由切换
1.1 HashRouter
利用hash实现路由切换
<body>
    <div id="root"></div>
    <a href="#/a">去/a</a>
    <a href="#/b">去/b</a>
  </body>
  <script>
    let root = document.getElementById(‘root‘)
    window.addEventListener(‘hashchange‘,(event) =>{
      let hash = window.location.hash
      root.innerhtml = hash
    })
  </script>
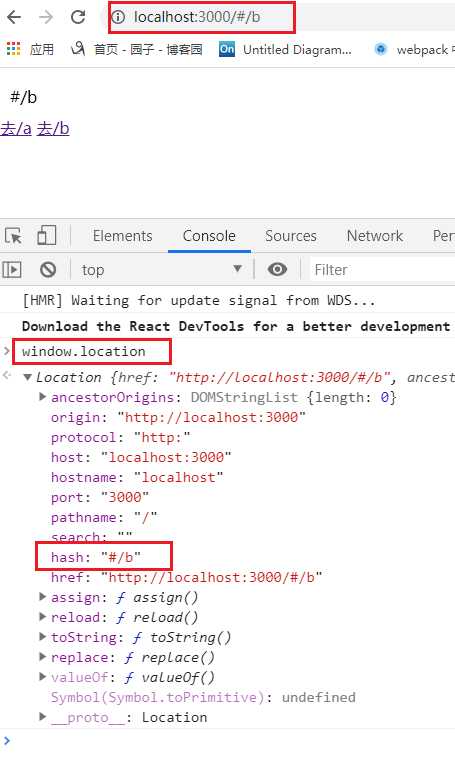
模拟点击切换页面,每当浏览器里的hash值发生变化之后,就会触发一个事件,叫hashchange,这个函数有一个回调,可以通过window.location.hash拿到当前的hash值。

1.2 BrowserRouter (浏览器路由)
利用h5 Api实现路由切换,主要是借助history对象。
- history对象提供了操作浏览器会话的历史接口。
- historylength属性声明了浏览器历史列表中的元素数量。
- pushState,H5引入了history.pushState()和history.replaceState()方法,它们分别可以添加和修改历史记录的条目,这些方法通常与window.onpopstate配合使用
- onpopstate,window.onpopstate是popstate事件再window对象上的事件处理程序
 setTimeout( () => {
      //pushState不会触发事件
      window.history.pushState({page: 1},‘page1‘,‘/page1‘)
    },1000)
    setTimeout( () => {
      //pushState不会触发事件
      window.history.pushState({page: 2},‘page2‘,‘/page2‘)
    },2000)
    setTimeout( () => {
      //pushState不会触发事件
      window.history.pushState({page: 3},‘page3‘,‘/page3‘)
    },3000)
    //后退的时候触发popstate
    setTimeout( () => {
      //go(-1)后退一个,会触发popstate事件
      window.history.go(-1)
    },4000)
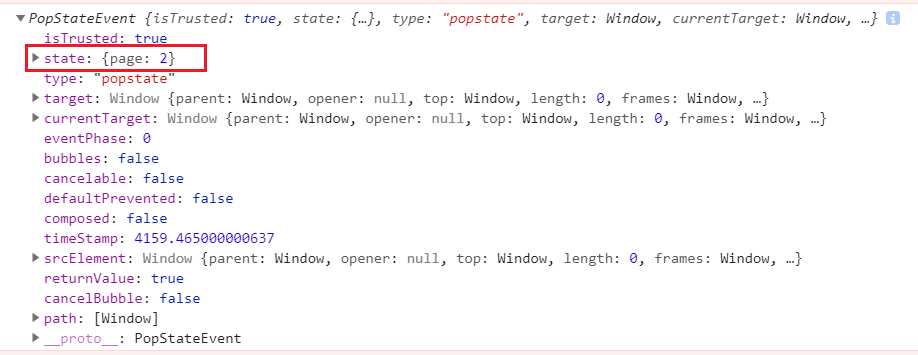
通过 window.history.pushState可以向history容器中存入当前路径,这个容器结构类似于栈,后进先出,当然也可以通过window.history.go这个方法后退到前一个路径,这个方法会触发一个popstate事件,通过这个事件我们可以做一些操作,比如向页面添加内容等:
//这个事件会在go(-1)的时候触发,可以在触发的时候改变文档内容
    window.onpopstate = function(event){
      console.log(event)
      root.innerHTML = window.location.pathname
    }

history对象在回退的时候有事件,但是在pushstate的时候并不会触发事件,我们要想自己做一些操作就需要改写一个onpushState事件,以便我们进行页面操作。
let root = document.getElementById(‘root‘)
    window.onpushstate = function(state,title,url) {
      root.innerHTML = url
    }

    ;(function (history) {
      //1.缓存原生的pushState方法
      let pushState = history.pushState
      //2.改写pushState方法
      history.pushState = function(state,title,url) {

        //3.自定义改写后的事件名为onpushstate
        if(typeof window.onpushstate === ‘function‘) {
          window.onpushstate(state,title,url)
        }
        //4.调用原生方法并且执行
        pushState.call(history,state,title,url)
      }
    })(window.history)
看过vue源码的同学肯定知道vue里面对数组的响应式处理就是通过改写数组的那7个方法实现的。我们这里也一样,拦截了原生的方法,对原生方法进行了缓存,然后再改写原生方法,最后再执行,就这么简单。
完整版:
<body>
    <div id="root"></div>
  </body>
  <script>
    let root = document.getElementById(‘root‘)
    window.onpushstate = function(state,title,url) {
      root.innerHTML = url
    }

    ;(function (history) {
      //1.缓存原生的pushState方法
      let pushState = history.pushState
      //2.改写pushState方法
      history.pushState = function(state,title,url) {

        //3.自定义改写后的事件名为onpushstate
        if(typeof window.onpushstate === ‘function‘) {
          window.onpushstate(state,title,url)
        }
        //4.调用原生方法并且执行
        pushState.call(history,state,title,url)
      }
    })(window.history)
    //这个事件会在go(-1)的时候触发,可以在触发的时候改变文档内容
    window.onpopstate = function(event){
      console.log(event)
      root.innerHTML = window.location.pathname
    }
    // window.history 这是浏览器原生提供的对象,通过它来操作会话容器
    setTimeout( () => {
      //pushState不会触发事件
      window.history.pushState({page: 1},‘page1‘,‘/page1‘)
    },1000)
    setTimeout( () => {
      //pushState不会触发事件
      window.history.pushState({page: 2},‘page2‘,‘/page2‘)
    },2000)
    setTimeout( () => {
      //pushState不会触发事件
      window.history.pushState({page: 3},‘page3‘,‘/page3‘)
    },3000)
    //后退的时候触发popstate
    setTimeout( () => {
      //go(-1)后退一个,会触发popstate事件
      window.history.go(-1)
    },4000)

  </script>
下一节写一个自己的路由库!
以上是关于React 学习之路由HashRouter和BrowserRouter的主要内容,如果未能解决你的问题,请参考以下文章