《Android Studio开发实战》学习- 下拉框
Posted 下唐人
tags:
篇首语:本文由小常识网(cha138.com)小编为大家整理,主要介绍了《Android Studio开发实战》学习- 下拉框相关的知识,希望对你有一定的参考价值。
《android Studio开发实战》学习(六)- 下拉框
背景
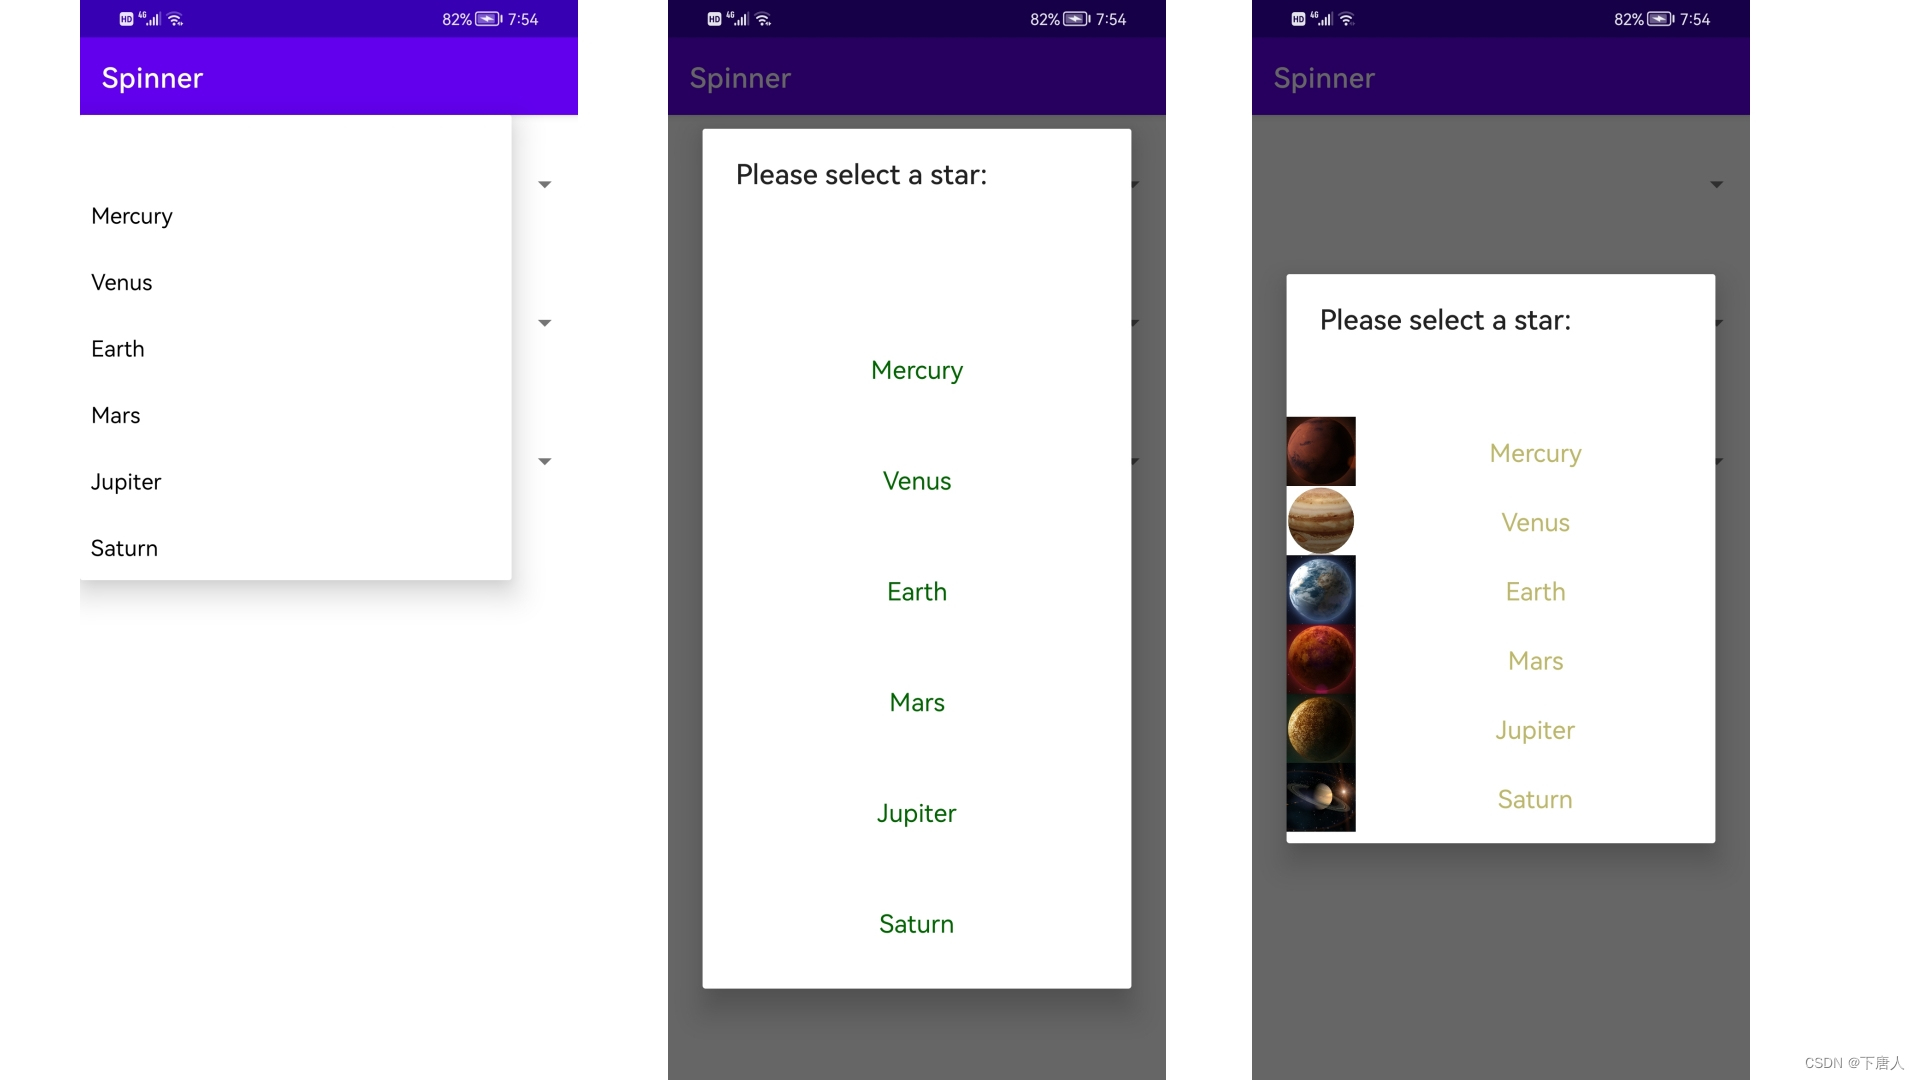
在这里继续学习Android Studio的使用方法,编写一个下拉列表选择工具 1,学习下拉框Spinner和数组适配器ArrayAdapter、简单适配器SimpleAdapter的使用。现在想要设计一个下拉列表选择工具,包括3个下拉框,内容是水金地火木土六个行星的名字,第一个用下拉方式显示列表,第二个用数组适配器 ArrayAdapter以对话框形式显示列表,第三个用简单适配器SimpleAdapter以对话框形式显示列表,每个列表项目包括一个行星的图片和名字。
下拉框Spinner的使用
Spinner是下拉框,用于从一串列表中选择某项,类似于单选按钮的组合 1。在布局文件layout/activity_main.xml中可以设置spinnerMode属性,以控制下拉列表的展示方式。dropdown表示以下拉框方式展示列表,dialog表示以对话框形式展示列表。布局代码可以这样写
<Spinner
	android:id="@+id/sp_stars"
	android:layout_width="match_parent"
	android:layout_height="match_parent"
	android:spinnerMode="dropdown"
	android:entries="@array/stars" />
entries属性用于提前指定列表中的内容,使用时需要提前把表示小行星名称的数组添加到资源文件values/stars.xml中
<?xml version="1.0" encoding="utf-8"?>
<resources>
    <string-array name="stars">
         <item></item>
        <item>Mercury</item>
        <item>Venus</item>
        <item>Earth</item>
        <item>Mars</item>
        <item>Jupiter</item>
        <item>Saturn</item>
    </string-array>
</resources>
数组适配器ArrayAdapter的使用
可以在代码文件中使用Spinner.setAdapter()方法为下拉框Spinner添加一个适配器,适配器可以是ArrayAdapter或SimpleAdapter 1。新建一个ArrayAdapter对象时,需要指定它的布局(不是下拉框列表整体的布局,而是单个列表项目的布局),这时候可以新建一个布局文件layout/activity_list.xml,这个文件内只有一个TextView,如下所示
<?xml version="1.0" encoding="utf-8"?>
<TextView xmlns:android="http://schemas.android.com/apk/res/android"
    android:layout_width="match_parent"
    android:layout_height="80dp"
    android:gravity="center"
    android:textSize="18sp"
    android:textColor="#006400">
</TextView>
简单适配器SimpleAdapter的使用
ArrayAdapter只能显示文本,SimpleAdapter能同时展示文本与图片。首先新建一个布局文件layout/activity_simple_list.xml,添加如下代码
<?xml version="1.0" encoding="utf-8"?>
<LinearLayout xmlns:android="http://schemas.android.com/apk/res/android"
    android:layout_width="match_parent"
    android:layout_height="wrap_content"
    android:orientation="horizontal" >
    <ImageView
        android:id="@+id/iv_icon"
        android:layout_width="50dp"
        android:layout_height="50dp"
        android:gravity="center" />
    <TextView
        android:id="@+id/tv_name"
        android:layout_width="match_parent"
        android:layout_height="50dp"
        android:gravity="center"
        android:textSize="18sp"
        android:textColor="#bdb76b" />
</LinearLayout>
这表示下拉列表中的每个项目是包括1个图像视图和1个文本视图的线性布局。
布局文件的编写
一共需要3个布局文件:
layout/activity_main.xml,垂直方向依次摆放3个下拉框
<?xml version="1.0" encoding="utf-8"?>
<LinearLayout xmlns:android="http://schemas.android.com/apk/res/android"
    android:layout_width="match_parent"
    android:layout_height="match_parent"
    android:orientation="vertical">
    <Spinner
        android:id="@+id/sp_stars_1"
        android:layout_width="match_parent"
        android:layout_height="100dp"
        android:spinnerMode="dropdown"
        android:orientation="vertical"
        android:entries="@array/stars" />
    <Spinner
        android:id="@+id/sp_stars_2"
        android:layout_width="match_parent"
        android:layout_height="100dp"
        android:spinnerMode="dialog" />
    <Spinner
        android:id="@+id/sp_stars_3"
        android:layout_width="match_parent"
        android:layout_height="100dp"
        android:spinnerMode="dialog" />
	<TextView
        android:id="@+id/tv_bbs"
        android:layout_width="match_parent"
        android:layout_height="400dp"
        android:text="" />
</LinearLayout>
layout/activity_list.xml,数组适配器列表项目布局设置,代码见上layout/activity_simple_list.xml,简单适配器列表项目布局设置,代码见上
代码文件的编写
6个行星的图片需要事先拷贝到AndroidStudioProjects目录下当前工程的src/main/res/drawable文件夹里。
package com.example.spinner;

import androidx.appcompat.app.AppCompatActivity;
import android.widget.*;
import android.os.Bundle;
import java.util.*;
import android.view.View;
import android.view.View.*;
import android.text.method.ScrollingMovementMethod;
public class MainActivity extends AppCompatActivity
    private TextView tv_bbs;
    private Spinner sp_stars_1, sp_stars_2, sp_stars_3;
    private String[] stars = "", "Mercury", "Venus", "Earth", "Mars", "Jupiter", "Saturn";
    private int[] iconArray = android.R.color.transparent, R.drawable.mercury, R.drawable.venus, R.drawable.earth, R.drawable.mars, R.drawable.jupiter, R.drawable.saturn;
    private List<Map<String, Object>> list = new ArrayList<Map<String, Object>>();
    @Override
    protected void onCreate(Bundle savedInstanceState)
        super.onCreate(savedInstanceState);
        setContentView(R.layout.activity_main);
        // 在下拉框中选择之后,在文本框中显示。
        tv_bbs = (TextView) findViewById(R.id.tv_bbs);
        tv_bbs.setMovementMethod(new ScrollingMovementMethod());
        OnLongClickListener clickL = new ClickLAction();
        tv_bbs.setOnLongClickListener(clickL);

        // 第一个下拉框
        sp_stars_1 = (Spinner) findViewById(R.id.sp_stars_1);
        sp_stars_1.setOnItemSelectedListener(new ClickIAction());
        sp_stars_1.setSelection(0);

        // 第二个下拉框
        sp_stars_2 = (Spinner) findViewById(R.id.sp_stars_2);
        ArrayAdapter<String> starAdapter = new ArrayAdapter<String>(this, R.layout.activity_list, stars);
        sp_stars_2.setPrompt("Please select a star:");
        sp_stars_2.setAdapter(starAdapter);
        sp_stars_2.setSelection(0);
        sp_stars_2.setOnItemSelectedListener(new ClickIAction());

        // 第三个下拉框
        sp_stars_3 = (Spinner) findViewById(R.id.sp_stars_3);
        for(int i=0; i < iconArray.length; i++)
            Map<String, Object> item = new HashMap<String, Object>();
            item.put("icon", iconArray[i]);
            item.put("name", stars[i]);
            list.add(item);

        SimpleAdapter starSimpleAdapter = new SimpleAdapter(this, list, R.layout.activity_simple_list, new String[] "icon", "name", new int[] R.id.iv_icon, R.id.tv_name);
        sp_stars_3.setPrompt("Please select a star:");
        sp_stars_3.setAdapter(starSimpleAdapter);
        sp_stars_3.setSelection(0);
        sp_stars_3.setOnItemSelectedListener(new ClickIAction());

    private class ClickIAction implements AdapterView.OnItemSelectedListener
        public void onItemSelected(AdapterView<?> arg0, View arg1, int arg2, long arg3)
            if ( arg2 != 0)
                String s = tv_bbs.getText() + "\\nYou choose: " + stars[arg2];
                tv_bbs.setText(s);


        public void onNothingSelected(AdapterView<?> arg0)


    private class ClickLAction implements OnLongClickListener
        @Override
        public boolean onLongClick(View v)
            if (v.getId() == R.id.tv_bbs)
                tv_bbs.setText("");

            return true;
运行结果
按之前探索的方法 2生成apk文件,然后传输到手机上运行,结果如下:

以上是关于《Android Studio开发实战》学习- 下拉框的主要内容,如果未能解决你的问题,请参考以下文章