pytorch基础
Posted fenglivoong
tags:
篇首语:本文由小常识网(cha138.com)小编为大家整理,主要介绍了pytorch基础相关的知识,希望对你有一定的参考价值。
1.张量数据类型

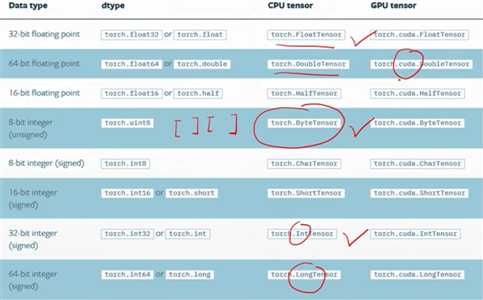
比如数字2在pytorch中就是intTensor类型,该维度为0即dim=0 ,pytorch内部没有自带的string 类型表示方法,要用的话只能通过以下两种编码方法表示:
one-hot : 如猫类别用【0 1】表示,狗类别用【1 0】表示
embedding:如果是汉字或者英文单词的话one-hot 表示就很费劲了,embedding 就是用数字的方式去表示语言,常用的编码器有Word2vec、glove
pytorch中的数据类型:

类型练习:
a = torch.randn(2,3)
print(a)
print(a.type())
print(type(a))
print(isinstance(a,torch.FloatTensor))

输出:
tensor([[-0.5431, -1.4844, -0.2626],
        [-2.0485, -1.3132, -0.4242]])
torch.FloatTensor
<class ‘torch.Tensor‘>
True
0维数据(标量,dim=0):loss计算
print(torch.tensor(1.))
print(torch.tensor(1.3))
b = torch.tensor(2.2)
print(b.shape)  #tensor 的维度
print(b.size()) #size是tensor的形状
输出:
tensor(1.)
tensor(1.3000)
torch.Size([])
torch.Size([])
1维数据(vector):偏置b
 1 print(torch.tensor([1.1,2.2])) #带了中括号
 2 print(torch.FloatTensor(1))   #生成dim为1,长度为1的向量
 3 print(torch.FloatTensor(2))   #生成dim为1,长度为2的向量
 4 data = np.ones(2)
 5 print(data)
 6 print(type(data))
 7 print(torch.from_numpy(data))  #numpy转成tensor
 8 a = torch.ones(2)
 9 print(a)
 10 print(a.shape)
对应输出如下:
1 tensor([1.1000, 2.2000])
2 tensor([2.8026e-45])
3 tensor([1.4013e-45, 0.0000e+00])
4 [1. 1.]
5 <class ‘numpy.ndarray‘>
6 tensor([1., 1.], dtype=torch.float64)
7 tensor([1., 1.])
8 torch.Size([2])
2维(带有batch的lLinear输入):如[4,784] 4表示哪一张照片(第0张,第1张···),784表示照片的内容
a = torch.randn(2,3) #随机正太分布
print(a)
print(a.shape)
print(a.shape[0])
print(a.size(0)) #返回shape的第0个元素
输出:
tensor([[ 1.1059,  1.2595,  0.9021],
        [-1.5283, -1.3688, -1.1164]])
torch.Size([2, 3])
2
2
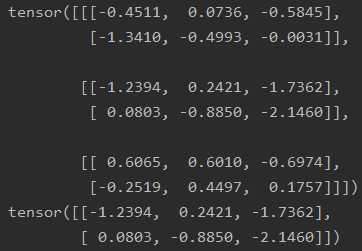
3维(RNN):如[10,100]一句话有10个单词,每个单词用one-hot 100维的向量编码,baatch插在中间,[10,20,100]每次处理20句话,很适合nlp中的文字处理
a = torch.randn(1,2,3)  #rand是随机均匀分布,数字都在0到1之间产生
b = torch.randn(3,2,3)
print(a)
print(a[0]) #打印第1个维度的第0个元素
print(b)
print(b[1]) #打印第2个维度的第0个元素(共3个维度)
输出:
tensor([[[-0.0764, -0.5074,  0.0471],
         [ 0.0092, -0.3284,  1.0120]]])
tensor([[-0.0764, -0.5074,  0.0471],
         [ 0.0092, -0.3284,  1.0120]])

4维(CNN:[b,c,h,w]) 如:[2,3,28,28]每张图大小28*28,每张图片通道数为3(RGB),2表示2张照片
c = torch.randn(2,1,2,4)
d = torch.randn(2,3,2,4)
print(c)
print(d)
c.numel() #a占用内存大小,2*1*2*4=16
c.dim() #返回4
输出:
tensor([[[[ 0.7643, -0.4273,  0.3473,  0.2171],
          [ 0.0261,  0.0090, -2.1018,  0.6874]]],


        [[[-0.4100, -0.1656, -0.3416, -0.0297],
          [ 0.1740,  0.0209,  1.6028, -0.1436]]]])
tensor([[[[ 0.2537, -0.8912,  0.1682,  0.8999],
          [ 0.1054,  0.8026,  0.3454, -0.6667]],

         [[ 1.2564,  0.8965, -0.7657,  0.2069],
          [ 0.4461, -1.0962,  1.0200, -0.0228]],

         [[ 1.0028, -1.1200, -0.0214, -1.6208],
          [-1.9092,  0.8667, -0.0240, -0.5384]]],


        [[[-2.8231,  1.2762,  0.7280,  0.7616],
          [ 1.9921,  0.6339, -0.4522,  0.2168]],

         [[ 0.8417, -0.7774,  0.1569,  1.2210],
          [-1.3550,  0.4030,  0.4196, -0.4030]],

         [[-2.1071, -0.9418,  0.1454, -0.5797],
          [-1.5162, -0.3553, -0.5200,  0.0503]]]])
以上是关于pytorch基础的主要内容,如果未能解决你的问题,请参考以下文章