前后端分离——博客项目
Posted sd-xyy
tags:
篇首语:本文由小常识网(cha138.com)小编为大家整理,主要介绍了前后端分离——博客项目相关的知识,希望对你有一定的参考价值。
1 初始化 django 博客项目步骤:
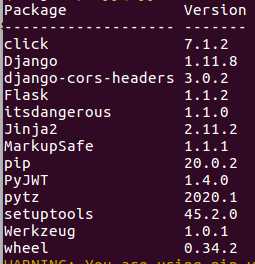
创建新虚拟环境, 安装各种包:
$ mkvirtualenv xinjian
$ cd xinjian/
$ pip install django==1.11.8
$ python steup.py install
$ pip install PyJWT.whl
$ django-admin startproject blog_server

2 更改settings.py 设置:
ALLOWED_HOSTS = [‘*‘]
MIDDLEWARE = [
‘django.middleware.security.SecurityMiddleware‘,
‘django.contrib.sessions.middleware.SessionMiddleware‘,
‘corsheaders.middleware.CorsMiddleware‘,
‘django.middleware.common.CommonMiddleware‘,
将csrf禁用掉
#‘django.middleware.csrf.CsrfViewMiddleware‘,
LANGUAGE_CODE = ‘zh-Hans‘
TIME_ZONE = ‘Asia/Shanghai‘
3 创建数据库:
$ mysql -u root -p

创建数据库:
create database blog_server default charset utf8 collate utf8_general_ci;
4 更改settings.py数据库设置:
DATABASES = {
    ‘default‘: {
        ‘ENGINE‘: ‘django.db.backends.mysql‘,
        ‘NAME‘: ‘blog_server‘,
        ‘USER‘: ‘root‘,
        ‘PASSWORD‘: ‘123456‘,
        ‘HOST‘: ‘127.0.0.1‘,
        ‘PORT‘: ‘3306‘
    }
}
5 更改settings.py设置

  1   1,INSTALLED_APPS 中添加 corsheaders
  2
  3      2,MIDDLEWARE 中添加 corsheaders.middleware.CorsMiddleware
  4            位置尽量靠前,官方建议 ‘django.middleware.common.CommonMiddleware’ 上方
  5         3,CORS_ORIGIN_ALLOW_ALL= True  布尔值  如果为True 白名单不启用,写在文件的最后面
  6         4,CORS_ORIGIN_WHITELIST =[ #指定白名单,一般不用写
  7             "https://example.com"
  8         ]
  9         5, CORS_ALLOW_METHODS = (
 10                 ‘DELETE‘,
 11                 ‘GET‘,
 12                 ‘OPTIONS‘,
 13                 ‘PATCH‘,
 14                 ‘POST‘,
 15                 ‘PUT‘,
 16                 )
 17         6, CORS_ALLOW_HEADERS = (
 18                 ‘accept-encoding‘,
 19                 ‘authorization‘,
 20                 ‘content-type‘,
 21                 ‘dnt‘,
 22                 ‘origin‘,
 23                 ‘user-agent‘,
 24                 ‘x-csrftoken‘,
 25                 ‘x-requested-with‘,
 26             )
 27         7, CORS_PREFLIGHT_MAX_AGE  默认 86400s
 28         8, CORS_EXPOSE_HEADERS  [] 扩展头
 29         9, CORS_ALLOW_CREDENTIALS  布尔值, 默认False
 30
 31
 32
 33
 34 import os
 35
 36
 37
 38 ALLOWED_HOSTS = [‘*‘]
 39
 40
 41 # Application definition
 42
 43 INSTALLED_APPS = [
 44
 45 ‘corsheaders‘,
 46 ‘user‘
 47 ]
 48
 49 MIDDLEWARE = [
 50 ‘django.middleware.security.SecurityMiddleware‘,
 51 ‘django.contrib.sessions.middleware.SessionMiddleware‘,
 52 ‘corsheaders.middleware.CorsMiddleware‘,
 53 ‘django.middleware.common.CommonMiddleware‘,
 54 #‘django.middleware.csrf.CsrfViewMiddleware‘,
 55 ]
 56
 57 # Database
 58 # https://docs.djangoproject.com/en/1.11/ref/settings/#databases
 59
 60 DATABASES = {
 61 ‘default‘: {
 62 ‘ENGINE‘: ‘django.db.backends.mysql‘,
 63 ‘NAME‘: ‘blog_server‘,
 64 ‘USER‘: ‘root‘,
 65 ‘PASSWORD‘: ‘123456‘,
 66 ‘HOST‘: ‘127.0.0.1‘,
 67 ‘PORT‘: ‘3306‘
 68 }
 69 }
 70
 71 LANGUAGE_CODE = ‘zh-Hans‘
 72
 73 TIME_ZONE = ‘Asia/Shanghai‘
 74
 75 USE_I18N = True
 76
 77 USE_L10N = True
 78
 79 USE_TZ = True
 80
 81 STATIC_URL = ‘/static/‘
 82
 83 CORS_ORIGIN_ALLOW_ALL = True
 84
 85 CORS_ALLOW_METHODS = (
 86 ‘DELETE‘,
 87 ‘GET‘,
 88 ‘OPTIONS‘,
 89 ‘PATCH‘,
 90 ‘POST‘,
 91 ‘PUT‘,
 92 )
 93
 94 CORS_ALLOW_HEADERS = (
 95 ‘accept-encoding‘,
 96 ‘authorization‘,
 97 ‘content-type‘,
 98 ‘dnt‘,
 99 ‘origin‘,
100 ‘user-agent‘,
101 ‘x-csrftoken‘,
102 ‘x-requested-with‘,
103 )
104
105 #关掉路由自动补全
106 APPEND_SLASH = False
6 blog_server/urls.py:
from django.conf.urls import url, include
from django.contrib import admin
from . import views

urlpatterns = [
    url(r‘^admin/‘, admin.site.urls),
    url(r‘^test_api‘, views.test_api),
    #添加user模块 url映射
    url(r‘v1/users‘, include(‘user.urls‘)),
    #添加btoken模块 url映射, 该模块用登录操作
    url(r‘v1/token‘, include(‘btoken.urls‘))
]
7 新建blog_server/views.py:
from django.http import JsonResponse


def test_api(request):
    #JsonResponse 1,将返回内容序列化成json
    #2,response中添加 content-type: application/json
    return JsonResponse({‘code‘:200})
8 在虚拟环境安装flask
pip install flask
9 创建文件包 client, 并创建 flask_client.py文件
 iew Code
10 创建client/static/的css, js, images 包, 并创建各种文件
11 创建模板:

<!DOCTYPE html>
<html>
<!--
author:guojunyu
date:2019-05
desc:this demo is about blog. PLEASE NOTE:If you have trouble running it ,try any of the other demos or connect with auther.
A ny individuals and organizations and not for commercial use, professiona website for customized web site.
-->
<head>
    <meta charset="utf-8">
    <meta name="viewport" content="width=device-width, initial-scale=1">
    <link rel="stylesheet" href="/static/css/login_reglogin.css"/>
    <script src="/static/js/jquery.min.js" type="text/javascript"></script>
        <title>登陆</title>
</head>
<body>
    <div class="bg">
        <img src="/static/images/b.jpg" alt="">
    </div>
    <div class="main">
        <div class="header" >
            <h1>Login!</h1>
        </div>
        <p></p>
            <ul class="right-form">
                <h2>Login:</h2>
                <li><input type="text" class="username" name="username" placeholder="Username" required/></li>
                <li><input type="password" class="password" name="password" placeholder="Password" required/></li>
                <input type="button" value="登录" onclick="login()">
                <div class="clear"> </div>
            </ul>
            <div class="clear"> </div>
    </div>

</body>

    <script>
        function login(){
        var username = $(‘.username‘).val()
        var password = $(‘.password‘).val()
        var post_data = {‘username‘:username, ‘password‘:password }

        $.ajax({
        // 请求方式
        type:"post",
        // contentType
        contentType:"application/json",
        // dataType
        dataType:"json",
        // url
        url:"http://127.0.0.1:8000/v1/tokens",
        // 把JS的对象或数组序列化一个json 字符串
        data:JSON.stringify(post_data),
        // result 为请求的返回结果对象
        success:function (result) {
            if (200 == result.code){
                window.localStorage.setItem(‘dnblog_token‘, result.data.token)
                window.localStorage.setItem(‘dnblog_user‘, result.username)
                alert(‘登陆成功‘)
                refer_url = document.referrer
                //如果是项目内部的请求,回跳到上一步
                if (refer_url.search(‘127.0.0.1‘) != -1){

                    window.location = refer_url;

                }else{

                    window.location =  ‘/‘ + result.username + ‘/topics‘;
                }

            }else{
                alert(result.error)
            }
        }
    });

    }
    </script>

</html>
以上是关于前后端分离——博客项目的主要内容,如果未能解决你的问题,请参考以下文章
