AspNetCore.Identity详解2——注册用户
Posted wzt2019l
tags:
篇首语:本文由小常识网(cha138.com)小编为大家整理,主要介绍了AspNetCore.Identity详解2——注册用户相关的知识,希望对你有一定的参考价值。
上一篇:AspNetCore.Identity详解1——入门使用
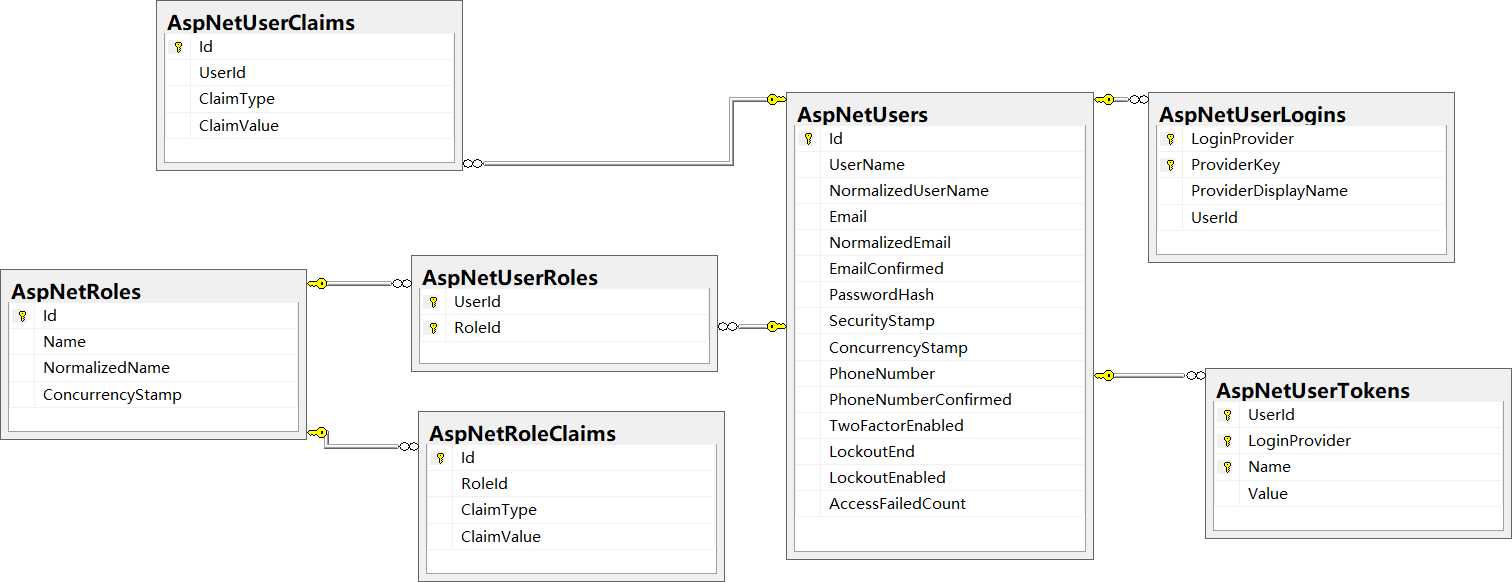
打开数据库,可以看到使用EF自动生成的表结构如下:

重点关注AspNetUsers表,打开数据库里的表可以知道目前也只用到了这张表。然后下载asp.net core开源代码 。在我们创建的项目里并没有/Identity/Account/Register 页面,可以猜测登录注册的页面必然封装在Microsoft.AspNetCore.Identity 里面。

<form asp-controller="Account" asp-action="Register" asp-route-returnurl="@ViewData["ReturnUrl"]" method="post" class="form-horizontal" role="form">
    略......
    <div class="form-group">
        <div class="col-md-offset-2 col-md-10">
            <button type="submit" class="btn btn-default">Register</button>
        </div>
    </div>
</form>
找到Account/Register 的post方法:

        [HttpPost]
        [AllowAnonymous]
        [ValidateAntiForgeryToken]
        public async Task<IActionResult> Register(RegisterViewModel model, string returnUrl = null)
        {
            ViewData["ReturnUrl"] = returnUrl;
            if (ModelState.IsValid)
            {
                var user = new ApplicationUser { UserName = model.Email, Email = model.Email };
                var result = await _userManager.CreateAsync(user, model.Password);
                if (result.Succeeded)
                {
                    // For more information on how to enable account confirmation and password reset please visit http://go.microsoft.com/fwlink/?LinkID=532713
                    // Send an email with this link
                    //var code = await _userManager.GenerateEmailConfirmationTokenAsync(user);
                    //var callbackUrl = Url.Action("ConfirmEmail", "Account", new { userId = user.Id, code = code }, protocol: HttpContext.Request.Scheme);
                    //await _emailSender.SendEmailAsync(model.Email, "Confirm your account",
                    //    "Please confirm your account by clicking this link: <a href=\\"" + callbackUrl + "\\">link</a>");
                    await _signInManager.SignInAsync(user, isPersistent: false);
                    _logger.LogInformation(3, "User created a new account with password.");
                    return RedirectToLocal(returnUrl);
                }
                AddErrors(result);
            }

            // If we got this far, something failed, redisplay form
            return View(model);
        }
这一行代码会帮我们完成注册任务
var result = await _userManager.CreateAsync(user, model.Password);
查看user 实体的定义

    public class ApplicationUser : IdentityUser
    {
    }

    public class IdentityUser : IdentityUser<string>
    {

        public IdentityUser()
        {
            Id = Guid.NewGuid().ToString();
            SecurityStamp = Guid.NewGuid().ToString();
        }

        public IdentityUser(string userName) : this()
        {
            UserName = userName;
        }
    }

   public class IdentityUser<TKey> where TKey : IEquatable<TKey>
    {

        public IdentityUser() { }

        public IdentityUser(string userName) : this()
        {
            UserName = userName;
        }

        [PersonalData]
        public virtual TKey Id { get; set; }

        [ProtectedPersonalData]
        public virtual string UserName { get; set; }

        public virtual string NormalizedUserName { get; set; }

        [ProtectedPersonalData]
        public virtual string Email { get; set; }

        public virtual string NormalizedEmail { get; set; }

        [PersonalData]
        public virtual bool EmailConfirmed { get; set; }

        public virtual string PasswordHash { get; set; }

        public virtual string SecurityStamp { get; set; }

        public virtual string ConcurrencyStamp { get; set; } = Guid.NewGuid().ToString();

        [ProtectedPersonalData]
        public virtual string PhoneNumber { get; set; }

        [PersonalData]
        public virtual bool PhoneNumberConfirmed { get; set; }

        [PersonalData]
        public virtual bool TwoFactorEnabled { get; set; }

        public virtual DateTimeOffset? LockoutEnd { get; set; }

        public virtual bool LockoutEnabled { get; set; }

        public virtual int AccessFailedCount { get; set; }

        public override string ToString()
            => UserName;
    }
打开CreateAsync方法,可以看到经过三步完成用户注册

        public virtual async Task<IdentityResult> CreateAsync(TUser user, string password)
        {
            ThrowIfDisposed();
            //1
            var passwordStore = GetPasswordStore();
            if (user == null)
            {
                throw new ArgumentNullException(nameof(user));
            }
            if (password == null)
            {
                throw new ArgumentNullException(nameof(password));
            }
            //2
            var result = await UpdatePasswordHash(passwordStore, user, password);
            if (!result.Succeeded)
            {
                return result;
            }
            //3
            return await CreateAsync(user);
        }
逐个查看注释1,2,3的方法

       private IUserPasswordStore<TUser> GetPasswordStore()
        {
            var cast = Store as IUserPasswordStore<TUser>;
            if (cast == null)
            {
                throw new NotSupportedException(Resources.StoreNotIUserPasswordStore);
            }
            return cast;
        }
GetPasswordStore()方法会返回IUserPasswordStore<TUser>接口,Store 这个变量是什么呢?是IUserStore<TUser>,让人困惑的是IUserPasswordStore<TUser>继承了IUserStore<TUser>,
为什么Store可以转换为自己的子类呢?找到UserStoreBase类,看到它继承了IUserPasswordStore接口,由此可以猜测Store是UserStoreBase的实例。
// TUser是ApplicationUser
//protected internal IUserStore<ApplicationUser> Store { get; set; }
protected internal IUserStore<TUser> Store { get; set; }
第二步,完成了对密码的加密工作,同时更新了用户的安全戳(就是一个随机生成的字符串)

        private async Task<IdentityResult> UpdatePasswordHash(IUserPasswordStore<TUser> passwordStore,
            TUser user, string newPassword, bool validatePassword = true)
        {
            if (validatePassword)
            {
                var validate = await ValidatePasswordAsync(user, newPassword);
                if (!validate.Succeeded)
                {
                    return validate;
                }
            }
            var hash = newPassword != null ? PasswordHasher.HashPassword(user, newPassword) : null;
            await passwordStore.SetPasswordHashAsync(user, hash, CancellationToken);
            await UpdateSecurityStampInternal(user);
            return IdentityResult.Success;
        }
第三步:完成对用户的最终创建

       public virtual async Task<IdentityResult> CreateAsync(TUser user)
        {
            ThrowIfDisposed();
            await UpdateSecurityStampInternal(user);
            var result = await ValidateUserAsync(user);
            if (!result.Succeeded)
            {
                return result;
            }
            if (Options.Lockout.AllowedForNewUsers && SupportsUserLockout)
            {
                await GetUserLockoutStore().SetLockoutEnabledAsync(user, true, CancellationToken);
            }
            await UpdateNormalizedUserNameAsync(user);
            await UpdateNormalizedEmailAsync(user);

            return await Store.CreateAsync(user, CancellationToken);
        }
找到UserOnlyStore类,这里面有最后一步向数据库插入用户的操作。
整个过程很绕,在理清逻辑的过程中很容易迷失。如果想要避免迷失,一定要牢记我们只是想看看注册用户这一步是怎样完成的,千万不要关心与之无关的代码。
以上是关于AspNetCore.Identity详解2——注册用户的主要内容,如果未能解决你的问题,请参考以下文章
如何修改 .Aspnetcore.Identity.Application Cookie 名称?
模拟问题:无法实例化类的代理:Microsoft.AspNetCore.Identity.UserManager`
找不到包 Microsoft.AspNetCore.Identity.EntityFramework
将现有 Microsoft.AspNet.Identity DB (EF 6) 迁移到 Microsoft.AspNetCore.Identity (EF Core)
Microsoft.AspNetCore.Identity 与 Azure ActiveDirectory
尝试激活“AuthenticateController”时无法解析“Microsoft.AspNetCore.Identity.UserManager”类型的服务
