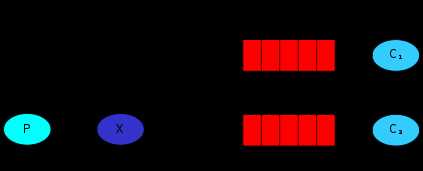
Rabbitmq 路由模式
Posted mm163
tags:
篇首语:本文由小常识网(cha138.com)小编为大家整理,主要介绍了Rabbitmq 路由模式相关的知识,希望对你有一定的参考价值。

设置路由键
发送者
package com.aynu.bootamqp.service;

import com.aynu.bootamqp.commons.utils.Amqp;
import com.rabbitmq.client.Channel;
import com.rabbitmq.client.Connection;


import java.io.IOException;
import java.util.concurrent.TimeoutException;

public class Send {

    private final static String Exchange_NAME ="hello";
    public static void main(String[] args) throws IOException, TimeoutException {
            Connection connection = Amqp.getConnection();
            Channel channel = connection.createChannel();
            //声明交换机
            channel.exchangeDeclare(Exchange_NAME,"direct");
            //在手动确认机制之前
            //一次只发送一条消息,给不同的消费者
            channel.basicQos(1);

            String message = "hello ps";
            String routingKey ="info";
            channel.basicPublish(Exchange_NAME,routingKey,null,message.getBytes("utf-8"));
            System.out.println(message);
            channel.close();
            connection.close();
    }
}
接受者1
package com.aynu.bootamqp.service;

import com.aynu.bootamqp.commons.utils.Amqp;
import com.rabbitmq.client.*;

import java.io.IOException;
import java.util.concurrent.TimeoutException;

@SuppressWarnings("all")
public class Receive {

    private final static String QUEUE_NAME ="hello";
    private final static String Exchange_NAME ="hello";
    public static void main(String[] args) throws IOException, TimeoutException {
        Connection connection = Amqp.getConnection();
        Channel channel = connection.createChannel();
        channel.queueDeclare(QUEUE_NAME,false,false,false,null);
        //绑定队列

        channel.queueBind(QUEUE_NAME,Exchange_NAME,"error");
       // 一次只处理一个消息
        channel.basicQos(1);
        DefaultConsumer consumer = new DefaultConsumer(channel) {

            @Override
            public void handleDelivery(String consumerTag, Envelope envelope,
                                       AMQP.BasicProperties properties, byte[] body) throws IOException {
                super.handleDelivery(consumerTag, envelope, properties, body);
                String msg = new String(body,"utf-8");
                System.out.println("receive"+msg);
                try {
                    Thread.sleep(1000*2);
                } catch (InterruptedException e) {
                    e.printStackTrace();
                }finally {
                    // 手动发送消息确认机制
                    channel.basicAck(envelope.getDeliveryTag(),false);
                }
            }
        };
        // 自动应答
        boolean autoAck = false;
        channel.basicConsume(QUEUE_NAME,autoAck,consumer);
    }
}
接受者2
package com.aynu.bootamqp.service;

import com.aynu.bootamqp.commons.utils.Amqp;
import com.rabbitmq.client.*;

import java.io.IOException;
import java.util.concurrent.TimeoutException;
@SuppressWarnings("all")
public class Receive2 {

    private final static String QUEUE_NAME ="hello1";
    private final static String Exchange_NAME ="hello";
    public static void main(String[] args) throws IOException, TimeoutException {
        Connection connection = Amqp.getConnection();
        Channel channel = connection.createChannel();
        channel.queueDeclare(QUEUE_NAME,false,false,false,null);
        channel.queueBind(QUEUE_NAME,Exchange_NAME,"info");
        channel.queueBind(QUEUE_NAME,Exchange_NAME,"error");
        channel.queueBind(QUEUE_NAME,Exchange_NAME,"warning");
        channel.basicQos(1);
        DefaultConsumer consumer = new DefaultConsumer(channel) {

            @Override
            public void handleDelivery(String consumerTag, Envelope envelope,
                                       AMQP.BasicProperties properties, byte[] body) throws IOException {
                super.handleDelivery(consumerTag, envelope, properties, body);
                String msg = new String(body,"utf-8");
                System.out.println("receive2222"+msg);
                try {
                    Thread.sleep(1000);
                } catch (InterruptedException e) {
                    e.printStackTrace();
                }finally {
                    // 手动发送消息确认机制
                    channel.basicAck(envelope.getDeliveryTag(),false);
                }
            }
        };
        boolean autoAck = false;
        channel.basicConsume(QUEUE_NAME,autoAck,consumer);
    }
}
以上是关于Rabbitmq 路由模式的主要内容,如果未能解决你的问题,请参考以下文章