WPF MVVM从入门到精通4:命令和事件
Posted lonelyxmas
tags:
篇首语:本文由小常识网(cha138.com)小编为大家整理,主要介绍了WPF MVVM从入门到精通4:命令和事件相关的知识,希望对你有一定的参考价值。
原文:WPF MVVM从入门到精通4:命令和事件
?
WPF MVVM从入门到精通5:PasswordBox的绑定
WPF MVVM从入门到精通6:RadioButton等一对多控件的绑定
?
这一部分我们要做的事情,是把点击登录按钮的事件也在ViewModel里实现。若不是用MVVM模式,可能XAML文件里是这样的:
<Button Grid.Row="3" Grid.ColumnSpan="2" Content="登录" Width="200" Height="30" Click="Button_Click"/>而跟XAML文件相关的CS文件里则是这样的:
private void Button_Click(object sender, RoutedEventArgs e)
{
    //业务处理逻辑代码
}
如此一来,前端和后端的代码又耦合在一起了。其实,命令和事件都是可以绑定的,就像数据一样。
我们先来了解一下命令。ICommand是所有命令的接口,它主要完成两件事情,这个命令能否被执行,以及执行命令。
event EventHandler CanExecuteChanged;
public bool CanExecute(object parameter);
public void Execute(object parameter);
例如当用户名为空时,我们可能会禁用按钮。当登录按钮跟一个命令绑定在一起时,CanExecute会不断被执行,如果返回false,按钮的IsEnabled属性也会被置为false。
一般情况下,我们需要继承ICommand接口来进行开发。
using System;
using System.Windows.Input;

namespace LoginDemo.ViewModel.Common
{
    /// <summary>
    /// 命令基类
    /// </summary>
    public class BaseCommand : ICommand
    {
        public event EventHandler CanExecuteChanged
        {
            add
            {
                if (_canExecute != null)
                {
                    CommandManager.RequerySuggested += value;
                }
            }
            remove
            {
                if (_canExecute != null)
                {
                    CommandManager.RequerySuggested -= value;
                }
            }
        }

        public bool CanExecute(object parameter)
        {
            if (_canExecute == null)
            {
                return true;
            }
            return _canExecute(parameter);
        }

        public void Execute(object parameter)
        {
            if (_execute != null && CanExecute(parameter))
            {
                _execute(parameter);
            }
        }

        private Func<object, bool> _canExecute;
        private Action<object> _execute;

        public BaseCommand(Action<object> execute, Func<object, bool> canExecute)
        {
            _execute = execute;
            _canExecute = canExecute;
        }

        public BaseCommand(Action<object> execute) :
            this(execute, null)
        {
        }
    }
}
BaseCommand的功能很简单,就是执行命令前先判断一下命令能不能执行。
然后我们就可以绑定命令了,在后端这样写:
private BaseCommand clickLoginCommand;
public BaseCommand ClickLoginCommand
{
    get
    {
        if(clickLoginCommand==null)
        {
            clickLoginCommand = new BaseCommand(new Action<object>(o =>
            {
                //执行登录逻辑
            }));
        }
        return clickLoginCommand;
    }
}
前端这样写:
<Button Grid.Row="3" Grid.ColumnSpan="2" Content="登录" Width="200" Height="30" Command="{Binding ClickLoginCommand}"/>点击按钮执行登录逻辑的代码就这样完成了。但不要急着复制代码,因为我们不打算使用命令。
我们知道,对于按钮的操作,不一定是点击,可能是鼠标划过,可能是鼠标右击。那Command触发的是什么呢?就是点击,没有其他了。对于其他控件,例如是输入框,Command又代表什么呢?文本改变事件能用Command吗?这些问题让我们感到困惑,所以一般在项目中,我都只会使用事件,而不会使用命令(即使是单击事件)。
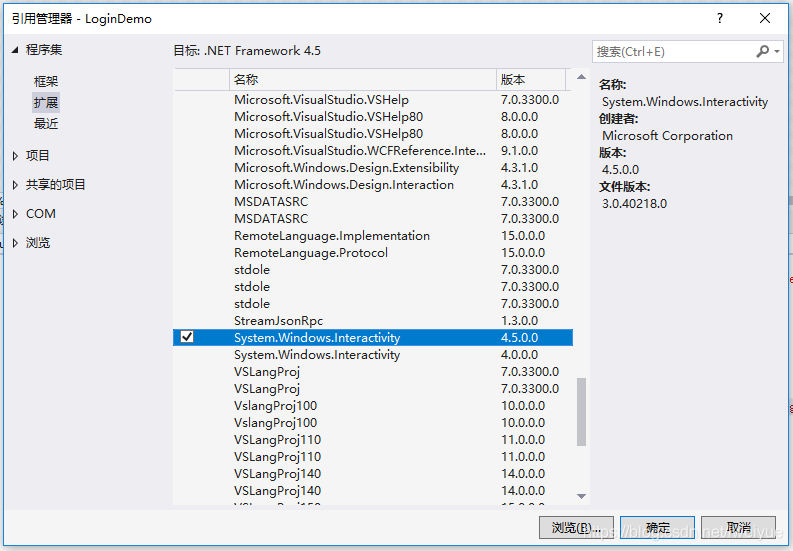
BaseCommand这个类还可以留着,我们后面还需要使用的。在引入事件之前,我们需要先引用一个dll:System.Windows.Interactivity.dll。这个dll并不是.NET Framework的标配,它是Blend的一个类库。可以在扩展的程序集里找到:
如果没有找到(我安装VS2017后就没有找到),需要安装以下库才有:
好了,引用了System.Windows.Interactivity.dll后,我们就可以开始讲事件了。
有些事件是有参数的,例如鼠标移动这个事件,会带上鼠标的位置。但我们之前使用的命令,默认传入的参数是null。为了能够传递参数,我们需要先定义一个事件基类:
using System.Windows;
using System.Windows.Input;
using System.Windows.Interactivity;

namespace LoginDemo.ViewModel.Common
{
    /// <summary>
    /// 事件命令
    /// </summary>
    public class EventCommand : TriggerAction<DependencyObject>
    {
        protected override void Invoke(object parameter)
        {
            if (CommandParameter != null)
            {
                parameter = CommandParameter;
            }
            if (Command != null)
            {
                Command.Execute(parameter);
            }
        }

        /// <summary>
        /// 事件
        /// </summary>
        public ICommand Command
        {
            get { return (ICommand)GetValue(CommandProperty); }
            set { SetValue(CommandProperty, value); }
        }
        public static readonly DependencyProperty CommandProperty =
            DependencyProperty.Register("Command", typeof(ICommand), typeof(EventCommand), new PropertyMetadata(null));

        /// <summary>
        /// 事件参数,如果为空,将自动传入事件的真实参数
        /// </summary>
        public object CommandParameter
        {
            get { return (object)GetValue(CommandParameterProperty); }
            set { SetValue(CommandParameterProperty, value); }
        }
        public static readonly DependencyProperty CommandParameterProperty =
            DependencyProperty.Register("CommandParameter", typeof(object), typeof(EventCommand), new PropertyMetadata(null));
    }
}
现在,我们可以在ViewModel里增加如下代码:
private BaseCommand loginClick;
/// <summary>
/// 登录事件
/// </summary>
public BaseCommand LoginClick
{
    get
    {
        if(loginClick==null)
        {
            loginClick = new BaseCommand(new Action<object>(o =>
            {
                //执行登录逻辑
            }));
        }
        return loginClick;
    }
}
然后在XAML文件里,先加入i这个命名空间:xmlns:i="http://schemas.microsoft.com/expression/2010/interactivity",然后修改按钮的代码:
<Button Grid.Row="3" Grid.ColumnSpan="2" Content="登录" Width="200" Height="30">
    <i:Interaction.Triggers>
        <i:EventTrigger EventName="Click">
            <c:EventCommand Command="{Binding LoginClick}"/>
        </i:EventTrigger>
    </i:Interaction.Triggers>
</Button>
上面的代码指出,Click这个事件,绑定到了LoginClick这个属性。当我们点击按钮的时候,LoginClick里面的Action就会被执行。
以上是关于WPF MVVM从入门到精通4:命令和事件的主要内容,如果未能解决你的问题,请参考以下文章
WPF MVVM从入门到精通5:PasswordBox的绑定

