第11天 日志收集系统kafka库实战
Posted xuejiale
tags:
篇首语:本文由小常识网(cha138.com)小编为大家整理,主要介绍了第11天 日志收集系统kafka库实战相关的知识,希望对你有一定的参考价值。
本节主要内容:
1. 日志收集系统设计
2. 日志客户端开发
1. 项目背景
a. 每个系统都有日志,当系统出现问题时,需要通过日志解决问题
b. 当系统机器比较少时,登陆到服务器上查看即可满足
c. 当系统机器规模巨大,登陆到机器上查看几乎不现实
2. 解决方案
a. 把机器上的日志实时收集,统一的存储到中心系统
b. 然后再对这些日志建立索引,通过搜索即可以找到对应日志
c. 通过提供界面友好的web界面,通过web即可以完成日志搜索
3. 面临的问题
a. 实时日志量非常大,每天几十亿条
b. 日志准实时收集,延迟控制在分钟级别
c. 能够水平可扩展
4. 业界方案ELK
日志收集系统架构
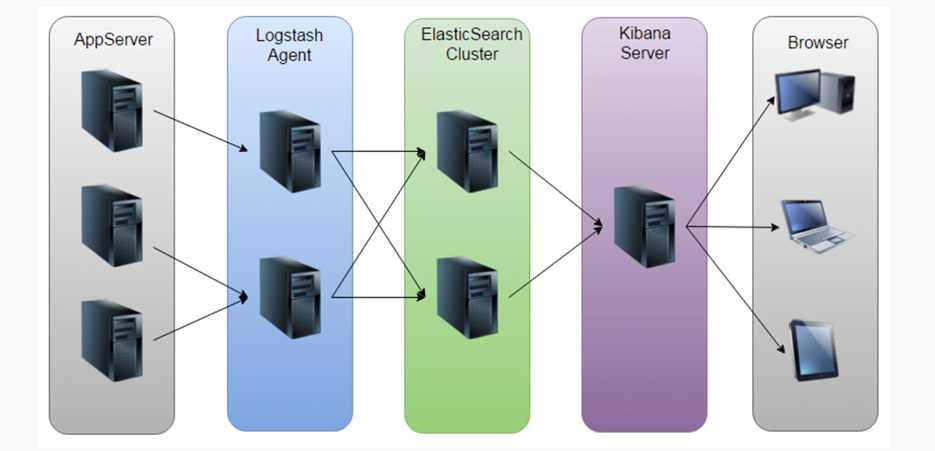
该方案问题:
a. 运维成本高,每增加一个日志收集,都需要手动修改配置
b. 监控缺失,无法准确获取logstash的状态
c. 无法做定制化开发以及维护
6. 日志收集系统设计
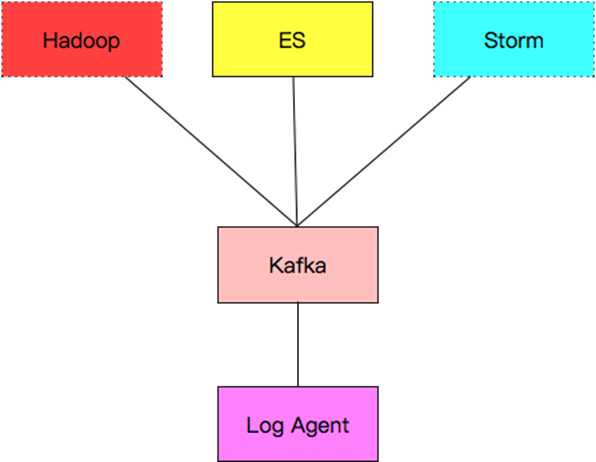
各组件介绍:
a. Log Agent,日志收集客户端,用来收集服务器上的日志
b. Kafka,高吞吐量的分布式队列,linkin开发,apache顶级开源项目
c. ES,elasticsearch,开源的搜索引擎,提供基于http restful的web接口
d. Hadoop,分布式计算框架,能够对大量数据进行分布式处理的平台
7. kafka应用场景
1. 异步处理, 把非关键流程异步化,提高系统的响应时间和健壮性
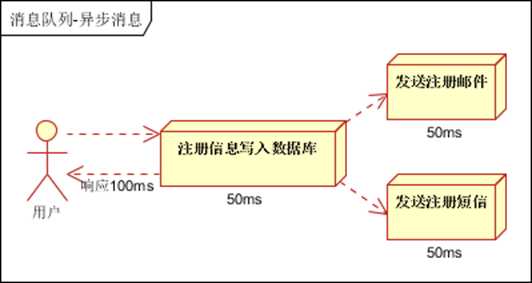

2. 应用解耦,通过消息队列
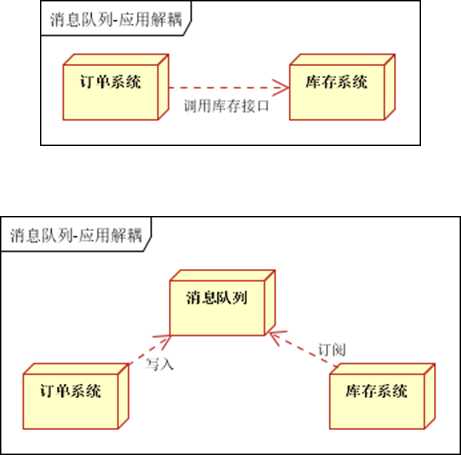
3. 流量削峰3. 流量削峰

8. zookeeper应用场景
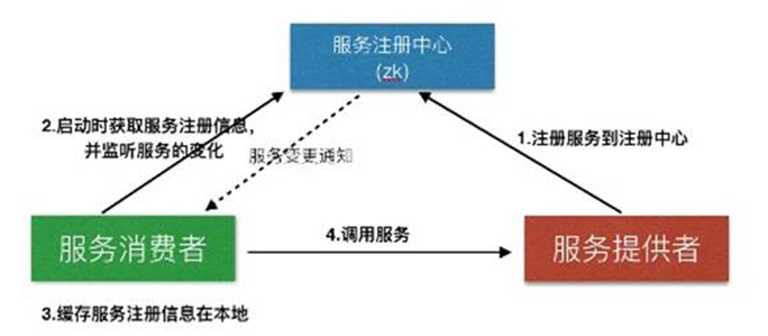
1. 服务注册&服务发现
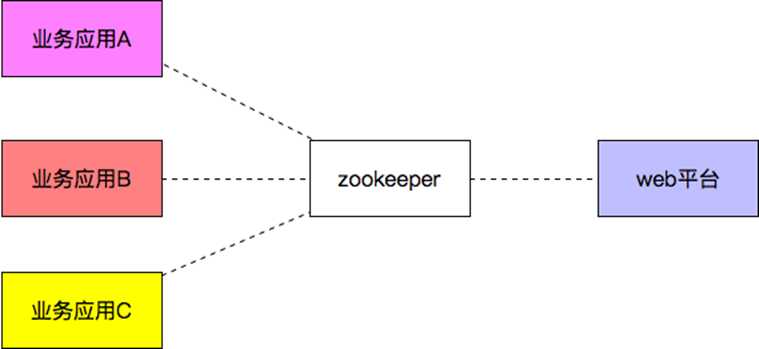
2. 配置中心
3. 分布式锁
- Zookeeper是强一致的
- 多个客户端同时在Zookeeper上创建相同znode,只有一个创建成功
9. 安装kafka
见博客:https://www.cnblogs.com/xuejiale/p/10505391.html
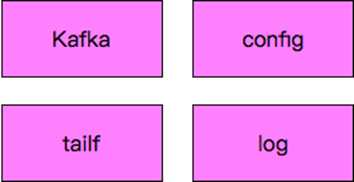
10. log agent设计
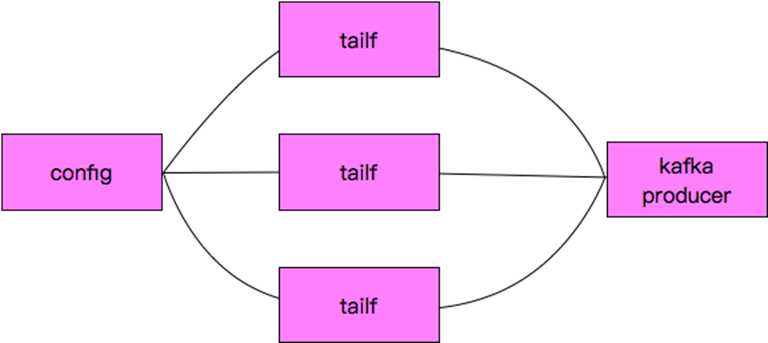
11. log agent流程
11. kafka示例代码
先导入第三方包:
github.com/Shopify/sarama
我的kafka和ZooKeeper都安装在Linux(Centos6.5,ip: 192.168.30.136)上:

 1 package main
 2
 3 import (
 4     "fmt"
 5     "time"
 6     "github.com/Shopify/sarama"
 7 )
 8
 9 func main() {
10
11     config := sarama.NewConfig()
12     config.Producer.RequiredAcks = sarama.WaitForAll
13     config.Producer.Partitioner = sarama.NewRandomPartitioner
14     config.Producer.Return.Successes = true
15
16     client, err := sarama.NewSyncProducer([]string{"192.168.30.136:9092"}, config)
17     if err != nil {
18         fmt.Println("producer close, err:", err)
19         return
20     }
21
22     defer client.Close()
23     for {
24         msg := &sarama.ProducerMessage{}
25         msg.Topic = "nginx_log"
26         msg.Value = sarama.StringEncoder("this is a good test, my message is good")
27
28         pid, offset, err := client.SendMessage(msg)
29         if err != nil {
30             fmt.Println("send message failed,", err)
31             return
32         }
33
34         fmt.Printf("pid:%v offset:%v
", pid, offset)
35         time.Sleep(time.Second)
36     }
37 }
Windows启动程序往Linux上的kafka发送数据:

Linux上的kafka接收数据:

12. tailf组件使用
先导入第三方包:
github.com/hpcloud/tail

 1 package main
 2
 3 import (
 4     "fmt"
 5     "github.com/hpcloud/tail"
 6     "time"
 7 )
 8 func main() {
 9     filename := "F:\\Go\\project\\src\\go_dev\\logCollect\\tailf\\my.log"
10     tails, err := tail.TailFile(filename, tail.Config{
11         ReOpen:    true,
12         Follow:    true,
13         //Location:  &tail.SeekInfo{Offset: 0, Whence: 2},
14         MustExist: false,
15         Poll:      true,
16     })
17     if err != nil {
18         fmt.Println("tail file err:", err)
19         return
20     }
21     var msg *tail.Line
22     var ok bool
23     for {
24         msg, ok = <-tails.Lines
25         if !ok {
26             fmt.Printf("tail file close reopen, filename:%s
", tails.Filename)
27             time.Sleep(100 * time.Millisecond)
28             continue
29         }
30         fmt.Println("msg:", msg)
31     }
32 }
my.log文件内容(unix格式):

在Windows上,当我的上面代码里日志文件(my.log)为Windows格式,代码执行结果如下:

当时用notepade++将文件格式转换为Unix格式,执行代码结果如下:

注意:最后一行必须有换行符,否则该行无法读取。
13. 配置文件库使用
先导入第三方包:
github.com/astaxie/beego/config
1) 初始化配置库
iniconf, err := NewConfig("ini", "testini.conf")
if err != nil {
    log.Fatal(err)
}
2) 读取配置项
String(key string) string
Int(key string) (int, error)
Int64(key string) (int64, error)
Bool(key string) (bool, error)
Float(key string) (float64, error)
例如:
iniconf.String("server::listen_ip")
iniconf.Int("server::listen_port")

[server]
listen_ip = "0.0.0.0"
listen_port = 8080

[logs]
log_level=debug
log_path=./logs/logagent.log

[collect]
log_path=/home/work/logs/nginx/access.log
topic=nginx_log

 1 package main
 2
 3 import (
 4     "fmt"
 5     "github.com/astaxie/beego/config"
 6 )
 7
 8 func main() {
 9     conf, err := config.NewConfig("ini", "./logcollect.conf")
10     if err != nil {
11         fmt.Println("new config failed, err:", err)
12         return
13     }
14
15     port, err := conf.Int("server::listen_port")
16     if err != nil {
17         fmt.Println("read server:port failed, err:", err)
18         return
19     }
20
21     fmt.Println("Port:", port)
22     log_level := conf.String("log::log_level")
23     if err != nil {
24         fmt.Println("read log_level failed, ", err)
25         return
26     }
27     fmt.Println("log_level:", log_level)
28
29     log_path := conf.String("log::log_path")
30     fmt.Println("log_path:", log_path)
31 }
配置文件内容:
[server]
listen_ip = "0.0.0.0"
listen_port = 8080

[log]
log_level=debug
log_path=./logs/logagent.log

[collect]
log_path=/home/work/logs/nginx/access.log
topic=nginx_log
执行结果:

14. 日志库的使用
先导入第三方包:
github.com/astaxie/beego/logs
1) 配置log组件
config := make(map[string]interface{})
config["filename"] = "./logs/logcollect.log"
config["level"] = logs.LevelDebug

configStr, err := json.Marshal(config)
if err != nil {
    fmt.Println("marshal failed, err:", err)
    return
}
2) 初始化日志组件
logs.SetLogger(“file”, string(configStr))

 1 package main
 2
 3 import (
 4     "encoding/json"
 5     "fmt"
 6     "github.com/astaxie/beego/logs"
 7 )
 8
 9 func main() {
10     config := make(map[string]interface{})
11     config["filename"] = "./logcollect.log"
12     config["level"] = logs.LevelDebug
13
14     configStr, err := json.Marshal(config)
15     if err != nil {
16         fmt.Println("marshal failed, err:", err)
17         return
18     }
19
20     logs.SetLogger(logs.AdapterFile, string(configStr))
21
22     logs.Debug("this is a test, my name is %s", "stu01")
23     logs.Trace("this is a trace, my name is %s", "stu02")
24     logs.Warn("this is a warn, my name is %s", "stu03")
25 }
15. 日志收集项目整体实现
以上是关于第11天 日志收集系统kafka库实战的主要内容,如果未能解决你的问题,请参考以下文章
