elk
Posted superlinux
tags:
篇首语:本文由小常识网(cha138.com)小编为大家整理,主要介绍了elk相关的知识,希望对你有一定的参考价值。
目录
elk简介
ELK是三个开源软件的缩写,分别表示:Elasticsearch , Logstash, Kibana , 它们都是开源软件。新增了一个FileBeat,它是一个轻量级的日志收集处理工具(Agent),Filebeat占用资源少,适合于在各个服务器上搜集日志后传输给Logstash,官方也推荐此工具。
Elasticsearch是个开源分布式搜索引擎,提供搜集、分析、存储数据三大功能。它的特点有:分布式,零配置,自动发现,索引自动分片,索引副本机制,restful风格接口,多数据源,自动搜索负载等。
Logstash 主要是用来日志的搜集、分析、过滤日志的工具,支持大量的数据获取方式。一般工作方式为c/s架构,client端安装在需要收集日志的tt主机上,server端负责将收到的各节点日志进行过滤、修改等操作在一并发往elasticsearch上去。
Kibana 也是一个开源和免费的工具,Kibana可以为 Logstash 和 ElasticSearch 提供的日志分析友好的 Web 界面,可以帮助汇总、分析和搜索重要数据日志。
Filebeat隶属于Beats。目前Beats包含四种工具:
- Packetbeat(搜集网络流量数据)
- Topbeat(搜集系统、进程和文件系统级别的 CPU 和内存使用情况等数据)
- Filebeat(搜集文件数据)
- Winlogbeat(搜集 Windows 事件日志数据)
官方帮助
Filebeat:
https://www.elastic.co/cn/products/beats/filebeat
https://www.elastic.co/guide/en/beats/filebeat/5.6/index.html
Logstash:
https://www.elastic.co/cn/products/logstash
https://www.elastic.co/guide/en/logstash/5.6/index.html
Kibana:
https://www.elastic.co/cn/products/kibana
https://www.elastic.co/guide/en/kibana/5.5/index.html
Elasticsearch:
https://www.elastic.co/cn/products/elasticsearch
https://www.elastic.co/guide/en/elasticsearch/reference/5.6/index.html
elasticsearch中文社区:
https://elasticsearch.cn/
rsyslog
rsyslog日志采集介绍与使用
架构图:

Linux的日志记录用户在系统中的所有操作,通过看日志分析系统的状态,这是i运维的基本功,因此我们需要熟练掌握rsyslog服务的使用
日志记录后会实时传输到一个更加安全的远程服务器中,达到真正记录用户行为,使得日志的二次更改可能性降低,从而达到日志真实回访,问题追踪的目的

rsyslog功能介绍
rsyslog是比syslog更加强大的工具 他具有以下优势
1.直接将日志写入数据库
2.日志队列(内存队列和磁盘队列)
3.灵活模板,可得到多种输出结果,得到想要的可视化图形输出
4.插件结构,多种输入输出模块
5.可以把日志存放在mysql postgresql oracle 等数据库中
rsyslog.conf文件中的日志规则定义
facitity.priority   Target

facility  日志设备
    auth         #pam产生的日志,认证日志
    authpriv     #ssh,ftp等登录信息的验证信息,认证授权认证
    cron         #时间任务相关
    kern         #内核
    lpr          #打印
    mail         #邮件
    mark(syslog) #rsyslog服务内部的信息,时间标识
    news         #新闻组
    user         #用户程序产生的相关信息
    uucp         #unix to unix copy, unix主机之间相关的通讯
    local 1~7    #自定义的日志设备

priority  日志级别(低-高)

    debug           调试
    info            一般信息格式
    notice          最具有重要性的普通条件信息
    warning,warn    警告级别
    err,error       错误级别  阻止某个功能或者模块不能正常工作的信息
    crit            严重级别  组织整个系统或者整个软件无法正常工作的消息
    alert           需要立刻修改的信息
    emerg,panic     内核崩溃 严重信息  级别最高

注意:日志级别记录方式为  只记录本身级别或到更高的级别 低于设定级别将不被记录。


Target:  输入的目标   日志处理方式
如:文件  用户  日志服务器  管道   等处理方式
综合实验
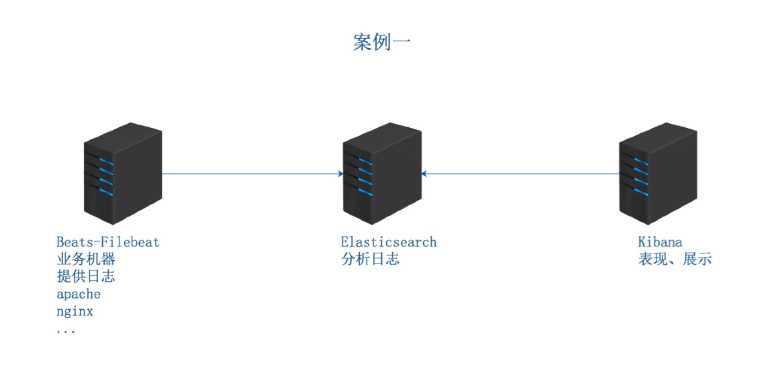
案例一: 单机ELK部署
拓扑图:
基本步骤:
通过rsyslog收集本机所有日志
filebeat 拿到日志传给elasticsearch
elasticsearch分析日志并且将其处理为json格式
elasticsearch把分析结果传送给kibana
kibana进行结果分析做可视化结果 如 出图 等操作
rsyslog安装配置:
1. 安装rsyslog (udp/514 tcp/514)
rpm -qa rsyslog
yum  install -y rsyslog
vi /etc/rsyslog.conf
配置日志收集方式, 如果是本机则直接写文件路径,如果是本机 则直接写路径 如果是要传送到远端服务器
============UDP日志传输配置[建议UDP传输]=================
UDP协议传输日志配置
# Provides UDP syslog reception
#$ModLoad imudp
#$UDPServerRun 514
更改为(去掉协议和端口的注释):
# Provides UDP syslog reception
$ModLoad imudp
$UDPServerRun 514
# Save boot messages also to boot.log
local7.* /var/log/boot.log
*.* @10.0.0.72:514 --新增配置
============UDP日志传输配置[建议UDP传输]=================
============TCP日志传输配置============================
tcp协议传输日志配置:
# Provides TCP syslog reception
#$ModLoad imtcp
#$InputTCPServerRun 514
更改为(去掉协议和端口的注释):
# Provides TCP syslog reception
$ModLoad imtcp
$InputTCPServerRun 514
找到local7.* 下面添加传送的服务器
# Save boot messages also to boot.log
local7.* /var/log/boot.log
*.* @@10.0.0.72:514 --新增配置
============TCP日志传输配置============================
两个协议可以同时监听。1.1 rsyslog收集本机服务器日志配置
收集本机日志:
vi /etc/rsyslog.conf   约74行
# Save boot messages also to boot.log
local7.*                                                /var/log/boot.log

此行以下新增以下内容行 [这是服务器配置,客户端直接 @@10.0.0.72:514 即可]
*.*                                                     /var/log/chenleilei.log

以上配置是将所有日志都进行收集,配置完成后保存文件,重启服务
rsyslog配置小总结:
服务器端配置日志文件 vim /etc/rsyslog.conf 中的
1.修改日志传输协议
# Provides UDP syslog reception
$ModLoad imudp
$UDPServerRun 514
2.配置写入日志的文件位置
# Save boot messages also to boot.log 行下添加写入的日志文件
3.重启服务
客户端配置:
1. 开启与服务器相同的协议(去除#号)
# Provides UDP syslog reception
$ModLoad imudp
$UDPServerRun 514
2. 配置远端服务器地址和端口[tcp协议为 两个@ 传输日志 udp协议使用一个@传输日志]
# Save boot messages also to boot.log
*.* @10.0.0.71:514启动rsyslog服务
systemctl start rsyslog使用logger命令 测试日志收集是否正常
以上配置完成会产生一个  /var/log/chenleilei.log  的配置文件。 新开一个窗口来监视这个配置文件

tailf /var/log/chenleilei.log

另一窗口使用 logger 'rsyslog test from chenleilei'   测试写入日志
然后检查监视的窗口是否多出新写入的日志 如果写入成功即可代表配置正确

写入的日志:
Feb 20 16:03:59 elk01 root: rsyslog test from chenleilei

经过这里的检查即代表 rsyslog配置成功
可以进行设置开启此服务
systemctl enable rsyslog    [设置开机启动]
systemctl start rsyslog     [启动服务]
systemctl status rsyslog    [查看服务状态]

注意配置到这里 是 rsyslog收集了所有日志。并且没有进行处理,下面会讲解

检查服务端口: netstat -lnpu
[[email protected] ~]# netstat -lnpu
Active Internet connections (only servers)
Proto Recv-Q Send-Q Local Address    Foreign Address   State       PID/Program name
udp        0      0 0.0.0.0:514      0.0.0.0:*                     5469/rsyslogd
udp        0      0 127.0.0.1:323    0.0.0.0:*                     564/chronyd
udp6       0      0 :::514           :::*                          5469/rsyslogd
udp6       0      0 ::1:323          :::*                          564/chronyd

514端口为rsyslog服务默认端口,看到存在即代表服务启动成功
1.2 rsyslog收集多台服务器日志配置
开启日志收集 udp/tcp 模式
#--安装rsyslog软件
yum install  -y rsyslog

#配置日志传送服务器
vi /etc/rsyslog.conf


----------------------去掉#号 开启TCP模式传送日志------------
# Provides TCP syslog reception
$ModLoad imtcp
$InputTCPServerRun 514

# Save boot messages also to boot.log
local7.*                                                /var/log/boot.log
*.*                                                     @@10.0.0.72:514
----------------------去掉#号 开启TCP模式传送日志------------


除此之外还可以使用UDP协议进行传输,UDP无需认证效率更高,安全性较差
但是写入日志内容较少 没有三次握手信息,切记 开启协议必须保持一只否则无法传输

----------------------去掉#号 开启UDP模式传送日志------------
# Provides UDP syslog reception
$ModLoad imudp
$UDPServerRun 514

# Save boot messages also to boot.log
local7.*                                                /var/log/boot.log
*.*                                                     @10.0.0.72:514
----------------------去掉#号 开启UDP模式传送日志------------

配置完成重启服务即可
systemctl restart rsyslog
以上配置仅仅只是配置了日志收集方式,并没有进行处理
案例二. JAVA环境配置,部署 filebeat+Elasticsearch
JDK安装
JDK 1.8.0下载:
https://www.oracle.com/technetwork/java/javase/downloads/jdk11-downloads-5066655.html
注意: 必须使用JDK8.0 才可以继续安装使用,建议选择 JDK-8u201-Linux的x64.rpm


如果有高版本建议删除:
先查询 rpm -qa | grep jdk
[[email protected] java]# rpm -qa | grep jdk
jdk-11.0.2-11.0.2-ga.x86_64
jdk1.8-1.8.0_201-fcs.x86_64

如果不是1.8版本就删除 然后安装1.8版本
rpm -e --nodeps jdk-11.0.2-11.0.2-ga.x86_64


下载好 jdk-8u201-linux-x64.rpm

安装:
rpm -ivh jdk-8u201-linux-x64.rpm

如发现无法安装请使用: -force --nodeps 参数安装

添加环境变量 [vi /etc/profile]

尾部添加以下变量:

JAVA_HOME=/usr/java/jdk1.8.0_131
CLASSPATH=%JAVA_HOME%/lib:%JAVA_HOME%/jre/lib
PATH=$PATH:$JAVA_HOME/bin:$JAVA_HOME/jre/bin
export PATH CLASSPATH JAVA_HOME

保存退出

使用 source /etc/profile  让变量生效


=====================================

另外可以使用
yum -y list java  来查看对应java版本 然后直接安装对应版本

查询当前版本:
[[email protected] ~]# java -version
java version "1.8.0_201"
Java(TM) SE Runtime Environment (build 1.8.0_201-b09)
Java HotSpot(TM) 64-Bit Server VM (build 25.201-b09, mixed mode)
java截图

安装filebeat[服务器安装]
下载filebeat
https://www.elastic.co/guide/en/beats/filebeat/6.6/setup-repositories.html
1. 首先需要下载公钥,执行下载公钥
rpm --import https://packages.elastic.co/GPG-KEY-elasticsearch

2. 新建repo文件
vi  /etc/yum.repos.d/elk.repo

[elastic-6.x]
name=Elastic repository for 6.x packages
baseurl=https://artifacts.elastic.co/packages/6.x/yum
gpgcheck=1
gpgkey=https://artifacts.elastic.co/GPG-KEY-elasticsearch
enabled=1
autorefresh=1
type=rpm-md


3.安装filebeat
yum install filebeat -y

4. 启动filebeat
systemctl start filebeat.service

5. 设置开机启动
systemctl enable filebeat.service
配置filebeat
filebeat配置文件地址: /etc/filebeat/
[[email protected] yum.repos.d]# ls /etc/filebeat/
fields.yml  filebeat.reference.yml  filebeat.yml  modules.d    <<---filebeat配置文件

先备份原始文件
cp  /etc/filebeat/filebeat.yml{,.bak}

配置filebeat

vim /etc/filebeat/filebeat.yml

修改约24行 复制 #  enabled: false  粘贴后去除注释
23   # Change to true to enable this input configuration.
24   #  enabled: false
25   enabled: true

修改约29行,复制后另起一行配置日志记录文件
29   #  - /var/log/httpd/access_log
30      -/var/log/chenleilei.log


修改 153行左右
#-------------------------- Elasticsearch output ------------------------------
output.elasticsearch:
  # Array of hosts to connect to.
  hosts: ["localhost:9200"]

改为:
output.elasticsearch:
  # Array of hosts to connect to.
  hosts: ["10.0.0.72:9200"]          ###这里IP地址为传给谁的


#了解:
# Optional protocol and basic auth credentials.
#protocol: "https"
#username: "elastic"
#password: "changeme"
#这段配置是给 https 和需要验证帐号密码的场景使用的,如果有需要可以开启
安装使用 elasticsearch
安装elasticsearch
#安装  elasticsearch
yum -y install elasticsearch

#配置  elasticsearch
# 配置文件地址: /etc/elasticsearch/elasticsearch.yml

备份一次配置文件:
cp  /etc/elasticsearch/elasticsearch.yml{,.bak}
配置 elasticsearch.yml
vim /etc/elasticsearch/elasticsearch.yml

# Set the bind address to a specific IP (IPv4 or IPv6):
#
network.host: 10.0.0.72    ##----->这里修改为 elasticsearch服务器地址,默认改成0.0.0.0 监听所有即可,如果写成IP地址那么curl获取 日志的时候 curl 127.0.0.1:9200/_cat/indices  会无法获取到相关信息 ,只能使用定义的  curl 10.0.0.72:9200/_cat/indices   如果只有一台 建议直接使用0.0.0.0 就行
启动elasticsearch服务:
systemctl enable elasticsearch.service
systemctl start elasticsearch.service
systemctl status elasticsearch.service
elasticsearch日志: /var/log/elasticsearch/elasticsearch.log
可以通过日志文件来判断elastic search是否正常启动
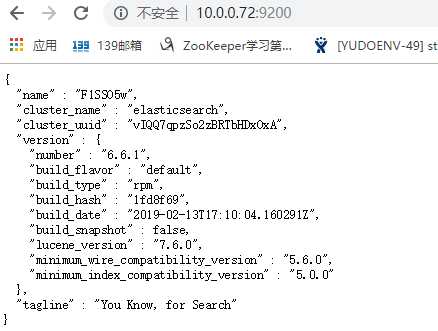
通过网页验证 elasticsearch 服务是否启动成功
http://10.0.0.72:9200/
成功访问即代表配置正确
处理日志将使用到filebeat:
安装Kibana
安装
yum直接安装有点大 从国外源下载太慢,所以需要自己先手动下载然后通过rpm来安装
rpm -ivh kibana-6.6.0-x86_64.rpm

[[email protected] ~]# rpm -ivh kibana-6.6.0-x86_64.rpm
Preparing...                          ################################# [100%]
    package kibana-6.6.0-1.x86_64 is already installed
配置
vi /etc/kibana/kibana.yml

跳转到 第 2 行 开启服务端口
#server.port: 5601  ##原来
 server.port: 5601  ## 新增一行 去掉注释

跳转到 第 8 行左右 开启服务端口
#server.host: "localhost"       ## 不用解除注释 直接 yyp 重新粘贴一行
 server.host: "0.0.0.0"         ##  这一行 服务监听电口改为  0.0.0.0  监听所有

跳转到 第 31 行左右 开启服务端口
#elasticsearch.hosts: ["http://localhost:9200"]
 elasticsearch.hosts: ["http://10.0.0.71:9200"]

 配置完成保存退出 重启kibana
 systemctl restart kibana.service
删除kibana收集的数据
服务中使用:
curl 127.0.0.1:9200/_cat/indices      查看现有数据

删除kibana数据:
[[email protected] Kibana_Hanization-master]# curl -XDELETE  127.0.0.1:9200/.kibana_1
{"acknowledged":true}      ####[出现true 代表删除成功,可以再次查看]
kibana网页端配置数据收集
创建第一条索引(确保服务都启动了)
http://10.0.0.71:5601/app/kibana#/management/kibana/index?_g=()

点击进入: Management - kibana - Index Patterns

#Step 1 of 2: Define index pattern
#Index pattern
filebeat-*         ###---第一步输入索引名


filebeat-6.6.1-2019.03.13      ##这是匹配出来的,匹配出来了就 点击   【Next step】


#Step 2 of 2: Configure settings  [设置根据什么选择索引]
选择
@timestamp

选择完成创建索引  点击 Create index pattern
已经可以收集日志了 配置完成
kibana 网页端配置日志过滤[优化日志收集]
vim /etc/filebeat/filebeat.yml

找到 大约39行 内容为:
#include_lines: ['^ERR', '^WARN']
修改为:
include_lines: ['^ERR', '^WARN', 'sshd']

这样的话 系统只会收集以ERROR WARN 开头 和包含sshd 的日志   修改完成保存后重启filebeat

通过tailf  /var/log/chenleilei.log[日志文件]  已经看不到了 一些乱七八糟的日志了 只会出现 我们设置的3中日志

添加 sshd  只是为了测试 sshd 登录是否会被记录


日志记录:
elk01上登录root用户后kibana上的记录:
beat.name:elk01 beat.hostname:elk01 host.name:elk01 @timestamp:March 13th 2019, 19:03:23.624 message:Mar 13 19:03:17 elk03 sshd[14134]: pam_unix(sshd:session): session opened for user root by (uid=0) prospector.type:log input.type:log beat.version:6.6.1 host.architecture:x86_64 host.os.name:CentOS Linux host.os.codename:Core host.os.platform:centos host.os.version:7 (Core) host.os.family:redhat host.id:a498e2c9c250499a8d68e8f1a980c3f5 host.containerized:true source:/var/log/chenleilei.log offset:1,069,329 log.file.path:/var/log/chenleilei.log _id:u-m4dmkBA26OlE2TnhDS _type:doc _index:filebeat-6.6.1-2019.03.13 _score: -

elk02上登录root用户后kibana上的记录:
message:Mar 13 19:07:48 elk02 sshd[14831]: pam_unix(sshd:session): session opened for user root by (uid=0) @timestamp:March 13th 2019, 19:07:48.707 prospector.type:log input.type:log beat.name:elk01 beat.hostname:elk01 beat.version:6.6.1 host.name:elk01 host.architecture:x86_64 host.os.platform:centos host.os.version:7 (Core) host.os.family:redhat host.os.name:CentOS Linux host.os.codename:Core host.id:a498e2c9c250499a8d68e8f1a980c3f5 host.containerized:true log.file.path:/var/log/chenleilei.log source:/var/log/chenleilei.log offset:1,115,205 _id:wOm8dmkBA26OlE2TqhBM _type:doc _index:filebeat-6.6.1-2019.03.13 _score: -

elk03上登录root用户后kibana上的记录:
message:Mar 13 19:03:17 elk03 sshd[14134]: pam_unix(sshd:session): session opened for user root by (uid=0) @timestamp:March 13th 2019, 19:03:23.624 prospector.type:log input.type:log beat.name:elk01 beat.hostname:elk01 beat.version:6.6.1 host.architecture:x86_64 host.os.name:CentOS Linux host.os.codename:Core host.os.platform:centos host.os.version:7 (Core) host.os.family:redhat host.id:a498e2c9c250499a8d68e8f1a980c3f5 host.containerized:true host.name:elk01 source:/var/log/chenleilei.log offset:1,069,329 log.file.path:/var/log/chenleilei.log _id:u-m4dmkBA26OlE2TnhDS _type:doc _index:filebeat-6.6.1-2019.03.13 _score: -


ssh连接到elk03 故意输错密码的记录:
March 13th 2019, 19:18:11.792   message:Mar 13 19:18:11 elk03 sshd[14921]: Failed password for chenleilei from 10.0.0.71 port 60284 ssh2 @timestamp:March 13th 2019, 19:18:11.792 prospector.type:log input.type:log beat.version:6.6.1 beat.name:elk01 beat.hostname:elk01 host.name:elk01 host.containerized:true host.architecture:x86_64 host.os.name:CentOS Linux host.os.codename:Core host.os.platform:centos host.os.version:7 (Core) host.os.family:redhat host.id:a498e2c9c250499a8d68e8f1a980c3f5 source:/var/log/chenleilei.log offset:1,124,133 log.file.path:/var/log/chenleilei.log _id:yOnGdmkBA26OlE2TLBA5 _type:doc _index:filebeat-6.6.1-2019.03.13 _score: -
------------------------------------------------------------------
登录记录:
elk01

elk02

elk03

日志收集与清除
删除filebeat收集数据

查看数据:
curl 10.0.0.71:9200/_cat/indices

[[email protected] ~]# curl 10.0.0.71:9200/_cat/indices
yellow open filebeat-6.6.1-2019.03.13    6piRJ-G_QQ-n8Xjk8oClEQ 3 1   3   0  21.6kb  21.6kb
yellow open filebeat-6.6.1-2019.03.15    _z4Eq8d3Rtm9Ur7W2luQxA 3 1   6   0  52.5kb  52.5kb
green  open .monitoring-es-6-2019.03.14  qVEPYEeHRCil_WTWmZt3wg 1 0 340 147 563.9kb 563.9kb
green  open .kibana_1                    tOEm5-DYRTa94rBzTVyN_g 1 0   4   0  15.6kb  15.6kb
green  open .monitoring-kibana-6-2019.03.14 hkL9pHgMTc6sZIPr9R3izQ 1 0  31   0  52.1kb  52.1kb
yellow open filebeat-6.6.1-2019.03.14       DPeKhOf_RRupSo1iOk_7xA 3 1   9   0  62.9kb  62.9kb

清除数据:
[[email protected] ~]# curl -XDELETE 10.0.0.71:9200/filebeat-6.6.1-2019.03.13
{"acknowledged":true}    ##---删除13号数据,出现 {"acknowledged":true} 即删除成功

清除所有数据:
通配符删除
[[email protected] ~]# curl -XDELETE 10.0.0.71:9200/filebeat-6.6.1-2019.03.1*
{"acknowledged":true}
[[email protected] ~]# curl 10.0.0.71:9200/_cat/indices
green open .kibana_1                       tOEm5-DYRTa94rBzTVyN_g 1 0   4  0  15.6kb  15.6kb
green open .monitoring-kibana-6-2019.03.14 hkL9pHgMTc6sZIPr9R3izQ 1 0  78  0 107.9kb 107.9kb
green open .monitoring-es-6-2019.03.14     qVEPYEeHRCil_WTWmZt3wg 1 0 809 30   516kb   516kb

可以看到已经全部filebeat数据都被删除
kibana汉化【可选】
kibana汉化: https://github.com/anbai-inc/Kibana_Hanization

方法:
#yum安装进入汉化包目录 /root/test/Kibana_Hanization   [下载不同目录也不一样]
#进入目录后安装 "/usr/share/kibana/" 是kibana的安装目录,根据自身条件来配置:

首先停止kibana服务
systemctl stop kibana.service

下载汉化包:
git clone https://github.com/anbai-inc/Kibana_Hanization
cd Kibana_Hanization-master/

命令:
python main.py "/usr/share/kibana/"

过程:
[email protected] Kibana_Hanization]# python main.py "/usr/share/kibana/"
文件[/usr/share/kibana/dlls/vendors.bundle.dll.js]已翻译。
文件[/usr/share/kibana/node_modules/x-pack/plugins/canvas/index.js]已翻译。
文件[/usr/share/kibana/node_modules/x-pack/plugins/canvas/canvas_plugin/renderers/all.js]已翻译。
文件[/usr/share/kibana/node_modules/x-pack/plugins/canvas/canvas_plugin/uis/arguments/all.s]已翻译。
文件[/usr/share/kibana/node_modules/x-pack/plugins/canvas/canvas_plugin/uis/datasources/al.js]已翻译。
文件[/usr/share/kibana/node_modules/x-pack/plugins/canvas/public/register_feature.js]已翻译。
文件[/usr/share/kibana/node_modules/x-pack/plugins/ml/index.js]已翻译。
文件[/usr/share/kibana/node_modules/x-pack/plugins/ml/public/register_feature.js]已翻译。
文件[/usr/share/kibana/node_modules/x-pack/plugins/spaces/index.js]已翻译。
文件[/usr/share/kibana/node_modules/x-pack/plugins/spaces/public/components/manage_spaces_utton.js]已翻译。
文件[/usr/share/kibana/node_modules/x-pack/plugins/spaces/public/views/nav_control/componets/spaces_description.js]已翻译。
文件[/usr/share/kibana/optimize/bundles/apm.bundle.js]已翻译。
文件[/usr/share/kibana/optimize/bundles/canvas.bundle.js]已翻译。
文件[/usr/share/kibana/optimize/bundles/commons.bundle.js]已翻译。
文件[/usr/share/kibana/optimize/bundles/infra.bundle.js]已翻译。
文件[/usr/share/kibana/optimize/bundles/kibana.bundle.js]已翻译。
文件[/usr/share/kibana/optimize/bundles/login.bundle.js]已翻译。
文件[/usr/share/kibana/optimize/bundles/ml.bundle.js]已翻译。
文件[/usr/share/kibana/optimize/bundles/monitoring.bundle.js]已翻译。
文件[/usr/share/kibana/optimize/bundles/timelion.bundle.js]已翻译。
文件[/usr/share/kibana/src/legacy/core_plugins/kibana/server/tutorials/kafka_logs/index.js已翻译。
文件[/usr/share/kibana/src/ui/public/chrome/directives/global_nav/global_nav.js]已翻译。
恭喜,Kibana汉化完成!

重新启动服务:
systemctl start kibana.service
systemctl status kibana.service
使用elk收集本机所有日志思路
1) filebeat读取slow日志到logstash

2) logstash处理日志,将所有日志过滤整理成json格式

?   grok是使得无结构的日志结构化和可查询的最好插件

3)将json日志发送给slasticsearch

4)kibana通过索引获取日志并且及逆行展示
收集apache日志
安装:
yum -y install  httpd
systemctl start  httpd.service日志:


apache日志:
tailf  /var/log/httpd/access_log
清除filebbeat日志:
curl 10.0.0.71:9200/_cat/indices      ##查看现有数据

curl -XDELETE 10.0.0.71:9200/.monitoring-es-6-2019.03.18    ##删除现有数据

还可以使用 * 来匹配删除
curl -XDELETE 10.0.0.71:9200/.monitoring-es-6-2019.03.1*
curl -XDELETE 10.0.0.71:9200/.monitoring-kibana-6-2019.03.1*
收集apache日志配置
设置apache 日志为 json
设置filebeat读取日志,按照json格式给elastic
kibana读取elastic日志
apache默认安装日志地址:/var/log/httpd/access_log

配置思路:
1. 修改filebeat.yml文件 然后启动filebeat
2. curl 10.0.0.71:9200/_cat/indices  查看索引
3. curl -XDELETE 10.0.0.71:9200/.monitoring-es-6-2019.03.18   删除所有索引


安装filebeat:
rpm -ivh ~/filebeat-6.6.1-x86_64.rpm    [这是安装本地下载的包,也可以yum来安装]

配置filebeat传送日志给服务器:
cp /etc/filebeat/filebeat.yml{,.bak_$(date +%F)} ##备份
vim /etc/filebeat/fields.yml    ##编辑配置

找到 大约 158行  :
找到 :  Filebeat inputs 段

更改此段:
----------------------------------------
filebeat.inputs:

# Each - is an input. Most options can be set at the input level, so
# you can use different inputs for various configurations.
# Below are the input specific configurations.

- type: log

  # Change to true to enable this input configuration.
  enabled: false
------------------------------------------

改为:
filebeat.inputs:

# Each - is an input. Most options can be set at the input level, so
# you can use different inputs for various configurations.
# Below are the input specific configurations.

- type: log

  # Change to true to enable this input configuration.
#  enabled: false
  enabled: true                                 #-----指定开启日志收集(别忘了)

  # Paths that should be crawled and fetched. Glob based paths.
  paths:
    #- /var/log/*.log
    - /var/log/httpd/access_log     ------指定access日志地址[同时这里可以指定多个日志文件,如再指定一个/var/log/chenleilei.log]
    #- c:programdataelasticsearchlogs*
    json.keys_under_root: true      -----新增行
    json.overwrite_keys: true       -----新增行


找到大约150行的 Elasticsearch output  将日志传输给Elasticsearch
修改:
output.elasticsearch:
  # Array of hosts to connect to.
  hosts: ["localhost:9200"]
改为:
output.elasticsearch:
  # Array of hosts to connect to.
  hosts: ["10.0.0.71:9200"]


 删除索引:
 curl 10.0.0.71:9200/_cat/indices     ###查看索引
 curl -XDELETE 10.0.0.71:9200/*      ###删除所有索引

 特别注意:如果索引被清除,客户端需要重新启动filebeat,并访问一次apache来生成新的索引! 否则添加索引时 无法选择索引

 删除网页数据:
 点击 Management  点击 kibana下的 Index Patterns

 修改完成后 重启 filebeat:
  systemctl restart filebeat.service


查看日志检查服务是否启动成功:
[[email protected] ~]# tailf /var/log/messages

Mar 21 11:31:34 elk03 systemd: Started Filebeat sends log files to Logstash or directly to Elasticsearch..
Mar 21 11:31:34 elk03 systemd: Starting Filebeat sends log files to Logstash or directly to Elasticsearch....   正确启动
kibana配置:
kibana 创建索引
创建索引 在filebeat中
Management  ---  Kibana  --- Create index pattern  --- 勾选左边的 include system indices

Step 1 of 2: Define index pattern
filebeat-*       【匹配filebeat数据】

Step 2 of 2: Configure settings
@timestamp       【使用时间来匹配】  点击Next step 下一步

点击 - Create index pattern
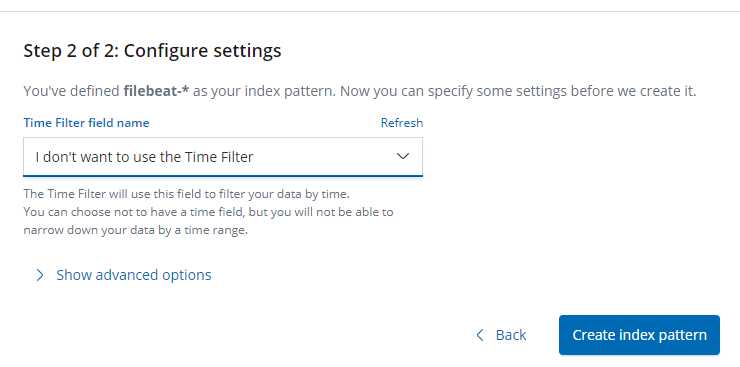
第二步:
选择: I don‘t want to use the Time Filter
配置完成后 在 Discover中查看是否正确收集了 access.log的日志
@timestamp:March 21st 2019, 12:11:37.627 beat.name:elk03 beat.hostname:elk03 beat.version:6.6.1 host.name:elk03 host.architecture:x86_64 host.os.platform:centos host.os.version:7 (Core) host.os.family:redhat host.os.name:CentOS Linux host.os.codename:Core host.id:a498e2c9c250499a8d68e8f1a980c3f5 host.containerized:true source:/var/log/httpd/access_log offset:10,246 log.file.path:/var/log/httpd/access_log message:10.0.0.1 - - [21/Mar/2019:12:11:27 +0800] "GET /noindex/css/fonts/Light/OpenSans-Light.woff HTTP/1.1" 404 241 "http://10.0.0.73/noindex/css/open-sans.css" "Mozilla/5.0 (Windows NT 10.0; Win64; x64) AppleWebKit/537.36 (KHTML, like Gecko) Chrome/72.0.3626.109 Safari/537.36" prospector.type:log input.type:log _id:ZY9ynmkBaEsJa_kWg44K _type:doc _index:filebeat-6.6.1-2019.03.21 _score: -

看到这样基本可以证实 日志被正确收集到了
第三步: 分析access.log
kibana绘图: 定义字段 制作图表[定义json] 定义apache日志格式为 json格式
LogFormat "{ "@timestamp": "%{%Y-%m-%dT%H:%M:%S%z}t", "@version": "1", "tags":["apache"], "message": "%h %l %u %t \\"%r\\" %>s %b", "clientip": "%a", "duration": %D, "status": %>s, "request": "%U%q", "urlpath": "%U", "urlquery": "%q", "bytes": %B, "method": "%m", "site": "%{Host}i", "referer": "%{Referer}i", "useragent": "%{User-agent}i" }" apache_json
CustomLog "logs/access_log" apache_json

该代码段插入到access配置文件/etc/httpd/conf/httpd.conf 中 约 202行 </IfModule> 标签下方


写入完成后 清空apache访问日志
>/etc/httpd/logs/access_log

systemctl start httpd.service
systemctl status  httpd.service


检查日志是否正确[启动apache后 打开窗口刷新  然后通过tailf 来查看日志样式是否改变为json]
tailf /var/log/httpd/access_log
[[email protected] ~]# tailf /var/log/httpd/access_log
{      "@timestamp": "2019-03-21T13:53:32+0800",       "@version": "1",        "tags":["apache"],      "message": "10.0.0.1 - - [21/Mar/2019:13:53:32 +0800] "GET / HTTP/1.1" 403 4897",     "clientip": "10.0.0.1",     "duration": 2057,    "status": 403,     "request": "/",     "urlpath": "/",     "urlquery": "",     "bytes": 4897,      "method": "GET",        "site": "10.0.0.73",         "referer": "-",        "useragent": "Mozilla/5.0 (Windows NT 10.0; Win64; x64) AppleWebKit/537.36 (KHTML, like Gecko) Chrome/72.0.3626.109 Safari/537.36"      }
10.0.0.1 - - [21/Mar/2019:13:53:32 +0800] "GET / HTTP/1.1" 403 4897 "-" "Mozilla/5.0 (Windows NT 10.0; Win64; x64) AppleWebKit/537.36 (KHTML, like Gecko) Chrome/72.0.3626.109 Safari/537.36"

这样已经就被定义为了 json格式了
去kibana中检查数据是否收集成功:

至此 apache 日志已经收集完成,如果收集有问题 就停止 filebeat 删除索引 然后重新添加一次索引即可,特别注意:如果索引被清除,客户端需要重新启动filebeat,并访问一次apache来生成新的索引! 否则添加索引时 无法选择索引
apache数据建立图表:
注意 只有日志格式更改为了json格式才可以输出图表 否则 图表时无法输出的
kibana页面中点击选择 Visualize – “Create a visualization” - 找到饼图 图标

选择下面标识的项目

设置好了后 点击 开始的图标 
查看效果
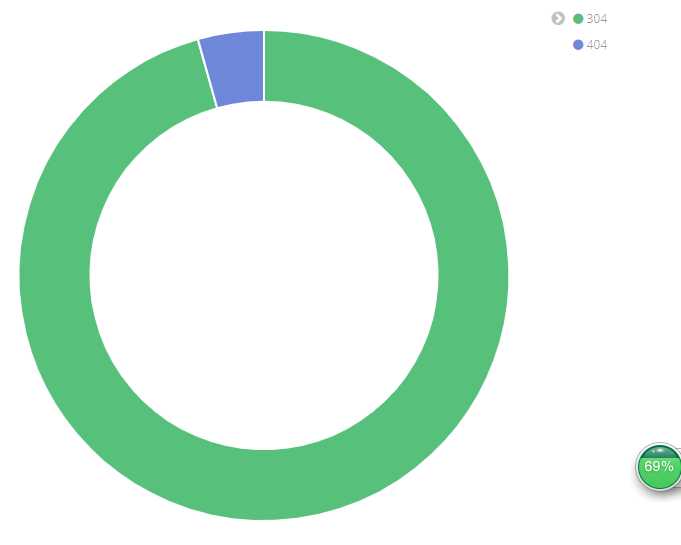
配置没有问题可以点击save 保存图表,如果没有出现这样 出现的是 3个图 那么 你多访问几次 正常页面和错误页面
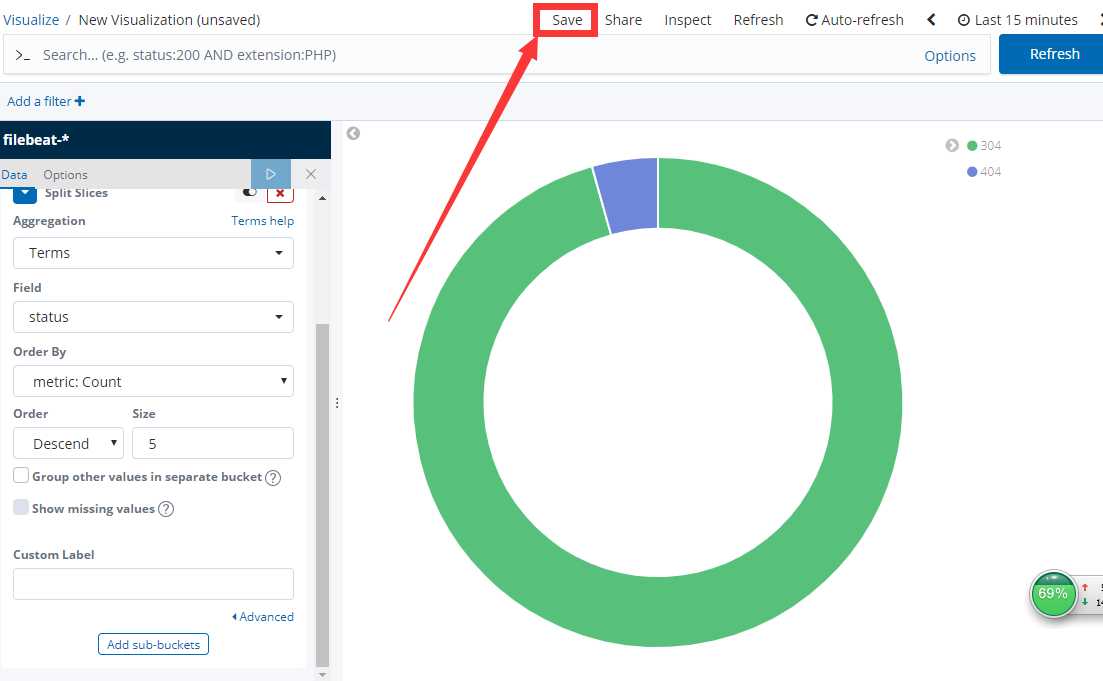
然后保存的时候取一个名字:

这样就配置好了图表:
注意: 如果发现状态码无法输出 可能是添加索引的时候选择了 @timestamp , 你应该选择 i don‘t want to use the Time Filter 然后点击 Create index pattern 来创建图表。 否则就不会有状态码显示 这样你也无法作图

建立仪表盘,将图标增加到仪表盘中
点击: Dashboard –— 点击 add 按钮 –– 选择刚才的 apache_status — 点击顶部的 Save -- 取个名字保存
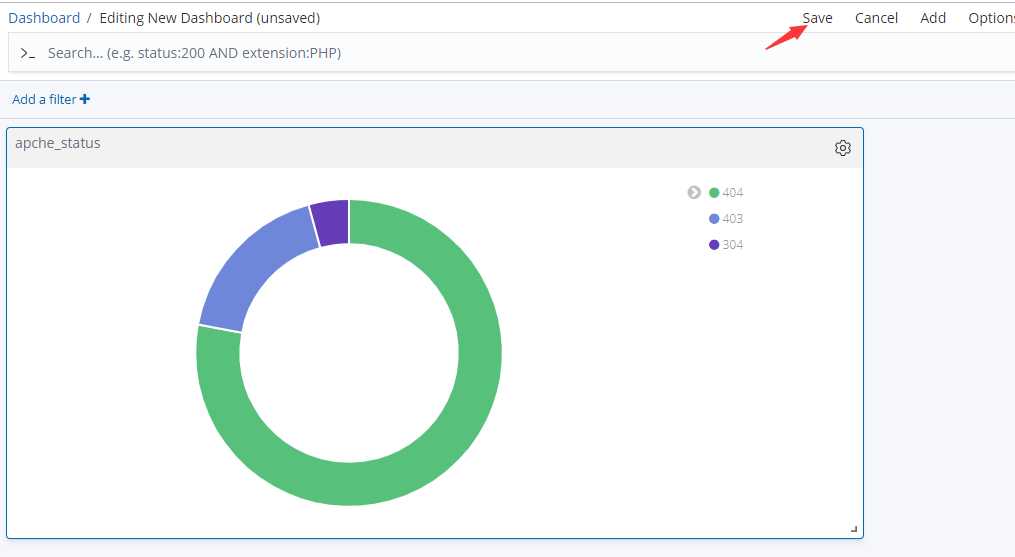
到这里 apache日志日志收集完成
nginx日志收集配置
? 注意:默认安装的nginx 首页文件在: /usr/share/nginx/html/.
日志定义为json格式:
log_format main_json '{"@timestamp":"$time_local",'
'"N_client_ip": "$remote_addr",'
'"N_request": "$request",'
'"N_request_time": "$request_time",'
'"N_status": "$status",'
'"N_bytes": "$body_bytes_sent",'
'"N_user_agent": "$http_user_agent",'
'"N_x_forwarded": "$http_x_forwarded_for",'
'"N_referer": "$http_referer"'
'}';
access_log logs/access.log main_json;
将此格式插入到nginx配置文件中
默认安装的nginx 配置文件在 /etc/nginx/nginx.conf
vim /etc/nginx/nginx.conf

注释默认日志格式:
#    log_format  main  '$remote_addr - $remote_user [$time_local] "$request" '
#                      '$status $body_bytes_sent "$http_referer" '
#                      '"$http_user_agent" "$http_x_forwarded_for"';

改为:
#-----------------------------------------------
#    log_format  main  '$remote_addr - $remote_user [$time_local] "$request" '
#                      '$status $body_bytes_sent "$http_referer" '
#                      '"$http_user_agent" "$http_x_forwarded_for"';

    log_format main_json '{"@timestamp":"$time_local",'
    '"N_client_ip": "$remote_addr",'
    '"N_request": "$request",'
    '"N_request_time": "$request_time",'
    '"N_status": "$status",'
    '"N_bytes": "$body_bytes_sent",'
    '"N_user_agent": "$http_user_agent",'
    '"N_x_forwarded": "$http_x_forwarded_for",'
    '"N_referer": "$http_referer"'
    '}';

    access_log  /var/log/nginx/access.log   main_json;
#    access_log  /var/log/nginx/access.log  main;
#-----------------------------------------------

改好后清除默认nginx日志文件内容
>/var/log/nginx/access.log
检查日志是否改为json
{"@timestamp":"23/Mar/2019:03:41:34 +0800","N_client_ip": "10.0.0.1","N_request": "GET / HTTP/1.1","N_request_time": "0.000","N_status": "304","N_bytes": "0","N_user_agent": "Mozilla/5.0 (Windows NT 10.0; Win64; x64) AppleWebKit/537.36 (KHTML, like Gecko) Chrome/72.0.3626.109 Safari/537.36","N_x_forwarded": "-","N_referer": "-"}
默认日志格式已经改为了 json格式。
重新定义filebeat索引[服务器客户端都需要配置]
vim /etc/filebeat/filebeat.yml
大约在 154 行 重新定义 Elasticsearch output 重新定义索引
output.elasticsearch: 字段上方添加:

setup.template.name: "web_chenleilei_com"
setup.template.pattern: "web_chenleilei_com_"
output.elasticsearch:
# Array of hosts to connect to.


hosts: ["10.0.0.71:9200"]  字段下方添加:

index: "web_chenleilei_com_%{+yyyy.MM.dd}"

修改完成后保存退出 重启 filebeat
systemctl restart filebeat.service

一定要检查状态确保启动正常:
systemctl status filebeat.service
删除filebeat的索引
curl 10.0.0.71:9200/_cat/indices   查看索引
curl -XDELETE 10.0.0.71:9200/filebeat-*   删除filebeat索引

重启filebeat 访问一下网站重新生成索引
ansible all -m shell -a "systemctl restart filebeat"
生成新的索引:
Management  --  Kibana  --- [新索引名 实验配置的是 web_chenleilei_com_2019.03.23 ]


Step 1 of 2: Define index pattern
Index pattern
   web_chenleilei_com_*       ------ 【定义新索引】  点击 Next step 下一步

然后重启服务即可。
多日志收集:
收集nginx日志和apache日志
多日志收集修改配置文件 filebeat.yml
vim /etc/filebeat/filebeat.yml
#=========================== Filebeat input ------------------------------
- type: log

  enabled: true
  paths:
    - /var/log/httpd/access_log
  json.keys_under_root: true
  json.overwrite_keys: true


- type: log
  enabled: true
  paths:
    - /var/log/nginx/access.log

  json.keys_under_root: true
  json.overwrite_keys: true
#=========================== Filebeat input ------------------------------


多台服务器收集,定位主机 配置:
#=========================== Filebeat input ------------------------------
vim /etc/filebeat/filebeat.yml

setup.template.name: "elk02_web_chenleilei_com"           ####这里自定义可以用于区别主机
setup.template.pattern: "elk02_web_chenleilei_com_"       ####这里自定义可以用于区别主机
output.elasticsearch:
  # Array of hosts to connect to.
  hosts: ["10.0.0.71:9200"]
  index: "elk02_web_chenleilei_com_%{+yyyy.MM.dd}"       ####这里自定义可以用于区别主机
#=========================== Filebeat input ------------------------------


修改完成后 重新启动filebeat,再次同步日志,会发现会有变化
systemctl restart  filebeat


服务器上删除多余的收集数据
curl -XDELETE 10.0.0.71:9200/web_chenleilei_com_2019.03.23

重建索引,重启filebeat

这样日志就会以索引名命名,这个命名是在添加elk日志来源的时候匹配的
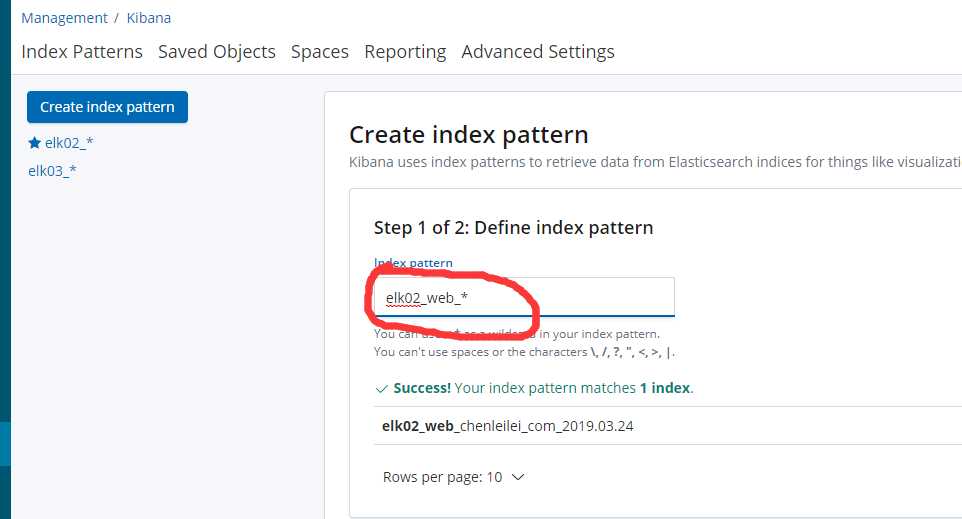
这样配置后就可以收到多台服务器的不同日志了 在查阅的时候可以按照主机来查询日志。
多图表展示:
使用kibana绘图来绘制饼图和图表展示

如果要做这个 需要先收集到这两个服务的日志并且 web服务开启

kibana - vsiualize  添加apache图表   添加nginx图表 点击Dashboard - Add a filter 添加图表
选择已经制作好的两张图添加保存即可
elk多日志收集配置:
elk多日志收集 是指在每台filebeat中配置不同的索引 让服务器获取,这样即可区分服务器

如何区分一台服务器中多日志收集中的 apache nginx两个服务的日志?
apache定义:
-----------------------------------
LogFormat "{ "@timestamp": "%{%Y-%m-%dT%H:%M:%S%z}t", "@version": "1", "tags":["apache"], "message": "%h %l %u %t \\"%r\\" %>s %b", "A_clientip": "%a", "duration": %D, "status": %>s, "request": "%U%q", "urlpath": "%U", "urlquery": "%q", "bytes": %B, "method": "%m", "site": "%{Host}i", "referer": "%{Referer}i", "useragent": "%{User-agent}i" }" apache_json
CustomLog "logs/access_log" apache_json
-------------------------------------
这里的 A_clientip  就是用于区分服务的  这里可以改为  APACHE_clientip
nginx 定义时改为:

log_format main_json '{"@timestamp":"$time_local",'
'"N_client_ip": "$remote_addr",'
'"N_request": "$request",'
'"N_request_time": "$request_time",'
'"N_status": "$status",'
'"N_bytes": "$body_bytes_sent",'
'"N_user_agent": "$http_user_agent",'
'"N_x_forwarded": "$http_x_forwarded_for",'
'"N_referer": "$http_referer"'
'}';

access_log  /var/log/nginx/access.log   main_json;

这样 在日式收集时  A_clientip 为apache的日志   N_clientip 为nginx日志
mysql slow 慢日志收集
收集思路:
后续补充
以上是关于elk的主要内容,如果未能解决你的问题,请参考以下文章