数仓1.4 |业务数仓搭建| 拉链表| Presto
Posted shengyang17
tags:
篇首语:本文由小常识网(cha138.com)小编为大家整理,主要介绍了数仓1.4 |业务数仓搭建| 拉链表| Presto相关的知识,希望对你有一定的参考价值。
电商业务及数据结构
SKU库存量,剩余多少
SPU商品聚集的最小单位,,,这类商品的抽象,提取公共的内容
订单表:周期性状态变化(order_info)

id                订单编号
total_amount    订单金额
order_status    订单状态
user_id            用户id
payment_way    支付方式
out_trade_no    支付流水号
create_time    创建时间
operate_time    操作时间
订单详情表:(order_detail)
order_detail.order_id 是要一一对应 order_info.id;导入数仓时要关联下,不一致的舍去

id            订单编号
order_id    订单号
user_id    用户id
sku_id    商品id
sku_name    商品名称
order_price    商品价格
sku_num            商品数量
create_time    创建时间
商品表 sku_info

id            skuId
spu_id    spuid
price        价格
sku_name    商品名称
sku_desc    商品描述
weight    重量
tm_id    品牌id
category3_id    品类id
create_time    创建时间
用户表user_info

id            用户id
name    姓名
birthday    生日
gender    性别
email    邮箱
user_level        用户等级
create_time    创建时间
商品一级分类表base_category1

id            id
name    名称
商品二级分类表base_category2

id            id
name    名称
category1_id    一级品类id
商品三级分类表base_category3

id            id
name    名称
Category2_id    二级品类id
支付流水表 payment_info

id                    编号
out_trade_no    对外业务编号
order_id            订单编号
user_id            用户编号
alipay_trade_no    支付宝交易流水编号
total_amount    支付金额
subject            交易内容
payment_type    支付类型
payment_time    支付时间
数仓理论(面试重点)
①实体表:用户表、商品表--->全量;一个个实实在在的个体
一般是指一个现实存在的业务对象,比如用户,商品,商家,销售员等等。 (同步策略)实体表数据量比较小:通常可以做每日全量,就是每天存一份完整数据。即每日全量。
②维度表(码表--编号的解释表):对应的业务状态;商品一级分类表、商品二级分类表、商品三级分类表.等都是全量表
比如地区表,订单状态,支付方式,审批状态,商品分类等等
同步策略(维度表数据量比较小:通常可以做每日全量,就是每天存一份完整数据。即每日全量。说明:1)针对可能会有变化的状态数据可以存储每日全量。2)没变化的客观世界的维度(比如性别,地区,民族,政治成分,鞋子尺码)可以就存一份固定值。)
③事务型事实表;一旦业务发生产生的数据就不会发生不变;比如,交易流水,操作日志,出库入库记录等。
每日新增 订单详情表(用户和商品信息)、支付流水表(增量)
同步策略(因为数据不会变化,而且数据量巨大,所以每天只同步新增数据即可,所以可以做成每日增量表,即每日创建一个分区存储。)
④周期型事实表:随着业务的发生(时间)而变化
订单表 (订单状态)--> 新增和变化
这类表从数据量的角度,存每日全量的话,数据量太大,冗余也太大。如果用每日增量的话无法反应数据变化。
每日新增及变化量可以用,包括了当日的新增和修改。一般来说这个表,足够计算大部分当日数据的。但是这种依然无法解决能够得到某一个历史时间点(时间切片)的切片数据。 所以要用利用每日新增和变化表,制作一张拉链表,以方便的取到某个时间切片的快照数据。所以我们需要得到每日新增及变化量。
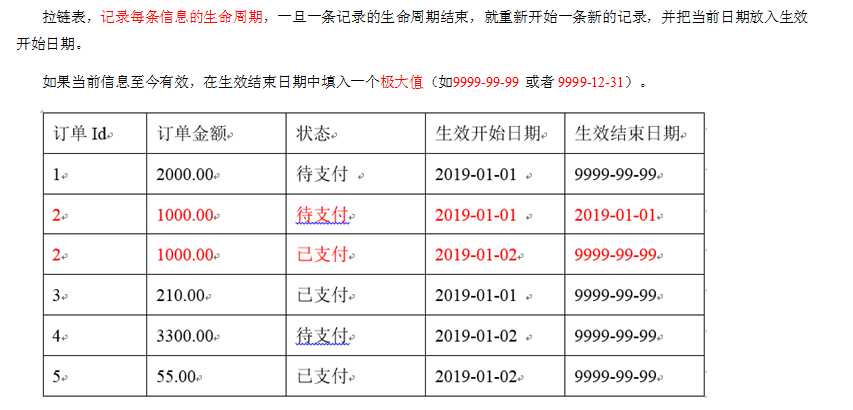
拉链
同步策略
数据同步策略的类型包括:全量表、增量表、新增及变化表、拉链表
- 全量表:存储完整的数据。
- 增量表:存储新增加的数据。
- 新增及变化表:存储新增加的数据和变化的数据。
- 拉链表:对新增及变化表做定期合并。 利用每日新增和变化表,制作一张拉链表,以方便的取到某个时间切片的快照数据
范式理论
1NF属性不可切割
商品|数量 可切割
2NF 不能存在部分函数依赖
联合主键(学号, 课名)
变成完全函数依赖
3NF不能存在传递函数依赖
学号->系名->系主任
把它拆开两张表
函数依赖
完全函数依赖
共同决定。任何单独一个推测不出来
部分函数依赖:
只依赖于一个,一半
传递函数依赖
a->b->c(c不能得到a)
关系模型主要应用与OLTP系统(关系型数据库。尽量-遵循第三范式)中,为了保证数据的一致性以及避免冗余,所以大部分业务系统的表都是遵循第三范式的。
维度模型主要应用于OLAP系统(减小表的关联)中,因为关系模型虽然冗余少,但是在大规模数据,跨表分析统计查询过程中,会造成多表关联,这会大大降低执行效率。
维度模型数据来源于--->OLTP各种类型的分析计算;
雪花模型、星型模型和星座模型
星型模型:(快)
1层,数据表中只有1个维度表
雪花模型:(灵活)
多级多个维度表,比较靠近3NF
星座模型:(可能是雪花也可能是星型)
多个事实表(一个项目中大概5-6个)
事实表-维度(共享)-事实表
生成业务数据并导入数仓
生成业务数据函数说明
init_data ( do_date_string VARCHAR(20) , order_incr_num INT, user_incr_num INT , sku_num INT , if_truncate BOOLEAN ):
参数一:do_date_string生成数据日期
参数二:order_incr_num订单id个数
参数三:user_incr_num用户id个数
参数四:sku_num商品sku个数
参数五:if_truncate是否删除数据
需求:生成日期2019年2月10日数据、订单1000个、用户200个、商品sku300个、不删除数据。
CALL init_data(‘2019-02-10‘,1000,200,300,FALSE);
生成2019年2月11日数据
CALL init_data(‘2019-02-11‘,1000,200,300,FALSE);
Sqoop安装
https://www.cnblogs.com/shengyang17/p/10512510.html
Sqoop导入命令参数 ms
/opt/module/sqoop/bin/sqoop import
--connect
--username
--password
--target-dir
--delete-target-dir
--num-mappers
--fields-terminated-by
--query "$2"‘ and $CONDITIONS;‘
Sqoop定时导入脚本
1)在/home/kris/bin目录下创建脚本sqoop_import.sh
[[email protected] bin]$ vim sqoop_import.sh
case $1是脚本的第一个参数,all是把所有的参数都导入进来;db_date=$2 是输入的第二个参数;
import_data这个函数##$1指这个函数的第一个输入参数,指表名; query "$2" ##这个函数的第二个参数即sql查询语句;
where 1=1是为了防止sql注入

#!/bin/bash

db_date=$2
echo $db_date
db_name=gmall

import_data() {
/opt/module/sqoop/bin/sqoop import --connect jdbc:mysql://hadoop101:3306/$db_name
--username root --password 123456 --target-dir  /origin_data/$db_name/db/$1/$db_date --delete-target-dir --num-mappers 1 --fields-terminated-by "	" --query   "$2"‘ and  $CONDITIONS;‘
}

import_sku_info(){
  import_data  "sku_info"  "select
id, spu_id, price, sku_name, sku_desc, weight, tm_id,
category3_id, create_time
  from sku_info  where 1=1"
}

import_user_info(){
  import_data "user_info" "select
id, name, birthday, gender, email, user_level,
create_time
from user_info where 1=1"
}

import_base_category1(){
  import_data "base_category1" "select
id, name from base_category1 where 1=1"
}

import_base_category2(){
  import_data "base_category2" "select
id, name, category1_id from base_category2 where 1=1"
}

import_base_category3(){
  import_data "base_category3" "select id, name, category2_id from base_category3 where 1=1"
}

import_order_detail(){
  import_data   "order_detail"   "select
    od.id,
    order_id,
    user_id,
    sku_id,
    sku_name,
    order_price,
    sku_num,
    o.create_time
  from order_info o , order_detail od
  where o.id=od.order_id
  and DATE_FORMAT(create_time,‘%Y-%m-%d‘)=‘$db_date‘"
}

import_payment_info(){
  import_data  "payment_info"   "select
    id,
    out_trade_no,
    order_id,
    user_id,
    alipay_trade_no,
    total_amount,
    subject ,
    payment_type,
    payment_time
  from payment_info
  where DATE_FORMAT(payment_time,‘%Y-%m-%d‘)=‘$db_date‘"
}

import_order_info(){
  import_data   "order_info"   "select
    id,
    total_amount,
    order_status,
    user_id,
    payment_way,
    out_trade_no,
    create_time,
    operate_time
  from order_info
  where  (DATE_FORMAT(create_time,‘%Y-%m-%d‘)=‘$db_date‘ or DATE_FORMAT(operate_time,‘%Y-%m-%d‘)=‘$db_date‘)"
}

case $1 in
  "base_category1")
     import_base_category1
;;
  "base_category2")
     import_base_category2
;;
  "base_category3")
     import_base_category3
;;
  "order_info")
     import_order_info
;;
  "order_detail")
     import_order_detail
;;
  "sku_info")
     import_sku_info
;;
  "user_info")
     import_user_info
;;
  "payment_info")
     import_payment_info
;;
   "all")
   import_base_category1
   import_base_category2
   import_base_category3
   import_order_info
   import_order_detail
   import_sku_info
   import_user_info
   import_payment_info
;;
esac
增加脚本执行权限
[email protected] bin]$ chmod 777 sqoop_import.sh
执行脚本导入数据
[email protected] bin]$ sqoop_import.sh all 2019-02-10
[email protected] bin]$ sqoop_import.sh all 2019-02-11
ODS层
完全仿照业务数据库中的表字段,一模一样的创建ODS层对应表。
1 )创建订单表

hive (gmall)>
drop table if exists ods_order_info;
create external table ods_order_info (
    `id` string COMMENT ‘订单编号‘,
    `total_amount` decimal(10,2) COMMENT ‘订单金额‘,
    `order_status` string COMMENT ‘订单状态‘,
    `user_id` string COMMENT ‘用户id‘ ,
    `payment_way` string COMMENT ‘支付方式‘,
    `out_trade_no` string COMMENT ‘支付流水号‘,
    `create_time` string COMMENT ‘创建时间‘,
    `operate_time` string COMMENT ‘操作时间‘
) COMMENT ‘订单表‘
PARTITIONED BY ( `dt` string)
row format delimited  fields terminated by ‘	‘
location ‘/warehouse/gmall/ods/ods_order_info/‘
;
2 )创建订单详情表

hive (gmall)>
drop table if exists ods_order_detail;
create external table ods_order_detail(
    `id` string COMMENT ‘订单编号‘,
    `order_id` string  COMMENT ‘订单号‘,
    `user_id` string COMMENT ‘用户id‘ ,
    `sku_id` string COMMENT ‘商品id‘,
    `sku_name` string COMMENT ‘商品名称‘,
    `order_price` string COMMENT ‘商品价格‘,
    `sku_num` string COMMENT ‘商品数量‘,
    `create_time` string COMMENT ‘创建时间‘
) COMMENT ‘订单明细表‘
PARTITIONED BY ( `dt` string)
row format delimited  fields terminated by ‘	‘
location ‘/warehouse/gmall/ods/ods_order_detail/‘
;
3 )创建商品表

hive (gmall)>
drop table if exists ods_sku_info;
create external table ods_sku_info(
    `id` string COMMENT ‘skuId‘,
    `spu_id` string   COMMENT ‘spuid‘,
    `price` decimal(10,2) COMMENT ‘价格‘ ,
    `sku_name` string COMMENT ‘商品名称‘,
    `sku_desc` string COMMENT ‘商品描述‘,
    `weight` string COMMENT ‘重量‘,
    `tm_id` string COMMENT ‘品牌id‘,
    `category3_id` string COMMENT ‘品类id‘,
    `create_time` string COMMENT ‘创建时间‘
) COMMENT ‘商品表‘
PARTITIONED BY ( `dt` string)
row format delimited  fields terminated by ‘	‘
location ‘/warehouse/gmall/ods/ods_sku_info/‘
;
4 )创建用户表

hive (gmall)>
drop table if exists ods_user_info;
create external table ods_user_info(
    `id` string COMMENT ‘用户id‘,
    `name`  string COMMENT ‘姓名‘,
    `birthday` string COMMENT ‘生日‘ ,
    `gender` string COMMENT ‘性别‘,
    `email` string COMMENT ‘邮箱‘,
    `user_level` string COMMENT ‘用户等级‘,
    `create_time` string COMMENT ‘创建时间‘
) COMMENT ‘用户信息‘
PARTITIONED BY ( `dt` string)
row format delimited  fields terminated by ‘	‘
location ‘/warehouse/gmall/ods/ods_user_info/‘
;
5 )创建商品一级分类表

hive (gmall)>
drop table if exists ods_base_category1;
create external table ods_base_category1(
    `id` string COMMENT ‘id‘,
    `name`  string COMMENT ‘名称‘
) COMMENT ‘商品一级分类‘
PARTITIONED BY ( `dt` string)
row format delimited  fields terminated by ‘	‘
location ‘/warehouse/gmall/ods/ods_base_category1/‘
;
6 )创建商品二级分类表

hive (gmall)>
drop table if exists ods_base_category2;
create external table ods_base_category2(
    `id` string COMMENT ‘ id‘,
    `name`  string COMMENT ‘名称‘,
    category1_id string COMMENT ‘一级品类id‘
) COMMENT ‘商品二级分类‘
PARTITIONED BY ( `dt` string)
row format delimited  fields terminated by ‘	‘
location ‘/warehouse/gmall/ods/ods_base_category2/‘
;
7 )创建商品三级分类表

hive (gmall)>
drop table if exists ods_base_category3;
create external table ods_base_category3(
    `id` string COMMENT ‘ id‘,
    `name`  string COMMENT ‘名称‘,
    category2_id string COMMENT ‘二级品类id‘
) COMMENT ‘商品三级分类‘
PARTITIONED BY ( `dt` string)
row format delimited  fields terminated by ‘	‘
location ‘/warehouse/gmall/ods/ods_base_category3/‘
;
8 )创建支付流水表

hive (gmall)>
drop table if exists `ods_payment_info`;
create external table  `ods_payment_info`(
    `id`   bigint COMMENT ‘编号‘,
    `out_trade_no`    string COMMENT ‘对外业务编号‘,
    `order_id`        string COMMENT ‘订单编号‘,
    `user_id`         string COMMENT ‘用户编号‘,
    `alipay_trade_no` string COMMENT ‘支付宝交易流水编号‘,
    `total_amount`    decimal(16,2) COMMENT ‘支付金额‘,
    `subject`         string COMMENT ‘交易内容‘,
    `payment_type` string COMMENT ‘支付类型‘,
    `payment_time`   string COMMENT ‘支付时间‘
   )  COMMENT ‘支付流水表‘
PARTITIONED BY ( `dt` string)
row format delimited  fields terminated by ‘	‘
location ‘/warehouse/gmall/ods/ods_payment_info/‘
;
ODS层数据导入脚本

[[email protected] bin]$ cat ods_db.sh
#!/bin/bash
   APP=gmall
   hive=/opt/module/hive/bin/hive
# 如果是输入的日期按照取输入日期;如果没输入日期取当前时间的前一天
if [ -n "$1" ] ;then
        do_date=$1
else
        do_date=`date -d "-1 day" +%F`
fi
sql="
load data inpath ‘/origin_data/$APP/db/order_info/$do_date‘  OVERWRITE into table "$APP".ods_order_info partition(dt=‘$do_date‘);

load data inpath ‘/origin_data/$APP/db/order_detail/$do_date‘  OVERWRITE into table "$APP".ods_order_detail partition(dt=‘$do_date‘);

load data inpath ‘/origin_data/$APP/db/sku_info/$do_date‘  OVERWRITE into table "$APP".ods_sku_info partition(dt=‘$do_date‘);

load data inpath ‘/origin_data/$APP/db/user_info/$do_date‘ OVERWRITE into table "$APP".ods_user_info partition(dt=‘$do_date‘);

load data inpath ‘/origin_data/$APP/db/payment_info/$do_date‘ OVERWRITE into table "$APP".ods_payment_info partition(dt=‘$do_date‘);

load data inpath ‘/origin_data/$APP/db/base_category1/$do_date‘ OVERWRITE into table "$APP".ods_base_category1 partition(dt=‘$do_date‘);

load data inpath ‘/origin_data/$APP/db/base_category2/$do_date‘ OVERWRITE into table "$APP".ods_base_category2 partition(dt=‘$do_date‘);

load data inpath ‘/origin_data/$APP/db/base_category3/$do_date‘ OVERWRITE into table "$APP".ods_base_category3 partition(dt=‘$do_date‘);
"
$hive -e "$sql"
查询导入数据
hive (gmall)> select * from ods_order_info where dt=‘2019-02-10‘ limit 1; select * from ods_order_info where dt=‘2019-02-11‘ limit 1;
DWD层
对ODS层数据进行判空过滤。对商品分类表进行维度退化(降维)。
1) 创建订单表

hive (gmall)>
drop table if exists dwd_order_info;
create external table dwd_order_info (
    `id` string COMMENT ‘‘,
    `total_amount` decimal(10,2) COMMENT ‘‘,
    `order_status` string COMMENT ‘ 1  2  3  4  5‘,
    `user_id` string COMMENT ‘id‘ ,
    `payment_way` string COMMENT ‘‘,
    `out_trade_no` string COMMENT ‘‘,
    `create_time` string COMMENT ‘‘,
    `operate_time` string COMMENT ‘‘
) COMMENT ‘‘
PARTITIONED BY ( `dt` string)
stored as  parquet
location ‘/warehouse/gmall/dwd/dwd_order_info/‘
tblproperties ("parquet.compression"="snappy")
;
2) 创建订单详情表

hive (gmall)>
drop table if exists dwd_order_detail;
create external table dwd_order_detail(
    `id` string COMMENT ‘‘,
    `order_id` decimal(10,2) COMMENT ‘‘,
    `user_id` string COMMENT ‘id‘ ,
    `sku_id` string COMMENT ‘id‘,
    `sku_name` string COMMENT ‘‘,
    `order_price` string COMMENT ‘‘,
    `sku_num` string COMMENT ‘‘,
    `create_time` string COMMENT ‘‘
) COMMENT ‘‘
PARTITIONED BY ( `dt` string)
stored as  parquet
location ‘/warehouse/gmall/dwd/dwd_order_detail/‘
tblproperties ("parquet.compression"="snappy")
;
3 )创建用户表

hive (gmall)>
drop table if exists dwd_user_info;
create external table dwd_user_info(
    `id` string COMMENT ‘id‘,
    `name`  string COMMENT ‘‘,
    `birthday` string COMMENT ‘‘ ,
    `gender` string COMMENT ‘‘,
    `email` string COMMENT ‘‘,
    `user_level` string COMMENT ‘‘,
    `create_time` string COMMENT ‘‘
) COMMENT ‘‘
PARTITIONED BY ( `dt` string)
stored as  parquet
location ‘/warehouse/gmall/dwd/dwd_user_info/‘
tblproperties ("parquet.compression"="snappy")
;
4) 创建支付流水表

hive (gmall)>
drop table if exists `dwd_payment_info`;
create external  table  `dwd_payment_info`(
    `id`   bigint COMMENT ‘‘,
    `out_trade_no`   string COMMENT ‘‘,
    `order_id`        string COMMENT ‘‘,
    `user_id`         string COMMENT ‘‘,
    `alipay_trade_no` string COMMENT ‘‘,
    `total_amount`    decimal(16,2) COMMENT ‘‘,
    `subject`         string COMMENT ‘‘,
    `payment_type` string COMMENT ‘‘,
    `payment_time`   string COMMENT ‘‘
   )  COMMENT ‘‘
PARTITIONED BY ( `dt` string)
stored as  parquet
location ‘/warehouse/gmall/dwd/dwd_payment_info/‘
tblproperties ("parquet.compression"="snappy")
;
5 )创建商品表(增加分类)

hive (gmall)>
drop table if exists dwd_sku_info;
create external table dwd_sku_info(
    `id` string COMMENT ‘skuId‘,
    `spu_id` string COMMENT ‘spuid‘,
    `price` decimal(10,2) COMMENT ‘‘ ,
    `sku_name` string COMMENT ‘‘,
    `sku_desc` string COMMENT ‘‘,
    `weight` string COMMENT ‘‘,
    `tm_id` string COMMENT ‘id‘,
    `category3_id` string COMMENT ‘1id‘,
    `category2_id` string COMMENT ‘2id‘,
    `category1_id` string COMMENT ‘3id‘,
    `category3_name` string COMMENT ‘3‘,
    `category2_name` string COMMENT ‘2‘,
    `category1_name` string COMMENT ‘1‘,
    `create_time` string COMMENT ‘‘
) COMMENT ‘‘
PARTITIONED BY ( `dt` string)
stored as  parquet
location ‘/warehouse/gmall/dwd/dwd_sku_info/‘
tblproperties ("parquet.compression"="snappy")
;
DWD层数据导入脚本

[[email protected] bin]$ cat dwd_db.sh
#!/bin/bash
APP=gmall
hive=/opt/module/hive/bin/hive

if [ -n "$1" ]; then
        do_date=$1
else
        do_date=`date -d ‘-1 day‘ +%F`
fi
sql="
set hive.exec.dynamic.partition.mode=nonstrict;
insert overwrite table   "$APP".dwd_order_info partition(dt)
select * from "$APP".ods_order_info
where dt=‘$do_date‘  and id is not null;

insert overwrite table   "$APP".dwd_order_detail partition(dt)
select * from "$APP".ods_order_detail
where dt=‘$do_date‘   and id is not null;

insert overwrite table   "$APP".dwd_user_info partition(dt)
select * from "$APP".ods_user_info
where dt=‘$do_date‘   and id is not null;

insert overwrite table   "$APP".dwd_payment_info partition(dt)
select * from "$APP".ods_payment_info
where dt=‘$do_date‘  and id is not null;

insert overwrite table   "$APP".dwd_sku_info partition(dt)
select
    sku.id,
    sku.spu_id,
    sku.price,
    sku.sku_name,
    sku.sku_desc,
    sku.weight,
    sku.tm_id,
    sku.category3_id,
    c2.id category2_id ,
    c1.id category1_id,
    c3.name category3_name,
    c2.name category2_name,
    c1.name category1_name,
    sku.create_time,
    sku.dt
from
    "$APP".ods_sku_info sku
join "$APP".ods_base_category3 c3 on sku.category3_id=c3.id
    join "$APP".ods_base_category2 c2 on c3.category2_id=c2.id
    join "$APP".ods_base_category1 c1 on c2.category1_id=c1.id
where sku.dt=‘$do_date‘  and c2.dt=‘$do_date‘
and  c3.dt=‘$do_date‘ and  c1.dt=‘$do_date‘
and sku.id is not null;
"
$hive -e "$sql"
执行脚本导入数据
[[email protected] bin]$ dwd_db.sh 2019-02-10 [[email protected] bin]$ dwd_db.sh 2019-02-11
查看导入数据
hive (gmall)> select * from dwd_sku_info where dt=‘2019-02-10‘ limit 2; select * from dwd_sku_info where dt=‘2019-02-11‘ limit 2;
DWS层之用户行为宽表
1)为什么要建宽表
需求目标,把每个用户单日的行为聚合起来组成一张多列宽表,以便之后关联用户维度信息后进行,不同角度的统计分析。
创建用户行为宽表

hive (gmall)>
drop table if exists dws_user_action;
create  external table dws_user_action
(
    user_id         string      comment ‘用户 id‘,
    order_count     bigint      comment ‘下单次数 ‘,
    order_amount    decimal(16,2)  comment ‘下单金额 ‘,
    payment_count   bigint      comment ‘支付次数‘,
    payment_amount  decimal(16,2) comment ‘支付金额 ‘,
    comment_count   bigint      comment ‘评论次数‘
) COMMENT ‘每日用户行为宽表‘
PARTITIONED BY ( `dt` string)
stored as  parquet
location ‘/warehouse/gmall/dws/dws_user_action/‘
tblproperties ("parquet.compression"="snappy");
向用户行为宽表导入数据

hive (gmall)>
with
tmp_order as
(
    select
        user_id,
count(*)  order_count,
        sum(oi.total_amount) order_amount
    from dwd_order_info  oi
    where date_format(oi.create_time,‘yyyy-MM-dd‘)=‘2019-02-10‘
    group by user_id
)  ,
tmp_payment as
(
    select
        user_id,
        sum(pi.total_amount) payment_amount,
        count(*) payment_count
    from dwd_payment_info pi
    where date_format(pi.payment_time,‘yyyy-MM-dd‘)=‘2019-02-10‘
    group by user_id
),
tmp_comment as
(
    select
        user_id,
        count(*) comment_count
    from dwd_comment_log c
    where date_format(c.dt,‘yyyy-MM-dd‘)=‘2019-02-10‘
    group by user_id
)

insert overwrite table dws_user_action partition(dt=‘2019-02-10‘)
select
    user_actions.user_id,
    sum(user_actions.order_count),
    sum(user_actions.order_amount),
    sum(user_actions.payment_count),
    sum(user_actions.payment_amount),
    sum(user_actions.comment_count)
from
(
    select
        user_id,
        order_count,
        order_amount ,
        0 payment_count ,
        0 payment_amount,
        0 comment_count
    from tmp_order

    union all
    select
        user_id,
        0,
        0,
        payment_count,
        payment_amount,
        0
    from tmp_payment

    union all
    select
        user_id,
        0,
        0,
        0,
        0,
        comment_count
    from tmp_comment
 ) user_actions
group by user_id;
DWS层用户行为数据宽边导入脚本
1)在/home/atguigu/bin目录下创建脚本dws_db_wide.sh
[[email protected] bin]$ vim dws_db_wide.sh

#!/bin/bash

# 定义变量方便修改
APP=gmall
hive=/opt/module/hive/bin/hive

# 如果是输入的日期按照取输入日期;如果没输入日期取当前时间的前一天
if [ -n "$1" ] ;then
    do_date=$1
else
    do_date=`date  -d "-1 day"  +%F`
fi

sql="

with
tmp_order as
(
    select
      user_id,
      sum(oi.total_amount) order_amount,
      count(*)  order_count
    from "$APP".dwd_order_info  oi
    where date_format(oi.create_time,‘yyyy-MM-dd‘)=‘$do_date‘
    group by user_id
)  ,
tmp_payment as
(
    select
      user_id,
      sum(pi.total_amount) payment_amount,
      count(*) payment_count
    from "$APP".dwd_payment_info pi
    where date_format(pi.payment_time,‘yyyy-MM-dd‘)=‘$do_date‘
    group by user_id
),
tmp_comment as
(
    select
      user_id,
      count(*) comment_count
    from "$APP".dwd_comment_log c
    where date_format(c.dt,‘yyyy-MM-dd‘)=‘$do_date‘
    group by user_id
)

insert  overwrite table "$APP".dws_user_action partition(dt=‘$do_date‘)
select
    user_actions.user_id,
    sum(user_actions.order_count),
    sum(user_actions.order_amount),
    sum(user_actions.payment_count),
    sum(user_actions.payment_amount),
    sum(user_actions.comment_count)
from
(
    select
      user_id,
      order_count,
      order_amount ,
      0 payment_count ,
      0 payment_amount,
      0 comment_count
    from tmp_order

    union all
    select
      user_id,
      0,
      0,
      payment_count,
      payment_amount,
      0
    from tmp_payment

    union all
    select
      user_id,
      0,
      0,
      0,
      0,
      comment_count
    from tmp_comment
 ) user_actions
group by user_id;

"

$hive -e "$sql"
订单表拉链表
导的是新增和变化(修改)
判断这两个条件创建时间create time 和操作时间operation time

查看某些业务信息的某一个时间点当日信息;
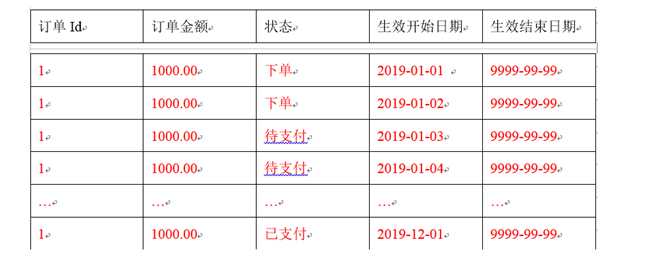
数据会发生变化,但是大部分是不变的。比如订单信息从下单、支付、发货、签收等状态经历了一周,大部分时间是不变的。(无法做每日增量)

数据量有一定规模,无法按照每日全量的的方式保存,比如1亿用户*365,每天一份用户信息。(无法做每日全量)
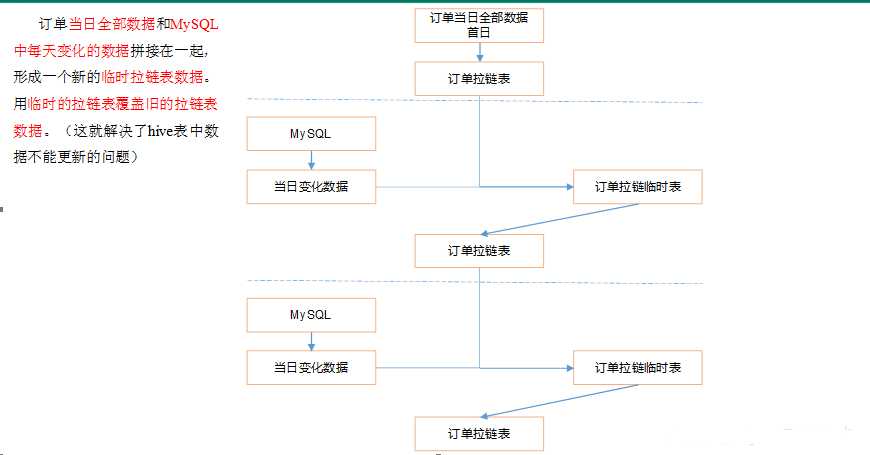
制作流程图

拉链表制作过程
步骤0:初始化拉链表(首次独立执行)
1)生成10条原始订单数据
[[email protected] bin]$ sqoop_import.sh all 2019-02-13
[[email protected] bin]$ ods_db.sh 2019-02-13
[[email protected] bin]$ dwd_db.sh 2019-02-13
2)初始化拉链表(首次独立执行)
hive (gmall)>
drop table if exists dwd_order_info_his;
create table dwd_order_info_his(
    `id` string COMMENT ‘订单编号‘,
    `total_amount` decimal(10,2) COMMENT ‘订单金额‘,
    `order_status` string COMMENT ‘订单状态‘,
    `user_id` string COMMENT ‘用户id‘ ,
    `payment_way` string COMMENT ‘支付方式‘,
    `out_trade_no` string COMMENT ‘支付流水号‘,
    `create_time` string COMMENT ‘创建时间‘,
    `operate_time` string COMMENT ‘操作时间‘ ,
    `start_date`  string COMMENT ‘有效开始日期‘,
    `end_date`  string COMMENT ‘有效结束日期‘
) COMMENT ‘订单拉链表‘
stored as  parquet
location ‘/warehouse/gmall/dwd/dwd_order_info_his/‘
tblproperties ("parquet.compression"="snappy");

就在原来基础上添加两个字段:start_date, end_date
3)初始化拉链表
hive (gmall)>
insert overwrite table dwd_order_info_his
select
    id,
    total_amount,
    order_status,
    user_id,
    payment_way,
    out_trade_no,
    create_time,
    operate_time,
    ‘2019-02-13‘,
    ‘9999-99-99‘
from ods_order_info oi
where oi.dt=‘2019-02-13‘;
查询拉链表中数据
hive (gmall)> select * from dwd_order_info_his limit 2;
2019-02-13
hive (gmall)> select * from dwd_order_info_his limit 2;
id   total_amount order_status user_id payment_way   out_trade_no create_time  operate_time     start_date   end_date
1       64      1       1       1       7824722278      2019-02-13 07:26:54.0   null    2019-02-13      9999-99-99
2       64      1       4       2       0028658702      2019-02-13 05:39:26.0   null    2019-02-13      9999-99-99
步骤1:制作当日变动数据(包括新增,修改)每日执行
1)如何获得每日变动表
1)最好表内有创建时间和变动时间(Lucky!)
2)如果没有,可以利用第三方工具监控比如canal,监控MySQL的实时变化进行记录(麻烦)。
3)逐行对比前后两天的数据, 检查md5(concat(全部有可能变化的字段))是否相同(low)
4)要求业务数据库提供变动流水(人品,颜值)
2)因为dwd_order_info本身导入过来就是新增变动明细的表,所以不用处理
1)2019-02-14日新增2条订单数据
CALL init_data(‘2019-02-14‘,2,5,10,TRUE);
2)通过Sqoop把2019-02-14日所有数据导入
sqoop_import.sh all 2019-02-14
3)ODS层数据导入
ods_db.sh 2019-02-14
4)DWD层数据导入
dwd_db.sh 2019-02-14
步骤2:先合并变动信息,再追加新增信息,插入到临时表中
1)建立临时表
hive (gmall)>
drop table if exists dwd_order_info_his_tmp;
create external table dwd_order_info_his_tmp(
    `id` string COMMENT ‘订单编号‘,
    `total_amount` decimal(10,2) COMMENT ‘订单金额‘,
    `order_status` string COMMENT ‘订单状态‘,
    `user_id` string COMMENT ‘用户id‘ ,
    `payment_way` string COMMENT ‘支付方式‘,
    `out_trade_no` string COMMENT ‘支付流水号‘,
    `create_time` string COMMENT ‘创建时间‘,
    `operate_time` string COMMENT ‘操作时间‘,
    `start_date`  string COMMENT ‘有效开始日期‘,
    `end_date`  string COMMENT ‘有效结束日期‘
) COMMENT ‘订单拉链临时表‘
stored as  parquet
location ‘/warehouse/gmall/dwd/dwd_order_info_his_tmp/‘
tblproperties ("parquet.compression"="snappy");
2)导入脚本
insert overwrite table dwd_order_info_his_tmp
select * from(
select
    id,
    total_amount,
    order_status,
    user_id,
    payment_way,
    out_trade_no,
    create_time,
    operate_time,
    ‘2019-02-14‘ start_date,
    ‘2019-99-99‘ end_date
from dwd_order_info where dt=‘2019-02-14‘
union all
select
    oh.id,
    oh.total_amount,
    oh.order_status,
    oh.user_id,
    oh.payment_way,
    oh.out_trade_no,
    oh.create_time,
    oh.operate_time,
    oh.start_date,
    if(oi.id is null, oh.end_date, date_add(oi.dt, -1)) end_date  ##没匹配上即不为空就还是原来的
from dwd_order_info_his oh left join(
select
    *
    from dwd_order_info where dt="2019-02-14"
)oi on oh.id = oi.id and oh.end_date="9999-99-99"  ##要改的就是它
)his order by his.id, start_date;
把所有的表拿来,加上两个字段日期;
left join下,能join上id(不为空)匹配上之后,判断结束的生效日期是否是9999-99-99,把匹配上的日期当前日期-1
步骤3:把临时表覆盖给拉链表
overwrite回原来的状态; 一般1个月拉链1次;
hive (gmall)> insert overwrite table  dwd_order_info_his
            > select * from  dwd_order_info_his_tmp;
hive (gmall)> select * from dwd_order_info_his ;
id   total_amount order_status user_id payment_way   out_trade_no create_time  operate_time     start_date   end_date
1       64      1       1       1       7824722278      2019-02-13 07:26:54.0   null    2019-02-13      2019-02-13
1       740     2       2       2       6172225040      2019-02-14 13:39:49.0   2019-02-14 14:17:13.0   2019-02-14 2019-99-99  ##修改之后变成02-14, 99-99记录的是变化
10      823     1       1       1       6002223362      2019-02-13 17:12:32.0   null    2019-02-13      9999-99-99
2       64      1       4       2       0028658702      2019-02-13 05:39:26.0   null    2019-02-13      2019-02-13  ##把原来的2019-02-13 2019-99-99修改为了2019-02-13 2019-02-13(用02-14减1)
2       369     2       2       1       3168474956      2019-02-14 06:15:57.0   2019-02-14 06:25:54.0   2019-02-14 2019-99-99
3       66      1       4       2       5999709451      2019-02-13 03:50:02.0   null    2019-02-13      9999-99-99
4       259     2       3       1       0789187336      2019-02-13 07:44:43.0   2019-02-13 08:30:01.0   2019-02-13 9999-99-99
5       684     2       1       2       8902377409      2019-02-13 10:46:09.0   2019-02-13 11:28:28.0   2019-02-13 9999-99-99
6       672     1       2       2       2398265682      2019-02-13 07:39:14.0   null    2019-02-13      9999-99-99
7       890     2       4       1       1480697931      2019-02-13 07:58:03.0   2019-02-13 08:10:22.0   2019-02-13 9999-99-99
8       130     1       2       2       8729918906      2019-02-13 09:45:16.0   null    2019-02-13      9999-99-99
9       171     2       2       2       3246623167      2019-02-13 15:33:50.0   2019-02-13 15:41:13.0   2019-02-13 9999-99-99
Time taken: 0.042 seconds, Fetched: 12 row(s)
OLAP分析工具之Presto
下载安装
1)下载地址
https://repo1.maven.org/maven2/com/facebook/presto/presto-server/0.196/presto-server-0.196.tar.gz
Presto Server安装
2)将presto-server-0.196.tar.gz导入hadoop101的/opt/software目录下,并解压到/opt/module目录
[[email protected] software]$ tar -zxvf presto-server-0.196.tar.gz -C /opt/module/
3)修改名称为presto
[[email protected] module]$ mv presto-server-0.196/ presto
4)进入到/opt/module/presto目录,并创建存储数据文件夹
[[email protected] presto]$ mkdir data
5)进入到/opt/module/presto目录,并创建存储配置文件文件夹
[[email protected] presto]$ mkdir etc
6)配置在/opt/module/presto/etc目录下添加jvm.config配置文件
[[email protected] etc]$ vim jvm.config

-server
-Xmx16G
-XX:+UseG1GC
-XX:G1HeapRegionSize=32M
-XX:+UseGCOverheadLimit
-XX:+ExplicitGCInvokesConcurrent
-XX:+HeapDumpOnOutOfMemoryError
-XX:+ExitOnOutOfMemoryError
7)Presto可以支持多个数据源,在Presto里面叫catalog,这里我们配置支持Hive的数据源,配置一个Hive的catalog
[[email protected] etc]$ mkdir catalog
[[email protected] catalog]$ vim hive.properties
connector.name=hive-hadoop2
hive.metastore.uri=thrift://hadoop101:9083
8)将hadoop101上的presto分发到hadoop102、hadoop103
[[email protected] module]$ xsync presto
9)分发之后,分别进入hadoop101、hadoop102、hadoop103三台主机的/opt/module/presto/etc的路径。配置node属性,node id每个节点都不一样。
[[email protected] etc]$vim node.properties
node.environment=production
node.id=ffffffff-ffff-ffff-ffff-ffffffffffff
node.data-dir=/opt/module/presto/data

[[email protected] etc]$vim node.properties
node.environment=production
node.id=ffffffff-ffff-ffff-ffff-fffffffffffe
node.data-dir=/opt/module/presto/data

[[email protected] etc]$vim node.properties
node.environment=production
node.id=ffffffff-ffff-ffff-ffff-fffffffffffd
node.data-dir=/opt/module/presto/data
10)Presto是由一个coordinator节点和多个worker节点组成。在hadoop101上配置成coordinator,在hadoop102、hadoop103上配置为worker。
(1)hadoop101上配置coordinator节点
[[email protected] etc]$ vim config.properties
coordinator=true
node-scheduler.include-coordinator=false
http-server.http.port=8881
query.max-memory=50GB
discovery-server.enabled=true
discovery.uri=http://hadoop101:8881
(2)hadoop102、hadoop103上配置worker节点
[[email protected] etc]$ vim config.properties
coordinator=false
http-server.http.port=8881
query.max-memory=50GB
discovery.uri=http://hadoop101:8881

[[email protected] etc]$ vim config.properties
coordinator=false
http-server.http.port=8881
query.max-memory=50GB
discovery.uri=http://hadoop101:8881
启动
11)在/opt/module/hive目录下,启动Hive Metastore,用atguigu角色
nohup bin/hive --service metastore >/dev/null 2>&1 &
12)分别在hadoop101、hadoop102、hadoop103上启动presto server
(1)前台启动presto,控制台显示日志
[[email protected] presto]$ bin/launcher run
[[email protected] presto]$ bin/launcher run
[[email protected] presto]$ bin/launcher run
(2)后台启动presto
[[email protected] presto]$ bin/launcher start
[[email protected] presto]$ bin/launcher start
[[email protected]3 presto]$ bin/launcher start
日志查看路径/opt/module/presto/data/var/log
Presto命令行Client安装--一般没人用
1)下载Presto的客户端
https://repo1.maven.org/maven2/com/facebook/presto/presto-cli/0.196/presto-cli-0.196-executable.jar
2)将presto-cli-0.196-executable.jar上传到hadoop101的/opt/module/presto文件夹下
3)修改文件名称
[[email protected] presto]$ mv presto-cli-0.196-executable.jar prestocli
4)增加执行权限
[[email protected] presto]$ chmod +x prestocli
5)启动prestocli
[[email protected] presto]$ ./prestocli --server hadoop101:8881 --catalog hive --schema default
6)Presto命令行操作
Presto的命令行操作,相当于hive命令行操作。每个表必须要加上schema。
例如:select * from schema.table limit 100
Presto可视化Client安装
1)将yanagishima-18.0.zip上传到hadoop101的/opt/module目录
2)解压缩yanagishima
[[email protected] module]$ unzip yanagishima-18.0.zip
cd yanagishima-18.0
3)进入到/opt/module/yanagishima-18.0/conf文件夹,编写yanagishima.properties配置
[[email protected] conf]$ vim yanagishima.properties
jetty.port=7080
presto.datasources=kris-presto
presto.coordinator.server.kris-presto=http://hadoop101:8881
catalog.kris-presto=hive
schema.kris-presto=default
sql.query.engines=presto
4)在/opt/module/yanagishima-18.0路径下启动yanagishima
[[email protected] yanagishima-18.0]$
nohup bin/yanagishima-start.sh >y.log 2>&1 &
5)启动web页面
http://hadoop101:7080 看到界面,进行查询了。
以上是关于数仓1.4 |业务数仓搭建| 拉链表| Presto的主要内容,如果未能解决你的问题,请参考以下文章
