学习saltstack Posted 2021-02-14 wuhg
tags:
篇首语:本文由小常识网(cha138.com)小编为大家整理,主要介绍了学习saltstack 相关的知识,希望对你有一定的参考价值。
Saltstack介绍
Salt三种运行方式
1.local本地运行
Salt的三大功能
a.远程执行
Saltstack环境准备
1.安装salt客户端和服务端
环境:
启动服务端
被控制端192.168.3.19:
cat /etc/hosts
192.168.3.12 mini1
2.修改客户端配置
启动客户端
3.Saltstack的认证
# salt-key -a mini1
可以看到/etc/salt/pki/minion目录下有了minion_master.pub文件,这个就是master的公钥
salt-key -a 支持通配符,比如salt-key -a mini* 统一mini开头的主机名加入信任列表
4.Saltstack的远程执行
批量执行简单命令:
# salt ‘*‘ test.ping
node2.chinasoft.com:
True
mini1:
True
使用cmd.run远程执行命令,cmd是模块,run是cmd模块的一个方法
# salt ‘*‘ cmd.run ‘uptime‘
node2.chinasoft.com:
0 9:52:35 up 3 days, 16:38, 2 users, load average: 0.00, 0.02, 0.00
mini1:
0 9:52:35 up 1 day, 19:48, 1 user, load average: 0.01, 0.02, 0.01
磁盘大小
# salt ‘*‘ cmd.run ‘df -Th‘
mini1:
Filesystem Type Size Used Avail Use % Mounted on
/dev/mapper/vg0-root ext4 25G 1.6G 23G 7% /
tmpfs tmpfs 495M 16K 495M 1% /dev/shm
/dev/sda1 ext4 291M 39M 238M 14% /boot
/dev/mapper/vg0-usr ext4 20G 2.8G 16G 15% /usr
/dev/mapper/vg0-var ext4 9.7G 1004M 8.2G 11% /var
node2.chinasoft.com:
Filesystem Type Size Used Avail Use % Mounted on
/dev/mapper/vg_node2-root ext4 29G 994M 27G 4% /
tmpfs tmpfs 935M 12K 935M 1% /dev/shm
/dev/sda1 ext4 485M 39M 421M 9% /boot
/dev/mapper/vg_node2-data ext4 29G 239M 28G 1% /data
/dev/mapper/vg_node2-usr ext4 9.7G 2.0G 7.2G 22% /usr
/dev/mapper/vg_node2-web ext4 25G 172M 23G 1% /web
5.配置管理
创建salt的工作目录,启用配置管理:
简单安装一个apache服务,并添加到自启动
file_roots:
创建/srv/salt目录
# /etc/init.d/salt-master restart
# 编写脚本安装apache服务并开机自启动,注意空格不能用tab键代替
vim /srv/salt/apache.sls
apache -install:
pkg.installed:
- names:
- httpd
- httpd-devel
apache -service:
service.running:
- name: httpd
- enable: True
- reload: True
执行脚本:
执行后可以看到已经成功完成apache的安装及启动
#########################################################################
saltstack自动化运维系列②之saltstack的数据系统
grains:搜集minion启动时的系统信息,只有在minion启动时才会搜集,grains更适合做一些静态的属性值的采集,例如设备的角色(role),磁盘个数(disk_num)等诸如此类非常固定的属性,另一个作用可以用来匹配minion
列出所有的grains选项
# salt ‘*‘ grains.ls
列出所有grains和内容
# salt ‘mini1‘ grains.items
显示单个grains内容,get方法直接显示值,item方法会把条目名也显示出来[email protected] ~]# salt ‘node2*‘ grains.get fqdn
# salt ‘node2*‘ grains.get os
# 匹配执行,系统为centos的主机执行命令
[[email protected] ~]# salt -G os:CentOS cmd.run ‘w‘[email protected] IDLE JCPU PCPU WHAT[email protected] IDLE JCPU PCPU WHAT
模拟使用grains匹配minion,-G代表指定grains匹配
vim /etc/salt/minion
打开grain的配置
添加grains,默认会到/etc/salt/grains中读取,手动添加到/etc/salt/grains即可nginx
# salt -G web:nginx cmd.run ‘w‘[email protected] IDLE JCPU PCPU WHAT[email protected] ~]# salt ‘*‘ grains.item roles
pillar的使用及配置
pillar_opts: True
pillar_roots:
mkdir /srv/pillar
查看master自带的pillar条目,实际生产是不打开的,自带的pillar用处不大,所以一般都会设置成false,使用自己定义的pillar
手动定义一个pillar
# cat /srv/pillar/apache.sls
{ % if grains[‘ os ‘ ] == ‘ CentOS ‘ %}
apache: httpd
{ % elif grains[‘ os ‘ ] == ‘ Debian ‘ %}
apache: apache2
{ % endif %}
# cat /srv/pillar/top.sls
base:
‘ * ‘ :
- apache
刷新策略
# salt ‘*‘ pillar.items
grains存储的是静态、不常变化的内容;pillar则相反,存储的是动态数据
#############################################################
saltstack自动化运维系列③之saltstack的常用模块使用
1.命令的常用方法:
指定主机运行命令
# salt ‘mini1‘ cmd.run ‘date‘
指定IP执行命令
# salt -C ‘[email protected] or [email protected] :nginx‘ test.ping
2.服务的管理
# salt ‘*‘ service.get_all
服务的管理:html
# salt ‘*‘ service.status httpd[email protected] ~]# salt ‘*‘ service.stop httpd[email protected] ~]# salt ‘*‘ service.status httpd
3.权限控制模块:
# vim /etc/salt/master
client_acl:
# useradd jack
可以看到当切换到tom这个用户的时候可以在mini*开头的机器上执行test.ping
$ salt ‘mini*‘ test.ping[email protected] ~]$ salt ‘mini*‘ test.ping
[[email protected] ~]$ salt ‘mini*‘ ‘w‘
切换到jack用户时可以执行test.ping[email protected] ~]$ salt ‘*‘ test.ping
############################################################################
saltstack自动化运维系列④之saltstack的命令返回结果mysql
在mysql数据库中创建数据库、表
CREATE DATABASE `salt`
DEFAULT CHARACTER SET utf8
DEFAULT COLLATE utf8_general_ci;
USE `salt`;
DROP TABLE IF EXISTS `jids`;
CREATE TABLE `jids` (
`jid` varchar( 255) NOT NULL,
`load` mediumtext NOT NULL,
UNIQUE KEY `jid` (`jid`)
) ENGINE =InnoDB DEFAULT CHARSET=utf8;
CREATE INDEX jid ON jids(jid) USING BTREE;
DROP TABLE IF EXISTS `salt_returns`;
CREATE TABLE `salt_returns` (
`fun` varchar( 50) NOT NULL,
`jid` varchar( 255) NOT NULL,
` return ` mediumtext NOT NULL,
`id` varchar( 255) NOT NULL,
`success` varchar( 10) NOT NULL,
`full_ret` mediumtext NOT NULL,
`alter_time` TIMESTAMP DEFAULT CURRENT_TIMESTAMP,
KEY `id` (`id`),
KEY `jid` (`jid`),
KEY `fun` (`fun`)
) ENGINE =InnoDB DEFAULT CHARSET=utf8;
DROP TABLE IF EXISTS `salt_events`;
CREATE TABLE `salt_events` (
`id` BIGINT NOT NULL AUTO_INCREMENT,
`tag` varchar( 255) NOT NULL,
`data` mediumtext NOT NULL,
`alter_time` TIMESTAMP DEFAULT CURRENT_TIMESTAMP,
`master_id` varchar( 255) NOT NULL,
PRIMARY KEY (`id`),
KEY `tag` (`tag`)
) ENGINE =InnoDB DEFAULT CHARSET=utf8;
mysql > show tables;
+----------------+
| Tables_in_salt |
+----------------+
| jids |
| salt_events |
| salt_returns |
mysql > grant all on salt.* to [email protected] ‘ % ‘ identified by ‘ salt ‘ ;
安装python插件
# yum install MySQL-python -y
将以下配置分别配置到服务端和客户端:
mysql.host: ‘ 192.168.3.19 ‘
mysql.user: ‘ salt ‘
mysql. pass : ‘ salt ‘
mysql.db: ‘ salt ‘
mysql.port: 3306
执行命令后面跟 --return mysql 可以将执行的结果和命令记录到mysql数据库中
# salt ‘*‘ test.ping --return mysql
node2.chinasoft.com:
True
mini1:
True
[[email protected] ~]# salt ‘*‘ cmd.run ‘date‘ --return mysql
node2.chinasoft.com:
Fri Apr 7 16:25:53 CST 2017
mini1:
Fri Apr 7 16:25:53 CST 2017
[[email protected] ~]# salt ‘*‘ cmd.run ‘df -Th‘ --return mysql
mini1:
Filesystem Type Size Used Avail Use % Mounted on
/dev/mapper/vg0-root ext4 25G 1.6G 23G 7% /
tmpfs tmpfs 495M 16K 495M 1% /dev/shm
/dev/sda1 ext4 291M 39M 238M 14% /boot
/dev/mapper/vg0-usr ext4 20G 2.8G 16G 15% /usr
/dev/mapper/vg0-var ext4 9.7G 1011M 8.2G 11% /var
node2.chinasoft.com:
Filesystem Type Size Used Avail Use % Mounted on
/dev/mapper/vg_node2-root ext4 29G 1020M 27G 4% /
tmpfs tmpfs 935M 12K 935M 1% /dev/shm
/dev/sda1 ext4 485M 39M 421M 9% /boot
/dev/mapper/vg_node2-data ext4 29G 252M 28G 1% /data
/dev/mapper/vg_node2-usr ext4 9.7G 2.0G 7.2G 22% /usr
/dev/mapper/vg_node2-web ext4 25G 172M 23G 1% /web
[[email protected] ~]# salt ‘*‘ cmd.run ‘free -m‘ --return mysql
node2.chinasoft.com:
total used free shared buffers cached
Mem: 1869 1760 108 0 167 456
-/+ buffers/cache: 1136 733
Swap: 3999 35 3964
mini1:
total used free shared buffers cached
Mem: 988 922 65 0 3 51
-/+ buffers/cache: 868 120
Swap: 3999 316 3683
可以看到表 salt_returns 中的数据
mysql> select * from salt_returnsG
*************************** 1. row ***************************
fun: test.ping
jid: 20170407162451855497
return : true
id: node2.chinasoft.com
success: 1
full_ret: { " fun_args " : [], " jid " : " 20170407162451855497 " , " return " : true, " retcode " : 0, " success " : true, " fun " : " test.ping " , " id " : " node2.chinasoft.com " }
alter_time: 2017-04-07 16:24:52
*************************** 2. row ***************************
fun: cmd.run
jid: 20170407162553259109
return : " Fri Apr 7 16:25:53 CST 2017 "
id: node2.chinasoft.com
success: 1
full_ret: { " fun_args " : [" date " ], " jid " : " 20170407162553259109 " , " return " : " Fri Apr 7 16:25:53 CST 2017 " , " retcode " : 0, " success " : true, " fun " : " cmd.run " , " id " : " node2.chinasoft.com " }
alter_time: 2017-04-07 16:25:53
*************************** 3. row ***************************
fun: cmd.run
jid: 20170407162605846972
return : " Filesystem Type Size Used Avail Use% Mounted on
/dev/mapper/vg_node2-root ext4 29G 1020M 27G 4% /
tmpfs tmpfs 935M 12K 935M 1% /dev/shm
/dev/sda1 ext4 485M 39M 421M 9% /boot
/dev/mapper/vg_node2-data ext4 29G 252M 28G 1% /data
/dev/mapper/vg_node2-usr ext4 9.7G 2.0G 7.2G 22% /usr
/dev/mapper/vg_node2-web ext4 25G 172M 23G 1% /web "
id: node2.chinasoft.com
success: 1
full_ret: { " fun_args " : [" df -Th " ], " jid " : " 20170407162605846972 " , " return " : " Filesystem Type Size Used Avail Use% Mounted on
/dev/mapper/vg_node2-root ext4 29G 1020M 27G 4% /
tmpfs tmpfs 935M 12K 935M 1% /dev/shm
/dev/sda1 ext4 485M 39M 421M 9% /boot
/dev/mapper/vg_node2-data ext4 29G 252M 28G 1% /data
/dev/mapper/vg_node2-usr ext4 9.7G 2.0G 7.2G 22% /usr
/dev/mapper/vg_node2-web ext4 25G 172M 23G 1% /web " , " retcode " : 0, " success " : true, " fun " : " cmd.run " , " id " : " node2.chinasoft.com " }
alter_time: 2017-04-07 16:26:06
*************************** 4. row ***************************
fun: cmd.run
jid: 20170407162611429976
return : " total used free shared buffers cached
Mem: 1869 1760 108 0 167 456
-/+ buffers/cache: 1136 733
Swap: 3999 35 3964 "
id: node2.chinasoft.com
success: 1
full_ret: { " fun_args " : [" free -m " ], " jid " : " 20170407162611429976 " , " return " : " total used free shared buffers cached
Mem: 1869 1760 108 0 167 456
-/+ buffers/cache: 1136 733
Swap: 3999 35 3964 " , " retcode " : 0, " success " : true, " fun " : " cmd.run " , " id " : " node2.chinasoft.com " }
alter_time: 2017-04-07 16:26:11
4 rows in set (0.00 sec)
至此saltstack命令行结果返回mysql数据库配置完毕,很多时候可以通过查询数据库得知哪些客户端没有返回我们想要的结果,可以方便的查询并进行二次处理
##################################################################################
saltstack自动化运维系列⑤之saltstack的配置管理详解
配置管理初始化:
a.服务端配置
file_roots:
  base:
    - /srv/salt/base
  test:
    - /srv/salt/test
  prod:
    - /srv/salt/prod
mkdir -p /srv/salt/base
1.统一管理dns配置文件resolv.conf
创建模板文件
vim /srv/salt/base/files/resolv.conf
nameserver 192.168.1.13
执行上面的状态文件,salt:命令 *:代表所有minion,state模块 sls方法 dns:要执行的state文件,可以看到minion客户端的resolv.conf已经改成了我们需要的文件
# salt ‘*‘ state.sls dns
Summary
Summary
2.通过执行高级状态进行配置管理
top.sls是默认的入口文件,名称也是top.sls,必须放在base环境下
# cat top.sls
# salt ‘*‘ state.highstate
关于配置文件的语法说明:
3.使用jinja模板进行配置管理:
jinja语法说明:
①.编辑配置文件
/etc/resolv.conf:
  file.managed:
    - source: salt://files/resolv.conf
    - user: root
    - group: root
    - mode: 644
    - template: jinja
    - defaults:
      DNS_SERVER: 202.96.134.133
②.编辑模板文件
②.执行配置状态
jinja结合grains
# cat files/resolv.conf
④执行配置:
可以看到客户端已经添加了客户端IP地址
4.综合示例使用salt初始化系统::
a. dns配置
①.建立初始化目录和配置文件目录
# pwd[email protected] base]# tree
1 directory, 1 file
②.编写初始化配置文件
/etc/resolv.conf:
  file.managed:
    - source: salt://init/files/resolv.conf
    - user: root
    - group: root
    - mode: 644
# cp /etc/resolv.conf /srv/salt/base/init/files/
b.初始化history命令,在历史命令中显示执行命令时间和用户
/etc/profile:
file.append:
- text:
- export HISTTIMEFORMAT=" %F %T `whoami` "
c.添加命令审计功能,即在/var/log/message中显示命令的详细信息
命令效果如下:
Apr 10 20:18:07 localhost root: [euid=root]:root pts/0 2017-04-10 20:11 (192.168.3.84):[/root]w
③编写配置文件
/etc/bashrc:
file.append:
- text:
- export PROMPT_COMMAND=‘ { msg=$(history 1 | { read x y; echo $y;});logger "[euid=$(whoami)]":$(who am i):[`pwd`]"$msg";} ‘
④内核参数调优
# cat /srv/salt/base/init/sysctl.sls
vm.swappiness:
sysctl.present:
- value: 0
net.ipv4.ip_local_port_range:
sysctl.present:
- value: 10000 65000
fs.file -max:
sysctl.present:
- value: 100000
⑤编写总的包含文件,即执行该状态会寻找dns/history/audit/sysctl等参数配置
include:
  - init.dns
  - init.history
  - init.audit
  - init.sysctl
⑥编写入口文件top.sls
base:
‘ * ‘ :
- init.env_init
进行配置测试,发现报错:
原因:/etc/profile这个ID重复
再次执行配置变更即可:
#############################################################################
saltstack自动化运维系列⑥SaltStack实践安装配置HAproxy
下载haproxy1.6.2.tar.gz
1、编写功能模块
①首先编写依赖安装模块
pkg.installed这个路径是相对于prod即在配置/etc/salt/master的file_roots路径的相对路径
同理如果在test环境下也是相对/srv/salt/test路径
# mkdir -p /srv/salt/prod/pkg /srv/salt/prod/haproxy /srv/salt/prod/haproxy/files
# cd /srv/salt/prod/pkg

# cat pkg-init.sls
pkg-init:
pkg.installed:
- names:
- gcc
- gcc-c++
- glibc
- make
- autoconf
- openssl
- openssl-devel
②编写HAproxy状态模块
2、将配置文件,启动文件等拷贝到/srv/salt/prod/haproxy/files下
①获取启动脚本,并copy到/srv/salt/prod/haproxy/files/
# mv haproxy-1.6.2.tar.gz /srv/salt/prod/haproxy/files/
# cd /srv/salt/prod/haproxy/files/
# tar zxf haproxy-1.6.2.tar.gz
# cd haproxy-1.6.2/examples/
# vim haproxy.init
BIN=/usr/local/haporxy/sbin/$BASENAME

# cp haproxy.init /srv/salt/prod/haproxy/files/

# cd /srv/salt/prod/haproxy/files
# rm -rf haproxy-1.6.2
②编写install.sls
# cd /srv/salt/prod/haproxy/
# vim install.sls
include:
- pkg.pkg-init
haproxy -install:
file.managed:
- name: /usr/local/src/haproxy-1.6.2.tar.gz
- source: salt://haproxy/files/haproxy-1.6.2.tar.gz
- user: root
- group: root
- mode: 755
cmd.run:
- name: cd /usr/local/src && tar zxf haproxy-1.6.2.tar.gz && cd haproxy-1.6.2 && make TARGET=linux26 PREFIX=/usr/local/haproxy && make install PREFIX=/usr/local/haproxy
- unless: test -d /usr/local/haproxy
- require:
- pkg: pkg-init
- file: haproxy-install
haproxy -init:
file.managed:
- name: /etc/init.d/haproxy
- source: salt://haproxy/files/haproxy.init
- user: root
- group: root
- mode: 755
- require:
- cmd: haproxy-install
cmd.run:
- name: chkconfig --add haproxy
- unless: chkconfig --list | grep haproxy
- require:
- file: /etc/init.d/haproxy
net.ipv4.ip_nonlocal_bind:
sysctl.present:
- value: 1
haproxy -config-dir:
file.directory:
- name: /etc/haproxy
- user: root
- group: root
- mode: 755
# salt ‘*‘ state.sls haproxy.install env=prod
3、编写业务引用
# mkdir -p /srv/salt/prod/cluster/files
# cd /srv/salt/prod/cluster/files/
# vim /srv/salt/prod/cluster/files/haproxy-outside.cfg
global
maxconn 100000
chroot /usr/local/haproxy
uid 99
gid 99
daemon
nbproc 1
pidfile /usr/local/haproxy/logs/haproxy.pid
log 127.0.0.1 local3 info
defaults
option http -keep-alive
maxconn 100000
mode http
timeout connect 5000ms
timeout client 50000ms
timeout server 50000ms
listen stats
mode http
bind 0.0.0.0:8888
stats enable
stats uri /haproxy-status
stats auth haproxy:saltstack
frontend frontend_www_example_com
bind 192.168.3.11:80
mode http
option httplog
log global
default_backend backend_www_example_com
backend backend_www_example_com
option forwardfor header X -REAL-IP
option httpchk HEAD / HTTP/1.0
balance source
server web -node1 192.168.3.12:8080 check inter 2000 rise 30 fall 15
server web -node2 192.168.3.19:8080 check inter 2000 rise 30 fall 15
# cd ..
# vim /srv/salt/prod/cluster/haproxy-outside.sls
include:
- haproxy.install
haproxy -service:
file.managed:
- name: /etc/haproxy/haproxy.cfg
- source: salt://cluster/files/haproxy-outside.cfg
- user: root
- group: root
- mode: 644
service.running:
- name: haproxy
- enable: True
- reload: True
- require:
- cmd: haproxy-init
- watch:
- file: haproxy-service
# cd /srv/salt/base/
# vim top.sls
base:
‘ * ‘ :
- init.env_init
prod:
‘ * ‘ :
- cluster.haproxy-outside
执行安装配置
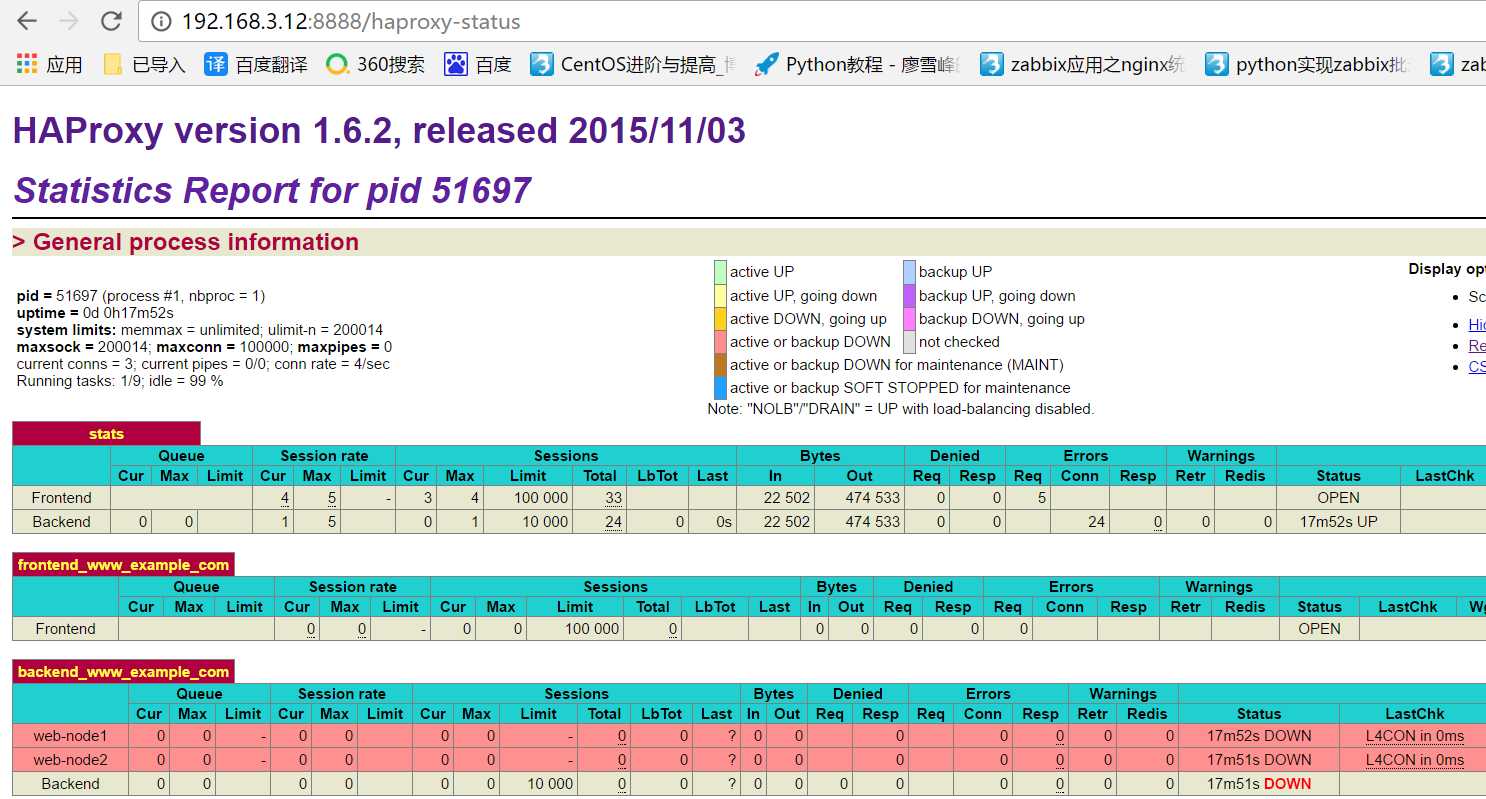
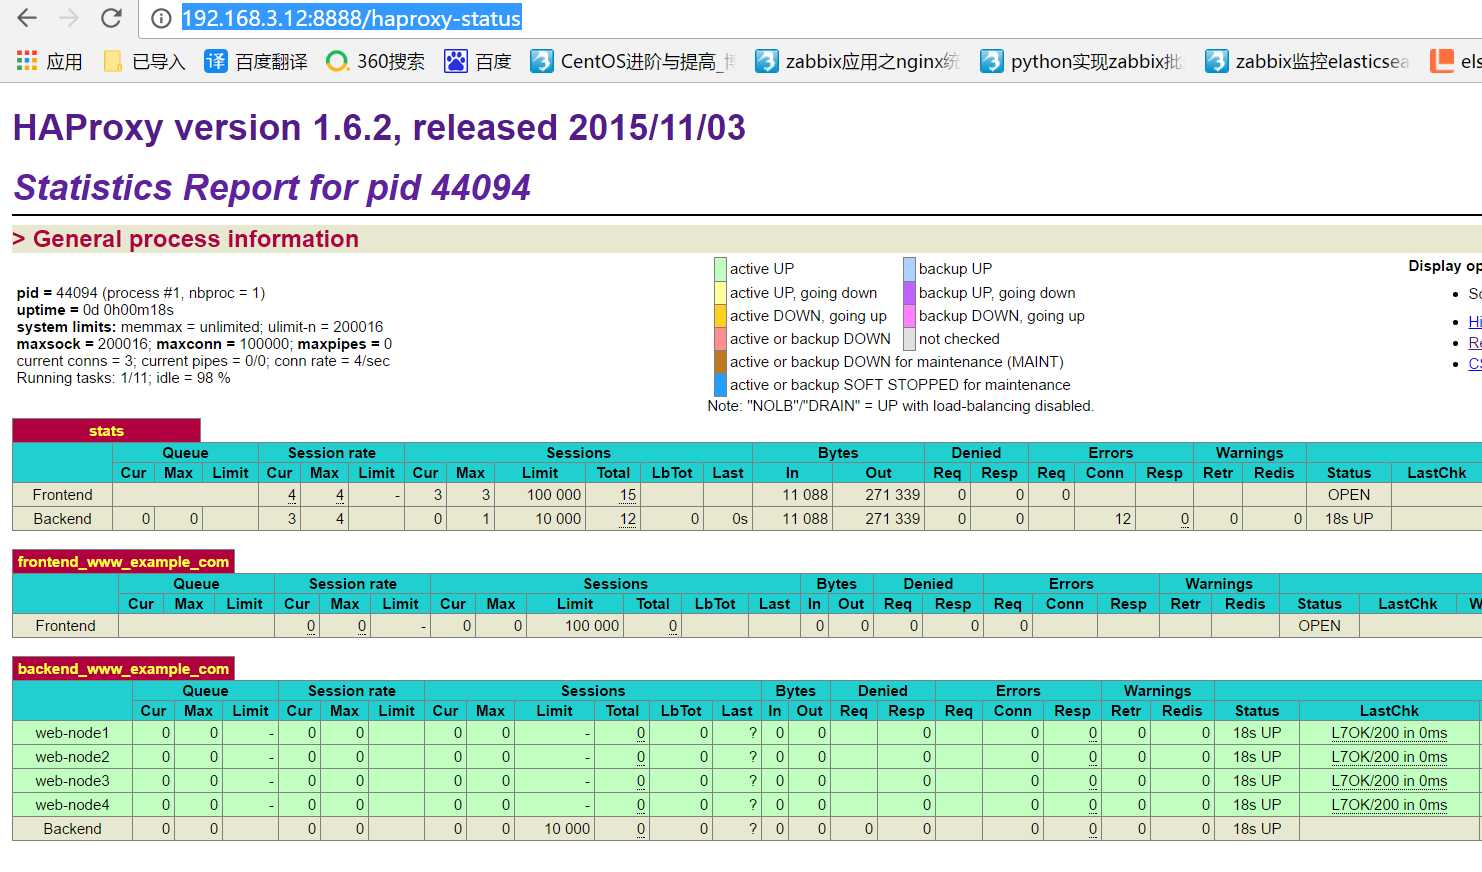
4、Web查看服务状态
从web登陆192.168.3.12:8888/haproxy-status
至此haproxy的配置完成
####################################################################################
saltstack自动化运维系列⑥SaltStack实践安装配置HAproxy的Keepalived
1、编写功能模块
#创建keepalived目录
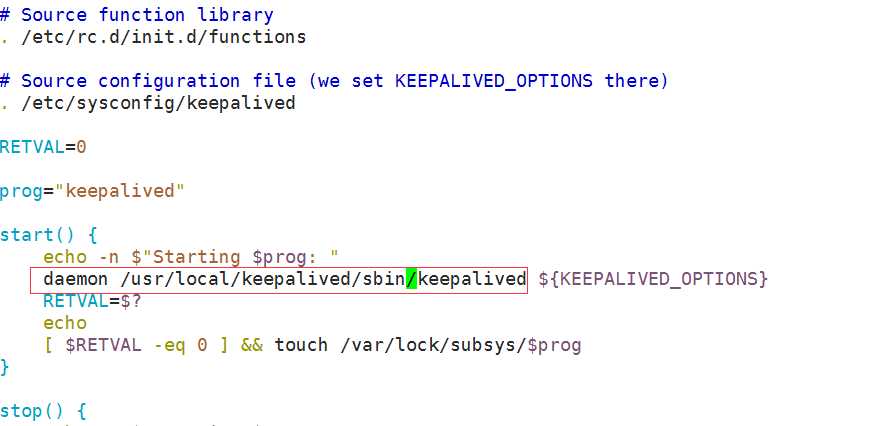
修改启动脚本:
23 daemon /usr/local/keepalived/sbin/keepalived ${KEEPALIVED_OPTIONS}
include:
- pkg.pkg-init
keepalived -install:
file.managed:
- name: /usr/local/src/keepalived-1.2.19.tar.gz
- source: salt://keepalived/files/keepalived-1.2.19.tar.gz
- user: root
- group: root
- mode: 755
cmd.run:
- name: cd /usr/local/src && tar xf keepalived-1.2.19.tar.gz && cd keepalived-1.2.19 && ./configure --prefix=/usr/local/keepalived --disable-fwmark && make && make install
- unless: test -d /usr/local/keepalived
- require:
- pkg: pkg-init
- file: keepalived-install
keepalived -init:
file.managed:
- name: /etc/init.d/keepalived
- source: salt://keepalived/files/keepalived.init
- user: root
- group: root
- mode: 755
cmd.run:
- name: chkconfig --add keepalived
- unless: chkconfig --list |grep keepalived
- require:
- file: keepalived-init
/etc/sysconfig/keepalived:
file.managed:
- source: salt://keepalived/files/keepalived.sysconfig
- user: root
- group: root
- mode: 644
/etc/keepalived:
file.directory:
- user: root
- group: root
- mode: 755
测试
2、编写业务模块
# cd /srv/salt/prod/cluster
#编写keepalived配置文件
! Configuration File for keepalived
global_defs {
notification_email {
[email protected]
}
notification_email_from [email protected]
smtp_server 127.0.0.1
smtp_connect_timeout 30
router_id {{ROUTEID}} # jinja模板变量
}
vrrp_instance haproxy_ha {
state {{STATEID}} # jinja模板变量
interface eth0
virtual_router_id 36
priority {{PRIORITYID}} # jinja模板变量
advert_int 1
authentication {
auth_type PASS
auth_pass 1111
}
virtual_ipaddress {
192.168.3.11
}
}
#编写用于管理keepalived配置文件的SLS
include:
- keepalived.install
keepalived -serivce:
file.managed:
- name: /etc/keepalived/keepalived.conf
- source: salt://cluster/files/haproxy-outside-keepalived.conf
- user: root
- group: root
- mode: 644
- template: jinja
{ % if grains[‘ fqdn ‘ ] == ‘ mini1 ‘ %}
- ROUTEID: haproxy_ha
- STATEID: MASTER
- PRIORITYID: 150
{ % elif grains[‘ fqdn ‘ ] == ‘ node2.chinasoft.com ‘ %}
- ROUTEID: haproxy_ha
- STATEID: BACKUP
- PRIORITYID: 100
{ % endif %}
service.running:
- name: keepalived
- enable: True
- watch:
- file: keepalived-serivce
测试
#在top.sls中加入keepalived
查看mini1主机的IP地址,可以看到vip 192.168.3.11已经在Mini1上
# ip addr
1: lo: <LOOPBACK,UP,LOWER_UP> mtu 16436 qdisc noqueue state UNKNOWN
link /loopback 00:00:00:00:00:00 brd 00:00:00:00:00:00
inet 127.0.0.1/8 scope host lo
inet6 :: 1/128 scope host
valid_lft forever preferred_lft forever
2: eth0: <BROADCAST,MULTICAST,UP,LOWER_UP> mtu 1500 qdisc pfifo_fast state UP qlen 1000
link /ether 00:0c:29:f3:33:f8 brd ff:ff:ff:ff:ff:ff
inet 192.168.3.12/24 brd 192.168.3.255 scope global eth0
inet 192.168.3.11/32 scope global eth0
inet6 fe80::20c:29ff:fef3:33f8 /64 scope link
valid_lft forever preferred_lft forever
访问:http://192.168.3.11:8888/haproxy-status Ok
测试vip的漂移:
min1停用keepalived服务:
# /etc/init.d/keepalived stop
node2.chinasoft.com查看vip就到了node2.chinasoft.com机器上
# ip addr
1: lo: <LOOPBACK,UP,LOWER_UP> mtu 16436 qdisc noqueue state UNKNOWN
link /loopback 00:00:00:00:00:00 brd 00:00:00:00:00:00
inet 127.0.0.1/8 scope host lo
inet6 :: 1/128 scope host
valid_lft forever preferred_lft forever
2: eth0: <BROADCAST,MULTICAST,UP,LOWER_UP> mtu 1500 qdisc pfifo_fast state UP qlen 1000
link /ether 00:0c:29:55:2e:82 brd ff:ff:ff:ff:ff:ff
inet 192.168.3.19/24 brd 192.168.3.255 scope global eth0
inet 192.168.3.11/32 scope global eth0
inet6 fe80::20c:29ff:fe55: 2e82/64 scope link
valid_lft forever preferred_lft forever
重新启动mini1的keepalived服务,vip又回到了mini1上
##################################################################################
saltstack自动化运维系列⑥SaltStack实践配置管理安装zabbix
zabbix-agent-install:
pkg.installed:
- name: zabbix-agent
file.managed:
- name: /etc/zabbix/zabbix_agentd.conf
- source: salt://init/files/zabbix_agentd.conf
- template: jinja
- defaults:
Server: {{ pillar[ ‘ zabbix-agent ‘ ][‘ Zabbix_Server ‘ ] }}
- require:
- pkg: zabbix-agent-install
service.running:
- name: zabbix-agent
- enable: True
- watch:
- pkg: zabbix-agent-install
- file: zabbix-agent-install
2.编辑master配置文件
pillar_roots:
base:
- /srv/pillar/base
# mkdir /srv/pillar/base
# /etc/init.d/salt-master restart
3.编写top文件
# vim /srv/pillar/base/top.sls
base:
‘ * ‘ :
- zabbix
4.编写zabbix.sls
5.拷贝模板文件,并修改pillar jinja模板变量值
cp /etc/zabbix/zabbix_agentd.conf /srv/salt/base/init/files/
Server={{ Server }}
6.将zabbix_agent配置包括含在初始化文件中
include:
- init.dns
- init.history
- init.audit
- init.sysctl
- init.zabbix_agent
7.执行配置变更:
########################################################################
saltstack自动化运维系列⑧SaltStack实践配置管理安装nginx-1.10.3
安装nginx-1.10.3.tar.gz
# mkdir -p /srv/salt/prod/pkg /srv/salt/prod/nginx /srv/salt/prod/nginx/files
1.初始化nginx相关配置文件
user www;
worker_processes 16;
error_log logs /error.log error;
worker_rlimit_nofile 30000;
pid logs /nginx.pid;
events {
use epoll;
worker_connections 65535;
}
http {
include mime.types;
default_type application /octet-stream;
sendfile on;
tcp_nopush on;
underscores_in_headers on;
keepalive_timeout 10;
send_timeout 60;
include /usr/local/nginx/conf/vhost/*.conf;
server {
listen 8080;
server_name 127.0.0.1;
location /nginx_status {
stub_status on;
access_log off;
allow 127.0.0.1;
deny all;
}
}
}
③服务管理脚本
#!/bin/sh
#
# nginx - this script starts and stops the nginx daemon
#
# chkconfig: - 85 15
# description: Nginx is an HTTP(S) server, HTTP(S) reverse # proxy and IMAP /POP3 proxy server
# processname: nginx
# config: /etc/nginx/nginx.conf
# config: /etc/sysconfig/nginx
# pidfile: /var/run/nginx.pid
# Source function library.
. /etc/rc.d/init.d/functions
# Source networking configuration.
. /etc/sysconfig/network
# Check that networking is up.
[ " $NETWORKING " = " no " ] && exit 0
nginx =" /usr/local/nginx/sbin/nginx "
prog =$(basename $nginx)
NGINX_CONF_FILE =" /usr/local/nginx/conf/nginx.conf "
[ -f /etc/sysconfig/nginx ] && . /etc/sysconfig/nginx
lockfile =/var/lock/subsys/nginx
make_dirs() {
# make required directories
user =`$nginx -V 2 >&1 | grep " configure arguments: " | sed ‘ s/[^*]*--user=([^ ]*).*/1/g ‘ -`
if [ -z " `grep $user /etc/passwd` " ]; then
useradd -M -s /bin/nologin $user
fi
options =`$nginx -V 2 >&1 | grep ‘ configure arguments: ‘ `
for opt in $options; do
if [ `echo $opt | grep ‘ .*-temp-path ‘ ` ]; then
value =`echo $opt | cut -d " = " -f 2 `
if [ ! -d " $value " ]; then
# echo " creating " $value
mkdir -p $value && chown -R $user $value
fi
fi
done
}
start() {
[ -x $nginx ] || exit 5
[ -f $NGINX_CONF_FILE ] || exit 6
make_dirs
echo -n $" Starting $prog: "
daemon $nginx -c $NGINX_CONF_FILE
retval =$?
echo
[ $retval -eq 0 ] && touch $lockfile
return $retval
}
stop() {
echo -n $" Stopping $prog: "
killproc $prog -QUIT
retval =$?
echo
[ $retval -eq 0 ] && rm -f $lockfile
return $retval
}
restart() {
configtest || return $?
stop
sleep 1
start
}
reload() {
configtest || return $?
echo -n $" Reloading $prog: "
$nginx -s reload
RETVAL =$?
echo
}
force_reload() {
restart
}
configtest() {
$nginx -t -c $NGINX_CONF_FILE
}
rh_status() {
status $prog
}
rh_status_q() {
rh_status >/dev/null 2 >&1
}
case " $1 " in
start)
rh_status_q && exit 0
$ 1
;;
stop)
rh_status_q || exit 0
$ 1
;;
restart |configtest)
$ 1
;;
reload)
rh_status_q || exit 7
$ 1
;;
force -reload)
force_reload
;;
status)
rh_status
;;
condrestart |try-restart)
rh_status_q || exit 0
;;
*)
echo $" Usage: $0 {start|stop|status|restart|condrestart|try-restart|reload|force-reload|configtest} "
exit 2
esac
2.编写依赖包安装
pkg-init:
pkg.installed:
- names:
- gcc
- gcc-c++
- glibc
- make
- autoconf
- openssl
- openssl-devel
- pcre
- pcre-devel
- glib
- glib-devel
3.用户添加模块
user.present:
4.编写nginx状态模块
include:
- pkg.pkg-init
- user.www
nginx -source-install:
file.managed:
- name: /usr/local/src/nginx-1.10.3.tar.gz
- source: salt://nginx/files/nginx-1.10.3.tar.gz
- user: root
- group: root
- mode: 755
cmd.run:
- name: cd /usr/local/src && tar zxf nginx-1.10.3.tar.gz && cd nginx-1.10.3 && ./configure --prefix=/usr/local/nginx --user=www --group=www --with-http_ssl_module --with-http_stub_status_module --with-file-aio --with-http_dav_module --with-pcre && make && make install && chown -R www:www /usr/local/nginx
- unless: test -d /usr/local/nginx
- require:
- user: www-user-group
- file: nginx-source-install
- pkg: pkg-init
服务模块
# vim /srv/salt/prod/nginx/service.sls
include:
- nginx.install
nginx -init:
file.managed:
- name: /etc/init.d/nginx
- source: salt://nginx/files/nginx-init
- mode: 755
- user: root
- group: root
- require:
- cmd: nginx-source-install
cmd.run:
- name: chkconfig --add nginx
- unless: chkconfig --list | grep nginx
- require:
- file: nginx-init
/usr/local/nginx/conf/nginx.conf:
file.managed:
- source: salt://nginx/files/nginx.conf
- user: www
- group: www
- mode: 644
nginx -service:
file.directory:
- name: /usr/local/nginx/conf/vhost
- require:
- cmd: nginx-source-install
service.running:
- name: nginx
- enable: True
- reload: True
- require:
- cmd: nginx-init
- watch:
- file: /usr/local/nginx/conf/nginx.conf
执行配置,至此nginx服务已安装完毕:
##############################################################################
saltstack自动化运维系列⑩SaltStack二次开发初探
1、当salt运行在公网或者网络环境较差的条件下,需要配置timeout时间
timeout: 60
2、salt-minion的单机模式:
file_client: local
# /etc/init.d/salt-minion stop
本地命令测试
# salt-call --local cmd.run ‘df -Th‘
[INFO ] Executing command ‘ df -Th ‘ in directory ‘ /root ‘
local:
Filesystem Type Size Used Avail Use % Mounted on
/dev/mapper/vg_node2-root ext4 29G 1.1G 27G 4% /
tmpfs tmpfs 935M 0 935M 0 % /dev/shm
/dev/sda1 ext4 485M 39M 421M 9% /boot
/dev/mapper/vg_node2-data ext4 29G 296M 28G 2% /data
/dev/mapper/vg_node2-usr ext4 9.7G 2.1G 7.1G 23% /usr
/dev/mapper/vg_node2-web ext4 25G 172M 23G 1% /web
# yum install python-setproctitle
# mkdir /srv/salt/base/_grains
# !/usr/bin/env python
def my_grains():
‘‘‘
my custom grains
‘‘‘
grains = {‘ mysite ‘ :‘ www.chinasoft.com ‘ ,‘ say ‘ :‘ life is short,i use python ‘ }
return grains
# salt ‘*‘ saltutil.sync_grains
# salt ‘*‘ grains.item mysite[email protected] ~]# salt ‘*‘ grains.item say
编写模块
# vim /srv/salt/base/_modules/my_disk.py
应用模块
使用查询:
node2.chinasoft.com:
Filesystem Type Size Used Avail Use % Mounted on
/dev/mapper/vg_node2-root ext4 29G 1.1G 27G 4% /
tmpfs tmpfs 935M 12K 935M 1% /dev/shm
/dev/sda1 ext4 485M 39M 421M 9% /boot
/dev/mapper/vg_node2-data ext4 29G 301M 28G 2% /data
/dev/mapper/vg_node2-usr ext4 9.7G 2.1G 7.1G 23% /usr
/dev/mapper/vg_node2-web ext4 25G 172M 23G 1% /web
mini1:
Filesystem Type Size Used Avail Use % Mounted on
/dev/mapper/vg0-root ext4 25G 1.6G 23G 7% /
tmpfs tmpfs 495M 16K 495M 1% /dev/shm
/dev/sda1 ext4 291M 39M 238M 14% /boot
/dev/mapper/vg0-usr ext4 20G 3.0G 16G 17% /usr
/dev/mapper/vg0-var ext4 9.7G 1.1G 8.2G 11% /var
4、拷贝文件到所有minion客户端
# salt ‘*‘ webmin-1.831-1.noarch.rpm /data/webmin-1.831-1.noarch.rpm
##########################################################################
saltstack自动化运维系列11基于etcd的saltstack的自动化扩容
# mkdir -p /data/etcd
# ss -tnlp|grep etcd
创建key和value
查看key和value
删除key,可以看到查不到了
建一个只存在25秒的键值,25秒后发现该键值查不到了
ext_pillar:
# /etc/init.d/salt-master restart
curl -s http://192.168.3.12:2379/v2/keys/salt/haproxy/backend_www_chinasoft_com/web-node1 -XPUT -d value="192.168.3.12:8080" | python -m json.tool
安装etcd
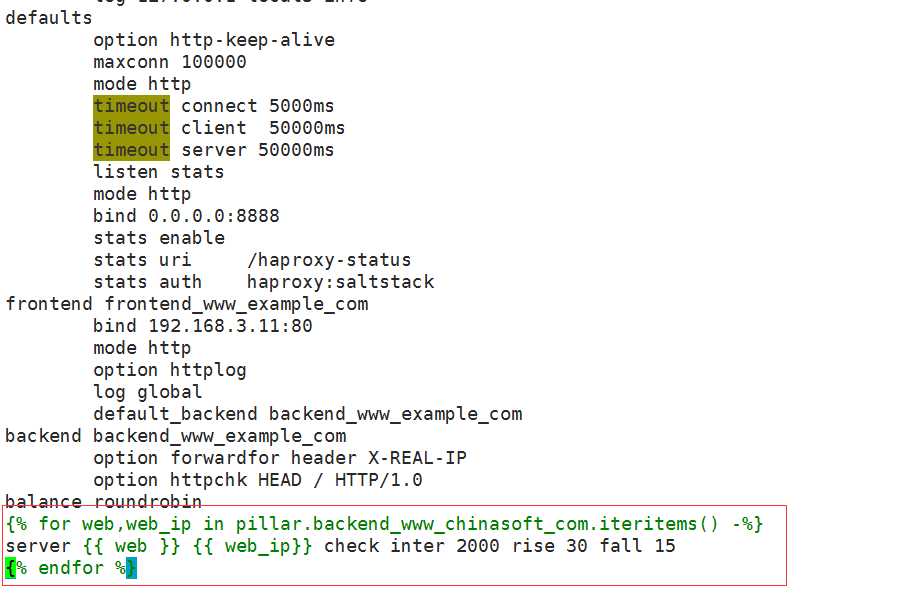
①编写haproxy的配置文件
②编写sls文件
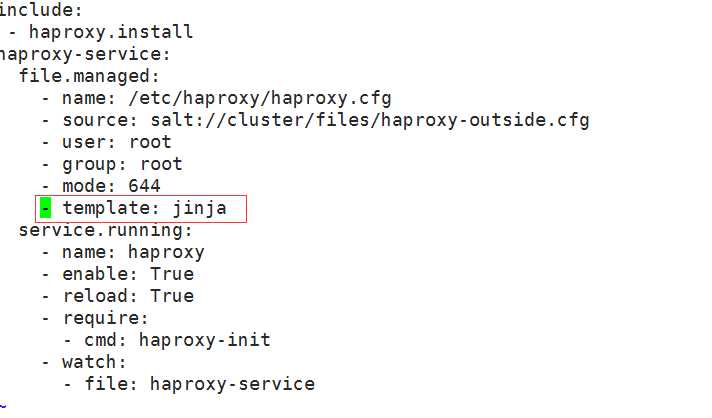
include:
执行以下高级状态,如果报错jinja has no attibute backend_www_chinasoft_com重启一下master即可
curl -s http://192.168.3.12:2379/v2/keys/salt/haproxy/backend_www_chinasoft_com/web-node2 -XPUT -d value="192.168.3.12:8080" | python -m json.tool
curl -s http://192.168.3.12:2379/v2/keys/salt/haproxy/backend_www_chinasoft_com/web-node3 -XPUT -d value="192.168.3.12:8080" | python -m json.tool
# curl -s http://192.168.3.12:2379/v2/keys/salt/haproxy/backend_www_chinasoft_com/web-node4 -XPUT -d value="192.168.3.12:8080" | python -m json.tool
通过访问haproxy的管理界面可以看到成功添加 http://192.168.3.12:8888/haproxy-status
可以看到pillar的选项,如果不能看到需要修改/etc/salt/master (pillar_opts: False)
# !/bin/bash
MAIN_ADD_HOST =$1
create_host(){
echo ‘ create host ok ‘
}
deploy_service(){
ADD_HOST_PORT =‘ 8080 ‘
}
deploy_code(){
echo ‘ deploy code ok ‘
}
service_check(){
STATUS =$(curl -s --head http://" $ADD_HOST " :" $ADD_HOST_PORT " / |grep " 200 OK " )
if [ -n " $STATUS " ];then
echo ‘ status check ok ‘
else
echo ‘ status check not ok ‘
exit
fi
}
etcd_key(){
ADD_HOST =$1
curl http: //192.168.3.12:2379/v2/keys/salt/haproxy/backend_www_chinasoft_com/$ADD_HOST -XPUT -d value=" 192.168.3.19:${ADD_HOST_PORT} "
}
sync_state(){
salt ‘ * ‘ state.sls cluster.haproxy-outside env=prod
}
main(){
create_host;
deploy_service;
deploy_code;
etcd_key $MAIN_ADD_HOST;
sync_state;
}
main $ 1
执行脚本,可以看到成功添加
#################################################################################
以上是关于学习saltstack 的主要内容,如果未能解决你的问题,请参考以下文章

