TX2之多线程读取视频及深度学习推理
Posted chay
tags:
篇首语:本文由小常识网(cha138.com)小编为大家整理,主要介绍了TX2之多线程读取视频及深度学习推理相关的知识,希望对你有一定的参考价值。
背景
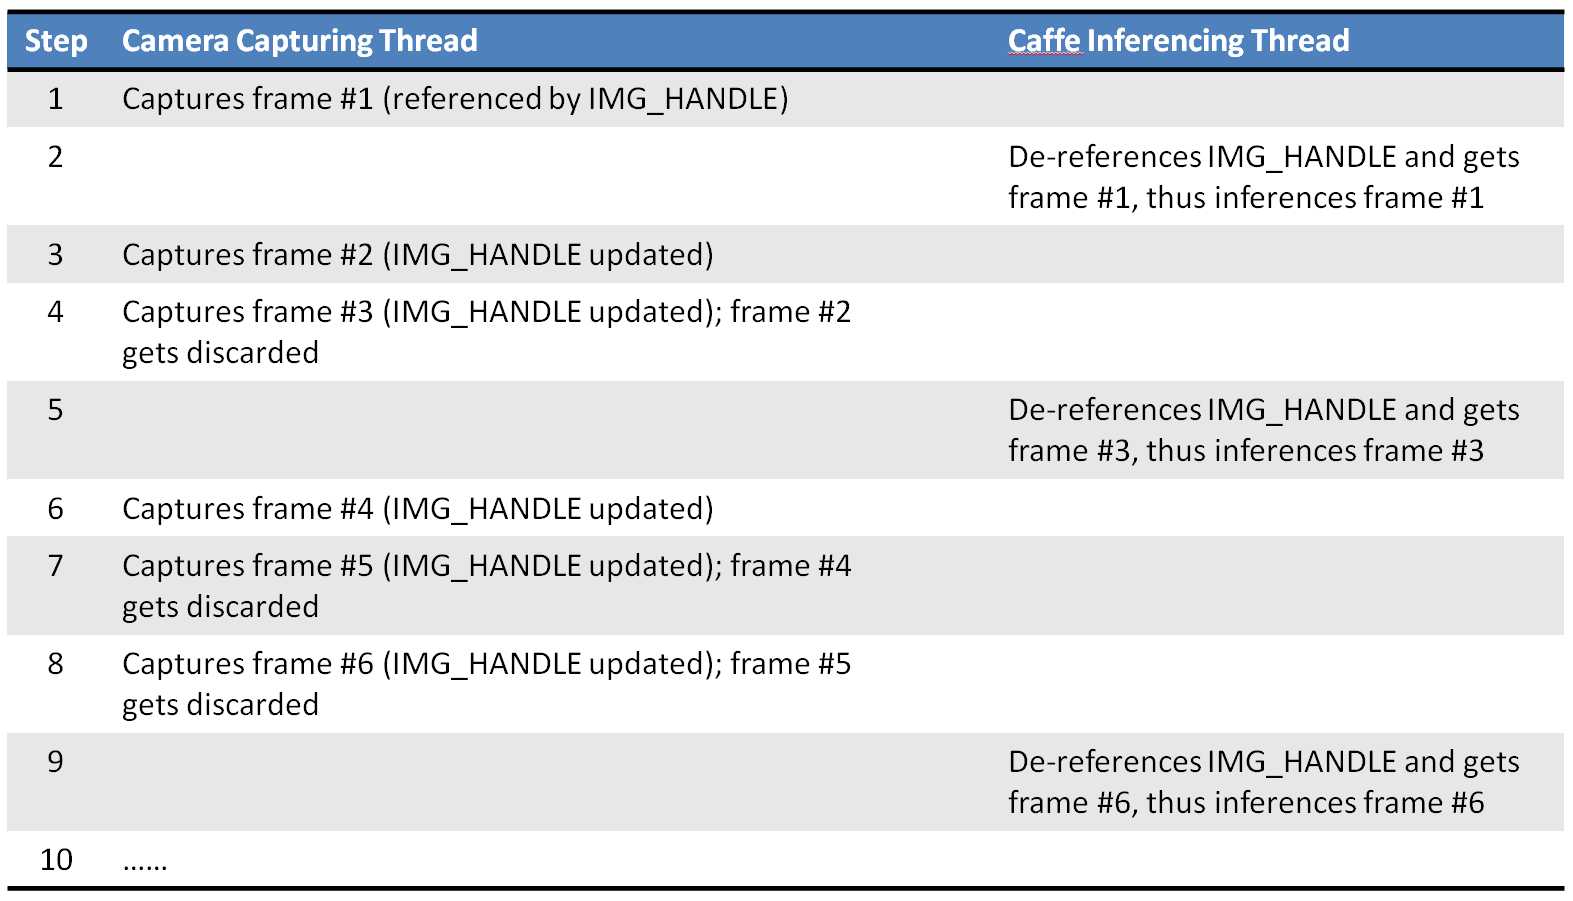
一般在TX2上部署深度学习模型时,都是读取摄像头视频或传入视频文件进行推理,从视频中抽取帧进行目标检测等任务。对于大点的模型,推理的速度是赶不上摄像头或视频的帧率的,如果我们使用单线程进行处理,即读取一帧检测一帧,推理会堵塞视频的正常传输,表现出来就是摄像头视频有很大的延迟,如果是对实时性要求较高,这种延迟是难以接受的。因此,采用多线程的方法,将视频读取与深度学习推理放在两个线程里,互不影响,达到实时的效果。
实现方法
将摄像头的视频读取放入子线程,充当一个生产者的角色,将推理放入主线程,充当消费者的角色,主线程推理完一帧后从子线程提数据,继续推理,下图是原博文的一幅图片,描述了两个线程的关系:

程序实现
子线程
"""camera.py
This code implements the Camera class, which encapsulates code to
handle IP CAM, USB webcam or the Jetson onboard camera.  The Camera
class is further extend to take either a video or an image file as
input.
"""

import time
import logging
import threading

import numpy as np
import cv2

def open_cam_rtsp(uri, width, height, latency):
    """Open an RTSP URI (IP CAM)."""
    gst_str = ('rtspsrc location={} latency={} ! '
               'rtph264depay ! h264parse ! omxh264dec ! '
               'nvvidconv ! '
               'video/x-raw, width=(int){}, height=(int){}, '
               'format=(string)BGRx ! videoconvert ! '
               'appsink').format(uri, latency, width, height)
    return cv2.VideoCapture(gst_str, cv2.CAP_GSTREAMER)

def open_cam_usb(dev, width, height):
    """Open a USB webcam.
    We want to set width and height here, otherwise we could just do:
        return cv2.VideoCapture(dev)
    """
    gst_str = ('v4l2src device=/dev/video{} ! '
               'video/x-raw, width=(int){}, height=(int){}, '
               'format=(string)RGB ! videoconvert ! '
               'appsink').format(dev, width, height)
    return cv2.VideoCapture(gst_str, cv2.CAP_GSTREAMER)

def open_cam_onboard(width, height):
    """Open the Jetson onboard camera.
    On versions of L4T prior to 28.1, you might need to add
    'flip-method=2' into gst_str.
    """
    gst_str = ('nvcamerasrc ! '
               'video/x-raw(memory:NVMM), '
               'width=(int)2592, height=(int)1458, '
               'format=(string)I420, framerate=(fraction)30/1 ! '
               'nvvidconv ! '
               'video/x-raw, width=(int){}, height=(int){}, '
               'format=(string)BGRx ! videoconvert ! '
               'appsink').format(width, height)
    return cv2.VideoCapture(gst_str, cv2.CAP_GSTREAMER)

def grab_img(cam):
    """This 'grab_img' function is designed to be run in the sub-thread.
    Once started, this thread continues to grab a new image and put it
    into the global 'img_handle', until 'thread_running' is set to False.
    """
    while cam.thread_running:
        if cam.args.use_image:
            assert cam.img_handle is not None, 'img_handle is empty in use_image case!'
            # keep using the same img, no need to update it
            time.sleep(0.01)  # yield CPU to other threads
        else:
            _, cam.img_handle = cam.cap.read()
            fps = cam.cap.get(cv2.CAP_PROP_FPS)
            time.sleep(1/fps)  # fps = 20hz
            print('time sleep ', 1/fps)
            if cam.img_handle is None:
                logging.warning('grab_img(): cap.read() returns None...')
                break
    cam.thread_running = False

class Camera():
    """Camera class which supports reading images from theses video sources:
    1. Video file
    2. Image (jpg, png, etc.) file, repeating indefinitely
    3. RTSP (IP CAM)
    4. USB webcam
    5. Jetson onboard camera
    """

    def __init__(self, args):
        self.args = args
        self.is_opened = False
        self.thread_running = False
        self.img_handle = None
        self.img_width = 0
        self.img_height = 0
        self.cap = None
        self.thread = None

    def open(self):
        """Open camera based on command line arguments."""
        assert self.cap is None, 'Camera is already opened!'
        args = self.args
        if args.use_file:
            self.cap = cv2.VideoCapture(args.filename)
            # ignore image width/height settings here
        elif args.use_image:
            self.cap = 'OK'
            self.img_handle = cv2.imread(args.filename)
            # ignore image width/height settings here
            if self.img_handle is not None:
                self.is_opened = True
                self.img_height, self.img_width, _ = self.img_handle.shape
        elif args.use_rtsp:
            self.cap = open_cam_rtsp(
                args.rtsp_uri,
                args.image_width,
                args.image_height,
                args.rtsp_latency
            )
        elif args.use_usb:
            self.cap = open_cam_usb(
                args.video_dev,
                args.image_width,
                args.image_height
            )
        else:  # by default, use the jetson onboard camera
            self.cap = open_cam_onboard(
                args.image_width,
                args.image_height
            )
        if self.cap != 'OK':
            if self.cap.isOpened():
                # Try to grab the 1st image and determine width and height
                _, img = self.cap.read()
                if img is not None:
                    self.img_height, self.img_width, _ = img.shape
                    self.is_opened = True

    def start(self):
        assert not self.thread_running
        self.thread_running = True
        self.thread = threading.Thread(target=grab_img, args=(self,))
        self.thread.start()

    def stop(self):
        self.thread_running = False
        self.thread.join()

    def read(self):
        if self.args.use_image:
            return np.copy(self.img_handle)
        else:
            return self.img_handle

    def release(self):
        assert not self.thread_running
        if self.cap != 'OK':
            self.cap.release()
主线程
主线程程序以tensorflow object-detection部分为主,重点看里边读摄像头或视频的方法,运行时要传入读取的摄像头或视频参数:
# coding: utf-8
import numpy as np
import os
import six.moves.urllib as urllib
import sys
import tarfile
import tensorflow as tf
import zipfile

from collections import defaultdict
from io import StringIO
from matplotlib import pyplot as plt
from PIL import Image

import cv2
import time
from PIL import Image

import tensorflow.contrib.tensorrt as trt
from camera import Camera
import argparse

os.environ['CUDA_VISIBLE_DEVICES'] = '0'

# This is needed since the notebook is stored in the object_detection folder.
sys.path.append("..")
from object_detection.utils import ops as utils_ops

if tf.__version__ < '1.4.0':
  raise ImportError('Please upgrade your tensorflow installation to v1.4.* or later!')

from utils import label_map_util
from utils import visualization_utils as vis_util

# Path to frozen detection graph. This is the actual model that is used for the object detection.
PATH_TO_FROZEN_GRAPH = 'data/ssd_mobilenet_coco_0129/frozen_inference_graph.pb'

# List of the strings that is used to add correct label for each box.
PATH_TO_LABELS = os.path.join('data/object-detection.pbtxt')

NUM_CLASSES = 12

VIDEO_NAME = 'data/2018-09-10_162811'
filename = VIDEO_NAME + '.mp4'

def parse_args():
    """Parse input arguments."""
    desc = ('This script captures and displays live camera video, '
            'and does real-time object detection with TF-TRT model '
            'on Jetson TX2/TX1')
    parser = argparse.ArgumentParser(description=desc)
    parser.add_argument('--file', dest='use_file',
                        help='use a video file as input (remember to '
                        'also set --filename)',
                        action='store_true')
    parser.add_argument('--image', dest='use_image',
                        help='use an image file as input (remember to '
                        'also set --filename)',
                        action='store_true')
    parser.add_argument('--filename', dest='filename',
                        help='video file name, e.g. test.mp4',
                        default='data/2018-09-10_162811.mp4', type=str)
    parser.add_argument('--rtsp', dest='use_rtsp',
                        help='use IP CAM (remember to also set --uri)',
                        action='store_true')
    parser.add_argument('--uri', dest='rtsp_uri',
                        help='RTSP URI, e.g. rtsp://admin:[email protected]/H.264/ch1/main',
                        default=None, type=str)
    parser.add_argument('--latency', dest='rtsp_latency',
                        help='latency in ms for RTSP [200]',
                        default=200, type=int)
    parser.add_argument('--usb', dest='use_usb',
                        help='use USB webcam (remember to also set --vid)',
                        action='store_true')
    parser.add_argument('--vid', dest='video_dev',
                        help='device # of USB webcam (/dev/video?) [1]',
                        default=1, type=int)
    parser.add_argument('--width', dest='image_width',
                        help='image width [1280]',
                        default=1280, type=int)
    parser.add_argument('--height', dest='image_height',
                        help='image height [720]',
                        default=720, type=int)
    parser.add_argument('--confidence', dest='conf_th',
                        help='confidence threshold [0.3]',
                        default=0.3, type=float)
    args = parser.parse_args()
    return args

def detect_in_video():
    args = parse_args()
    detection_graph = tf.Graph()
    with detection_graph.as_default():
        od_graph_def = tf.GraphDef()
        with tf.gfile.GFile(PATH_TO_FROZEN_GRAPH, 'rb') as fid:
            serialized_graph = fid.read()
            od_graph_def.ParseFromString(serialized_graph)
            tf.import_graph_def(od_graph_def, name='')

    label_map = label_map_util.load_labelmap(PATH_TO_LABELS)
    categories = label_map_util.convert_label_map_to_categories(
        label_map, max_num_classes=NUM_CLASSES, use_display_name=True)
    category_index = label_map_util.create_category_index(categories)

    config = tf.ConfigProto()
    config.gpu_options.allow_growth = True

    with detection_graph.as_default():
        with tf.Session(graph=detection_graph,config=config) as sess:
            image_tensor = detection_graph.get_tensor_by_name('image_tensor:0')
            detection_boxes = detection_graph.get_tensor_by_name(
                'detection_boxes:0')
            detection_scores = detection_graph.get_tensor_by_name(
                'detection_scores:0')
            detection_classes = detection_graph.get_tensor_by_name(
                'detection_classes:0')
            num_detections = detection_graph.get_tensor_by_name(
                'num_detections:0')

            cam = Camera(args)
            cam.open()
            cam.start()

            while cam.thread_running:
                frame = cam.read()
                color_frame = cv2.cvtColor(frame, cv2.COLOR_BGR2RGB)
                image_np_expanded = np.expand_dims(color_frame, axis=0)
                (boxes, scores, classes, num) = sess.run(
                    [detection_boxes, detection_scores,
                        detection_classes, num_detections],
                    feed_dict={image_tensor: image_np_expanded})

def main():
  detect_in_video()

if __name__ =='__main__':
  main()
Ref
以上是关于TX2之多线程读取视频及深度学习推理的主要内容,如果未能解决你的问题,请参考以下文章