mysql-5.7.22的安装和问题总结
Posted arielcharlotte
tags:
篇首语:本文由小常识网(cha138.com)小编为大家整理,主要介绍了mysql-5.7.22的安装和问题总结相关的知识,希望对你有一定的参考价值。
前期给JIRA配置的oracle数据库,oracle服务一旦启动,一下占掉系统2G的内存,好可怕。于是决定切换成mysql,更轻量级一些。平时在工作中没使用过mysql,于是下载记录总结一下。
准备工作:
目前mysql最新版本是8.0.11版本,查看jira的安装说明,推荐的mysql环境是5.7,于是选取版本5.7.22。5.7的版本和之前的版本有些语句不太相同。需要说明的就是:
1、新本的mysql的user表中的password字段已经改成了authentication_string 字段。
2、可以为用户设置密码过期策略,一定时间以后,强制用户修改密码
ALTER USER 'jeffrey'@'localhost' PASSWORD EXPIRE INTERVAL 90 DAY;3、各种非结构化数据存储的数据库应运而生(如MongoDB),提供对JSON的支持。
4、sys schema是MySQL 5.7.7中引入的一个系统库,包含了一系列视图、函数和存储过程, 该项目专注于MySQL的易用性。
*好了,下面开始进入正题,准备开始安装了。
一、下载和安装
下载地址:https://www.mysql.com/downloads/
1、选择COMMUNITY,mysql community server。解压安装包。
2、配置系统环境变量
键名:MYSQL_HOME
值为:C:\\Program Files\\mysql-5.7.22-winx64
在Path中添加:%MYSQL_HOME%\\bin,注意Path中不同值之间的“;”符号不能省略
3、准备my.ini文件
可以先新建一个my.txt文件,然后通过重命名修改文件后缀为.ini,以前的版本解压后或许会存在my-default.ini文件,但是5.7.22版本没有,因此要自己手动创建

[mysql]
default-character-set=utf8

[mysqld]
port=3306
basedir=C:/Program Files/mysql-5.7.22-winx64
datadir=C:/database/mysql/data
max_connections=200
character-set-server=utf8
default-storage-engine=INNODB
sql-mode=NO_ENGINE_SUBSTITUTION,STRICT_TRANS_TABLES
此步骤要注意:basedir和datadir的路径,间隔是“/”而不是"",否则在下面会出错,这个问题当时没注意,查了好久。
编辑好my.ini文件后,放在C:\\Program Files\\mysql-5.7.22-winx64路径下。
4、执行mysql安装
以管理员身份打开cmd命令窗口,如果环境变量配置,就不需要切换到sql安装目录的bin目录下了,直接执行以下语句。
mysqld -install
?执行命令后提示:Service successfully installed. 表示安装成功
5、执行以下语句进行mysql的初始化
mysqld?--initialize-insecure?--user=mysql???执行命令后会在MySQL的安装目录下生成data目录并创建root用户。
6、启动mysql服务
net start mysql执行后会有如下提示:
MySQL服务正在启动.
MySQL服务已经启动成功。
7、root密码设置
mysqladmin -uroot -p回车后提示输入密码。
注:mysql解压缩版初次安装管理员root的密码为空,直接再回车一次就登入mysql数据库。
8、卸载mysql服务
输入"mysqld -remove"或者"sc delete mysql"执行卸载服务。
二、安装问题
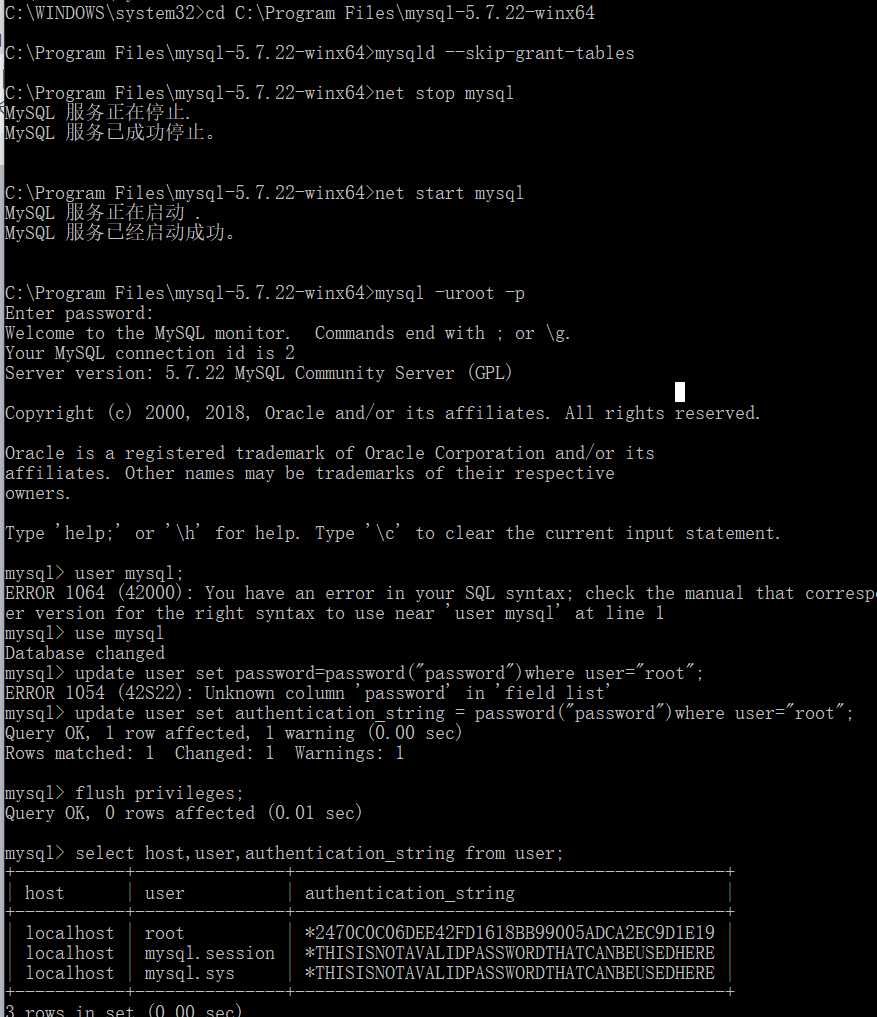
1、mysql密码忘记解决办法
今天重新装了一遍MySQL,因为用的是免安装的,所以需要重新设置密码,然后我一通瞎几把设,结果搞得自己也忘了,没办法,只能重新搞一下,这是网上的方法。亲测可用!
1.以系统管理员身份运行cmd.
2.查看mysql是否已经启动,如果已经启动,就停止:net stop mysql.
3.修改my.ini文件,最后增加一行忽略密码skip_grant_tables,保存
3.重新启动服务
net start mysql
mysql -uroot -p
use mysql
update user set authentication_string = password("password")where user="root"
flush privileges;

mysql>FLUSH?PRIVILEGES; 【注意一定不要遗忘这句话,否则密码更改不能生效,刷新MySQL的系统权限相关表,第二种方法,就是重新启动mysql服务器】
mysql>QUIT改好之后,再修改一下my.ini这个文件,把刚才加入的"skip-grant-tables"这行删除,保存退出,再重启mysql。
三、配置JIRA的数据库
1. Create and configure the MySQL database
Create a database user which JIRA will connect as (e.g. jiradbuser).
Remember this database user name, as it will be used to configure JIRA‘s connection to this database in subsequent steps.
Create a database for JIRA to store issues in (e.g. jiradb). The database must have a character set of UTF8. Enter the following command from within the MySQL command client.
Remember this database name, as it will be used to configure JIRA‘s connection to this database in subsequent steps.
CREATE DATABASE jiradb CHARACTER SET utf8 COLLATE utf8_bin;
(if you want your database to be named jiradb).
Ensure that the user has permission to connect to the database, and permission to create and populate tables. These can be provided with the following -
For MySQL 5.5, MySQL 5.6, and MySQL 5.7.0 to MySQL 5.7.5:
GRANT SELECT,INSERT,UPDATE,DELETE,CREATE,DROP,ALTER,INDEX on
flush privileges;
For MySQL 5.7.6 and above, you must also include the REFERENCES permission:
GRANT SELECT,INSERT,UPDATE,DELETE,CREATE,DROP,REFERENCES,ALTER,INDEX on
flush privileges;
Tip:
To confirm if the permissions were granted successfully, log into the DB server with the JIRA DB user and run the command below:
SHOW GRANTS FOR
Edit the my.cnf file (my.ini on Windows operating systems) in your MySQL server. (Refer to MySQL Option Files for detailed instructions on editing my.cnf and my.ini.)
Locate the [mysqld]section in the file, and add or modify the following parameters:
Set the default storage engine to InnoDB:
[mysqld]
...
default-storage-engine=INNODB
...
Specify the value of max_allowed_packet to be at least 256M:
[mysqld]
...
max_allowed_packet=256M
...
Specify the value of innodb_log_file_size to be at least 256M for MySQL 5.5 and below:
[mysqld]
...
innodb_log_file_size=256M
...
NB: This should be set to at least 2G for MySQL 5.6 and above.
Ensure the sql_mode parameter does not specify NO_AUTO_VALUE_ON_ZERO
// remove this if it exists
sql_mode = NO_AUTO_VALUE_ON_ZERO
Restart your MySQL server for the changes to take effect:
On Windows, use the Windows Services manager to restart the service.
On Linux:
Run one of the following commands, depending on your setup: ‘/etc/init.d/mysqld stop‘ or ‘/etc/init.d/mysql stop‘ or ‘service mysqld stop‘.
Then run the same command again, replacing ‘stop‘ with ‘start‘.
以上是关于mysql-5.7.22的安装和问题总结的主要内容,如果未能解决你的问题,请参考以下文章