BBS - 文章详情页
Posted mumupa0824
tags:
篇首语:本文由小常识网(cha138.com)小编为大家整理,主要介绍了BBS - 文章详情页相关的知识,希望对你有一定的参考价值。
一. 文章详情页的设计和数据构建
url.py
# 文章详情页
    re_path(‘^(?P<username>w+)/articles/(?P<article_id>d+)$‘, views.article_detail),  # w+:数字和字母
views.py
def get_query_data(username):  # 查询相关的数据,获取分类的数据
    ‘‘‘
    由于数据很多个地方需要用到,所以可以解耦出来,单独写一个函数
    :param username:
    :return:
    ‘‘‘

    user = UserInfo.objects.filter(username=username).first()
    blog = user.blog

    cate_list = models.Category.objects.filter(blog=blog).values("pk").annotate(c=Count("article__title")).values(
        "title", "c")
    tag_list = models.Tag.objects.filter(blog=blog).values("pk").annotate(c=Count("article__title")).values("title",
                                                                                                            "c")

    from django.db.models.functions import TruncMonth
    date_list = models.Article.objects.filter(user=user).annotate(month=TruncMonth("create_time")).values(
        "month").annotate(c=Count("title")).values("month", "c")

    return {"blog": blog, "cate_list": cate_list, "tag_list": tag_list, "date_list": date_list}


def article_detail(request, username, article_id):  # url:127.0.0.1:8000/mm/articles/1

    context = get_query_data(username)

    return render(request, "article_detail.html", context)
base.html(继承)
<!DOCTYPE html>
<html lang="en">
<head>
    <meta charset="UTF-8">
    <title>Title</title>
    <link rel="stylesheet" href="/static/blog/bs/css/bootstrap.css">
    <style>
        *{
            margin: 0;
            padding: 0;
        }
        .header{
            width: 100%;
            height: 60px;
            background-color: #369;

        }
        .content .title{
            font-size: 18px;
            font-weight: 100;
            line-height: 60px;
            color: white;
            margin-left: 20px;
        }
        .backend{
            float: right;
            color: white;
            text-decoration: none;
            font-size: 14px;
            margin-top: 10px;
            margin-right: 15px;
        }
        .pub_info{
            margin-top: 10px;
            color: darkgrey;
        }
    </style>
</head>
<body>
    <div class="header">
        <div class="content">
            <p class="title">
                <span>{{ blog.title }}</span>
                <a href=""  class="backend">管理</a>
            </p>
        </div>
    </div>

<div class="container">
    <div class="row">
        <div class="col-md-3">
            <div class="panel panel-warning">
                <div class="panel-heading">我的标签</div>
                <div class="panel-body">
                    {% for tag in tag_list %}
                    <p><a href="/{{ username }}/tag/{{ tag.0 }}">{{ tag.0 }}({{ tag.1 }})</a></p>

                    {% endfor %}
                </div>
            </div>
            <div class="panel panel-danger">
                <div class="panel-heading">随笔分类</div>
                <div class="panel-body">
                    {% for cate in cate_list %}
                    <p><a href="/{{ username }}/category/{{ cate.0 }}"> {{ cate.0 }}({{ cate.1 }})</a></p>
                    {% endfor %}
                </div>
            </div>
            <div class="panel panel-success">
                <div class="panel-heading">随笔归档</div>
                <div class="panel-body">
                    {% for date in date_list %}
                    <p><a href="/{{ username }}/archive/{{ date.0 }}"> {{ date.0 }}({{ date.1 }})</a></p>
                    {% endfor %}
                </div>
            </div>
        </div>
        <div class="col-md-9">
           {% block content %}  {# 写个块留着扩展用#}

            {% endblock %}

        </div>
    </div>
</div>
</body>
</html>
home_site.html
{% extends ‘base.html‘ %} // 继承base.html {% block content %} <div class="article_list"> {% for article in article_list %} <div class="article_item clearfix"> {# clearfix:清除浮动 #} <h5><a href="">{{ article.title }}</a></h5> <div class="article_desc"> <span class="media-right"> {{ article.desc }} </span> </div> <div class="small pub_info pull-right"> <span>发布于  {{ article.create_time|date:"Y-m-d H:i" }}</span>   <span class="glyphicon glyphicon-comment"></span><a href="">评论({{ article.comment_count }})</a>   <span class="glyphicon glyphicon-thumbs-up"></span><a href="">点赞({{ article.up_count }})</a> </div> </div> <hr> {% endfor %} </div> {% endblock %}
二. 文章详情页的inclution_tag(定义自己的标签)
样式和数据结合成一个整体
两种方法:1是可以用函数get_query_data (构建函数,传到模板文件里边去,如上边那种方法)
2是可以用inclution_tag(方法二,样式和数据结合成一个整体)

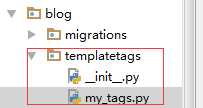
my_tags.py
# -*- coding:utf-8 -*-

from blog import models
from django.db.models import Count

# inclution_tag

# 自己创建一个标签

from django import template

register = template.Library()

@register.simple_tag
def multi_tag(x, y):
    return x*y


# 将得到的数据直接交给"classification.html"渲染出来一个html页面
@register.inclusion_tag("classification.html")
def get_classification_style(username):
    user = models.UserInfo.objects.filter(username=username).first()
    blog = user.blog

    cate_list = models.Category.objects.filter(blog=blog).values("pk").annotate(c=Count("article__title")).values(
        "title", "c")
    tag_list = models.Tag.objects.filter(blog=blog).values("pk").annotate(c=Count("article__title")).values("title",
                                                                                                            "c")

    from django.db.models.functions import TruncMonth
    date_list = models.Article.objects.filter(user=user).annotate(month=TruncMonth("create_time")).values(
        "month").annotate(c=Count("title")).values("month", "c")

    return {"blog": blog, "cate_list": cate_list, "tag_list": tag_list, "date_list": date_list}
    # 先解读上边这些数据,然后返回一个字典给classfication.html,渲染成一个真正的html
定义好标签之后,是在模板里边去使用。
article_detail.html
{% extends "base.html" %}

{% block content %}
    {% load my_tags %}  //要先load下 ,相当于python的import
    {% multi_tag 3 9 %} // 27
{% endblock %}
base.html
<div class="col-md-3 menu">
            {% load my_tags %}  //把原来在base.html里边的col-md-3的内容单独作为一个classification.html,然后再load下把它引入进来。
            {% get_classification_style username %} //把那一堆html代码又返回到这个地方来了
</div>
classificition.html
<div>
    <div class="panel panel-warning">
    <div class="panel-heading">我的标签</div>
    <div class="panel-body">
        {% for tag in tag_list %}
        <p><a href="/{{ username }}/tag/{{ tag.title }}">{{ tag.title }}</a>({{ tag.c }})</p>
        {% endfor %}
    </div>
    </div>

    <div class="panel panel-danger">
    <div class="panel-heading">随笔分类</div>
    <div class="panel-body">
        {% for cate in cate_list %}
        <p><a href="/{{ username }}/category/{{ cate.title }}">{{ cate.title }}</a>({{ cate.c }})</p>
        {% endfor %}

    </div>
    </div>

    <div class="panel panel-info">
    <div class="panel-heading">随笔归档</div>
    <div class="panel-body">
        {% for date in date_list %}
        <p><a href="/{{ username }}/archive/{{ date.month|date:"Y-m" }}">{{ date.month|date:"Y-m" }}</a>({{ date.c }})</p>
        {% endfor %}

    </div>
    </div>
</div>
views.py的视图函数访问home_site.html进行渲染,同时继承了base.html进行渲染,渲染base的时候会去调用get_classification_style,先取数据再去交给classification.html这套样式渲染,渲染之后的结果再放到这个col-md-3中,
views.py
def home_site(request, username, **kwargs):
    ‘‘‘
    个人站点视图函数
    :param request:
    :return:
    ‘‘‘
    user = UserInfo.objects.filter(username=username).first()
    if not user:
        return render(request, "not_found.html")

    article_list = models.Article.objects.filter(user=user)

    if kwargs:
        condition = kwargs.get("condition")
        param = kwargs.get("param")

        if condition == "category":
            article_list = article_list.filter(category__title=param)
        elif condition == "tag":
            article_list = article_list.filter(tags__title=param)
        else:
            year, month = param.split("-")
            article_list = article_list.filter(create_time__year=year, create_time__month=month)

    return render(request, "home_site.html", {"username": username, "article_list": article_list})

def get_query_data(username):
    ‘‘‘
    由于数据很多个地方需要用到,所以可以解耦出来,单独写一个函数
    :param username:
    :return:
    ‘‘‘

    user = UserInfo.objects.filter(username=username).first()
    blog = user.blog

    cate_list = models.Category.objects.filter(blog=blog).values("pk").annotate(c=Count("article__title")).values(
        "title", "c")
    tag_list = models.Tag.objects.filter(blog=blog).values("pk").annotate(c=Count("article__title")).values("title",
                                                                                                            "c")

    from django.db.models.functions import TruncMonth
    date_list = models.Article.objects.filter(user=user).annotate(month=TruncMonth("create_time")).values(
        "month").annotate(c=Count("title")).values("month", "c")

    return {"blog": blog, "cate_list": cate_list, "tag_list": tag_list, "date_list": date_list}


def article_detail(request, username, article_id):return render(request, "article_detail.html", locals())
三.文章详情页渲染的标签字符串转义
views.py
def article_detail(request, username, article_id):

    user = UserInfo.objects.filter(username=username).first()
    blog = user.blog

    article_obj = models.Article.objects.filter(pk=article_id).first()

    return render(request, "article_detail.html", locals())
article_detail.html
{% extends "base.html" %}

{% block content %}
{#    {% load my_tags %}#}
{#    {% multi_tag 3 9 %}#}
    <h3 class="text-center">{{ article_obj.title }}</h3>
    <div class="cont">
       {{ article_obj.content |safe }} {# 加这个是为了告诉django的模板不要给我做任何转义,为了安全性;网页源码#}
    </div>

{% endblock %}

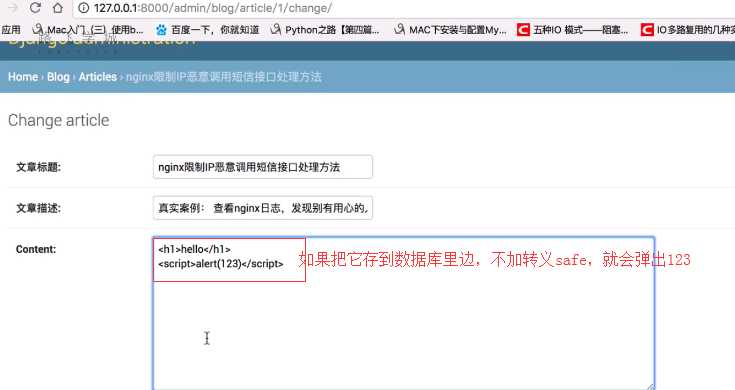
作为一个用户提交了JS代码,相当于我可以控制了其他看到这篇文章的用户的浏览器了,可以通过js代码去控制其他信息。这叫XSS恶意攻击。
Django加了safe转义了给你变成了特殊符号。作为开发人员,在用户提交的时候,不应该允许他提交。

以上是关于BBS - 文章详情页的主要内容,如果未能解决你的问题,请参考以下文章