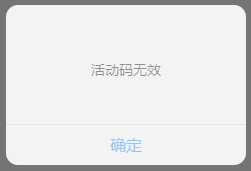
十制作优美的div弹框
Posted jiarui-zjb
tags:
篇首语:本文由小常识网(cha138.com)小编为大家整理,主要介绍了十制作优美的div弹框相关的知识,希望对你有一定的参考价值。
功能描述:确认【调整按钮】弹出精美div弹框
1、jsp页面:perfectAlertDiv.jsp

1 <%@ page contentType="text/html;charset=UTF-8" language="java" %> 2 <html> 3 <head> 4 <title>确认调整按钮弹出精美弹框</title> 5 <script type="text/javascript" src="../../js/common/jquery.min.js"></script> 6 <script type="text/javascript" src="../../js/common/jquery.easyui.min.js"></script> 7 <script type="text/javascript" src="../../js/common/jquery.form.js"></script> 8 <link rel="stylesheet" type="text/css" href="../../css/perfectAlertDiv.css"> 9 <script type="text/javascript" src="../../js/divFunction/perfectAlertDiv.js"></script> 10 </head> 11 <body> 12 <!--模块1 --> 13 <div class="mainDiv"> 14 <div class="div-inline"> 15 <select class="selectCategory commonClass"> 16 <option value ="activityMainId">活动1</option> 17 <option value ="id">活动2</option> 18 </select> 19 <input type="text" class="commonClass"> 20 </div> 21 <div class="div-inline"> 22 <label> 设置活动截止日期:</label> 23 <input type="text" style="width:152px" id="activityEndTime" class="commonClass" value = ""/> 24 </div> 25 <div class="div-inline"> 26 27 <button class="confirmModifyBtn" id="confirmModifyBtn" type="button">确认调整</button> 28 </div> 29 </div> 30 31 <!--弹框div --> 32 <div class="layerDiv" id="layerDiv"> 33 <div class="layer-content" id="first-layer"> 34 <div class="content-title" id="first-content-title"> 35 </div> 36 <div class="content-btn"> 37 <span class="btn-lt confirmLeft cancleLayer">取消</span> 38 <span class="btn-rt confirmRight closelayer" id="firstConfirmBtn">确定</span> 39 </div> 40 </div> 41 <div class="layer-content" id="second-layer"> 42 <div class="content-title" id="second-layer-title"> 43 活动码无效 44 </div> 45 <div class="content-btn" id="comfirmBtn"> 46 确定 47 </div> 48 </div> 49 <div class="layer-content" id="three-layer"> 50 <div class="content-title" id="Three-layer-title"> 51 活动码无效 52 </div> 53 <div class="content-btn" id="comfirmThreeBtn"> 54 确定 55 </div> 56 </div> 57 </div> 58 </body> 59 </html>
2、perfectAlertDiv.js

 1 //利用正则去掉前后空格
 2 function spaceTrim(val){
 3     return val.replace(/(^s*)|(s*$)/g, "");
 4 }
 5
 6 $(function(){
 7     //确认调整触发的事件
 8     $(‘#confirmModifyBtn‘).click(function () {
 9         var date = new Date();
10         /*
11         this.hour = date.getHours() < 10 ? "0" + date.getHours() : date.getHours();
12         this.minute = date.getMinutes() < 10 ? "0" + date.getMinutes() : date.getMinutes();
13         this.second = date.getSeconds() < 10 ? "0" + date.getSeconds() : date.getSeconds();
14         */
15         $("#first-content-title").text("是否确定将"+"活动截止日期调整至:"+ date);
16         //弹出首次提示框:
17         $("#layerDiv").show();
18         $("#first-layer").show();
19     });
20
21     $("#firstConfirmBtn").click(function () {
22         $("#layerDiv").hide();
23         $("#first-layer").hide();
24         $("#layerDiv").show();
25         $("#three-layer").show();
26     })
27     //点击首个弹框的取消按钮
28     $(".cancleLayer").click(function(){
29         $("#layerDiv").hide();
30         $("#first-layer").hide();
31         $("#scond-layer").hide();
32     })
33
34     //点击回显弹框的取消按钮
35     $("#comfirmThreeBtn").click(function(){
36         $("#layerDiv").hide();
37         $("#three-layer").hide();
38     })
39 })
3、perfectAlertDiv.css

  1 @charset "UTF-8";
  2 /*1、设置筛选模块样式*/
  3 .mainDiv {
  4     width: 100%;
  5     height: 100%;
  6     background: #E8E8E8;
  7     padding-top: 70px;
  8     padding-left: 70px;
  9     box-sizing: border-box;
 10 }
 11
 12 /*实现多个div在同一行*/
 13 .mainDiv .div-inline{
 14     display:inline;
 15 }
 16
 17 /*设置选择下拉列表的宽度*/
 18 .mainDiv .selectCategory {
 19     width: 120px;
 20 }
 21
 22 /*设置:下拉列表、输入框、确认调整按钮的边线带有弧度*/
 23 .mainDiv .commonClass {
 24     border: 1px;
 25     border-radius: 5px;
 26     height: 28px;
 27     font-size: 16px;
 28 }
 29
 30 /*设置确认调整按钮:字体为白色(#fff)、蓝色背景、带有弧度 */
 31 .mainDiv .confirmModifyBtn{
 32     width: 102px;
 33     height: 28px;
 34     line-height: 28px;
 35     background: #169BD5;
 36     border-radius: 5px;
 37     color: #fff;
 38 }
 39
 40 /*2、设置弹框模块样式*/
 41 .layerDiv{
 42     width:100%;
 43     height:100%;
 44     background:#000;
 45     position:fixed;
 46     opacity:0.5;
 47     top:0px;
 48     left:0px;
 49     z-index:999;
 50     display:none;
 51 }
 52
 53 /*设置三层div弹框都是隐藏的*/
 54 #first-layer{
 55     display:none;
 56 }
 57
 58 .layerDiv .layer-content{
 59     width:240px;
 60     height:160px;
 61     background:#fff;
 62     position:absolute;
 63     top:0;
 64     left:0;
 65     bottom:0;
 66     right:0;
 67     margin:auto;
 68     border-radius:12px;
 69 }
 70 .layerDiv .layer-content .content-title{
 71     width:100%;
 72     height:119px;
 73     padding:20px;
 74     box-sizing:border-box;
 75     font-size:14px;
 76     line-height:1.5;
 77     color:#333;
 78 }
 79 .layerDiv .layer-content #first-content-title{
 80     padding-top:30px;
 81 }
 82 .layerDiv .layer-content .content-btn{
 83     width:100%;
 84     height:40px;
 85     border-top:1px solid #ddd;
 86 }
 87 .layerDiv .layer-content .content-btn span{
 88     text-align:center;
 89     line-height:40px;
 90     color:#40A5FF;
 91     cursor:pointer;
 92 }
 93 .layerDiv .layer-content .content-btn .btn-lt{
 94     display:inline-block;
 95     width:119px;
 96     height:40px;
 97     border-right:1px solid #ddd;
 98 }
 99 .layerDiv .layer-content .content-btn .btn-rt{
100     display:inline-block;
101     width:119px;
102     height:40px;
103 }
104 #second-layer{
105     display:none;
106 }
107 #three-layer{
108     display:none;
109 }
110 #second-layer #comfirmBtn #three-layer{
111     text-align:center;
112     line-height:40px;
113     color:#40A5FF;
114     cursor:pointer;
115
116 }
117 #second-layer #second-layer-title #three-layer-title{
118     padding:0px;
119     text-align:center;
120     line-height:119px;
121 }
122 #comfirmThreeBtn{
123     text-align:center;
124     line-height:40px;
125     color:#40A5FF;
126     cursor:pointer;
127 }
128
129 .layerDiv #three-layer #Three-layer-title {
130     width: 100%;
131     height: 119px;
132     padding: 20px;
133     box-sizing: border-box;
134     font-size: 14px;
135     line-height: 1.5;
136     color: #333;
137     text-align:center;
138     line-height:90px;
139 }
140
141 .confirmRight{
142     float: right;
143 }
144
145 .confirmLeft{
146     float: left;
147 }
效果展示:


以上是关于十制作优美的div弹框的主要内容,如果未能解决你的问题,请参考以下文章
