DIY树莓派之随身工具箱
Posted h2zzhou
tags:
篇首语:本文由小常识网(cha138.com)小编为大家整理,主要介绍了DIY树莓派之随身工具箱相关的知识,希望对你有一定的参考价值。
摆弄树莓派有一年多了,在这里把经验分享给大家,少走弯路。
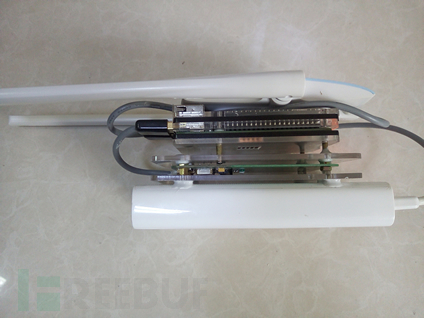
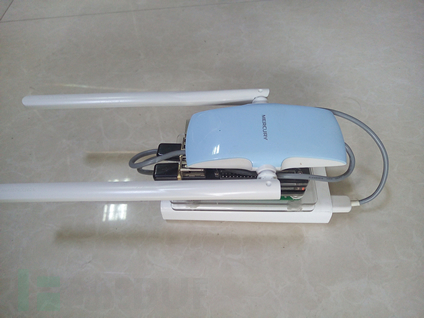
先放图两张。
搭建目的:
wifi信号中转站\网站服务器\IC卡渗透测试\中间人\otr…
基于树莓派3 系统为Kali Linux 2017.3 硬件包含无线网卡 Acr122u TF卡
关键词:
树莓派 无线路由器;树莓派 网站;树莓派 Apache php mysql/mariadb;树莓派 wordpress;树莓派 Kali Linux;树莓派 IC卡;Apache https
1、解压并写入系统
推荐三星evo、evo plus不差钱的就直接上lexar 1800x吧
dd if=kali-2017.3-rpi3-nexmon.img of=/dev/sdb bs=1M /------注意文件位置和写入磁盘------/
写入完毕后等待读卡器指示灯不再闪烁然后重新插拔 可以用GParted将未使用分区扩展给系统使用,同时增加2GB的swap空间。
2、系统初始配置
首次启动时不要连接外置无线网卡,这样可以通过名称有效的区分板载网卡和外置网卡。使用网线将树莓派和路由器连接在一起,然后通过ssh连接树莓派(在测试时发现会抛出java.io.IOException:End of IO Stream Read,重新下载系统 重新写入,更换ssh客户端,尝试多次无解。于是尝试使用usb转ttl连接树莓派,失败。 后查询资料得知树莓派3只提供了一个硬件uart接口,默认用于蓝牙。 回到ssh上,挂载内存卡 检查/etc/ssh/发现缺少证书 从之前的版本中导入后正常 推测可能原镜像文件有问题 点我下载证书)。
1.)升级系统
[email protected]:~# apt-get update
[email protected]:~# apt-get upgrade
[email protected]:~# apt-get disk-upgrade
root@kali:~# reboot
2.)搭建wifi
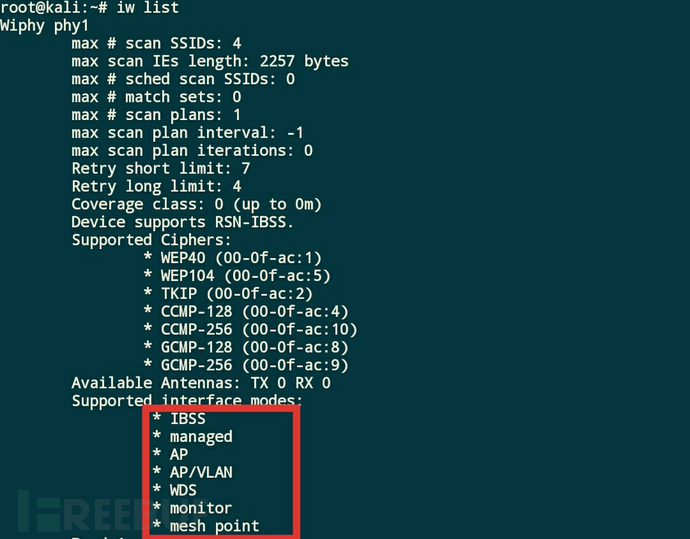
连上外置无线网卡(需支持monitor模式)
通过命令 iw list可以查看网卡是否支持monitor模式
安装hostapd和dnsmasq并配置网络
[email protected]:~# apt-get install hostapd dnsmasq
这里贴出我的配置文件 供参考
/etc/hostapd.conf
interface=wlan1
driver=nl80211
logger_syslog=-1
logger_syslog_level=2
logger_stdout=-1
logger_stdout_level=2
ctrl_interface=/var/run/hostapd
ctrl_interface_group=0
ssid=Rpi
hw_mode=g
channel=1
country_code=CN
beacon_int=100
dtim_period=2
max_num_sta=255
rts_threshold=2347
fragm_threshold=2346
macaddr_acl=0
auth_algs=1
ignore_broadcast_ssid=0
wmm_enabled=1
wmm_ac_bk_cwmin=4
wmm_ac_bk_cwmax=10
wmm_ac_bk_aifs=7
www_ac_bk_txop_limit=0
wmm_ac_bk_acm=0
wmm_ac_be_aifs=3
wmm_ac_be_cwmin=4
wmm_ac_be_cwmax=10
wmm_ac_be_txop_limit=0
wmm_ac_be_acm=0
wmm_ac_vi_aifs=2
wmm_ac_vi_cwmin=3
wmm_ac_vi_cwmax=4
wmm_ac_vi_txop_limit=94
wmm_ac_vi_acm=0
wmm_ac_vo_aifs=2
wmm_ac_vo_cwmin=2
wmm_ac_vo_cwmax=3
wmm_ac_vo_txop_limit=47
wmm_ac_vo_acm=0
iee80211n=1
# ht_capab=[HT40+][SHORT-GI-20][SHORT-GI-40][TX-STBC][RX-STBC12][MAX-AMSDU-3839]     /*根据iw list 列出的网卡支持模式选择添加 有利于提高传输速率  */
eapol_key_index_workaround=0
eap_server=0
own_ip_addr=127.0.0.1
wpa=2
#如果不设置wifi密码  则 wpa=0 同时下边的四行全部#号 注销
wpa_passphrase=12345678
wpa_key_mgmt=WPA-PSK
wpa_pairwise=CCMP
rsn_pairwise=CCM
配置hostapd
nano /etc/init.d/hostapd
为DAEMON_CONF指定配置文件路径
DAEMON_CONF=/etc/hostapd.confCtrl+x退出 y 确认保存 回车即可
/etc/dnsmasq.conf
resolv-file=/etc/resolv.conf
interface=wlan1
listen-address=192.168.36.1
addn-hosts=/etc/another_hosts
ahcp-range=192.168.36.30,192.168.36.90,12h
dhcp-option=3,192.168.36.1
dhcp-option=6,192.168.36.1
变态版 dnsmasq.conf
该版本dnsmasq配置文件会将所有域名后缀为.net、.com、.cn的访问指向192.168.36.1 设备接入后会自动弹出Apache首页
resolv-file=/etc/resolv.conf
no-poll
address=/.net/192.168.36.1
address=/.com/192.168.36.1
address=/.cn/192.168.36.1
address=/.cpm.cn/192.168.36.1
interface=wlan1
listen-address=192.168.36.1
addn-hosts=/etc/another_hosts
ahcp-range=192.168.36.30,192.168.36.90,12h
dhcp-option=3,192.168.36.1
dhcp-option=6,192.168.36.1
/etc/NetworkManager/NetworkManager.conf
[main]
plugins=ifupdown,keyfile

[ifupdown]
managed=true

[keyfile]
unmanaged-devices=interface-name:wlan1
/etc/network/interfaces
auto lo
iface lo inet loopback

iface wlan1 inet static
address 192.168.36.1
netmask 255.255.255.0
备注:linux有两套独立的网络管理系统 NetworkManager和network 当检测到自身配置文件改变后 会在配置冲突时优先执行 。树莓派通过wifi或者网线接口获得网络访问权限,同时把网络通过hostapd搭建的热点共享出去。
I、树莓派通过wlan0上网:
[email protected]:~# echo "1" > /proc/sys/net/ipv4/ip_forward
[email protected]:~# iptables -A FORWARD -i wlan1 -o wlan0 -j ACCEPT
[email protected]:~# iptables -t nat -A POSTROUTING -o wlan0 -j MASQUERADE
II、树莓派通过eth0上网:
[email protected]:~# echo "1" > /proc/sys/net/ipv4/ip_forward
[email protected]:~# iptables -A FORWARD -i wlan1 -o eth0 -j ACCEPT
[email protected]:~# iptables -t nat -A POSTROUTING -o eth0 -j MASQUERADE
3.)安装Apache php mariadb搭建wordpress
[email protected]:~# apt-get install libapache2-mod-php7.0 mariadb-client-10.1 mariadb-server-10.1 mariadb-server-core-10.1 mariadb-client-core-10.1 mariadb-common php7.0-gd php7.0-mysql php7.0-cli php7.0-common php7.0-json php7.0-opcache php7.0-mbstring
[email protected]:~# a2enmod proxy_fcgi setenvif
[email protected]:~# a2enconf php7.0-fpm
[email protected]:~# a2enmod ssl
[email protected]:~# openssl genrsa -des3 -out ca.key 2048
[email protected]:~# openssl req -new -x509 -days 9999 -key ca.key -out intermediate.crt
[email protected]:~# openssl genrsa -des3 -out server.key 2048
[email protected]:~# openssl rsa -in server.key -out server.key
[email protected]:~# openssl req -new -key server.key -out server.csr
[email protected]:~# mkdir ./demoCA/newcerts -p
[email protected]:~# touch ./demoCA/index.txt
[email protected]:~# echo "01" >> ./demoCA/serial
[email protected]:~# openssl ca -in server.csr -out certificate.crt -cert intermediate.crt -keyfile ca.key
[email protected]:~# cp server.key /etc/apache2
[email protected]:~# cp server.csr /etc/apache2
[email protected]:~# cp certificate.crt /etc/apache2
[email protected]:~# cp ca.key /etc/apache2
[email protected]:~# cp intermediate.crt /etc/apache2
配置default-ssl.conf
nano /etc/apache2/sites-available/default-ssl.conf修改以下地方 并去掉前面的#号
SSLCertificateFile   /etc/apache2/certificate.crt
SSLCertificateKeyFile  /etc/apache2/server.key
SSLCACertificateFile  /etc/apache2/intermediate.crt
安装wordpress
[email protected]:~# wget https://cn.wordpress.org/wordpress-4.9.1-zh_CN.zip
[email protected]:~# unzip wordpress-4.9.1-zh_CN.zip
[email protected]:~# cp -r wordpress/* /var/www/html
[email protected]:~# service mariadb start
[email protected]:~# /usr/bin/mysql_secure_installation
[email protected]:~# mariadb -u root -p
MariaDB [(none)]>CREATE DATABASE wordpress;
Query OK,1 row affected (0.00 sec)

MariaDB [(none)]>CREATE USER [email protected];
Query OK,0 row affected (0.00 sec)

MariaDB [(none)]>SET PASSWORD FOR [email protected]= PASSWORD("userpassword");
Query OK,0 row affected (0.00 sec)

MariaDB [(none)]>GRANT ALL PRIVILEGES ON wordpress.* TO [email protected] IDENTIFIED BY ‘userpassword‘;
Query OK,0 row affected (0.00 sec)

MariaDB [(none)]>FLUSH PRIVILEGES;
Query OK,0 row affected (0.00 sec)

MariaDB [(none)]>exit
Bye
[email protected]:~# reboot
开启服务 部署wordpress
[email protected]:~# service mariadb start
[email protected]:~# service apache2 start
[email protected]:~# service php7.0-fpm start
[email protected]:~# service hostapd start
[email protected]:~# service dnsmasq start
[email protected]:~# chown www-data:www-data -R /var/www/
连接树莓派搭建的wifi 账号:Rpi 密码:12345678 浏览器访问http://192.168.36.1/ 做最后的部署
配置wordpress上传文件大小限制
[email protected]:~# nano /etc/php/7.0/apache2/php.ini
修改以下地方
post_max_size = 200M
upload_max_filesize = 200M
3.其他配置
1.)设置开机自动开启wifi
[email protected]:~# systemctl enable dnsmasq.service
[email protected]:~# systemctl enable hostapd.service
2.)开机自动启动web服务
[email protected]:~# systemctl enable mariadb.service
[email protected]:~# systemctl enable php7.0-fpm.service
[email protected]:~# systemctl enable apache2.service
3.)安装常用小软件
[email protected]:~# apt-get install leafpad tightvncserver fille-roller4.)安装中文支持
[email protected]:~# apt-get install fonts-wqy-microhei
[email protected]:~# dpkg-reconfigure locales
按空格键把 zh_CN GB2312、zh_CN.GB18030、zh_CN.GBK、zh_CN.UTF-8 选中,Table键选择 OK 回车后再选中zh_CN.UTF-8 确认后稍等片刻系统即完成配置。 这时候系统里面的中文就能正常显示了。
5.)加快wordpress访问速度
由于wordpress使用了谷歌字体和js脚本,导致访问时速度异常缓慢,可以手动修改wordpress源文件 将字体地址替换为本地地址并在本地建立相应的目录存放对应的资源文件。
4.)nfc模块
nfc模块来源于 acr122u 拆解后 测量尺寸 淘宝定制亚克力外壳(哈哈 只花了四元 包邮),然后自己焊两根数据线进行连接即可。
数据线在保证美观的前提下尽可能的短,并且屏蔽层一定要焊接上。这样才能确保数据传输的顺畅。
读取卡数据、写入数据的基本命令
[email protected]:~# mfoc -O oldcard.mfd
[email protected]:~# mfoc -O newblankcard.mfd
[email protected]:~# nfc-mfclassic W a oldcard.mfd newblankcard.mfd
带着树莓派 携带多个TF卡 手机安装 juicessh 随时随地嗨起来(注意:系统关机后才能切断电源,否则容易造成内存卡数据错误,无法运行一些程序。此时可以更换一张内存卡,启动树莓派后将数据错误的TF卡通过读卡器连到树莓派上,通过 fsck.ext4命令进行修复)
po一张美美哒饭卡
以上。嗯 还有树莓派上的小网站
以上,搭建完毕
以上是关于DIY树莓派之随身工具箱的主要内容,如果未能解决你的问题,请参考以下文章


