LayUI-Table表格渲染
Posted yatelanda93
tags:
篇首语:本文由小常识网(cha138.com)小编为大家整理,主要介绍了LayUI-Table表格渲染相关的知识,希望对你有一定的参考价值。
记项目中又一表格使用方法,项目首选是使用BootstrapTable的,但是经过多番查证与调试,始终没有把固定列的功能调试成功,找到的成功的例子原样照搬都不行,文件引入也都没有问题,实在搞不懂了,如果有哪位大神知道BootstrapTable列固定如何实现,望不吝赐教。
言归正传,依据项目表格展示需求,剥去业务,需要一个具有每行具有复选框,多级表头,表头信息动态获取,列固定,点击单元格数据可查看详情的这样一个表格,所以因为没能搞定BootstrapTable渲染表格列固定问题没有搞定(满足其他需求没问题),这个表格就交给layui table来展示了,下面贴上是怎么用的。
先来渲染效果

首先,引入jQuery及本地layui的样式文件与js文件,这是渲染基础(jQuery是后续数据处理需要引入)。因为需要的表格表头数据项也是请求数据获取到后才能渲染显示,所以此次表格全部使用js方法方式初始化,对应的页面的表格容器就简单的多了,一行代码即可。

<table class="layui-table" id="detailTable" lay-filter="detailTable" style="height:100%;width:100%;" lay-size="sm"></table>

<button type="button" class="btn btn-getData hidden" data-type="getCheckData" id="getData">提交保存</button>
<input type="button" class="btn btn-primary" onclick="save(true)" id="createOrder" value="生成分配单" />
<input type="button" class="btn btn-primary" onclick="save(false)" id="refuseList" value="退回已选单据" disabled="disabled" />
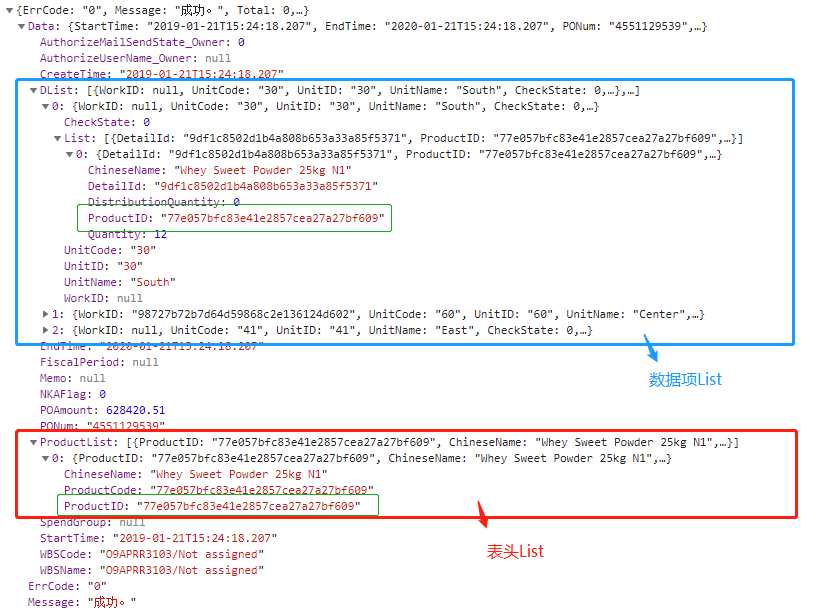
然后就要对空的表格容器填内容,所有要显示的数据是一个接口返回的,所以返回的数据形式可能会比较乱,重要是理清楚然后对应项放在对应位置,其中表头和数据是分了两个LIST返回的,但是数据和表头又有对应关系,所以在渲染表格前,先把数据逻辑理顺,贴上请求返回的数据结构,才能理解后面对数组的处理。

其中表头List返回表格要显示的表头项,数据详情List返回的数据和表头通过ProductID对应,这样展示表格所需的数据就准备好了。

  1 var productList = [], detailList = [], dList = [], submitAllotFlag = true, refusedList = [], returnList = [];
  2 $(function () {
  3     //这个地方就看作普通Ajax请求就可以,只是封装了新方法
  4     BaseApiPost("/api/data", //请求接口url
  5         params,//请求参数
  6         function (obj) {//回调函数
  7             if (obj.ErrCode == 0) {
  8                 //取表头数组
  9                 for (var m = 0; m < obj.Data.ProductList.length; m++) {
 10                     productList.push(obj.Data.ProductList[m].ProductID);
 11                 }
 12                 //数据数组
 13                 dList = obj.Data.DList;
 14                 //渲染表格数据数组
 15                 detailList = obj.Data.DList;
 16                 //将数据数组数据分别与表头对应放入渲染表格数据数组
 17                 for (var i = 0; i < dList.length; i++) {
 18                     for (var j = 0; j < dList[i].List.length; j++) {
 19                         var ProductIn = productList.indexOf(dList[i].List[j].ProductID);
 20                         if (ProductIn == -1) {
 21                             detailList[i][‘qty‘ + j] = 0;
 22                             detailList[i][‘disQty‘ + j] = 0;
 23                         } else {
 24                             detailList[i][‘qty‘ + ProductIn] = dList[i].List[j].Quantity;
 25                             detailList[i][‘DetailId‘ + ProductIn] = dList[i].List[j].DetailId;
 26                             detailList[i][‘disQty‘ + ProductIn] = dList[i].List[j].DistributionQuantity;
 27                         }
 28                     }
 29                     if (dList[i].CheckState == -1) {
 30                         $("#createOrder").attr("disabled", "disabled");
 31                     }
 32                 }
 33                 //二级表头,表头数组2个
 34                 var cols2 = [],
 35                     cols1 = [
 36                     { templet:‘<div>{{setCheckBox(d)}}</div>‘, type: ‘checkbox‘, fixed: ‘left‘, rowspan: 2 } //复选框列
 37                     , { templet: ‘<div>{{getCheckStatus(d)}}</div>‘, width: 80, title: ‘状态‘, fixed: ‘left‘, rowspan: 2, unresize: true }
 38                     , { field: ‘UnitName‘, width: 150, title: ‘用户名‘, fixed: ‘left‘, rowspan: 2, unresize: true }];
 39                 for (var n = 0; n < productList.length; n++) {
 40                     //控制表头显示字数
 41                     var name = "" + obj.Data.ProductList[n].ChineseName;
 42                     if (name.length > 26) {
 43                         name = name.substring(0, 26) + "...";
 44                     }
 45                     //一级表头
 46                     cols1.push({ field: ‘‘, width:300,maxWidth:300, title: name, colspan: 2, align: "center", unresize: true });
 47                     //二级表头
 48                     cols2.push({ field: ‘qty‘ + n, width: 150, title: ‘物料总量‘, align: "center", unresize: true });
 49                     cols2.push({ templet: ‘<div>{{getDetail(d,‘ + n + ‘)}}</div>‘, width: 150, title: ‘分配数量‘, align: "center", unresize: true });
 50
 51                 }
 52                 // 使用layui的table组件
 53                 layui.use(‘table‘, function () {
 54                     var $ = layui.jquery;
 55                     var table = layui.table;
 56                     table.render({
 57                         elem: ‘#detailTable‘//指定容器
 58                         , cols: [cols1, cols2]//表头
 59                         , data: detailList//数据
 60                         , done: function (res, page, count) {
 61                             //可以自行添加判断的条件是否选中,通过设置关键字LAY_CHECKED为true选中,这里只对第一行选中
 62                             for (var k = 0; k < res.data.length; k++) {
 63                                 if (res.data[k].CheckState == -1) {
 64                                     //几种复选框选中设置方法
 65                                     //res.data[k]["LAY_CHECKED"] = ‘true‘;
 66                                     $(‘tr[data-index=‘ + k + ‘] input[type="checkbox"]‘).attr("disabled", "disabled");
 67                                     $(‘tr[data-index=‘ + k + ‘] input[type="checkbox"]‘).next().addClass(‘layui-form-checked‘);
 68                                     $(‘tr[data-index=‘ + k + ‘] input[type="checkbox"]‘).attr("disabled", "disabled");
 69                                     //通过改变class与设置style属性让复选框选中必须加上此句,点击后才是真正选中,后面可用layui table提供的方法获取选中数据
 70                                     $(‘tr[data-index=‘ + k + ‘] input[type="checkbox"]‘).click();
 71                                     returnList.push(res.data[k].UnitID);
 72                                 }
 73                             }
 74                         }
 75                     });
 76                     var active = {
 77                         getCheckData: function () {
 78                             refusedList = table.checkStatus("detailTable").data;
 79                             //console.log(refusedList);
 80                         }
 81                     };
 82
 83                     $(‘.btn-getData‘).on(‘click‘, function () {
 84                         var type = $(this).data(‘type‘);
 85                         active[type] ? active[type].call(this) : ‘‘;
 86                     });
 87
 88                     table.on(‘checkbox(detailTable)‘, function (obj) {
 89                         //console.log(obj);
 90                         $("#getData").click();
 91                         var okFlag0 = 0, okFlag1 = 0, okFlag2 = 0;
 92                         for (var x = 0; x < detailList.length; x++) {
 93                             if (detailList[x].CheckState == -1) {
 94                                 okFlag0++;
 95                                 detailList[x]["LAY_CHECKED"] = ‘true‘;
 96                                 $(‘tr[data-index=‘ + x + ‘]‘).prop(‘checked‘, true);
 97                                 $(‘tr[data-index=‘ + x + ‘] input[disabled="disabled"]‘).next().addClass(‘layui-form-checked‘);
 98                                 $(‘tr[data-index=‘ + x + ‘] input[type="checkbox"]‘).attr("disabled", "disabled");
 99                             }
100                         }
101                         for (var y = 0; y < refusedList.length; y++) {
102                             if (refusedList[y].CheckState != -1) {
103                                 okFlag1++;
104                             }
105                         }
106                         //如果有被选中数据,只能退回选中保存
107                         if (okFlag1 > 0) {
108                             $("#refuseList").removeAttr("disabled", "disabled");
109                             $("#createOrder").attr("disabled", "disabled");
110                         } else if (okFlag0 > 0) {
111                             $("#refuseList").attr("disabled", "disabled");
112                             $("#createOrder").attr("disabled", "disabled");
113                         } else {
114                             $("#refuseList").attr("disabled", "disabled");
115                             $("#createOrder").removeAttr("disabled", "disabled");
116                         }
117
118                     });
119                 });
120             } else {
121                 alert(obj.Message);
122             }
123 });
124     function getCheckStatus(data) {
125         return (data.CheckState == -1 ? "已退回" : "未审核" );
126     }
127
128     function getDetail(o, n) {
129         //o行数据,n行号
130         if (o.WorkID != null && o["DetailId" + n] != undefined ) {
131             var a = "<a class=‘td-show-detail-a‘ href=‘#‘ data-method=‘offset‘ onclick=‘showDetail("" + o["DetailId" + n] + "")‘ >" + o["disQty" + n] + "</a>";
132             return a;
133         } else {
134             return  "";
135         }
136     }
以上是关于LayUI-Table表格渲染的主要内容,如果未能解决你的问题,请参考以下文章
layui框架实战案例(19):layui-table模块表格综合应用(筛选查询导入导出群发短信一键审核照片展示隐私加密)
