前端路由原理及vue-router介绍
Posted lhh520
tags:
篇首语:本文由小常识网(cha138.com)小编为大家整理,主要介绍了前端路由原理及vue-router介绍相关的知识,希望对你有一定的参考价值。
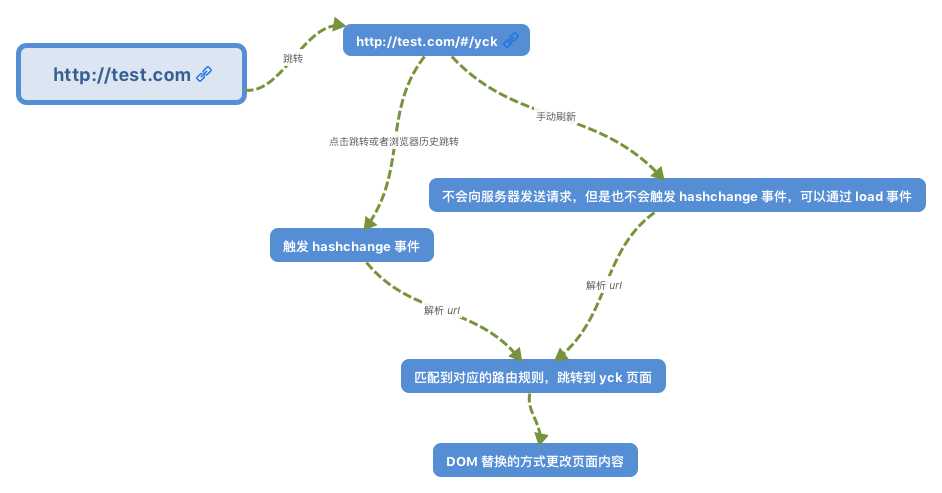
前端路由原理本质就是监听 URL 的变化,然后匹配路由规则,显示相应的页面,并且无须刷新。目前单页面使用的路由就只有两种实现方式
hash
history
www.test.com/##/ 就是 Hash URL,当 ## 后面的哈希值发生变化时,不会向服务器请求数据,可以通过 hashchange 事件来监听到 URL 的变化,从而进行跳转页面。

vue-router hash实现源码(完整源码访问https://github.com/vuejs/vue-router/blob/dev/src/history/hash.js#L22-L54):
**
 * 添加 url hash 变化的监听器
 */
setupListeners () {
  const router = this.router

  /**
   * 每当 hash 变化时就解析路径
   * 匹配路由
   */
  window.addEventListener(‘hashchange‘, () => {
    const current = this.current
    /**
     * transitionTo:
     * 匹配路由
     * 并通过路由配置,把新的页面 render 到 ui-view 的节点
     */
    this.transitionTo(getHash(), route => {
      replaceHash(route.fullPath)
    })
  })
}
检测到 hash 的变化后,就可以通过替换 DOM 的方式来实现页面的更换。
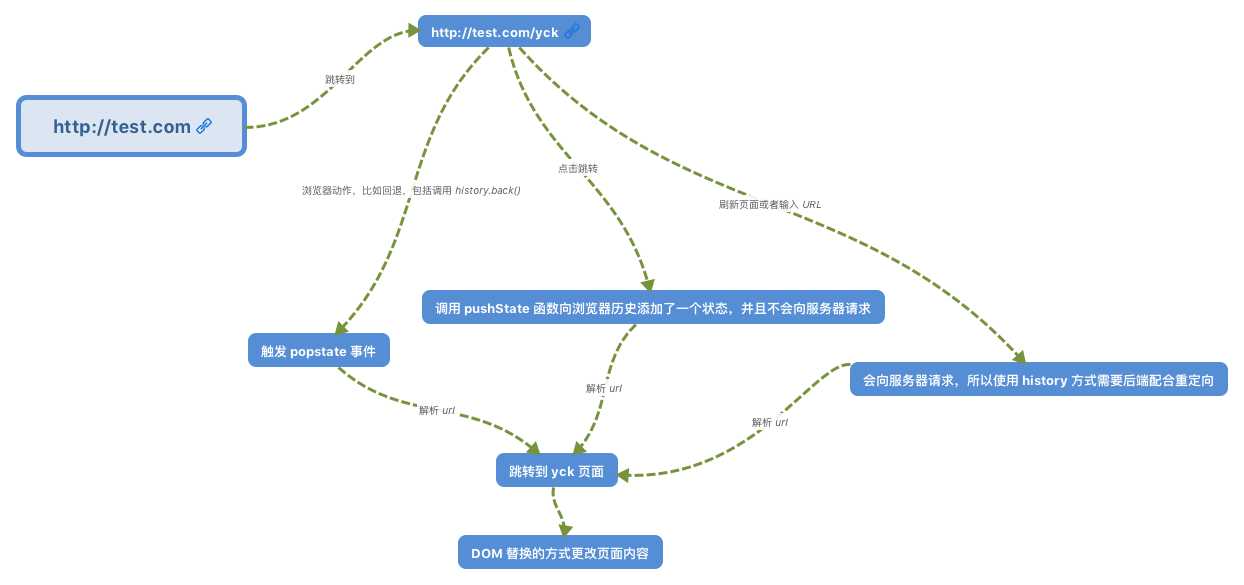
History 模式是 html5 新推出的功能,比之 Hash URL 更加美观
两个 API ,pushState和replaceState可以改变 url 地址且不会发送请求,还有onpopState事件。但因为没有 # 号,所以当用户刷新页面之类的操作时,浏览器还是会给服务器发送请求。为了避免出现这种情况,所以这个实现需要服务器的支持,需要把所有路由都重定向到根页面。具体可以访问官网:https://router.vuejs.org/zh/guide/essentials/history-mode.html

vue-router history实现源码(完整源码访问https://github.com/vuejs/vue-router/blob/dev/src/history/html5.js)
export class HTML5History extends History {
  constructor (router, base) {
    super(router, base)
    /**
     * 原理还是跟 hash 实现一样
     * 通过监听 popstate 事件
     * 匹配路由,然后更新页面 DOM
     */
    window.addEventListener(‘popstate‘, e => {
      const current = this.current

      // Avoiding first `popstate` event dispatched in some browsers but first
      // history route not updated since async guard at the same time.
      const location = getLocation(this.base)
      if (this.current === START && location === initLocation) {
        return
      }

      this.transitionTo(location, route => {
        if (supportsScroll) {
          handleScroll(router, route, current, true)
        }
      })
    })
  }

  go (n) {
    window.history.go(n)
  }

  push (location, onComplete, onAbort) {
    const { current: fromRoute } = this
    this.transitionTo(location, route => {
      // 使用 pushState 更新 url,不会导致浏览器发送请求,从而不会刷新页面
      pushState(cleanPath(this.base + route.fullPath))
      onComplete && onComplete(route)
    }, onAbort)
  }

  replace (location, onComplete, onAbort) {
    const { current: fromRoute } = this
    this.transitionTo(location, route => {
      // replaceState 跟 pushState 的区别在于,不会记录到历史栈
      replaceState(cleanPath(this.base + route.fullPath))
      onComplete && onComplete(route)
    }, onAbort)
  }
}
以上是关于前端路由原理及vue-router介绍的主要内容,如果未能解决你的问题,请参考以下文章