[Qt Quick入门] 基本元素初体验
Posted linuxandmcu
tags:
篇首语:本文由小常识网(cha138.com)小编为大家整理,主要介绍了[Qt Quick入门] 基本元素初体验相关的知识,希望对你有一定的参考价值。
Qt Quick作为QML语言的标准库,提供了很多基本元素和控件来帮助我们构建Qt Quick应用。这节我们简要地介绍一些Qt Quick元素,如Rectangle、Item、Text、Button、Image、ButtonStyle、MouseArea等。
?
1 Rectangle
Rectangle用来绘制一个填充矩形,可以带边框,也可以不带,可以使用纯色填充,也可以使用渐变色填充,甚至还可以不填充而只提供边框......
Rectangle有很多属性,color属性可以指定填充颜色,而gradient属性则用来设置渐变色供填充使用,如果你同时指定了color和gradient,那么gradient生效;如果你设置color属性为transparent,那么就可以达到只绘制边框不填充的效果。
border.width和border.color分别用来指定边框的宽度和颜色,radius设置圆角矩形。
示例▼
import QtQuick 2.0

Rectangle {
    width: 320
    height: 480
    color: Qt.rgba(0.4,0.6,0.4,1.0)
    border.width: 2
    border.color: "black"
    radius: 4
}
将上面的代码片段保存到一个QML文件中,然后在QML文件目录下使用qmlscene加载它来看效果。
2 颜色
关于颜色值,在QML 中可以使用颜色名字,如blue、red、green、transparent等,也可以使用“#RRGGBB”或者“#AARRGGBB”来指定,还可以使用Qt.rgba()、Qt.lighter()等方法来构造。color类型有r、g、b、a四个属性,分别表示一个颜色值的alpha、red、green、blue四个成分。
示例▼
Rectangle {
    color: "red"
    //color: "#00AA00"
    //color: "#800000B0"
    //color: Qt.rgba(0.4,0.6,0.4,0.2)
}
3 渐变色
QML中渐变色的类型是Gradient,渐变色通过两个或多个颜色值来指定,QML会自动在你指定的颜色之间插值,进行无缝填充。Gradient使用GradientStop来指定一个颜色值和它的位置(取值在0.0与1.0之间)。
示例▼
Rectangle {
    rotation: 90 //默认是垂直方向的线性渐变,其它方向可通过rotation旋转获得
    gradient: Gradient{
        GradientStop { position: 0.0; color: "black" }
        GradientStop { position: 0.33; color: "blue" }
        GradientStop { position: 1.0; color: "white" }
    }
}
4 Item
Item是Qt Quick中所有可视元素的基类,虽然它自己什么也不绘制,但是它定义了绘制图元所需要的大部分通用属性,比如x、y、width、height、锚定(anchoring)和按键处理。
Item除了 x、y属性,其实还有一个z属性,用来指定图元在场景中的Z序。2属性的类 型是real,数值越小,图元就越垫底(远离我们);数值越大,图元就越靠近我们。Item的属性opacity可以指定一个图元的透明度,取值在0.0到1.0之间。
虽然Item本身不可见,但你可以使用Item来分组其他的可视图元。分组后可以通过Item的children或visibleChildren属性来访问子对象元素。示例如下:
示例▼
import QtQuick 2.0

Rectangle {
    width: 300
    height: 200

    //使用Item对Rectangle进行分组
    Item {
        id: gradientGroup

        //矩形子对象0
        Rectangle {
            x: 20
            y: 20
            width: 120
            height: 120
            gradient: Gradient {
                GradientStop { position: 0.0; color: "#202020" }
                GradientStop { position: 1.0; color: "#A0A0A0" }
            }
        }

        //矩形子对象1
        Rectangle {
            x: 160
            y: 20
            width: 120
            height: 120
            rotation: 90
            gradient: Gradient {
                GradientStop { position: 0.0; color: "#202020" }
                GradientStop { position: 1.0; color: "#A0A0A0" }
            }
        }

        //分组后可以通过Item的children或visibleChildren属性来访问子对象元素
        Component.onCompleted: {
            console.log("visible children: ",
                        gradientGroup.visibleChildren.length) //可见子对象长度,为2
            console.log("children: ",gradientGroup.children.length) //子对象长度,为2
            //访问两个子对象的x绝对坐标
            for(var i=0; i<gradientGroup.children.length; i++){
                console.log("child ", i, " x=",gradientGroup.children[i].x)
            }
        }
    }
}
另外,你可能注意到了,x、y、width、height四个属性结合起来,可以完成QtQuick应用的界面布局,不过这种采用绝对坐标的布局方式,不太容易适应多种多样的移动设备分辨率,也不太适应可变大小的窗口。可以采用一种全新的布局方式:锚布局。铺布局是通过Item的anchors属性实现的。
5 锚布局
anchors提供了一种方式,让你可以通过指定一个元素与其他元素的关系来确定元素在界面中的位置。
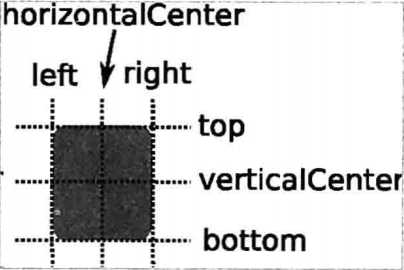
你可以想象一下,每个Item都有7条不可见的铺线:左(left)、水平中心(horizontalCenter)、 上(top)、下(bottom)、右(right)、垂直中心(verticalCenter)、基线(baseline)。如下图所示。

上图中,没有标注基线,基线是用于定位文本的,你可以想象一行文字端坐基线的 情景。对于没有文本的图元,baseline和top—致。
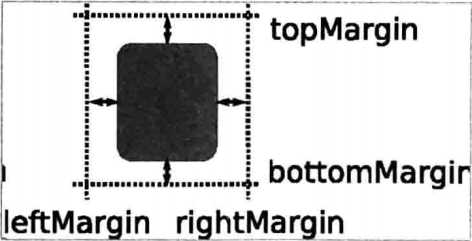
使用anchors布局时,除了对齐锚线,还可以指定上(topMargin)、下(bottomMargin)、 左(leftMargin)、右(rightMargin)四个边的留白。如下图所示。

而如果你想懒省事儿,也可以使用margins属性将四个边的留白置成一样。示例程序如下:
import QtQuick 2.0

Rectangle {
    width: 300
    height: 200

    Rectangle {
        id: rect1
        anchors.left: parent.left
        anchors.leftMargin: 20
        anchors.top: parent.top
        anchors.topMargin: 20
        width: 100
        height: 100
        color: "red"
    }

    Rectangle {
        anchors.left: rect1.right
        anchors.leftMargin: 20
        anchors.top: rect1.top
        width: 100
        height: 100
        color: "blue"
    }
}
程序效果如下所示:

Item的anchors属性,除了上面介绍的,还有一些,如centerln表示将一个Item居中放置到一个Item内;fill表示充满某个Item……更多的请参考Item类的文档。
6 响应按键
前面提到Item可以处理按键,所有从Item继承的元素都可以处理按键,比如Rectangle、 Button。Item通过附加属性Keys来处理按键。
Keys对象是Qt Quick提供的、专门供Item处理按键事件的对象。它定义了很多针对特定按键的信号,比如pressed和released信号,一般地,你可以使用这两个信号来处理按键(请对照Qt C++ 中的keyPressEvent和keyReleaseEvent来理解)。它们有一个类型为KeyEvent、名字是event 的参数,包含了按键的详细信息。如果一个按键被处理,event.accepted应该被设置为true,以免它被继续传递。
这里举一个简单的例子,检测到Escape和Back键时退出应用,检测到数字键时,就通过Text来显示对应的数字。示例程序如下:
import QtQuick 2.0

Rectangle {
    width: 300
    height: 200

    focus: true
    Keys.onEscapePressed: Qt.quit()
    Keys.onBackPressed: Qt.quit()
    Keys.onPressed: {
        switch(event.key) {
        case Qt.Key_0:
        case Qt.Key_1:
        case Qt.Key_2:
        case Qt.Key_3:
        case Qt.Key_4:
        case Qt.Key_5:
        case Qt.Key_6:
        case Qt.Key_7:
        case Qt.Key_8:
        case Qt.Key_9:
            event.accept = true
            keyView.text = event.key - Qt.Key_0;
            break;
        }
    }

    Text {
        id: keyView
        anchors.centerIn: parent
        font{ bold: true; pixelSize: 24}
        text: qsTr("text");
    }
}
7 Button
按钮可能是GUI应用中最常用的控件了。QML中的Button和QPushButton类似,用户点击按钮会触发一个clicked()信号,在QML文档中可以为clicked()指定信号处理器(onClicked),响应用户操作。
要使用 Button,需要引入 import QtQuick.Controls 2.x() 先看一个简单的示例,button_quit.qml,点击按钮,退出应用。代码如下:
import QtQuick 2.0
import QtQuick.Controls 2.0

Rectangle {
    width: 300
    height: 200

    Button {
        anchors.centerIn: parent
        text: "Button"

        //onClicked为信号处理器,处理clicked信号
        onClicked: Qt.quit()
    }
}
checkable属性设置Button是否可选。如果Button可选,checked属性则保存Button选中状态。
iconName属性设定图标的名字,如果平台的图标主题中存在该名字对应的资源,Button 就可以加载并显示它。iconSource则通过URL的方式来指定icon的位置。iconName属性的优先级高于iconSource。
isDefault属性指定按钮是否为默认按钮,如果是默认的,用户按Enter键就会触发按钮的clicked()信号。(Qt Quick.Controls 2.0 已移除)
menu属性允许你给按钮设置一个菜单(此时按钮可能会出现一个小小的下拉箭头),用 户点击按钮时会弹出菜单。默认是null。(Qt Quick.Controls 2.0 已移除)
action属性允许你设定按钮的action, action可以定义按钮的checked、text、tooltip、 iconSource等属性,还可以绑定按钮的clicked信号。action属性的默认值为null。
style属性用来定制按钮的风格,与它配套的有一个ButtonStyle类,允许你定制按钮的背景和文本。(Qt Quick.Controls 2.0 已移除)
接下来看看如何使用ButtonStyle来定制按钮外观。
8 ButtonStyle
要使用 ButtonStyle,需要引入 QtQuick.Controls.Styles 1.x。(Qt Quick.Controls 2.0 已移除)
ButtonStyle 类有 background、control、label 三个属性。background属性的类型是Component,用来绘制Button的背景。label属性的类型也是 Component,用于定制按钮的文本。control属性指向使用ButtonStyle的按钮对象,你可以用它访问按钮的各种状态。示例程序如下:
import QtQuick 2.0
import QtQuick.Controls 1.2
import QtQuick.Controls.Styles 1.2

Rectangle {
    width: 300
    height: 200

    Button {
        text: "Quit"
        anchors.centerIn: parent
        style: ButtonStyle {
            background: Rectangle {
                implicitWidth: 70;
                implicitHeight: 25;
                //按下按键时,边框宽度增大为2
                border.width: control.pressed ? 2 : 1;
                //鼠标覆盖或者按下按键时,边框颜色变为"green"
                border.color: (control.hovered || control.pressed)
                                ? "green" : "#888888";
            }
        }
        onClicked: Qt.quit();
    }
}
我通过给style属性指定一个ButtonStyle对象来定制Button的风格。这个就地实现的 ButtonStyle对象,为background属性指定一个Rectangle对象来定义按钮的背景。我定义了背景的建议宽度和高度,根据按钮的pressed属性(control是实际按钮的引用)来设置背景矩形的边框粗细,而边框颜色则随着按钮的hovered和pressed属性而变化。
对于ButtonStyle,如果有多个按钮同时用到,上面的方式就有点烦琐了,此时我们可以 使用Component在QML文档内定义一个组件,设置其id属性的值为btnStyle,然后在Button中设定style属性时直接使用btnStyle。示例代码如下:
import QtQuick 2.0
import QtQuick.Controls 1.2
import QtQuick.Controls.Styles 1.2

Rectangle {
    width: 300
    height: 200

    Component {
        id: btnStyle
        ButtonStyle {
            background: Rectangle {
                implicitWidth: 70;
                implicitHeight: 25;
                //按下按键时,边框宽度增大为2
                border.width: control.pressed ? 2 : 1;
                //鼠标覆盖或者按下按键时,边框颜色变为"green"
                border.color: (control.hovered || control.pressed)
                                ? "green" : "#888888";
            }
        }
    }

    Button {
        text: "OK"
        style: btnStyle
        onClicked: Qt.quit();
    }

    Button {
        text: "Quit"
        style: btnStyle
        anchors.centerIn: parent
        onClicked: Qt.quit();
    }
}
9 Image
Image可以显示一个图片,只要是Qt支持的,比如JPG、PNG、BMP、GIF、SVG等都可以显示。它只能显示静态图片,对于GIF等格式,只会把第一帧显示出来。如果要显示动 画,则可以使用 AnimatedSprite 或者 Animatedlmage。
Image的width和height属性用来设定图元的大小,如果没有设置它们,那么Image会使用图片本身的尺寸。如果设置了 width和height,那么图片就可能会被拉伸来适应这个尺寸。
Image默认会阻塞式地加载图片,如果要显示的图片很小,则没什么问题,如果分辨率很高,那麻烦就来了。此时你可以设置asynchronous属性为true来开启异步加载模式,在这种模式下Image使用一个线程来加载图片,而你可以在界面上显示一个等待图标之类的小玩意儿来告诉用户他需要等会儿。然后,当status (枚举值)的值为Image.Ready时再隐藏加载等待图元。
Image支持从网络加载图片。它的source属性类型是url,可以接受Qt 支持的任意一种网络协议,比如http、ftp等。而当Image识别到你提供的source是网络资源 时,会自动启用异步加载模式。此时Image的progress (取值范围是0.0?1.0)、status (枚举 值)都会适时更新,你可以根据它们判断何时结束加载等候提示界面。
显示网络图片
下面显示网络上的图片,在下载和加载前显示一个转圈圈的Loading图标,图片加载成功后隐藏Loading图标,如果加载出错,则显示一个简单的错误消息。示例如下:
import QtQuick 2.2
import QtQuick.Controls 1.2

Rectangle {
    id: text
    width: 480
    height: 320

    //用来显示一个等待图元
    BusyIndicator {
        id: busy
        running: true
        anchors.centerIn: parent
        z: 2
    }

    Text {
        id: stateLabel
        visible: false
        anchors.centerIn: parent
        z: 3
    }

    Image {
        id: imageViewer
        //开启异步加载模式,专门使用一个线程来加载图片
        asynchronous: true
        //图片较大的情况下,指定不缓存图像(cache默认为true)
        cache: false
        anchors.fill: parent
        //设置图片的填充模式为“等比缩放”
        fillMode: Image.PreserveAspectFit
        onStatusChanged: {
            if (imageViewer.status === Image.Loading) {
                busy.running = true; //图片为“加载状态”,则显示“等待图元”
                stateLabel.visible = false
            }
            else if(imageViewer.status === Image.Ready)
                busy.running = false; //图片为“准备好的状态”,则不再显示“等待图元”
            else if(imageViewer.status === Image.Error) {
                busy.running = false;
                stateLabel.visible = true //图片为“加载失败状态”,则显示“Error”文本
                stateLabel.text = "Error"
            }
        }

        //上面都执行完了,再显示图片
        Component.onCompleted: {
            imageViewer.source = "https://www.cnblogs.com/images/cnblogs_com/linuxAndMcu/1348721/o_o_misaka.jpg"
        }
    }
}
Image对象,设置了 asynchronous属性为true,不过对于网络资源Image默认异步加载, 这个属性不起作用,只有你想异步加载本地资源时才需要设置它。cache属性设置为false, 告诉Image不用缓存图片。fillMode属性设置了等比缩放模式。
onStatusChanged是信号处理器,Image的status属性变化时会发射statusChanged()信号。属性变化触发的信号,对应的信号处理器格式为on<property>Changed, 所以这里的名字是onStatusChanged。在信号处理器的代码块中,我们通过Image对象的id访问它的status属性,根据不同的状态来更新界面。
10 Busylndicator
Busylndicator用来显示一个等待图元,在进行一些耗时操作时你可以使用它来缓解用户的焦躁情绪。
Busylndicator的running属性是个布尔值,为true时显示。style属性允许你定制Busylndicator。默认的效果就是一个转圈圈的动画。
11 图片浏览器的第一个版本
import QtQuick 2.11
import QtQuick.Window 2.11
import QtQuick.Controls 1.2
import QtQuick.Controls.Styles 1.2
import QtQuick.Dialogs 1.2

Window {
    id: window
    visible: true
    width: 640
    height: 480
    minimumWidth: 480
    minimumHeight: 380
    title: qsTr("ImageViewer")

    BusyIndicator {
        id: busy
        running: false
        anchors.centerIn: parent
        z: 2
    }

    Text {
        id: stateLabel
        visible: false
        anchors.centerIn: parent
        z: 3
    }

    Image {
        id: imageViewer
        asynchronous: true
        cache: false
        anchors.fill: parent
        fillMode: Image.PreserveAspectFit
        onStatusChanged: {
            if (imageViewer.status === Image.Loading) {
                busy.running = true
                stateLabel.visible = false
            }
            else if(imageViewer.status === Image.Ready)
                busy.running = false
            else if(imageViewer.status === Image.Error) {
                busy.running = false
                stateLabel.visible = true
                stateLabel.text = "Error"
            }
        }
    }

    Button {
        id: openFile
        text: "open"
        anchors.left: parent.left
        anchors.leftMargin: 8
        anchors.bottom: parent.bottom
        anchors.bottomMargin: 8
        style: ButtonStyle {
            background: Rectangle {
                implicitWidth: 70;
                implicitHeight: 25;
                border.width: control.pressed ? 2 : 1;
                border.color: (control.hovered || control.pressed)
                                ? "green" : "#888888";
            }
        }
        //按下按钮,打开文件对话框
        onClicked: fileDialog.open()
        z: 4
    }

    Text {
        id: imageText
        anchors.left: openFile.right
        anchors.leftMargin: 8
        anchors.verticalCenter: openFile.verticalCenter
        font.pixelSize: 20
    }

    FileDialog {
        id: fileDialog
        title: "Please choose a ImageFile"
        nameFilters: ["Image Files (*.jpg *.png *.gif)"]
        onAccepted: {
            imageViewer.source = fileDialog.fileUrl
            var imageFile = new String(fileDialog.fileUrl)
            imageText.text = imageFile.slice(8)
        }
    }
}
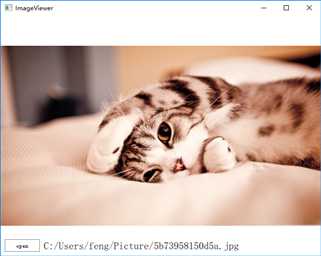
在Open按钮的onClicked信号处理器中,调用FileDialog对象的open()方法让用户选择文件。当用户选择文件后会触发FileDialog的accepted信号,我为它创建了onAccepted信号处理器,在信号处理器内设置imageViewer的source属性来显示图片,同时设置imagePath 的text属性来展示图片文件的路径。程序效果如下图所示:

12 FileDialog
FileDialog是Qt Quick中的文件对话框,它可以用来选择已有的文件、文件夹,支持单 选、多选,也可以用来在保存文件或创建文件夹时让用户提供一个名字。
FileDialog的visible属性的默认值为false,如果要显示对话框,则需要调用open()方法或者设置此属性为true。
selectExisting属性的默认值为true,表示选择已有文件或文件夹;当其为false时,用于供用户创建文件或文件夹名字。
selectFolder属性的默认值为false,表示选择文件;设置其为true,则表示选择文件夹。
selectMultiple属性的默认值为false,表示单选;设置其为true,则表示多选。当selectExisting为false 时,selectMultiple 应该为 false。
FileDialog还支持名字过滤功能,nameFilters用于设定一个过滤器列表。而selectedNameFilter则保存用户选择的过滤器,或者用来设置初始的过滤器。
当用户选择了一个文件时,fileUrl属性保存该文件的路径。如果用户选择了多个文件, 该属性为空。fileUrls属性是一个列表,保存用户选择的所有文件的路径。
folder属性存放的是用户选择的(文件所在的)文件夹的位置。
上面图片浏览器实例中选择图片文件的对话框也可以修改成这样:
    FileDialog {
        id: fileDialog
        title: "Please choose a ImageFile"
        nameFilters: ["Image Files (*.jpg *.png *.gif)"]
        selectMultiple: true
        onAccepted: {
            imageViewer.source = fileDialog.fileUrls[0]
            var imageFile = new String(fileDialog.fileUrls[0])
            imageText.text = imageFile.slice(8)
        }
    }
做了上述修改后,可以一次选择多个图片文件,也可以切换名字过滤器。
以上是关于[Qt Quick入门] 基本元素初体验的主要内容,如果未能解决你的问题,请参考以下文章