在线教育_Day06_项目整合阿里云OSS和Excel导入分类
Posted 编程指南针
tags:
篇首语:本文由小常识网(cha138.com)小编为大家整理,主要介绍了在线教育_Day06_项目整合阿里云OSS和Excel导入分类相关的知识,希望对你有一定的参考价值。
一、阿里云OSS概述及开通
1.1 对象存储OSS
为了解决海量数据存储与弹性扩容,项目中我们采用云存储的解决方案- 阿里云OSS。
1.2 开通“对象存储OSS”服务
(1)申请阿里云账号
(2)实名认证
(3)开通“对象存储OSS”服务
(4)进入管理控制台
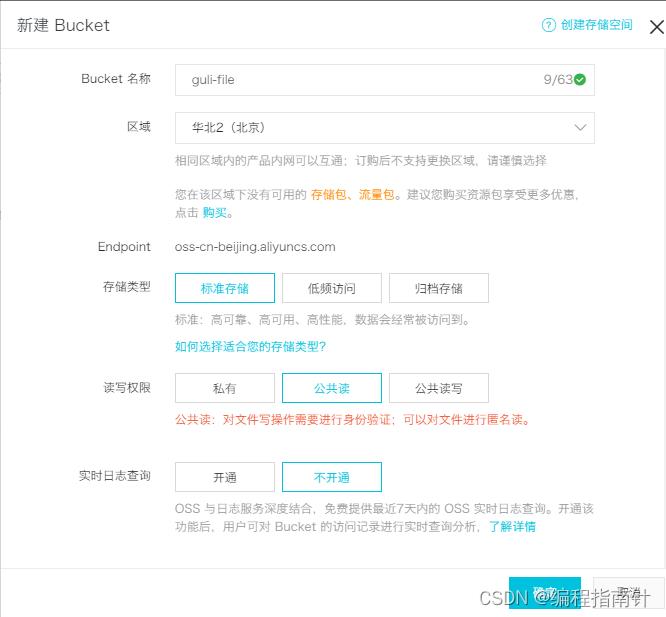
1.3 创建Bucket
选择:标准存储、公共读、不开通
1.3 上传默认头像
创建文件夹avatar,上传默认的用户头像

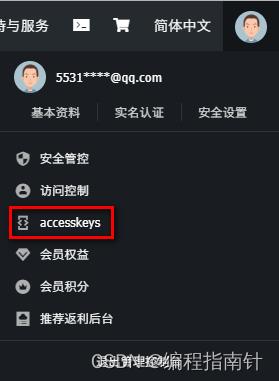
1.4 创建RAM子用户
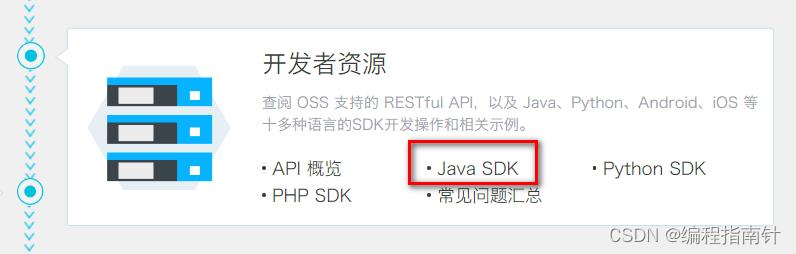
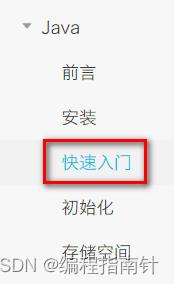
二、阿里云OSS快速入门
2.1 创建Mavaen项目
com.itfxp
aliyun-oss
2.2 引入pom依赖
<dependencies> <!--aliyunOSS--> <dependency> <groupId>com.aliyun.oss</groupId> <artifactId>aliyun-sdk-oss</artifactId> <version>2.8.3</version> </dependency> <dependency> <groupId>junit</groupId> <artifactId>junit</artifactId> <version>4.12</version> </dependency> </dependencies>
2.3 找到编码时需要用到的常量值
(1)endpoint
(2)bucketName
(3)accessKeyId
(4)accessKeySecret
2.4 测试创建Bucket的连接
public class OSSTest // Endpoint以杭州为例,其它Region请按实际情况填写。 String endpoint = "your endpoint"; // 阿里云主账号AccessKey拥有所有API的访问权限,风险很高。强烈建议您创建并使用RAM账号进行API访问或日常运维,请登录 https://ram.console.aliyun.com 创建RAM账号。 String accessKeyId = "your accessKeyId"; String accessKeySecret = "your accessKeySecret"; String bucketName = "your bucketName"; @Test public void testCreateBucket() // 创建OSSClient实例。 OSSClient ossClient = new OSSClient(endpoint, accessKeyId, accessKeySecret); // 创建存储空间。 ossClient.createBucket(bucketName); // 关闭OSSClient。 ossClient.shutdown();
2.5 判断存储空间是否存在

@Test public void testExist() // 创建OSSClient实例。 OSSClient ossClient = new OSSClient(endpoint, accessKeyId, accessKeySecret); boolean exists = ossClient.doesBucketExist(bucketName); System.out.println(exists); // 关闭OSSClient。 ossClient.shutdown();
2.6 设置存储空间的访问权限
@Test public void testAccessControl() // 创建OSSClient实例。 OSSClient ossClient = new OSSClient(endpoint, accessKeyId, accessKeySecret); // 设置存储空间的访问权限为:公共读。 ossClient.setBucketAcl(bucketName, CannedAccessControlList.PublicRead); // 关闭OSSClient。 ossClient.shutdown();

三、后端集成阿里云OSS
3.1 新建云存储微服务
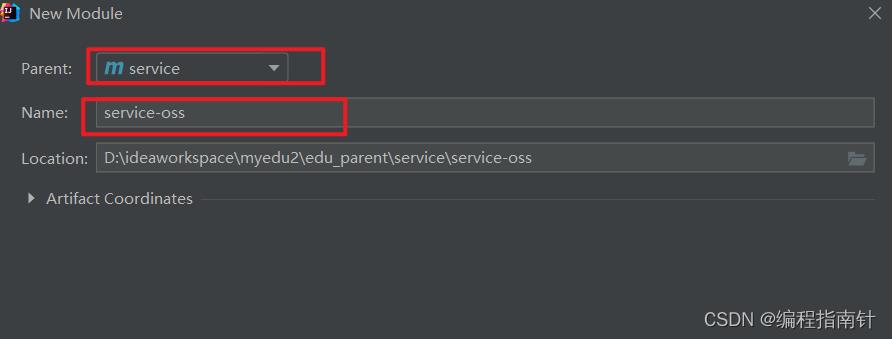
3.1.1 创建子模块service-oss
在service模块下创建子模块service-oss
3.1.2 配置pom.xml
service-oss上级模块service已经引入service的公共依赖,所以service-oss模块只需引入阿里云oss相关依赖即可,
service父模块已经引入了service-base模块,所以Swagger相关默认已经引入
<dependencies> <!-- 阿里云oss依赖 --> <dependency> <groupId>com.aliyun.oss</groupId> <artifactId>aliyun-sdk-oss</artifactId> </dependency> <!-- 日期工具栏依赖 --> <dependency> <groupId>joda-time</groupId> <artifactId>joda-time</artifactId> </dependency> </dependencies>
3.2 配置application.properties
#服务端口 server.port=8002 #服务名 spring.application.name=service-oss #环境设置:dev、test、prod spring.profiles.active=dev #阿里云 OSS #不同的服务器,地址不同 aliyun.oss.file.endpoint=oss-cn-beijing.aliyuncs.com aliyun.oss.file.keyid=LTAI5tHFXMpivCYnRmXR7MnL aliyun.oss.file.keysecret=uEi6NdCOdJd7hLNBQZ1ie3W5s54Tmg #bucket可以在控制台创建,也可以使用java代码创建 aliyun.oss.file.bucketname=zjledu
3.3 创建启动类
创建OssApplication.java
package com.itfxp.oss;
import org.springframework.boot.SpringApplication;
import org.springframework.boot.autoconfigure.SpringBootApplication;
import org.springframework.context.annotation.ComponentScan;
@SpringBootApplication
@ComponentScan("com.itfxp")
public class OssApplication
public static void main(String[] args)
SpringApplication.run(OssApplication.class, args);
3.4 启动项目
报错
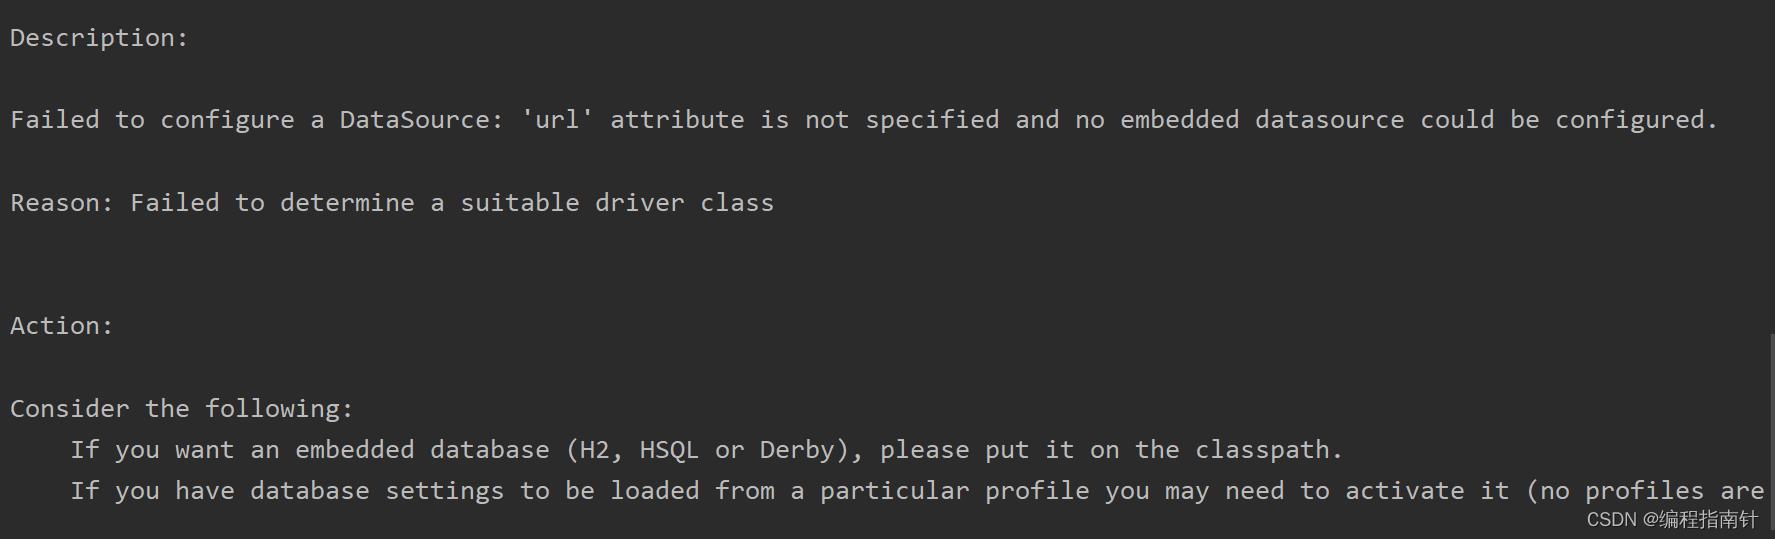
spring boot 会默认加载org.springframework.boot.autoconfigure.jdbc.DataSourceAutoConfiguration这个类,
而DataSourceAutoConfiguration类使用了@Configuration注解向spring注入了dataSource bean,又因为项目(oss模块)中并没有关于dataSource相关的配置信息,所以当spring创建dataSource bean时因缺少相关的信息就会报错。
解决办法:
方法1、在@SpringBootApplication注解上加上exclude,解除自动加载DataSourceAutoConfiguration
@SpringBootApplication(exclude = DataSourceAutoConfiguration.class)
四、实现文件上传
4.1 从配置文件读取常量
创建常量读取工具类:ConstantPropertiesUtil.java
使用@Value读取application.properties里的配置内容
用spring的 InitializingBean 的 afterPropertiesSet 来初始化配置信息,这个方法将在所有的属性被初始化后调用。
package com.itfxp.oss.util;

import org.springframework.beans.factory.InitializingBean;
import org.springframework.beans.factory.annotation.Value;
import org.springframework.stereotype.Component;

/**
 * 常量类,读取配置文件application.properties中的配置
 */
@Component
//@PropertySource("classpath:application.properties")
public class ConstantPropertiesUtil implements InitializingBean

    @Value("$aliyun.oss.file.endpoint")
    private String endpoint;

    @Value("$aliyun.oss.file.keyid")
    private String keyId;

    @Value("$aliyun.oss.file.keysecret")
    private String keySecret;


    @Value("$aliyun.oss.file.bucketname")
    private String bucketName;

    public static String END_POINT;
    public static String ACCESS_KEY_ID;
    public static String ACCESS_KEY_SECRET;
    public static String BUCKET_NAME;

    @Override
    public void afterPropertiesSet() throws Exception
        END_POINT = endpoint;
        ACCESS_KEY_ID = keyId;
        ACCESS_KEY_SECRET = keySecret;
        BUCKET_NAME = bucketName;
4.2 文件上传
创建Service接口:FileService.java
4.2.1 创建FileService接口
public interface FileService

    /**
     * 文件上传至阿里云
     * @param file
     * @return
     */
    String upload(MultipartFile file);
4.2.2 创建FileService接口实现类
参考SDK中的:Java->上传文件->简单上传->流式上传->上传文件流

package com.itfxp.oss.service.impl;

import com.aliyun.oss.*;
import com.itfxp.oss.service.FileService;
import com.itfxp.oss.util.ConstantPropertiesUtil;
import org.springframework.stereotype.Service;
import org.springframework.web.multipart.MultipartFile;

import java.io.FileInputStream;
import java.io.IOException;
import java.io.InputStream;

@Service
public class FileServiceImpl implements FileService
    @Override
    public String upload(MultipartFile file)

        //获取阿里云存储相关常量
        String endPoint = ConstantPropertiesUtil.END_POINT;
        String accessKeyId = ConstantPropertiesUtil.ACCESS_KEY_ID;
        String accessKeySecret = ConstantPropertiesUtil.ACCESS_KEY_SECRET;
        String bucketName = ConstantPropertiesUtil.BUCKET_NAME;


        String uploadUrl = null;
        OSS ossClient = null;
        try
            ossClient = new OSSClientBuilder().build(endPoint, accessKeyId, accessKeySecret);
            InputStream inputStream = file.getInputStream();
            // 获取文件的名称
            String filename = file.getOriginalFilename();
            // 创建PutObject请求。
            ossClient.putObject(bucketName, filename, inputStream);
            // 上传阿里云之后路径返回
            uploadUrl = "https://" + bucketName+"."+endPoint+"/"+filename;
         catch (IOException e)
            e.printStackTrace();
         finally
            if (ossClient != null)
                ossClient.shutdown();


        return uploadUrl;
4.2.3 创建OssController
创建controller:FileUploadController.java
@Api(description="阿里云文件管理")
@CrossOrigin //跨域
@RestController
@RequestMapping("/admin/oss/file")
public class FileController

    @Autowired
    private FileService fileService;

    /**
     * 文件上传
     *
     * @param file
     */
    @ApiOperation(value = "文件上传")
    @PostMapping("upload")
    public R upload(
            @ApiParam(name = "file", value = "文件", required = true)
            @RequestParam("file") MultipartFile file)

        String uploadUrl = fileService.upload(file);
        //返回r对象
        return R.ok().message("文件上传成功").data("url", uploadUrl);
4.3 重启oss服务
查看控制台是否有报错信息。

在service-oss中引入service-base模块
<dependency>
    <groupId>com.itfxp</groupId>
    <artifactId>service-base</artifactId>
    <version>0.0.1-SNAPSHOT</version>
</dependency>
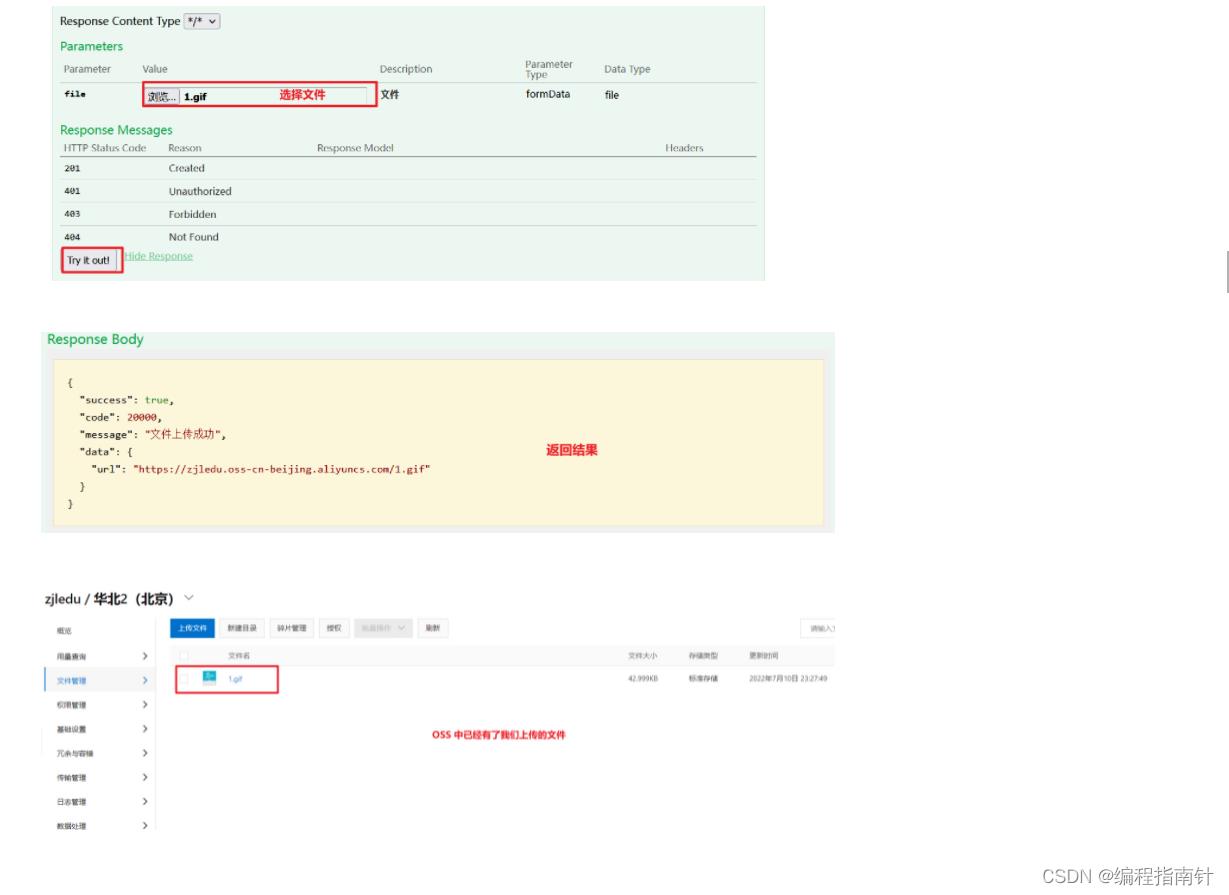
4.5 Swagger中测试文件上传
4.6 文件上传代码完善
package com.itfxp.oss.service.impl;

import com.aliyun.oss.*;
import com.itfxp.oss.service.FileService;
import com.itfxp.oss.util.ConstantPropertiesUtil;
import org.joda.time.DateTime;
import org.springframework.stereotype.Service;
import org.springframework.web.multipart.MultipartFile;

import java.io.FileInputStream;
import java.io.IOException;
import java.io.InputStream;
import java.text.SimpleDateFormat;
import java.util.Date;
import java.util.UUID;

@Service
public class FileServiceImpl implements FileService
    @Override
    public String upload(MultipartFile file)

        //获取阿里云存储相关常量
        String endPoint = ConstantPropertiesUtil.END_POINT;
        String accessKeyId = ConstantPropertiesUtil.ACCESS_KEY_ID;
        String accessKeySecret = ConstantPropertiesUtil.ACCESS_KEY_SECRET;
        String bucketName = ConstantPropertiesUtil.BUCKET_NAME;


        String uploadUrl = null;
        OSS ossClient = null;
        try
            ossClient = new OSSClientBuilder().build(endPoint, accessKeyId, accessKeySecret);
            InputStream inputStream = file.getInputStream();
            // 随机文件名唯一
            String uuid = UUID.randomUUID().toString().replace("-", "");
            // 获取文件的名称
            String filename = file.getOriginalFilename();

            filename= uuid+filename;

            // 把文件按照日期进行分类

            String datePath = new DateTime().toString("yyyy-MM-dd");
            filename= datePath+"/"+filename;

            // 创建PutObject请求。
            ossClient.putObject(bucketName, filename, inputStream);
            // 上传阿里云之后路径返回
            uploadUrl = "https://" + bucketName+"."+endPoint+"/"+filename;
         catch (IOException e)
            e.printStackTrace();
         finally
            if (ossClient != null)
                ossClient.shutdown();


        return uploadUrl;
五、配置nginx
5.1 配置nginx反向代理
5.1.1 安装window版的nginx
将nginx-1.12.0.zip解压到开发目录中
如:E:\\development\\nginx-1.12.0-guli-api
双击nginx.exe运行nginx
访问:localhost
5.1.2 配置nginx代理
在Nginx中配置对应的微服务服务器地址即可
注意:最好修改默认的 80端口改成81
http
    server
        listen       81;
        ......
    ,

    ......
    server

        listen 9001;
        server_name localhost;

        location ~ /eduservice/
             proxy_pass http://localhost:8001;


        location ~ /eduoss/
              proxy_pass http://localhost:8002;
5.1.3 重启nginx
nginx -s reload
5.1.4 测试
访问讲师列表接口:http://localhost:8201/admin/edu/teacher
访问获取用户信息接口:http://localhost:8201/user/info?token=admin
5.2 配置开发环境
5.2.1 修改config/dev.env.js
BASE_API: '"http://127.0.0.1:9001"'

5.2.2 重启前端程序
修改配置文件后,需要手动重启前端程序
六、用户头像上传
6.1 前端添加文件上传组件
将资料中的上传组件ImageCropper和PanThumb复制到前端项目components中

6.2 引用上传组件
src/views/edu/teacher/save.vue
<!-- 讲师头像:TODO -->
<el-form-item label="讲师头像">
    <!-- 头衔缩略图 -->
    <pan-thumb :image="teacher.avatar" />
    <!-- 文件上传按钮 -->
    <el-button
               type="primary"
               icon="el-icon-upload"
               @click="imagecropperShow = true">更换头像
    </el-button>

    <!--
    v-show:是否显示上传组件
    :key:类似于id,如果一个页面多个图片上传控件,可以做区分
    :url:后台上传的url地址
    @close:关闭上传组件
    @crop-upload-success:上传成功后的回调
    -->
    <image-cropper
                   v-show="imagecropperShow"
                   :width="300"
                   :height="300"
                   :key="imagecropperKey"
                   :url="BASE_API + '/admin/oss/file/upload'"
                   field="file"
                   @close="close"
                   @crop-upload-success="cropSuccess"
                   />
</el-form-item>
6.3 上传组件相关配置
在data中设置以下三个值:
// 上传弹框组件是否显示
imagecropperShow: false,
// 上传组件key值
imagecropperKey: 0,
// 获取dev.env.js中的地址
BASE_API:process.env.BASE_API ,

在method中定义以下两个方法:
// 关闭上传弹窗的方法
close()

,
// 上传成功方法
cropSuccess()

,

引入组件模块
import ImageCropper from '@/components/ImageCropper'
import PanThumb from '@/components/PanThumb'

在data上面进行声明组件。
components: ImageCropper,PanThumb,

配置上传接口URL

实现上传和图片回显
  methods:
    //其他函数
    .......

    // 上传成功后的回调函数
    cropSuccess(data)
      console.log(data)
      this.imagecropperShow = false
      this.teacher.avatar = data.url
      // 上传成功后,重新打开上传组件时初始化组件,否则显示上一次的上传结果
      this.imagecropperKey = this.imagecropperKey + 1
    ,

    // 关闭上传组件
    close()
      this.imagecropperShow = false
      // 上传失败后,重新打开上传组件时初始化组件,否则显示上一次的上传结果
      this.imagecropperKey = this.imagecropperKey + 1
6.4 测试文件上传

七、EasyExcel基本使用
7.1 EasyExcel简介
7.1.1 Excel导入导出的应用场景
1、数据导入:减轻录入工作量
2、数据导出:统计信息归档
3、数据传输:异构系统之间数据传输
7.1.2 EasyExcel特点
-
Java领域解析、生成Excel比较有名的框架有Apache poi、jxl等。但他们都存在一个严重的问题就是非常的耗内存。如果你的系统并发量不大的话可能还行,但是一旦并发上来后一定会OOM或者JVM频繁的full gc。
-
EasyExcel是阿里巴巴开源的一个excel处理框架,以使用简单、节省内存著称。EasyExcel能大大减少占用内存的主要原因是在解析Excel时没有将文件数据一次性全部加载到内存中,而是从磁盘上一行行读取数据,逐个解析。
-
EasyExcel采用一行一行的解析模式,并将一行的解析结果以观察者的模式通知处理(AnalysisEventListener)
7.2 EasyExcel 写操作
7.2.1 创建一个普通的maven项目
项目名:excel-easydemo
7.2.2 pom中引入xml相关依赖
<dependencies>
    <!-- https://mvnrepository.com/artifact/com.alibaba/easyexcel -->
    <dependency>
        <groupId>com.alibaba</groupId>
        <artifactId>easyexcel</artifactId>
        <version>2.1.1</version>
    </dependency>
</dependencies>
7.2.3 创建实体类
设置表头和添加的数据字段
import com.alibaba.excel.annotation.ExcelProperty;

//设置表头和添加的数据字段
public class DemoData
    //设置表头名称
    @ExcelProperty("学生编号")
    private int sno;

    //设置表头名称
    @ExcelProperty("学生姓名")
    private String sname;

    public int getSno()
        return sno;


    public void setSno(int sno)
        this.sno = sno;


    public String getSname()
        return sname;


    public void setSname(String sname)
        this.sname = sname;


    @Override
    public String toString()
        return "DemoData" +
                "sno=" + sno +
                ", sname='" + sname + '\\'' +
                '';
7.2.4 实现写操作
(1)创建方法循环设置要添加到Excel的数据
//循环设置要添加的数据,最终封装到list集合中
private static List<DemoData> data()
    List<DemoData> list = new ArrayList<DemoData>();
    for (int i = 0; i < 10; i++)
        DemoData data = new DemoData();
        data.setSno(i);
        data.setSname("张三"+i);
        list.add(data);

    return list;
(2)实现最终的添加操作(写法一)
public static void main(String[] args) throws Exception
    // 写法1
    String fileName = "F:\\\\11.xlsx";
    // 这里 需要指定写用哪个class去写,然后写到第一个sheet,名字为模板 然后文件流会自动关闭
    // 如果这里想使用03 则 传入excelType参数即可
    EasyExcel.write(fileName, DemoData.class).sheet("写入方法一").doWrite(data());
(3)实现最终的添加操作(写法二)
public static void main(String[] args) throws Exception
    // 写法2,方法二需要手动关闭流
    String fileName = "F:\\\\112.xlsx";
    // 这里 需要指定写用哪个class去写
    ExcelWriter excelWriter = EasyExcel.write(fileName, DemoData.class).build();
    WriteSheet writeSheet = EasyExcel.writerSheet("写入方法二").build();
    excelWriter.write(data(), writeSheet);
    /// 千万别忘记finish 会帮忙关闭流
    excelWriter.finish();
7.3 EasyExcel 读操作
7.3.1 创建实体类
import com.alibaba.excel.annotation.ExcelProperty;
public class ReadData
    //设置列对应的属性
    @ExcelProperty(index = 0)
    private int sid;

    //设置列对应的属性
    @ExcelProperty(index = 1)
    private String sname;

    public int getSid()
        return sid;

    public void setSid(int sid)
        this.sid = sid;

    public String getSname()
        return sname;

    public void setSname(String sname)
        this.sname = sname;

    @Override
    public String toString()
        return "ReadData" +
                "sid=" + sid +
                ", sname='" + sname + '\\'' +
                '';
7.3.2 创建读取操作的监听器
//创建读取excel监听器
public class ExcelListener extends AnalysisEventListener<ReadData>

    //创建list集合封装最终的数据
    List<ReadData> list = new ArrayList<ReadData>();

    //一行一行去读取excle内容
    @Override
    public void invoke(ReadData user, AnalysisContext analysisContext)
       System.out.println("***"+user);
        list.add(user);


    //读取excel表头信息
    @Override
    public void invokeHeadMap(Map<Integer, String> headMap, AnalysisContext context)
        System.out.println("表头信息:"+headMap);


    //读取完成后执行
    @Override
    public void doAfterAllAnalysed(AnalysisContext analysisContext)
7.3.3 调用实现最终的读取
public static void main(String[] args) throws Exception

    // 写法1:
    String fileName = "F:\\\\01.xlsx";
    // 这里 需要指定读用哪个class去读,然后读取第一个sheet 文件流会自动关闭
    EasyExcel.read(fileName, ReadData.class, new ExcelListener()).sheet().doRead();

    // 写法2:
    InputStream in = new BufferedInputStream(new FileInputStream("F:\\\\01.xlsx"));
    ExcelReader excelReader = EasyExcel.read(in, ReadData.class, new ExcelListener()).build();
    ReadSheet readSheet = EasyExcel.readSheet(0).build();
    excelReader.read(readSheet);
    // 这里千万别忘记关闭,读的时候会创建临时文件,到时磁盘会崩的
    excelReader.finish();
八、课程分类管理接口
8.0 生成subject相关代码
使用代码生成器,生成subject相关代码

配置mapper扫描路径以及驼峰命名方式
# 该配置就是将带有下划线的表字段映射为驼峰格式的实体类属性
mybatis-plus.configuration.map-underscore-to-camel-case=true
# 配置mapper扫描路径
mybatis-plus.mapper-locations= classpath*:/mapper/**/*.xml
8.1 添加依赖
service-edu模块配置依赖
<dependencies>
    <!-- https://mvnrepository.com/artifact/com.alibaba/easyexcel -->
    <dependency>
        <groupId>com.alibaba</groupId>
        <artifactId>easyexcel</artifactId>
        <version>2.1.1</version>
    </dependency>
</dependencies>
8.2 业务处理
8.2.1 EduSubjectController
/**
 * <p>
 * 讲师 前端控制器
 * </p>
 *
 * @author zjl
 * @since 2022-06-26
 */

@Api("课程分类管理")
@RestController
@RequestMapping("/eduservice/subject")
@CrossOrigin
public class EduSubjectController

    @Autowired
    EduSubjectService eduSubjectService;

    // 添加课程分类
    @ApiOperation(value = "Excel批量导入")
    @PostMapping("addSubject")
    public R addSubject(MultipartFile file)
        //1 获取上传的excel文件 MultipartFile
        //返回错误提示信息
        eduSubjectService.importSubjectData(file,eduSubjectService);
        //判断返回集合是否为空
        return R.ok();
8.2.2 创建和Excel对应的实体类
import com.alibaba.excel.annotation.ExcelProperty;
import lombok.Data;

@Data
public class ExcelSubjectData
    @ExcelProperty(index = 0)
    private String oneSubjectName;

    @ExcelProperty(index = 1)
    private String twoSubjectName;
8.2.3 编写SubjectService
(1)SubjectService接口
void importSubjectData(MultipartFile file,EduSubjectService subjectService);
(2)SubjectService接口实现类
@Service
public class EduSubjectServiceImpl extends ServiceImpl<EduSubjectMapper, EduSubject>
implements EduSubjectService

    @Override
    public void importSubjectData(MultipartFile file,EduSubjectService subjectService)
        try
            //1 获取文件输入流
            InputStream inputStream = file.getInputStream();

            // 这里 需要指定读用哪个class去读,然后读取第一个sheet 文件流会自动关闭
            EasyExcel.read(inputStream, ExcelSubjectData.class, new SubjectExcelListener(subjectService)).sheet().doRead();
        catch(Exception e)
            e.printStackTrace();
            throw new EduException(20002,"添加课程分类失败");
8.2.4 创建读取Excel监听器
package com.itfxp.eduservice.listener;

import com.alibaba.excel.context.AnalysisContext;
import com.alibaba.excel.event.AnalysisEventListener;
import com.baomidou.mybatisplus.core.conditions.query.QueryWrapper;
import com.itfxp.eduservice.entity.EduSubject;
import com.itfxp.eduservice.entity.excel.ExcelSubjectData;
import com.itfxp.eduservice.service.EduSubjectService;
import com.itfxp.servicebase.exceptionhandler.EduException;

public class SubjectExcelListener extends AnalysisEventListener<ExcelSubjectData>

    private EduSubjectService subjectService;

    public SubjectExcelListener()


    public SubjectExcelListener(EduSubjectService subjectService)
        this.subjectService = subjectService;


    @Override
    public void invoke(ExcelSubjectData excelSubjectData, AnalysisContext analysisContext)
        if (excelSubjectData == null)
            throw new EduException(20001, "文件数据为空!");


        // 一行一行的读

        EduSubject eduOneSubject = this.existOneSubject(subjectService, excelSubjectData.getOneSubjectName());
        if (eduOneSubject == null)  // 没有相同的一级分类
            eduOneSubject = new EduSubject();
            eduOneSubject.setParentId("0");
            eduOneSubject.setTitle(excelSubjectData.getOneSubjectName());

            subjectService.save(eduOneSubject);


        // 判断二级分类
        String pid = eduOneSubject.getId();
        EduSubject eduTwoSubject = this.existTwoSubject(subjectService, excelSubjectData.getTwoSubjectName(), pid);
        if (eduTwoSubject == null)  // 没有相同的一级分类
            eduTwoSubject = new EduSubject();
            eduTwoSubject.setParentId(pid);
            eduTwoSubject.setTitle(excelSubjectData.getTwoSubjectName());

            subjectService.save(eduTwoSubject);


    @Override
    public void doAfterAllAnalysed(AnalysisContext analysisContext)


    // 判断一级分类不能重复添加
    private EduSubject existOneSubject(EduSubjectService subjectService, String name)
        // 查询数据库判断一级分类是否存在
        QueryWrapper<EduSubject> wrapper = new QueryWrapper<>();
        wrapper.eq("title", name);
        wrapper.eq("parent_id", "0");

        EduSubject eduSubjectOne = subjectService.getOne(wrapper);
        return eduSubjectOne;


    // 判断二级分类不能重复添加
    private EduSubject existTwoSubject(EduSubjectService subjectService, String name, String pid)
        QueryWrapper<EduSubject> wrapper = new QueryWrapper<>();
        wrapper.eq("title", name);
        wrapper.eq("parent_id", pid);
        EduSubject eduSubjectTwo = subjectService.getOne(wrapper);
        return eduSubjectTwo;
8.2.5 修改实体类
在EduSubject实体类中,添加时间和主键策略
/**
* 课程类别ID
*/
@TableId(value = "id", type = IdType.ID_WORKER_STR)
private String id;
/**
* 创建时间
*/
@TableField(fill = FieldFill.INSERT)
private Date gmtCreate;

/**
* 更新时间
*/
@TableField(fill = FieldFill.INSERT_UPDATE)
private Date gmtModified;
8.2.6 swagger 测试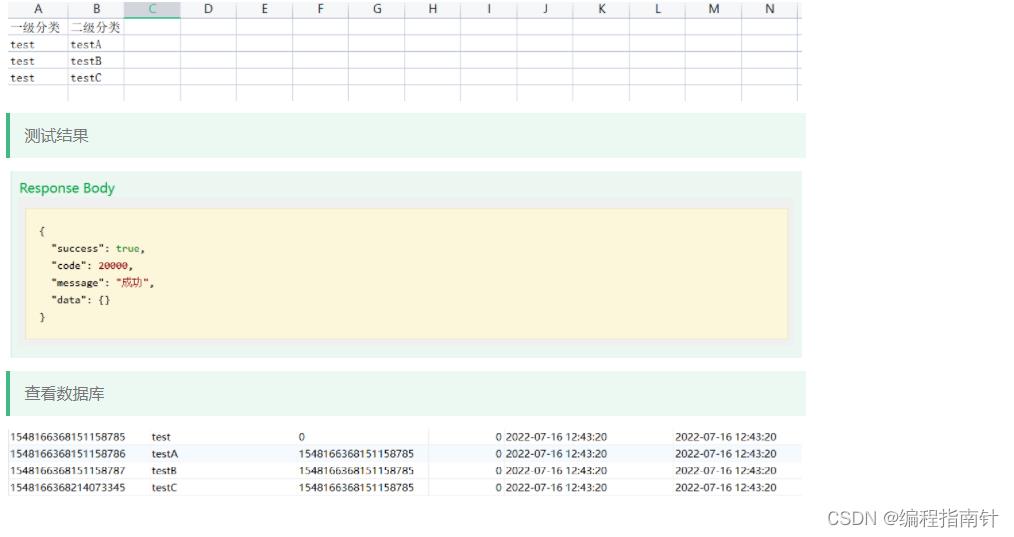
九、课程分类管理前端实现
9.1 配置路由
9.1.1 添加路由
在src/router/index.js中添加课程分类管理路由
// 课程分类管理

  path: '/subject',
  component: Layout,
  redirect: '/subject/list',
  name: '课程分类管理',
  meta:  title: '课程分类管理', icon: 'nested' ,
  children: [

      path: 'list',
      name: '课程分类列表',
      component: () => import('@/views/edu/subject/list'),
      meta:  title: '课程分类列表', icon: 'table'
    ,

      path: 'import',
      name: '导入课程分类',
      component: () => import('@/views/edu/subject/import'),
      meta:  title: '导入课程分类', icon: 'tree'

  ]
,
9.1.2 添加vue组件

9.2 表单组件import.vue
8.3.1 js定义数据
<script>
export default

  data()
    return
      BASE_API: process.env.BASE_API, // 接口API地址
      OSS_PATH: process.env.OSS_PATH, // 阿里云OSS地址
      fileUploadBtnText: '上传到服务器', // 按钮文字
      importBtnDisabled: false, // 按钮是否禁用,
      loading: false


</script>
8.3.2 template
<template>
  <div class="app-container">
    <el-form label-width="120px">
      <el-form-item label="信息描述">
        <el-tag type="info">excel模版说明</el-tag>
        <el-tag>
          <i class="el-icon-download" />
          <a
            :href="
              'https://zjledu.oss-cn-beijing.aliyuncs.com/excel%E6%A8%A1%E7%89%88/%E8%AF%BE%E7%A8%8B%E5%88%86%E7%B1%BB%E6%A8%A1%E7%89%88.xlsx'
            "
            >点击下载模版</a
          >
        </el-tag>
      </el-form-item>

      <el-form-item label="选择Excel">
        <el-upload
          ref="upload"
          :auto-upload="false"
          :on-success="fileUploadSuccess"
          :on-error="fileUploadError"
          :disabled="importBtnDisabled"
          :limit="1"
          :action="BASE_API + '/eduservice/subject/addSubject'"
          name="file"
          accept="application/vnd.ms-excel"
        >
          <el-button slot="trigger" size="small" type="primary"
            >选取文件</el-button
          >
          <el-button
            :loading="loading"
            style="margin-left: 10px"
            size="small"
            type="success"
            @click="submitUpload"
            > fileUploadBtnText </el-button
          >
        </el-upload>
      </el-form-item>
    </el-form>
  </div>
</template>
8.3.3 js上传方法
methods:
    submitUpload()
      this.fileUploadBtnText = '正在上传'
      this.importBtnDisabled = true
      this.loading = true
      this.$refs.upload.submit()
    ,

    fileUploadSuccess(response)

    ,

    fileUploadError(response)
8.3.4 回调函数
fileUploadSuccess(response)
    if (response.success === true)
    this.fileUploadBtnText = '导入成功'
    this.loading = false
    this.$message(
        type: 'success',
        message: response.message
    )

,

fileUploadError(response)
    this.fileUploadBtnText = '导入失败'
    this.loading = false
    this.$message(
    type: 'error',
    message: '导入失败'
    )
十、课程分类列表展示
10.1 前端实现
10.1.1 参考 views/tree/index.vue
直接把tree/index.vue文件中的代码复制到subject/list.vue文件中,运行看效果。

10.1.2 创建api
在api/edu/下创建subject.js
import request from '@/utils/request'

export default
    // 此参数的名称 要与后台接口的参数名称一致
    getSubjectList()
        return request(
        // 推荐方式
          url: `/eduservice/subject/getAllSubject`,
          method: 'get'
        //   params 后台使用RequestBody接收数据,是要的json数据,所以不能使用params进行传参

        )
10.1.3 导入subject.js
在views/edu/subject/list.vue中引入 subject.js文件
<template>
  <div class="app-container">
    <el-input v-model="filterText" placeholder="Filter keyword" style="margin-bottom:30px;" />

    <el-tree
      ref="subjectTree"
      :data="subjectList"
      :props="defaultProps"
      :filter-node-method="filterNode"
      class="filter-tree"
      default-expand-all
    />

  </div>
</template>

<script>
import subject from '@/api/edu/teacher/subject.js'
export default

  data()
    return
      filterText: '',
      subjectList: [],
      defaultProps:
        children: 'children',
        label: 'title'


  ,
  watch:
    filterText(val)
      this.$refs.subjectTree.filter(val)

  ,

  created()
    this.fetchNodeList()
  ,

  methods:
    fetchNodeList()
      subject.getNestedTreeList().then(response =>
        if (response.success === true)
          this.subjectList = response.data.items

      )
    ,
    filterNode(value, data)
      if (!value) return true
      return data.title.indexOf(value) !== -1


</script>
10.2 后端实现
10.2.1 创建vo
创建两个实体类,用于封装一级分类和二级分类
@Data
public class OneSubject

    private String id;
    private String title;
    // 一个一级分类有多个二级分类
    private List<TwoSubject> children = new ArrayList<>();
@Data
public class TwoSubject

    private String id;
    private String title;
10.2.2 创建controller
// 课程分类列表显示(树形)
@GetMapping("/getAllSubject")
public R getAllSubject()
    List<OneSubject> list = eduSubjectService.getAllOneTwoSubject();
    return R.ok().data("list",list);
10.2.3 创建service
service接口
List<OneSubject> getAllOneTwoSubject();
service接口实现类
    // 课程分类
    @Override
    public List<OneSubject> getAllOneTwoSubject()
        // 查询出所有的一级分类 parentid = 0
        QueryWrapper<EduSubject> oneSubjectQueryWrapper = new QueryWrapper<>();
        oneSubjectQueryWrapper.eq("parent_id", 0);
        List<EduSubject> oneSubjectsList = this.baseMapper.selectList(oneSubjectQueryWrapper);

        // 查询出所有的二级分类 parentid != 0
        QueryWrapper<EduSubject> twoSubjectQueryWrapper = new QueryWrapper<>();
        twoSubjectQueryWrapper.ne("parent_id", 0);
        List<EduSubject> twoSubjectsList = this.baseMapper.selectList(twoSubjectQueryWrapper);

        // 用于封装最终分类的集合
        List<OneSubject> finalSubjectList = new ArrayList<>();

        // 封装一级分类
        // 查询出来所有的一级分类list集合遍历,得到每个一级分类对象,获取每一个一级分类对象值
        // 封装到要求的集合里面 List<OneSubject> finalSubjectList = new ArrayList<>();
        oneSubjectsList.forEach((oneEduSubject ->
            // 获取每一个eduSubject对象,把eduSubject对象里面的内容放到OneSubject里面
            OneSubject oneSubject = new OneSubject();
            BeanUtils.copyProperties(oneEduSubject, oneSubject);
            // 将多个OneSubject存放到finalSubjectList集合中
            finalSubjectList.add(oneSubject);

            // 封装二级分类
            // 创建集合封装每个一级分类的二级分类
            List<TwoSubject> finalTwoSubjectList = new ArrayList<>();

            twoSubjectsList.forEach(twoEduSubject ->
                // 判断二级分类的parent_id与一级分类的id是否一样
                if (twoEduSubject.getParentId().equals(oneEduSubject.getId()))
                    TwoSubject  twoSubject = new TwoSubject();
                    BeanUtils.copyProperties(twoEduSubject,twoSubject);
                    finalTwoSubjectList.add(twoSubject);


                // 将二级分类添加封装到oneSubject分类中
                oneSubject.setChildren(finalTwoSubjectList);

            );

        ));
        return finalSubjectList;
10.3 优化前端过滤功能
修改filterNode方法,在搜索时,不区分大小写
filterNode(value, data)
    if (!value) return true
    return data.title.toLowerCase().indexOf(value.toLowerCase()) !== -1
10.4 修改import.vue
修改上传课程分类成功后,跳转list.vue页面
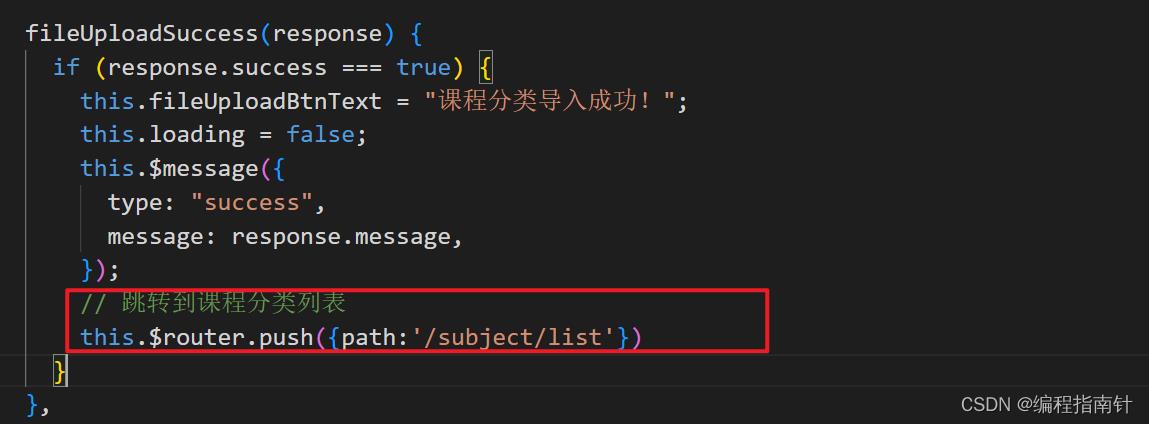
// 跳转到课程分类列表
this.$router.push(path:'/subject/list')
以上是关于在线教育_Day06_项目整合阿里云OSS和Excel导入分类的主要内容,如果未能解决你的问题,请参考以下文章