日志管理工具--Graylog
Graylog+mongodb+elasticsearch日志管理架构搭建
一、mongodb安装
1、添加mongodb安装镜像
[[email protected] package]# vim /etc/yum.repos.d/mongodb-org-3.0.repo
[mongodb-org-3.0]
name=MongoDB Repository
baseurl=http://repo.mongodb.org/yum/redhat/$releasever/mongodb-org/3.0/x86_64/
gpgcheck=0
enabled=1
2、yum安装mongodb
[[email protected] package]# yum install -y mongodb-org
[[email protected] package]# vi /etc/yum.conf
最后一行添加:
exclude=mongodb-org,mongodb-org-server,mongodb-org-shell,mongodb-org-mongos,mongodb-org-tools
3、启动mongodb并加入系统开机自启动
[[email protected] package]# service mongod start
Starting mongod: [ OK ]
[[email protected] package]#chkconfig mongod on
查看端口是否启动:

4、优化服务器内核参数
[[email protected] package]# vim /etc/security/limits.conf
最后一行添加
* soft nproc 65536
* hard nproc 65536
mongod soft nproc 65536
* soft nofile 131072
* hard nofile 131072
5、修改启动脚本配置
[[email protected] package]# vim /etc/init.d/mongod
ulimit -f unlimited行前插入一下内容:
if test -f /sys/kernel/mm/transparent_hugepage/enabled; then
echo never > /sys/kernel/mm/transparent_hugepage/enabled
fi
if test -f /sys/kernel/mm/transparent_hugepage/defrag; then
echo never > /sys/kernel/mm/transparent_hugepage/defrag
fi
6、重启mongodb
[[email protected] package]# /etc/init.d/mongod restart
Stopping mongod: [ OK ]
Starting mongod: [ OK ]
[[email protected] package]#
二、Elasticsearch安装
1、依赖环境Jre安装
[[email protected] package]# rpm -ivh jre-8u131-linux-x64.rpm
Preparing... ########################################### [100%]
1:jre1.8.0_131 ########################################### [100%]
Unpacking JAR files...
plugin.jar...
javaws.jar...
deploy.jar...
rt.jar...
jsse.jar...
charsets.jar...
localedata.jar...
[[email protected] package]# java -version
java version "1.8.0_131"
Java(TM) SE Runtime Environment (build 1.8.0_131-b11)
Java HotSpot(TM) 64-Bit Server VM (build 25.131-b11, mixed mode)
[[email protected] package]#
2、添加elasticsearch镜像
[[email protected] package]# rpm --import https://packages.elastic.co/GPG-KEY-elasticsearch
[[email protected] package]# vim /etc/yum.repos.d/elasticsearch.repo
[elasticsearch-1.5]
name=Elasticsearch repository for 1.5.x packages
baseurl=http://packages.elastic.co/elasticsearch/1.5/centos
gpgcheck=1
gpgkey=http://packages.elastic.co/GPG-KEY-elasticsearch
enabled=1
3、安装启动
[[email protected] package]# yum -y install elasticsearch
[[email protected] package]# chkconfig --add elasticsearch
[[email protected] package]# vim /etc/elasticsearch/elasticsearch.yml
cluster.name: graylog
[[email protected] package]# /etc/init.d/elasticsearch start
Starting elasticsearch: [ OK ]
[[email protected] package]#
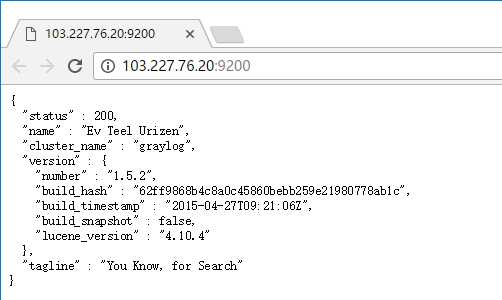
查看端口是否正常开启:

4、测试
三、graylog安装
1、下载rpm包
wget https://packages.graylog2.org/repo/el/6Server/1.0/x86_64/graylog-web-1.0.2-1.noarch.rpm
wget https://packages.graylog2.org/repo/el/6Server/1.0/x86_64/graylog-web-1.0.2-1.noarch.rpm
2、安装
[[email protected] package]# rpm -ivh graylog-server-1.0.2-1.noarch.rpm
warning: graylog-server-1.0.2-1.noarch.rpm: Header V3 RSA/SHA1 Signature, key ID b1606f22: NOKEY
Preparing... ########################################### [100%]
1:graylog-server ########################################### [100%]
[[email protected] package]# rpm -ivh graylog-web-1.0.2-1.noarch.rpm
warning: graylog-web-1.0.2-1.noarch.rpm: Header V3 RSA/SHA1 Signature, key ID b1606f22: NOKEY
Preparing... ########################################### [100%]
1:graylog-web ########################################### [100%]
[[email protected] package]#
3、安装密码生成工具
[[email protected] package]# wget "https://jaist.dl.sourceforge.net/project/pwgen/pwgen/2.07/pwgen-2.07.tar.gz" --no-check-certificate
[[email protected] package]# tar -xvzf pwgen-2.07.tar.gz
[[email protected] package]# cd pwgen-2.07
[[email protected] pwgen-2.07]# ./configure
[[email protected] pwgen-2.07]# make &&make install
4、生成后台登录的密钥(server端配置)
[[email protected] package]# pwgen -N 1 -s 96
dlpczsPk5onyxfuvzEofWf9hImti8gy1IuwGHEU8hgK7mJ0n1ONRP1RhmUoOfbjebY9ntcSJisMnyFdDCqFTTc0gTXiXE5Gm
[[email protected] package]#
[[email protected] package]# vim /etc/graylog/server/server.conf
password_secret=dlpczsPk5onyxfuvzEofWf9hImti8gy1IuwGHEU8hgK7mJ0n1ONRP1RhmUoOfbjebY9ntcSJisMnyFdDCqFTTc0gTXiXE5Gm
[[email protected] package]# echo -n zc1215 | sha256sum
333afba6e2b8b480168b0c7704099cfb15e546f3cdf57e97c4b58cf9a3d8e398 -
[[email protected] package]#
[[email protected] package]# vim /etc/graylog/server/server.conf
root_password_sha2=333afba6e2b8b480168b0c7704099cfb15e546f3cdf57e97c4b58cf9a3d8e398
root_username = dengluyonghu
elasticsearch_cluster_name = graylog
5、启动server端
[[email protected] package]# /etc/init.d/graylog-server start
Java HotSpot(TM) 64-Bit Server VM warning: ignoring option PermSize=128m; support was removed in 8.0
Java HotSpot(TM) 64-Bit Server VM warning: ignoring option MaxPermSize=256m; support was removed in 8.0
[[email protected] package]#
该报错可以忽略
6、生成后台登录密钥(web端配置)
[[email protected] package]# pwgen -N 1 -s 96
dlpczsPk5onyxfuvzEofWf9hImti8gy1IuwGHEU8hgK7mJ0n1ONRP1RhmUoOfbjebY9ntcSJisMnyFdDCqFTTc0gTXiXE5Gm
[[email protected] package]#
[[email protected] package]# vim /etc/graylog/web/web.conf
graylog2-server.uris="http://127.0.0.1:12900/"
application.secret="dlpczsPk5onyxfuvzEofWf9hImti8gy1IuwGHEU8hgK7mJ0n1ONRP1RhmUoOfbjebY9ntcSJisMnyFdDCqFTTc0gTXiXE5Gm”
注意:/etc/graylog/web/web.conf中的graylog2-server.uris必须与/etc/graylog/server/server.conf中的rest_listen_uri一致
7、启动web端
[[email protected] package]# /etc/init.d/graylog-web start
Starting graylog-web: [ OK ]
[[email protected] package]#
8、测试
浏览器中输入URL:http://103.227.76.20:9000可以进入graylog登录页面
管理员账号和密码:dengluyonghu/zc1215

四、添加日志收集器
1、创建tcp端口检测
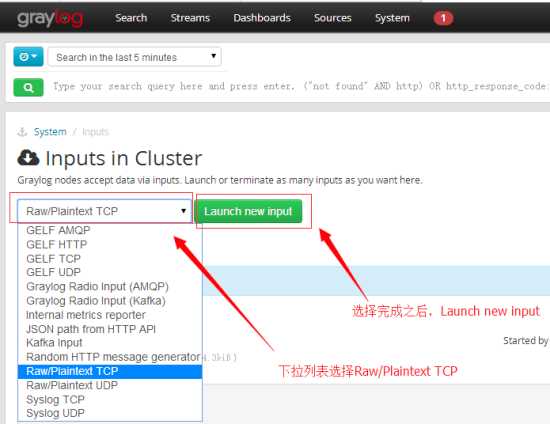
进入 System > Inputs > Inputs in Cluster > Raw/Plaintext TCP | Launch new input,取名"tcp 5555" 完成创建

完成之后在任何安装NC的linux机器上执行:
echo `date`|nc 103.227.76.20 5555
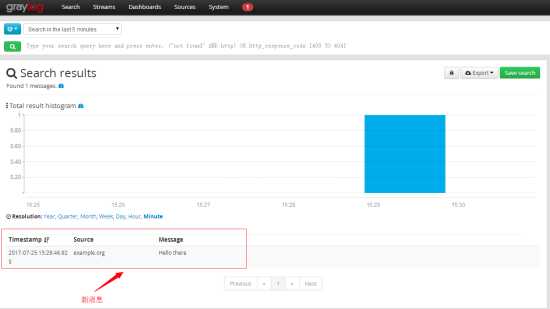
浏览器的http://103.227.76.20:9000登录首页之后,点击第三行绿色的搜索按钮,看到一条消息:如下截图:

说明安装成功
2、创建http端口检测
进入 System > Inputs > Inputs in Cluster > GELF HTTP | Launch new input,取名"http 12201" 完成创建

测试:
在任何安装了curl的linux机器上执行:
curl -XPOST http://103.227.76.20:12201/gelf -p0 -d ‘{"short_message":"Hello there", "host":"example.org", "facility":"test", "_foo":"bar"}‘
浏览器的http://103.227.76.20:9000登录首页之后,点击第三行绿色的搜索按钮,看到一条消息:如下截图:
说明GELF HTTP Input设置成功!!
3、设置时区
[[email protected] shell]# vim /etc/graylog/server/server.conf
root_timezone = Asia/Shanghai
[[email protected] shell]# vim /etc/graylog/web/web.conf
timezone="Asia/Shanghai"
重启服务
[[email protected] shell]# /etc/init.d/graylog-server restart
[[email protected] shell]# /etc/init.d/graylog-web restart
五、发送日志到Graylog服务器
1、使用http协议发送日志
curl -XPOST http://103.227.76.20:12202/gelf -p0 -d ‘{"short_message":"Hello there", "host":"example.org", "facility":"test", "_foo":"bar"}‘
2、使用tcp协议发送日志
echo "hello, graylog" | nc 103.227.76.20 5555
3、结合inotifywait收集php-error.log日志
gather-php-log.sh 【该脚本是通过inotifywait进行实时检测日志并发送到graylog服务端的脚本】
#!/bin/bash
app=php-error
node=$HOSTNAME
log_file=/data/weblogs/php-fpm-error.log
graylog_server_ip=223.202.208.85
graylog_server_port=12201
while inotifywait -e modify $log_file; do
last_size=`cat ${app}.size`
curr_size=`stat -c%s $log_file`
echo $curr_size > ${app}.size
count=`echo "$curr_size-$last_size" | bc`
python read_log.py $log_file ${last_size} $count | sed ‘s/"/\\\\\\\\\\"/g‘ > ${app}.new_lines
while read line。
do
if [ 0 -lt 1 ]; then
curl -XPOST http://103.227.76.19:12201/gelf -p0 -d "{\\"short_message\\":\\"$line\\", \\"host\\":\\"${graylog_server_ip}\\", \\"facility\\":\\"php-error\\"}"
echo "gathered -- $line"
fi
done < ${app}.new_lines
done
file=/data/shell/php-error.new_lines
if [ ! -s $file ];then
echo "文件为空,日志无异常"
else
cat /data/shell/php-error.new_lines |grep "php"|grep -v "php-fpm">/data/shell/${app}.new_lines2
file2=/data/shell/php-error.new_lines2
if [ ! -s $file2 ];then
echo "无异常"
else
echo -e "详情请登录:http://103.227.76.19:9000进行查看\\n `cat /data/shell/php-error.new_lines`" |mutt -s "php错误日志"
fi
>/data/shell/${app}.new_lines
>/data/shell/${app}.new_lines2
fi
read_log.py 【读取获取到的日志脚本】
#!/usr/bin/python
#coding=utf-8
import sys
import os
if len(sys.argv) < 4:
print "Usage: %s /path/of/log/file print_from count" % (sys.argv[0])
print "Example: %s /var/log/syslog 90000 100" % (sys.argv[0])
sys.exit(1)
filename = sys.argv[1]
if (not os.path.isfile(filename)):
print "%s not existing!!!" % (filename)
sys.exit(1)
filesize = os.path.getsize(filename)
position = int(sys.argv[2])
if (filesize < position):
print "log file may cut by logrotate.d, print log from begin!" % (position,filesize)
position = 0
count = int(sys.argv[3])
fo = open(filename, "r")
fo.seek(position, 0)
content = fo.read(count)
print content.strip()
# Close opened file
fo.close()