Ocelot简易教程之集成IdentityServer认证以及授权
Posted lonelyxmas
tags:
篇首语:本文由小常识网(cha138.com)小编为大家整理,主要介绍了Ocelot简易教程之集成IdentityServer认证以及授权相关的知识,希望对你有一定的参考价值。
原文:Ocelot简易教程(五)之集成IdentityServer认证以及授权Ocelot简易教程目录
- Ocelot简易教程(一)之Ocelot是什么
- Ocelot简易教程(二)之快速开始1
- Ocelot简易教程(二)之快速开始2
- Ocelot简易教程(三)之主要特性及路由详解
- Ocelot简易教程(四)之请求聚合以及服务发现
- Ocelot简易教程(五)之集成IdentityServer认证以及授权
- Ocelot简易教程(六)之重写配置文件存储方式并优化响应数据
-
作者:依乐祝
原文地址:https://www.cnblogs.com/yilezhu/p/9807125.html
最近比较懒,所以隔了N天才来继续更新第五篇Ocelot简易教程,本篇教程会先简单介绍下官方文档记录的内容然后在前几篇文档代码的基础上进行实例的演示。目的是为了让小白也能按照步骤把代码跑起来。当然,在开始之前你要对IdentityServer有一定的了解,并且能够进行IdentityServer的集成,如果你还不会集成IdentityServer的话还是先看看我的这篇Asp.NetCoreWebApi图片上传接口(二)集成IdentityServer4授权访问(附源码)文章吧。里面有一步一步的集成IdentityServer的实例。
好了,废话说完了,那就让我们开始进入今天的主题吧!Ocelot认证与授权。
概念表述
认证
为了验证ReRoutes并随后使用Ocelot的任何基于声明的功能,例如授权或使用令牌中的值修改请求。 用户必须像往常一样在他们的Startup.cs中注册认证服务,惟一的不同是他们需要给每个认证注册提供一个方案,例如
public void ConfigureServices(IServiceCollection services)
{
    var authenticationProviderKey = "OcelotKey";

    services.AddAuthentication()
        .AddJwtBearer(authenticationProviderKey, x =>
        {
        });
}
在此示例中,OcelotKey是此提供程序已注册的方案。然后我们将其映射到配置中的ReRoute,例如
"ReRoutes": [
    {
      "DownstreamPathTemplate": "/api/{everything}",
      "DownstreamScheme": "http",
      "DownstreamHostAndPorts": [
        {
          "Host": "localhost",
          "Port": 1001
        },
        {
          "Host": "localhost",
          "Port": 1002
        }
      ],
      "UpstreamPathTemplate": "/{everything}",
      "UpstreamHttpMethod": [ "Get", "Post" ],
      "LoadBalancerOptions": {
        "Type": "RoundRobin"
      },
      "AuthenticationOptions": {
        "AuthenticationProviderKey": "OcelotKey",
        "AllowedScopes": []
      }
    }
  ]
当Ocelot运行时,它将查看此ReRoutes中 AuthenticationOptions节点下面的AuthenticationProviderKey并检查是否有使用给定密钥注册的身份验证提供程序。如果没有,那么Ocelot不会启动,如果有的话ReRoute将在执行时使用该提供者。
如果对ReRoute进行了身份验证,则Ocelot将在执行身份验证中间件时调用与其关联的认证方案。如果请求失败,则认证Ocelot返回http的状态代码为401即未授权状态。
JWT令牌
如果您想使用JWT令牌进行身份验证,可能来自OAuth之类的提供程序,您可以正常注册您的身份验证中间件,例如
public void ConfigureServices(IServiceCollection services)
{
    var authenticationProviderKey = "OcelotKey";

    services.AddAuthentication()
        .AddJwtBearer(authenticationProviderKey, x =>
        {
            x.Authority = "test";
            x.Audience = "test";
        });

    services.AddOcelot();
}
然后将身份验证提供程序密钥映射到配置中的ReRoute,例如
"ReRoutes": [
    {
      "DownstreamPathTemplate": "/api/{everything}",
      "DownstreamScheme": "http",
      "DownstreamHostAndPorts": [
        {
          "Host": "localhost",
          "Port": 1001
        },
        {
          "Host": "localhost",
          "Port": 1002
        }
      ],
      "UpstreamPathTemplate": "/{everything}",
      "UpstreamHttpMethod": [ "Get", "Post" ],
      "LoadBalancerOptions": {
        "Type": "RoundRobin"
      },
      "AuthenticationOptions": {
        "AuthenticationProviderKey": "OcelotKey",
        "AllowedScopes": []
      }
    }
  ]
Identity Server Bearer Tokens认证
接下来上今天的主角了。identityServer认证方式。为了使用IdentityServer承载令牌,请按照惯例在ConfigureServices 中使用方案(密钥)注册您的IdentityServer服务。 如果您不明白如何操作,请访问IdentityServer文档。或者查看我的这篇Asp.NetCoreWebApi图片上传接口(二)集成IdentityServer4授权访问(附源码)文章。
 var authenticationProviderKey = "OcelotKey";
            var identityServerOptions = new IdentityServerOptions();
            Configuration.Bind("IdentityServerOptions", identityServerOptions);
            services.AddAuthentication(identityServerOptions.IdentityScheme)
                .AddIdentityServerAuthentication(authenticationProviderKey, options =>
                {
                    options.RequireHttpsMetadata = false; //是否启用https
                    options.Authority = $"http://{identityServerOptions.ServerIP}:{identityServerOptions.ServerPort}";//配置授权认证的地址
                    options.ApiName = identityServerOptions.ResourceName; //资源名称,跟认证服务中注册的资源列表名称中的apiResource一致
                    options.SupportedTokens = SupportedTokens.Both;
                }
                );
            services.AddOcelot()//注入Ocelot服务
                    .AddConsul();
然后将身份验证提供程序密钥映射到配置中的ReRoute,例如
"ReRoutes": [
    {
      "DownstreamPathTemplate": "/api/{everything}",
      "DownstreamScheme": "http",
      "DownstreamHostAndPorts": [
        {
          "Host": "localhost",
          "Port": 1001
        },
        {
          "Host": "localhost",
          "Port": 1002
        }
      ],
      "UpstreamPathTemplate": "/{everything}",
      "UpstreamHttpMethod": [ "Get", "Post" ],
      "LoadBalancerOptions": {
        "Type": "RoundRobin"
      },
      "AuthenticationOptions": {
        "AuthenticationProviderKey": "OcelotKey",
        "AllowedScopes": []
      }
    }
  ]
允许访问的范围(Allowed Scopes)
如果将范围添加到AllowedScopes,Ocelot将获得类型范围的所有用户声明(从令牌中),并确保用户具有列表中的所有范围。
这是一种基于范围限制对ReRoute访问的方式。(我也没用过这种方式,感觉有点类似IdentityServer Scope的概念)
实例演示集成IdentityServer
新建一个OcelotDemo.Auth asp.net core web api项目
项目进行IdentityServer服务端相关的配置,这里为了演示的方便采用硬编码的方式进行的配置。具体配置可以参考Asp.NetCoreWebApi图片上传接口(二)集成IdentityServer4授权访问(附源码)这篇文章
在网关项目OcelotDemo中添加Nuget包
Install-Package IdentityServer4.AccessTokenValidation在OcelotDemo项目中的Startup.cs中加入identityServer验证,如下所示:
var authenticationProviderKey = "OcelotKey";
            var identityServerOptions = new IdentityServerOptions();
            Configuration.Bind("IdentityServerOptions", identityServerOptions);
            services.AddAuthentication(identityServerOptions.IdentityScheme)
                .AddIdentityServerAuthentication(authenticationProviderKey, options =>
                {
                    options.RequireHttpsMetadata = false; //是否启用https
                    options.Authority = $"http://{identityServerOptions.ServerIP}:{identityServerOptions.ServerPort}";//配置授权认证的地址
                    options.ApiName = identityServerOptions.ResourceName; //资源名称,跟认证服务中注册的资源列表名称中的apiResource一致
                    options.SupportedTokens = SupportedTokens.Both;
                }
                );
            services.AddOcelot()//注入Ocelot服务
                    .AddConsul();
在ocelot.json中需要加入验证的ReRoute中,修改为如下的配置代码:
"ReRoutes": [
    {
      "DownstreamPathTemplate": "/api/{everything}",
      "DownstreamScheme": "http",
      "DownstreamHostAndPorts": [
        {
          "Host": "localhost",
          "Port": 1001
        },
        {
          "Host": "localhost",
          "Port": 1002
        }
      ],
      "UpstreamPathTemplate": "/{everything}",
      "UpstreamHttpMethod": [ "Get", "Post" ],
      "LoadBalancerOptions": {
        "Type": "RoundRobin"
      },
      "AuthenticationOptions": {
        "AuthenticationProviderKey": "OcelotKey",
        "AllowedScopes": []
      }
    }
  ]
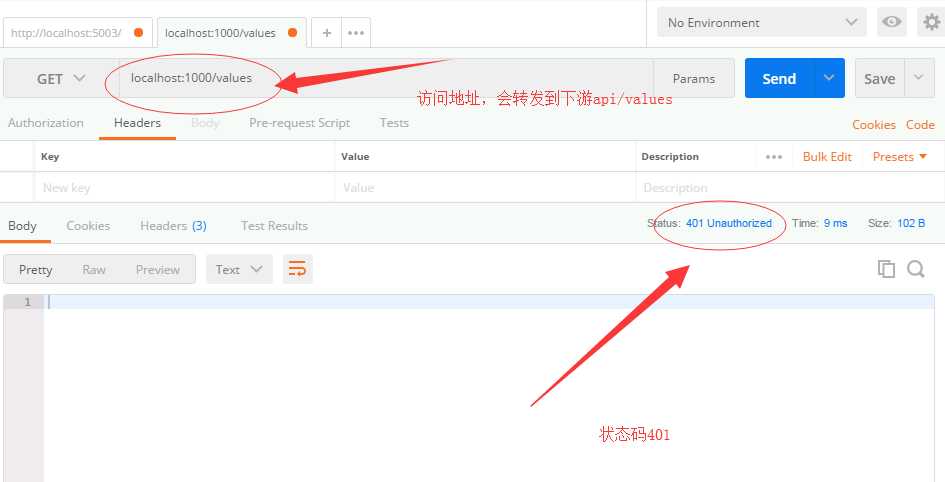
打开PostMan测试一下代码吧,首先访问一下http://localhost:1000/values 这时候返回的结果是401未授权的状态,如下图所示:

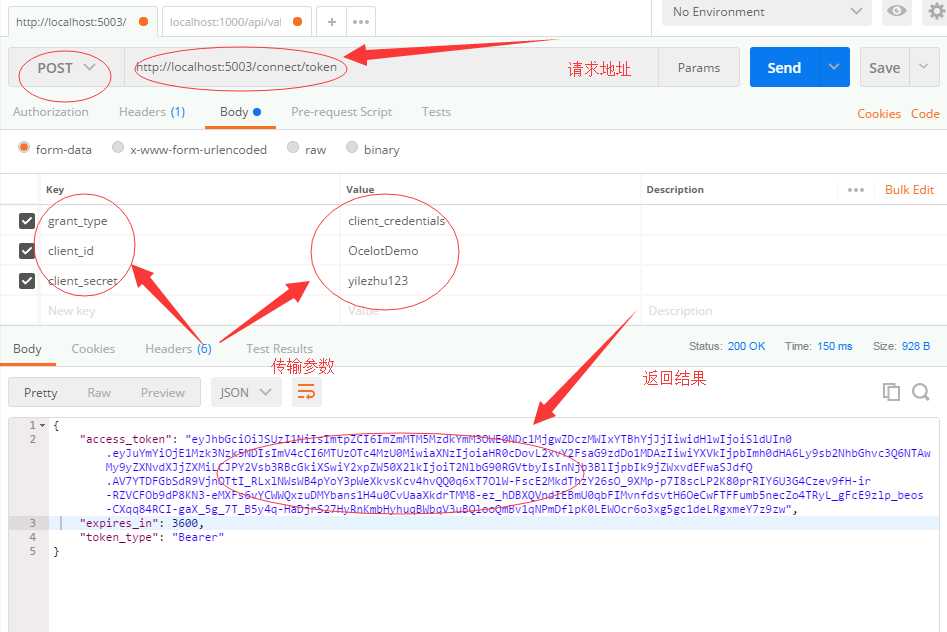
然后访问我们上面新建的IdentityServer服务器并获取Token。如下图所示配置对应的参数进行获取:

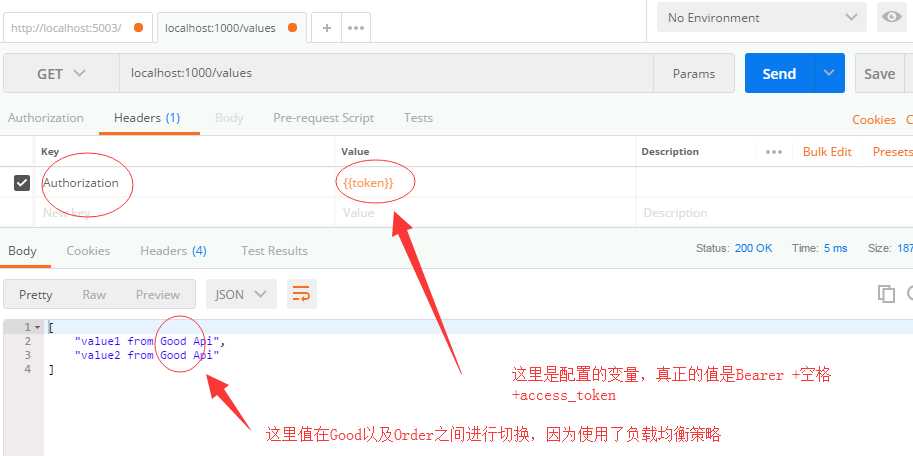
然后使用我们获取到的access_token进行Ocelot网关接口的访问,如下所示进行配置:

可以看到结果返回了200代码,并且结果在Good以及Order之间进行切换。因为Ocelot.json文件中对路由进行了RoundRobin的负载均衡的策略。
授权
Ocelot支持基于声明的授权,该授权在身份验证后运行。这意味着如果您有要授权的Url,则可以将以下内容添加到ReRoute配置中。
"RouteClaimsRequirement": {
    "UserType": "registered"
}
在此示例中,当调用授权中间件时,Ocelot将检查用户是否具有声明类型UserType以及是否已注册该声明的值。如果不是,则用户将不被授权,并且将响应403禁止访问的状态码。
当然这种授权的方式在大部分业务场景中都是不适用的,需要自己重写Ocelot的中间件才能实现。通过Ocelot中间件的重写你可以实现自己的授权逻辑,如果你还有限流的需求,比如说对每个客户端进行不同的限流策略。比方说,有三个客户端A,B,C。访问相同的URL,但是我们要控制A,每分钟只能访问10次,B每分钟能访问20次,而C不允许访问。针对这个场景Ocelot却没有相关的实现。但是我们可以通过重写Ocelot中间件来实现它。由于篇幅有限,所以今天就不进行介绍了。但是我会抽时间进行相关的实现,并分享给大家。
源码
本篇博文的源码已经上传到Github。可以进行参考。https://github.com/yilezhu/OcelotDemo
总结
本文先大致介绍一下Ocelot如何集成认证授权,然后通过实例进行了IdentityServer集成的演示,希望能对大家有一定的参考作用。当然文中也提到了,应对复杂的授权以及限流需要自行重写Ocelot中间件进行实现。具体如何实现呢,我会尽快分享给大家。同样的通过重写Ocelot中间件我们还可以把ocelot.json的配置信息存储到数据库并缓存到Redis中!最后,感谢大家的阅读!
以上是关于Ocelot简易教程之集成IdentityServer认证以及授权的主要内容,如果未能解决你的问题,请参考以下文章