supervisor-monitor进程集中管理部署
Posted galsnag
tags:
篇首语:本文由小常识网(cha138.com)小编为大家整理,主要介绍了supervisor-monitor进程集中管理部署相关的知识,希望对你有一定的参考价值。
写在前面:在网易蜂巢里面保存了一个docker镜像文件,可以直接使用,需要调整一些内容!
https://github.com/mlazarov/supervisord-monitor?spm=a2c4e.11153940.blogcont556762.23.2ea563274Uwu6E
一: 在以上连接中下载最新的supervisord-monitor 的代码文件(php)
二:先安装nginx和php-fpm环境(可以使用yum和源码安装方式进行安装,以下事列有源码方式展示)
2.1:源码文件在[email protected] 中的百度云盘中保存(可根据情况下载最新版本)
2.2:安装nginx
[[email protected] ~]# tar zxvf nginx-1.6.0.tar.gz
[[email protected] ~]# cd nginx-1.6.0
[[email protected] ~]# ./configure --prefix=/usr/local/nginx --pid-path=/var/run/nginx.pid --lock-path=/var/lock/nginx.lock --with-http_ssl_module --with-http_v2_module --with-http_dav_module --with-http_flv_module --with-http_realip_module --with-http_gzip_static_module --with-http_stub_status_module --with-mail --with-mail_ssl_module --with-debug --http-client-body-temp-path=/var/tmp/nginx/client --http-proxy-temp-path=/var/tmp/nginx/proxy --http-fastcgi-temp-path=/var/tmp/nginx/fastcgi --http-uwsgi-temp-path=/var/tmp/nginx/uwsgi --http-scgi-temp-path=/var/tmp/nginx/scgi --with-http_flv_module --with-http_mp4_module --with-ipv6 --with-openssl=/opt/cpnginx/openssl/
[[email protected] ~]# make && make install
nginx 默认安装即可
2.3 安装php-fpm (直接安装php-fpm 会提示需要安装common,直接安装即可)
[[email protected] ~]# rpm -ivh php-fpm-5.3.3-49.el6.x86_64.rpm
[[email protected] ~]# rpm -ivh php-common-5.3.3-49.el6.x86_64.rpm
查看php-fpm的默认文件
[[email protected] ~]# vim /etc/php-fpm.d/www.conf
listen = 127.0.0.1:9000
listen.allowed_clients = 127.0.0.1
[[email protected] ~]# services php-fpm start
查看是否正常启动
[[email protected] ~]# ss -tanlp | grep 9000
2.4,nginx配置
启动nginx看是否可以正常访问nginx的默认网站
(Welcome to nginx on Fedora ! )
配置nginx的配置文件可以在nginx.conf 中直接添加,或者在conf文件夹中写一个自定义的配置文件,
添加内容如下所示(未注释的内容如下):
[[email protected] ~]# vim nginx.conf
#设置使用的用户
user nginx;
worker_processes 1;
#开启日志记录
error_log logs/error.log info;
events {
worker_connections 1024;
}
http {
include mime.types;
default_type application/octet-stream;

sendfile on;
keepalive_timeout 65;

server {
listen 80;
server_name super.izejin.com;
root /usr/share/nginx/html/public_html;
index index.php index.html;

location /control/ {
index index.php;
rewrite /(.*)$ /index.php?$1 last;
}
location ~ .php$ {
root /usr/share/nginx/html/public_html;
fastcgi_pass 127.0.0.1:9000;
fastcgi_index index.php;
fastcgi_param SCRIPT_FILENAME $document_root$fastcgi_script_name;
include fastcgi_params;
}
#添加nginx验证用户名密码
location / {
index index.php index.html;
auth_basic "Basic Auth";
auth_basic_user_file "/usr/local/nginx/conf/.htpasswd";
}
}
}
[[email protected] ~]# /usr/local/nginx/sbin/nginx -s reload
nginx: the configuration file /etc/nginx/nginx.conf syntax is ok
nginx: configuration file /etc/nginx/nginx.conf test is successful
2.5 安装 supervisor-monitor
[[email protected] ~]# unzip -q supervisord-monitor-master-new.zip -d /usr/share/nginx/html/
[[email protected] ~]# cd /usr/share/nginx/html
[[email protected] ~]# cp /application/config/supervisor.php.example /application/config/supervisor.php

[[email protected] ~]# vim supervisor.php
$config[‘supervisor_servers‘] = array(
‘192.168.1.90‘ => array(
‘url‘ => ‘http://192.168.1.2/RPC2‘,
‘port‘ => ‘9001‘,
‘username‘ => ‘user‘,
‘password‘ => ‘123‘
),
);
直接访问部署supervisor-monitor所部署的服务器
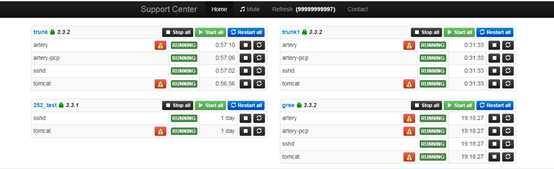
添加了nginx的验证之后
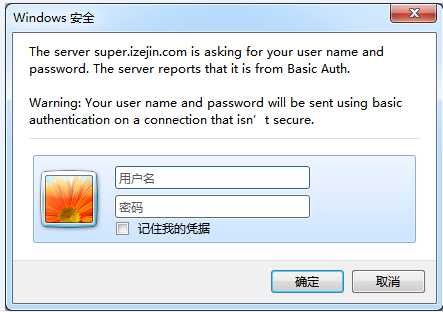
问题记录:
1,添加nginx验证之后,在访问网页的时候可能会提示输入用户名密码之后网页报错不能访问,
则需要nginx日志中打开记录日志,查看具体原因,
设置nginx配置文件中user 用户为nginx。

2,如遇 UNKNOWN_METHOD 故障报错 则需要在被控端的supervisor 的配置文件中添加 一下内容
[rpcinterface:supervisor] supervisor.rpcinterface_factory = supervisor.rpcinterface:make_main_rpcinterface
3,如遇报错内容为:
Did not receive a ‘200 OK‘ response from remote server. (HTTP/1.0 401 Unauthorized)
处理方法:检查防火墙和网络连接性
可以参照网上阿里云的一个文档:
https://yq.aliyun.com/articles/556762?spm=a2c4e.11154873.tagmain.79.279d27fd3QP6M4
以上是关于supervisor-monitor进程集中管理部署的主要内容,如果未能解决你的问题,请参考以下文章
supervisor集群方式-supervisor-monitor