Google guava cache源码解析1--构建缓存器
Posted zyfd
tags:
篇首语:本文由小常识网(cha138.com)小编为大家整理,主要介绍了Google guava cache源码解析1--构建缓存器相关的知识,希望对你有一定的参考价值。
此文已由作者赵计刚授权网易云社区发布。
欢迎访问网易云社区,了解更多网易技术产品运营经验。
下面介绍在LocalCache(CacheBuilder, CacheLoader)中调用的一些方法:
CacheBuilder-->getConcurrencyLevel()
int getConcurrencyLevel() {
        return (concurrencyLevel == UNSET_INT) ? //是否设置了concurrencyLevel
                DEFAULT_CONCURRENCY_LEVEL//如果没有设置,采用默认值16
                : concurrencyLevel;//如果设置了,采用设置的值
    }
说明:检查是否设置了concurrencyLevel,如果设置了,采用设置的值,如果没有设置,采用默认值16
CacheBuilder-->getKeyStrength()
//获取键key的强度(默认为Strong,还有weak和soft)
    Strength getKeyStrength() {
        return MoreObjects.firstNonNull(keyStrength, Strength.STRONG);
    }
说明:获取key的引用类型(强度),默认为Strong(强引用类型),下表列出MoreObjects的方法firstNonNull(@Nullable T first, @Nullable T second)
public static <T> T firstNonNull(@Nullable T first, @Nullable T second) {
    return first != null ? first : checkNotNull(second);
  }
CacheBuilder-->getValueStrength()
    Strength getValueStrength() {
        return MoreObjects.firstNonNull(valueStrength, Strength.STRONG);
    }
说明:获取value的引用类型(强度),默认为Strong(强引用类型)
CacheBuilder-->getExpireAfterWriteNanos()
long getExpireAfterWriteNanos() {
        return (expireAfterWriteNanos == UNSET_INT) ?
                DEFAULT_EXPIRATION_NANOS
                : expireAfterWriteNanos;
    }
说明:获取超时时间,如果设置了,就是设置值,如果没设置,默认是0
CacheBuilder-->getInitialCapacity()
int getInitialCapacity() {
        return (initialCapacity == UNSET_INT) ?
                DEFAULT_INITIAL_CAPACITY
                : initialCapacity;
    }
说明:获取初始化容量,如果指定了就是用指定容量,如果没指定,默认为16。值得注意的是,该容量是用于计算每个Segment的容量的,并不一定是每个Segment的容量,其具体使用的方法见LocalCache(CacheBuilder, CacheLoader)
LocalCache-->evictsBySize()
//这里maxWeight没有设置值,默认为UNSET_INT,即-1

    boolean evictsBySize() {
        return maxWeight >= 0;
    }
说明:这是一个与weight相关的方法,由于我们没有设置weight,所以该方法对我们的程序没有影响。
EntryFactory-->getFatory()
/** * Masks used to compute indices in the following table. */ static final int ACCESS_MASK = 1; static final int WRITE_MASK = 2; static final int WEAK_MASK = 4; /** * Look-up table for factories. */ static final EntryFactory[] factories = { STRONG, STRONG_ACCESS, STRONG_WRITE, STRONG_ACCESS_WRITE, WEAK, WEAK_ACCESS, WEAK_WRITE, WEAK_ACCESS_WRITE, }; static EntryFactory getFactory(Strength keyStrength, boolean usesAccessQueue, boolean usesWriteQueue) { int flags = ((keyStrength == Strength.WEAK) ? WEAK_MASK : 0)//0 | (usesAccessQueue ? ACCESS_MASK : 0)//0 | (usesWriteQueue ? WRITE_MASK : 0);//WRITE_MASK-->2 return factories[flags];//STRONG_WRITE }说明:EntryFactory是LocalCache的一个内部枚举类,通过上述方法,获取除了相应的EntryFactory,这里选出的是STRONG_WRITE工厂,该工厂代码如下:
        STRONG_WRITE {
            /**
             * 创建新的Entry
             */
            @Override
            <K, V> ReferenceEntry<K, V> newEntry(Segment<K, V> segment,
                                                 K key,
                                                 int hash,
                                                 @Nullable ReferenceEntry<K, V> next) {
                return new StrongWriteEntry<K, V>(key, hash, next);
            }

            /**
             * 将原来的Entry(original)拷贝到当下的Entry(newNext)
             */
            @Override
            <K, V> ReferenceEntry<K, V> copyEntry(Segment<K, V> segment,
                                                  ReferenceEntry<K, V> original,
                                                  ReferenceEntry<K, V> newNext) {
                ReferenceEntry<K, V> newEntry = super.copyEntry(segment,
                        original, newNext);
                copyWriteEntry(original, newEntry);
                return newEntry;
            }
        }
在该工厂中,指定了创建新entry的方法与复制原有entry为另一个entry的方法。
LocalCache-->newSegmentArray(int ssize)
/**
     * 创建一个指定大小的Segment数组
     */
    @SuppressWarnings("unchecked")
    final Segment<K, V>[] newSegmentArray(int ssize) {
        return new Segment[ssize];
    }
说明:该方法用于创建一个指定大小的Segment数组。关于Segment的介绍后边会说。
LocalCache-->createSegment(initialCapacity,maxSegmentWeight,StatsCounter)
    Segment<K, V> createSegment(int initialCapacity,
                                long maxSegmentWeight,
                                StatsCounter statsCounter) {
        return new Segment<K, V>(this,
                                 initialCapacity,
                                 maxSegmentWeight,
                                 statsCounter);
    }
该方法用于为之前创建的Segment数组的每一个元素赋值。
下边列出Segment类的一些属性和方法:
final LocalCache<K, V> map;// 外部类的一个实例

        /** 该Segment中已经存在缓存的个数  */
        volatile int count;

        /**
         * 指定是下边的AtomicReferenceArray<ReferenceEntry<K, V>> table,即扩容也是只扩自己的Segment
         * The table is expanded when its size exceeds this threshold. (The
         * value of this field is always {@code (int) (capacity * 0.75)}.)
         */
        int threshold;

        /**
         * 每个Segment中的table
         */
        volatile AtomicReferenceArray<ReferenceEntry<K, V>> table;

        /**
         * The maximum weight of this segment. UNSET_INT if there is no maximum.
         */
        final long maxSegmentWeight;

        /**
         * map中当前元素的一个队列,队列元素根据write time进行排序,每write一个元素就将该元素加在队列尾部
         */
        @GuardedBy("this")
        final Queue<ReferenceEntry<K, V>> writeQueue;

        /**
         * A queue of elements currently in the map, ordered by access time.
         * Elements are added to the tail of the queue on access (note that
         * writes count as accesses).
         */
        @GuardedBy("this")
        final Queue<ReferenceEntry<K, V>> accessQueue;

        Segment(LocalCache<K, V> map, int initialCapacity,
                long maxSegmentWeight, StatsCounter statsCounter) {
            this.map = map;
            this.maxSegmentWeight = maxSegmentWeight;//0
            this.statsCounter = checkNotNull(statsCounter);
            initTable(newEntryArray(initialCapacity));

            writeQueue = map.usesWriteQueue() ? //过期时间>0
                         new WriteQueue<K, V>() //WriteQueue
                         : LocalCache.<ReferenceEntry<K, V>> discardingQueue();

            accessQueue = map.usesAccessQueue() ? //false
                          new AccessQueue<K, V>()
                          : LocalCache.<ReferenceEntry<K, V>> discardingQueue();
        }

        AtomicReferenceArray<ReferenceEntry<K, V>> newEntryArray(int size) {
            return new AtomicReferenceArray<ReferenceEntry<K, V>>(size);//new Object[size];
        }

        void initTable(AtomicReferenceArray<ReferenceEntry<K, V>> newTable) {
            this.threshold = newTable.length() * 3 / 4; // 0.75
            if (!map.customWeigher() && this.threshold == maxSegmentWeight) {
                // prevent spurious expansion before eviction
                this.threshold++;
            }
            this.table = newTable;
        }
Segment的构造器完成了三件事儿:为变量复制 + 初始化Segment的table + 构建相关队列
initTable(newEntryArray(initialCapacity))源代码在Segment类中已给出:初始化table的步骤简述为:创建一个指定个数的ReferenceEntry数组,计算扩容值。
其他队列不说了,这里实际上只用到了WriteQueue,建立该Queue的目的是用于实现LRU缓存回收算法
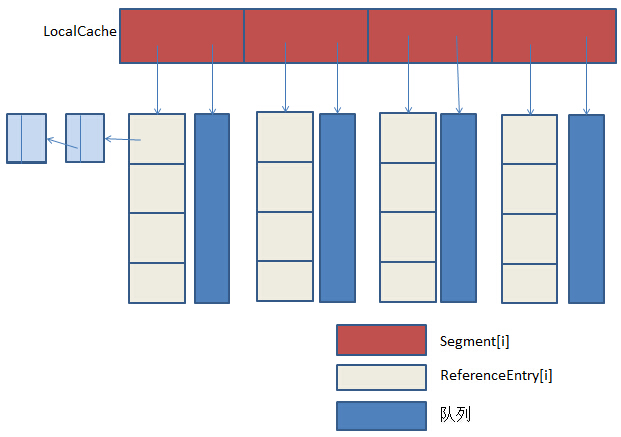
到目前为止,guava cache的完整的一个数据结构基本上就建立起来了。最后再总结一下。
guava cache的数据结构:

guava cache的数据结构的构建流程:
1)构建CacheBuilder实例cacheBuilder
2)cacheBuilder实例指定缓存器LocalCache的初始化参数
3)cacheBuilder实例使用build()方法创建LocalCache实例(简单说成这样,实际上复杂一些)
3.1)首先为各个类变量赋值(通过第二步中cacheBuilder指定的初始化参数以及原本就定义好的一堆常量)
3.2)之后创建Segment数组
3.3)最后初始化每一个Segment[i]
3.3.1)为Segment属性赋值
3.3.2)初始化Segment中的table,即一个ReferenceEntry数组(每一个key-value就是一个ReferenceEntry)
3.3.3)根据之前类变量的赋值情况,创建相应队列,用于LRU缓存回收算法
这里,我们就用开头给出的代码实例,来看一下,最后构建出来的cache结构是个啥:
显示指定:
expireAfterWriteNanos==20min maximumSize==1000
默认值:
concurrency_level==4(用于计算Segment个数) initial_capcity==16 (用于计算每个Segment容量)
keyStrength==STRONG valueStrength==STRONG
计算出:
entryFactory==STRONG_WRITE
segmentCount==4:Segment个数,一个刚刚大于等于concurrency_level且是2的几次方的一个数
segmentCapacity==initial_capcity/segmentCount==4:用来计算每个Segment能放置的entry个数的一个值,一个刚刚等于initial_capcity/segmentCount或者比initial_capcity/segmentCount大1的数(关键看是否除尽)
segmentSize==4:每个Segment能放置的entry个数,刚刚>=segmentCapacity&&是2的几次方的数
segments==Segment[segmentCount]==Segment[4]
segments[i]:
包含一个ReferenceEntry[segmentSize]==ReferenceEntry[4]
WriteQueue:用于LRU算法的队列
threshold==newTable.length()*3/4==segmentSize*3/4==3:每个Segment中有了3个Entry(key-value),就会扩容,扩容机制以后在添加Entry的时候再讲
免费领取验证码、内容安全、短信发送、直播点播体验包及云服务器等套餐
更多网易技术、产品、运营经验分享请点击。
相关文章:
【推荐】 #3.14 Piday#我的圆周率日
以上是关于Google guava cache源码解析1--构建缓存器的主要内容,如果未能解决你的问题,请参考以下文章