PyTorch in Action: A Step by Step Tutorial
Posted fengyubo
tags:
篇首语:本文由小常识网(cha138.com)小编为大家整理,主要介绍了PyTorch in Action: A Step by Step Tutorial相关的知识,希望对你有一定的参考价值。
PyTorch in Action: A Step by Step Tutorial
Installation Guide
Step 1, donwload the Miniconda and installing it on your computer.
Beacause some of classmates dont have a conda environment in their computer, hence we need to explain how to install it.
https://mirrors.tuna.tsinghua.edu.cn/anaconda/miniconda/
Step 2, create a conda virtual envriomment
In this ariticle, we assume that there is a CPU version of PyTorch is going to be installed. To specifically distinguish CPU version and GPU version, we`re going to create a virtual environment with CPU version of PyTorch.
In the Conda Prompt run the following commands:
conda create -n PyTorch-CPU pipStep 3, install PyTorch
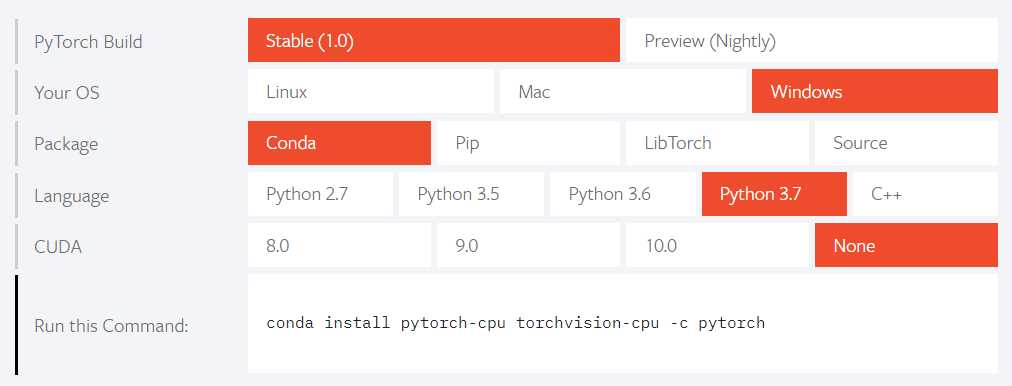
On the website of PyTorch(https://pytorch.org/), there is a guidance on the page. To chose the most appropriate options(e.g. as the follow figure).
In the Conda Prompt run the following commands:
activate PyTorh-CPU
conda install pytorch-cpu torchvision-cpu -c pytorch
Congratulations, installation of PyTorch is complete!
Data Processing
Before we start ours building. We have to access the dataset and clean it.
Here we have accessed 西瓜数据集3.0. And we convert the character-described features to numeric.
# encoding:utf8
# 西瓜3.0 数据集

waterMelons = [
    # 1
    [‘青绿‘, ‘蜷缩‘, ‘浊响‘, ‘清晰‘, ‘凹陷‘, ‘硬滑‘, ‘好瓜‘],
    # 2
    [‘乌黑‘, ‘蜷缩‘, ‘沉闷‘, ‘清晰‘, ‘凹陷‘, ‘硬滑‘, ‘好瓜‘],
    # 3
    [‘乌黑‘, ‘蜷缩‘, ‘浊响‘, ‘清晰‘, ‘凹陷‘, ‘硬滑‘, ‘好瓜‘],
    # 4
    [‘青绿‘, ‘蜷缩‘, ‘沉闷‘, ‘清晰‘, ‘凹陷‘, ‘硬滑‘, ‘好瓜‘],
    # 5
    [‘浅白‘, ‘蜷缩‘, ‘浊响‘, ‘清晰‘, ‘凹陷‘, ‘硬滑‘, ‘好瓜‘],
    # 6
    [‘青绿‘, ‘稍蜷‘, ‘浊响‘, ‘清晰‘, ‘稍凹‘, ‘软粘‘, ‘好瓜‘],
    # 7
    [‘乌黑‘, ‘稍蜷‘, ‘浊响‘, ‘稍糊‘, ‘稍凹‘, ‘软粘‘, ‘好瓜‘],
    # 8
    [‘乌黑‘, ‘稍蜷‘, ‘浊响‘, ‘清晰‘, ‘稍凹‘, ‘硬滑‘, ‘好瓜‘],
    # 9
    [‘乌黑‘, ‘稍蜷‘, ‘沉闷‘, ‘稍糊‘, ‘稍凹‘, ‘硬滑‘, ‘坏瓜‘],
    # 10
    [‘青绿‘, ‘硬挺‘, ‘清脆‘, ‘清晰‘, ‘平坦‘, ‘软粘‘, ‘坏瓜‘],
    # 11
    [‘浅白‘, ‘硬挺‘, ‘清脆‘, ‘模糊‘, ‘平坦‘, ‘硬滑‘, ‘坏瓜‘],
    # 12
    [‘浅白‘, ‘蜷缩‘, ‘浊响‘, ‘模糊‘, ‘平坦‘, ‘软粘‘, ‘坏瓜‘],
    # 13
    [‘青绿‘, ‘稍蜷‘, ‘浊响‘, ‘稍糊‘, ‘凹陷‘, ‘硬滑‘, ‘坏瓜‘],
    # 14
    [‘浅白‘, ‘稍蜷‘, ‘沉闷‘, ‘稍糊‘, ‘凹陷‘, ‘硬滑‘, ‘坏瓜‘],
    # 15
    [‘乌黑‘, ‘稍蜷‘, ‘浊响‘, ‘清晰‘, ‘稍凹‘, ‘软粘‘, ‘坏瓜‘],
    # 16
    [‘浅白‘, ‘蜷缩‘, ‘浊响‘, ‘模糊‘, ‘平坦‘, ‘硬滑‘, ‘坏瓜‘],
    # 17
    [‘青绿‘, ‘蜷缩‘, ‘沉闷‘, ‘稍糊‘, ‘稍凹‘, ‘硬滑‘, ‘坏瓜‘]
]

features = list() # [[青绿, 乌黑, 浅白], [蜷缩, 硬挺...], ...]


def numeric(data):
    l = list()
    for i,s in enumerate(data):
        val = features[i].index(s)
        l.append(val)
    return l


if __name__ == ‘__main__‘:
    for melon in waterMelons:
        for i, feature in enumerate(melon):
            try:
                if feature not in features[i]:
                    features[i].append(feature)
            except IndexError:
                features.append([feature])

    f = open(‘data/WaterMelon.txt‘, encoding=‘utf8‘, mode=‘w‘)
    for melon in waterMelons:
        val = numeric(melon)
        f.write("%s
" % val)
Your first Neural Network with PyTorch
Here we implement a neural network with input layer and log softmax layer.
There are 12 parameters need to be trained:
[
input imes hiddens imes output = parameters6 imes 2 = 12
]
# encoding:utf8

import torch
from sklearn.model_selection import train_test_split


class Model(torch.nn.Module):
    def __init__(self):
        super(Model, self).__init__()
        self.layer = torch.nn.Linear(6, 2)
        self.softmax = torch.nn.LogSoftmax(dim=1)

    def forward(self, x):
        out = self.layer(x)
        out = self.softmax(out)
        return out


if __name__ == ‘__main__‘:
    x, y = list(), list()
    with open(‘data/WaterMelon.txt‘, encoding=‘utf8‘) as f:
        for line in f:
            l = eval(line.strip())
            x.append(l[:-1])
            y.append(l[-1])

    x_train, x_test, y_train, y_test = train_test_split(x, y, test_size=0.25, random_state=33)
    x_train, x_test, y_train, y_test = torch.Tensor(x_train), torch.Tensor(x_test), torch.Tensor(y_train).long(), torch.Tensor(y_test).long()

    model = Model()
    optimizer = torch.optim.SGD(model.parameters(), lr=0.01)
    criticism = torch.nn.CrossEntropyLoss()

    # train
    for epoch in range(500):
        out = model(x_train)
        loss = criticism(out, y_train)
        optimizer.zero_grad()
        loss.backward()
        optimizer.step()

    # test
    y_pred = model(x_test)
    _, predicted = torch.max(y_pred, 1)
    acc = torch.sum(y_test == predicted ).numpy() / len(x_test)
    print(acc)
We got the accuracy 0.8, sometimes we got 1.
LOL!
以上是关于PyTorch in Action: A Step by Step Tutorial的主要内容,如果未能解决你的问题,请参考以下文章