haproxy实现负载均衡
Posted wzxmt
tags:
篇首语:本文由小常识网(cha138.com)小编为大家整理,主要介绍了haproxy实现负载均衡相关的知识,希望对你有一定的参考价值。
环境准备:
10.0.0.7 web01
10.0.0.8 web02
10.0.0.3  haproxy
centOS 7
1)安装常用软件
yum install -y gcc glibc gcc-c++ screen
2)下载haproxy软件
http://www.haproxy.org/download/1.7/src/haproxy-1.7.10.tar.gz
由于http://www.haproxy.org在国内被屏蔽,只能通过其他方式获取软件
3)将软件上传到相应目录,进行解压,源码编译安装haproxy
[[email protected] ~]# cd /usr/local/src
[[email protected] src]# tar zxf haproxy-1.7.10.tar.gz
[[email protected] src]# cd haproxy-1.7.10
[[email protected] haproxy-1.7.10]# make TARGET=linux3100 PREFIX=/usr/local/haproxy-1.7.10
[[email protected] haproxy-1.7.10]# make install
[[email protected] haproxy-1.7.10]# cp /usr/local/sbin/haproxy /usr/sbin/
通过 haproxy -v,我们可以看到haproxy的版本号
[[email protected] ~]# haproxy -v
HA-Proxy version 1.7.10-a7dcc3b 2018/01/02
Copyright 2000-2018 Willy Tarreau <[email protected]>
4)创建haproxy用户及配置文件目录
[[email protected] haproxy-1.7.10]# useradd -r haproxy
[[email protected] haproxy-1.7.10]# mkdir /etc/haproxy
[[email protected] haproxy-1.7.10]# mkdir /var/lib/haproxy
[[email protected] haproxy-1.7.10]# mkdir /var/run/haproxy
5)编辑启动脚本
[[email protected] haproxy-1.7.10]# cp examples/haproxy.init /etc/init.d/haproxy
[[email protected] haproxy-1.7.10]# chmod 755 /etc/init.d/haproxy
6)编辑配置文件/etc/haproxy/haproxy.cfg
vim /etc/haproxy/haproxy.cfg
global
log 127.0.0.1 local3 info
chroot /var/lib/haproxy
user haproxy
group haproxy
daemon
defaults
log global
mode http
option httplog
option dontlognull
timeout connect 5000
timeout client 50000
timeout server 50000

frontend www.desc.com
mode http
bind *:80
stats uri /haproxy?stats
default_backend www.desc.com

backend www.desc.com
option httpchk GET /index.html
balance roundrobin
server web01 10.0.0.7:80 check inter 2000 rise 3 fall 3 weight 1
server web02 10.0.0.8:80 check inter 2000 rise 3 fall 3 weight 2
启动服务
[[email protected] haproxy-1.7.10]# /etc/init.d/haproxy start
Starting haproxy (via systemctl):                          [  OK  ]
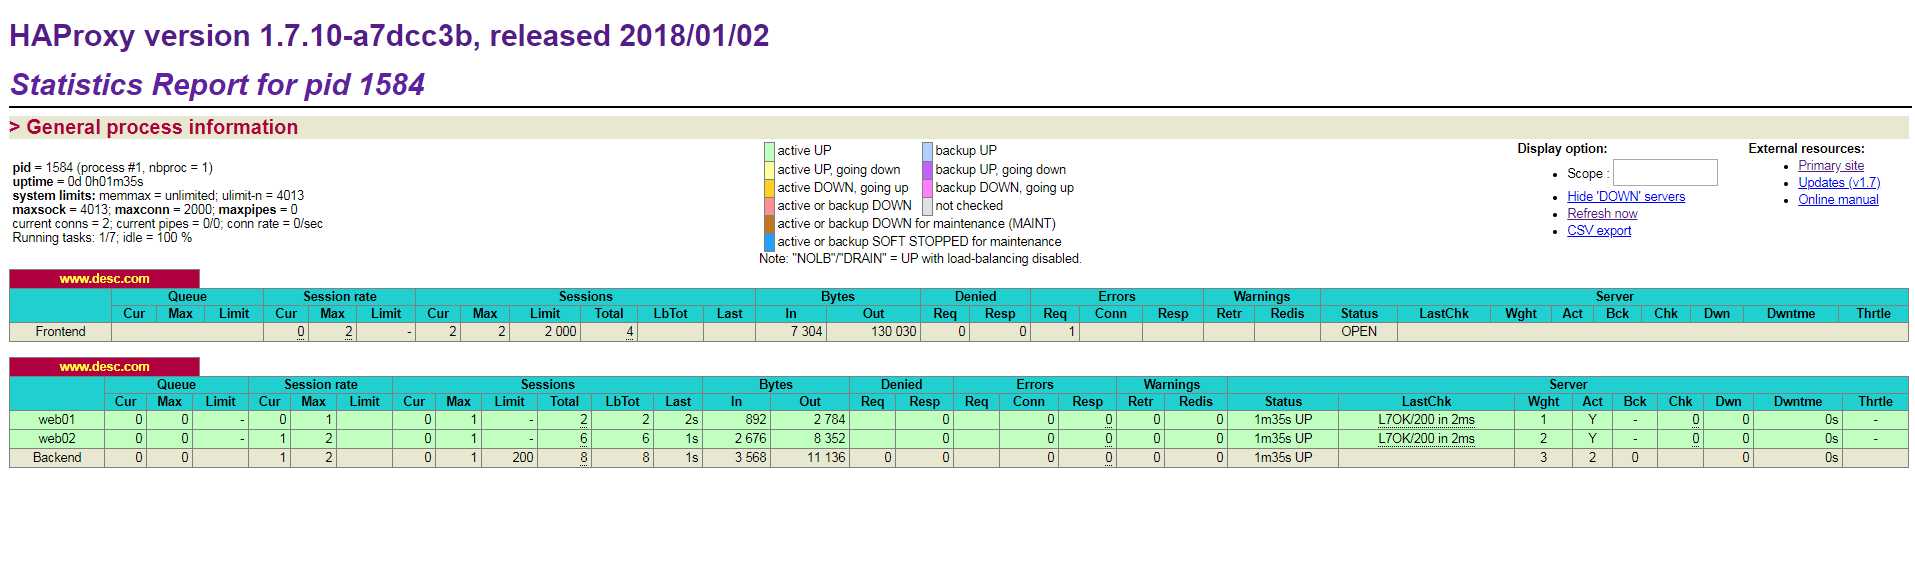
通过web界面,查看状态信息
http://10.0.0.3/haproxy?stats
7)开启日志
vim /etc/rsyslog.conf
$ModLoad imudp #取消注释
$UDPServerRun 514 #取消注释
local3.* /var/log/haproxy.log #最后一行添加local3的路径
[[email protected] haproxy-1.7.10]# systemctl restart rsyslog.service
[[email protected] haproxy-1.7.10]# touch /var/log/haproxy.log
[[email protected] haproxy-1.7.10]# chown -R haproxy.haproxy /var/log/haproxy.log
[[email protected] haproxy-1.7.10]# /etc/init.d/haproxy restart
Restarting haproxy (via systemctl): [ OK ]
通过监控日志,可以看到haproxy已经启动成功
[[email protected] haproxy-1.7.10]# tailf /var/log/haproxy.log
Dec 10 09:37:39 localhost haproxy[1660]: Stopping frontend www.desc.com in 0 ms.
Dec 10 09:37:39 localhost haproxy[1660]: Stopping backend www.desc.com in 0 ms.
Dec 10 09:37:39 localhost haproxy[1660]: Proxy www.desc.com stopped (FE: 0 conns, BE: 0 conns).
Dec 10 09:37:39 localhost haproxy[1660]: Proxy www.desc.com stopped (FE: 0 conns, BE: 0 conns).
Dec 10 09:37:39 localhost haproxy[1692]: Proxy www.desc.com started.
Dec 10 09:37:39 localhost haproxy[1692]: Proxy www.desc.com started.
通过测试,我们可以看到自动切换


到此,web的负载均衡配置完成!
以上是关于haproxy实现负载均衡的主要内容,如果未能解决你的问题,请参考以下文章