搭建自己的博客(十三):为博客后台添加ckeditor富文本编辑器
Posted felixwang2
tags:
篇首语:本文由小常识网(cha138.com)小编为大家整理,主要介绍了搭建自己的博客(十三):为博客后台添加ckeditor富文本编辑器相关的知识,希望对你有一定的参考价值。
使用django默认的编辑器感觉功能太少了,所以集成一下富文本编辑器。
1、安装和使用
(1)、安装
pip install django-ckeditor
(2)、注册应用
在django的settings中添加‘ckeditor’的app
(3)、配置models
将需要用到富文本编辑器的字段改成RichTextField
上面三步配置过后是不能上传图片的,下面配置上传图片的功能。
(4)、安装pillow库
pip install pillow
(5)、注册应用
添加‘ckeditor_uploader‘这个app
(6)、在settings指定图片上传的目录
# media
MEDIA_URL=‘/media/‘
MEDIA_ROOT=os.path.join(BASE_DIR,‘media‘)

# 配置ckeditor
CKEDITOR_UPLOAD_PATH=‘upload/‘
(7)、在urls中指定要上传的网址
from django.contrib import admin
from django.urls import path, include
from django.conf import settings
from django.conf.urls.static import static
from . import views

urlpatterns = [
    path(‘‘, views.home, name=‘home‘),  # 主页路径
    path(‘admin/‘, admin.site.urls),
    path(‘ckeditor‘, include(‘ckeditor_uploader.urls‘)),  # 配置上传url
    path(‘blog/‘, include(‘blog.urls‘)),  # 博客app路径
]

# 设置ckeditor的上传
urlpatterns += static(settings.MEDIA_URL, document_root=settings.MEDIA_ROOT)
(8)、配置model
把字段改成RichTextUploadingField字段类型
(9)、官方文档
上面这几步差不多就行了,还需要扩展功能,前往-》官方文档
2、变化的部分:

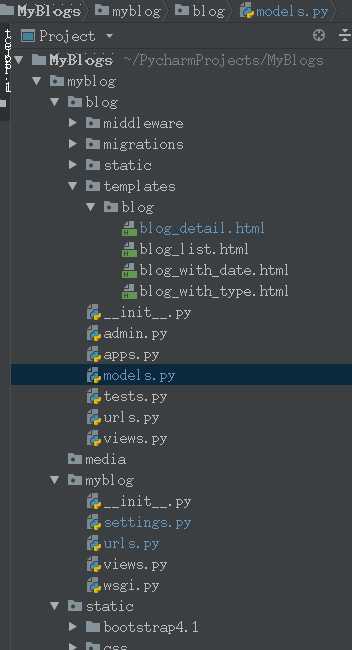
3、上代码

{# 引用模板 #}
{% extends ‘base.html‘ %}

{% load staticfiles %}
{% block header_extends %}
    <link rel="stylesheet" href="{% static ‘blog/blog.css‘ %}">
{% endblock %}


{# 标题 #}
{% block title %}
    {{ blog.title }}
{% endblock %}

{# 内容#}
{% block content %}
    <div class="container">
        <div class="row">
            <div class="col-6 offset-1">
                <ul class="blog-info-description">
                    <h3>{{ blog.title }}</h3>
                    <li>作者:{{ blog.author }}</li>
                    {# 时间过滤器让时间按照自己需要的格式过滤 #}
                    <li>发布日期:{{ blog.created_time|date:"Y-m-d H:n:s" }}</li>
                    <li>分类:
                        <a href="{% url ‘blogs_with_type‘ blog.blog_type.pk %}">
                            {{ blog.blog_type }}
                        </a>
                    </li>
                </ul>
                <p class="blog-content">{{ blog.content|safe }}</p>


                <p>上一篇:
                    {% if previous_blog %}
                       <a href="{% url ‘blog_detail‘ previous_blog.pk %}">{{ previous_blog.title }}</a>
                    {% else %}
                        <span>没有了</span>
                    {% endif %}
                </p>
                <p>下一篇:
                    {% if next_blog %}
                        <a href="{% url ‘blog_detail‘ next_blog.pk %}">{{ next_blog.title }}</a>
                    {% else %}
                        <span>没有了</span>
                    {% endif %}
                </p>
            </div>
        </div>
    </div>


{% endblock %}

{% block js %}
    <script>
        $(".nav-blog").addClass("active").siblings().removeClass("active");
    </script>
{% endblock %}

from django.db import models
from django.contrib.auth.models import User
from ckeditor_uploader.fields import RichTextUploadingField


# Create your models here.

# 博客分类
class BlogType(models.Model):
    type_name = models.CharField(max_length=15)  # 博客分类名称

    def __str__(self):  # 显示标签名
        return self.type_name


# 博客
class Blog(models.Model):
    title = models.CharField(max_length=50)  # 博客标题
    blog_type = models.ForeignKey(BlogType, on_delete=models.DO_NOTHING)  # 博客分类
    content = RichTextUploadingField()  # 博客内容,使用富文本编辑
    author = models.ForeignKey(User, on_delete=models.DO_NOTHING)  # 博客作者
    created_time = models.DateTimeField(auto_now_add=True)  # 博客创建时间
    last_updated_time = models.DateTimeField(auto_now=True)  # 博客更新事件

    def __str__(self):  # 显示标题名
        return "<Blog:{}>".format(self.title)

    class Meta:
        ordering = [‘-created_time‘]  # 定义排序规则,按照创建时间倒序

"""
Django settings for myblog project.

Generated by ‘django-admin startproject‘ using Django 2.1.3.

For more information on this file, see
https://docs.djangoproject.com/en/2.1/topics/settings/

For the full list of settings and their values, see
https://docs.djangoproject.com/en/2.1/ref/settings/
"""

import os

# Build paths inside the project like this: os.path.join(BASE_DIR, ...)
BASE_DIR = os.path.dirname(os.path.dirname(os.path.abspath(__file__)))

# Quick-start development settings - unsuitable for production
# See https://docs.djangoproject.com/en/2.1/howto/deployment/checklist/

# SECURITY WARNING: keep the secret key used in production secret!
SECRET_KEY = ‘ea+kzo_5k^[email protected]([email protected]*+w5d11=0mp1p5ngr‘

# SECURITY WARNING: don‘t run with debug turned on in production!
DEBUG = True

ALLOWED_HOSTS = []

# Application definition

INSTALLED_APPS = [
    ‘django.contrib.admin‘,
    ‘django.contrib.auth‘,
    ‘django.contrib.contenttypes‘,
    ‘django.contrib.sessions‘,
    ‘django.contrib.messages‘,
    ‘django.contrib.staticfiles‘,
    ‘blog.apps.BlogConfig‘,  # 将自己创建的app添加到设置中
    ‘ckeditor‘,
    ‘ckeditor_uploader‘,
]

MIDDLEWARE = [

    ‘django.middleware.security.SecurityMiddleware‘,
    ‘django.contrib.sessions.middleware.SessionMiddleware‘,

    ‘django.middleware.common.CommonMiddleware‘,
    ‘django.middleware.csrf.CsrfViewMiddleware‘,
    ‘django.contrib.auth.middleware.AuthenticationMiddleware‘,
    ‘django.contrib.messages.middleware.MessageMiddleware‘,
    ‘django.middleware.clickjacking.XFrameOptionsMiddleware‘,
    ‘blog.middleware.mymiddleware.My404‘,  # 添加自己的中间件
]

ROOT_URLCONF = ‘myblog.urls‘

TEMPLATES = [
    {
        ‘BACKEND‘: ‘django.template.backends.django.DjangoTemplates‘,
        ‘DIRS‘: [
            os.path.join(BASE_DIR, ‘templates‘),
        ],
        ‘APP_DIRS‘: True,
        ‘OPTIONS‘: {
            ‘context_processors‘: [
                ‘django.template.context_processors.debug‘,
                ‘django.template.context_processors.request‘,
                ‘django.contrib.auth.context_processors.auth‘,
                ‘django.contrib.messages.context_processors.messages‘,
            ],
        },
    },
]

WSGI_APPLICATION = ‘myblog.wsgi.application‘

# Database
# https://docs.djangoproject.com/en/2.1/ref/settings/#databases

DATABASES = {
    # ‘default‘: {
    #     ‘ENGINE‘: ‘django.db.backends.sqlite3‘,
    #     ‘NAME‘: os.path.join(BASE_DIR, ‘db.sqlite3‘),
    # }
    ‘default‘: {
        ‘ENGINE‘: ‘django.db.backends.mysql‘,
        ‘NAME‘: ‘myblogs‘,  # 要连接的数据库,连接前需要创建好
        ‘USER‘: ‘root‘,  # 连接数据库的用户名
        ‘PASSWORD‘: ‘felixwang‘,  # 连接数据库的密码
        ‘HOST‘: ‘127.0.0.1‘,  # 连接主机,默认本级
        ‘PORT‘: 3306  # 端口 默认3306
    }
}

# Password validation
# https://docs.djangoproject.com/en/2.1/ref/settings/#auth-password-validators

AUTH_PASSWORD_VALIDATORS = [
    {
        ‘NAME‘: ‘django.contrib.auth.password_validation.UserAttributeSimilarityValidator‘,
    },
    {
        ‘NAME‘: ‘django.contrib.auth.password_validation.MinimumLengthValidator‘,
    },
    {
        ‘NAME‘: ‘django.contrib.auth.password_validation.CommonPasswordValidator‘,
    },
    {
        ‘NAME‘: ‘django.contrib.auth.password_validation.NumericPasswordValidator‘,
    },
]

# Internationalization
# https://docs.djangoproject.com/en/2.1/topics/i18n/

# LANGUAGE_CODE = ‘en-us‘
# 语言
LANGUAGE_CODE = ‘zh-hans‘

# TIME_ZONE = ‘UTC‘
# 时区
TIME_ZONE = ‘Asia/Shanghai‘

USE_I18N = True

USE_L10N = True

# 不考虑时区
USE_TZ = False

# Static files (CSS, javascript, Images)
# https://docs.djangoproject.com/en/2.1/howto/static-files/

STATIC_URL = ‘/static/‘
STATICFILES_DIRS = [
    os.path.join(BASE_DIR, "static")
]

# media
MEDIA_URL=‘/media/‘
MEDIA_ROOT=os.path.join(BASE_DIR,‘media‘)

# 配置ckeditor
CKEDITOR_UPLOAD_PATH=‘upload/‘


# 自定义参数
EACH_PAGE_BLOGS_NUMBER = 7

"""myblog URL Configuration

The `urlpatterns` list routes URLs to views. For more information please see:
    https://docs.djangoproject.com/en/2.1/topics/http/urls/
Examples:
Function views
    1. Add an import:  from my_app import views
    2. Add a URL to urlpatterns:  path(‘‘, views.home, name=‘home‘)
Class-based views
    1. Add an import:  from other_app.views import Home
    2. Add a URL to urlpatterns:  path(‘‘, Home.as_view(), name=‘home‘)
Including another URLconf
    1. Import the include() function: from django.urls import include, path
    2. Add a URL to urlpatterns:  path(‘blog/‘, include(‘blog.urls‘))
"""
from django.contrib import admin
from django.urls import path, include
from django.conf import settings
from django.conf.urls.static import static
from . import views

urlpatterns = [
    path(‘‘, views.home, name=‘home‘),  # 主页路径
    path(‘admin/‘, admin.site.urls),
    path(‘ckeditor‘, include(‘ckeditor_uploader.urls‘)),  # 配置上传url
    path(‘blog/‘, include(‘blog.urls‘)),  # 博客app路径
]

# 设置ckeditor的上传
urlpatterns += static(settings.MEDIA_URL, document_root=settings.MEDIA_ROOT)
以上是关于搭建自己的博客(十三):为博客后台添加ckeditor富文本编辑器的主要内容,如果未能解决你的问题,请参考以下文章
