一款非常推荐的用户界面插件----EasyUI
Posted
tags:
篇首语:本文由小常识网(cha138.com)小编为大家整理,主要介绍了一款非常推荐的用户界面插件----EasyUI相关的知识,希望对你有一定的参考价值。
前 言
easyui是一种基于jQuery的用户界面插件集合。
easyui为创建现代化,互动,javascript应用程序,提供必要的功能。 使用easyui你不需要写很多代码,你只需要通过编写一些简单html标记,就可以定义用户界面。
easyui是个完美支持HTML5网页的完整框架。easyui节省您网页开发的时间和规模。easyui很简单但功能强大的。
| 一、声明组件的方法 |
jQuery EasyUI 提供易于使用的组件,它使 Web 开发人员能快速地在流行的 jQuery 核心和 HTML5 上建立程序页面。 有两个方法声明的 UI 组件:
1. 直接在 HTML 声明组件;
<div class="easyui-dialog" style="width:450px;height:220px" data-options="title:‘My Dialog‘">
        我创建的对话框
</div>
2. 编写 JavaScript 代码来创建组件。
<input id="a" style="width:230px" />
$(‘#a‘).combobox({
        url: ...,
        required: true,
        valueField: ‘id‘,
        textField: ‘text‘
});
| 二、组件的使用 |
1EasyUI窗口
1)创建简单窗口
创建一个窗口(window)非常简单,我们创建一个 DIV 标记:
<div id="win" class="easyui-window" title="My Window" style="width:300px;height:100px;padding:5px;">
    内容区
</div>
运行结果如下:
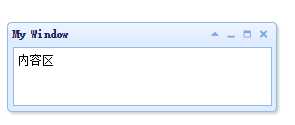
一行简单的代码就可以快速地搭建一个窗口,并且还不用写javascript,是不是非常好用。。
如果您希望创建一个隐藏的窗口(window),记得设置 ‘closed‘ 属性为 ‘true‘ 值,您可以调用 ‘open‘ 方法来打开窗口(window):
<div id="win" class="easyui-window" title="My Window" closed="true" style="width:300px;height:100px;padding:5px;">
    内容区
</div>
$(‘#win‘).window(‘open‘);
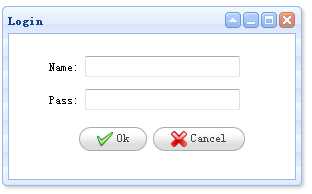
下面我们来创建一个简单的登录窗口:
<div id="win" class="easyui-window" title="Login" style="width:300px;height:180px;">
    <form style="padding:10px 20px 10px 40px;">
        <p>Name: <input type="text"></p>
        <p>Pass: <input type="password"></p>
        <div style="padding:5px;text-align:center;">
            <a href="#" class="easyui-linkbutton" icon="icon-ok">Ok</a>
            <a href="#" class="easyui-linkbutton" icon="icon-cancel">Cancel</a>
        </div>
    </form>
</div>
效果如图所示:
2)自定义窗口工具栏
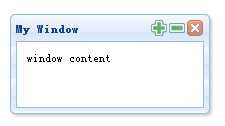
默认情况下,窗口(window)有四个工具:collapsible、minimizable、maximizable 和 closable。比如我们定义以下窗口(window):
<div id="win" class="easyui-window" title="My Window" style="padding:10px;width:200px;height:100px;">
        window content
</div>
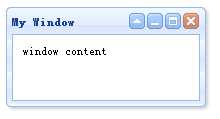
如需自定义工具,设置该工具为 true 或者 false。比如我们希望定义一个窗口(window),仅仅拥有一个可关闭的工具。您应该设置任何其他工具为 false。我们可以在标记中或者通过 jQuery 代码定义 tools 属性。现在我们使用 jQuery 代码来定义窗口(window):
$(‘#win‘).window({
        collapsible:false,
        minimizable:false,
        maximizable:false
});
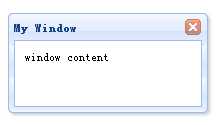
如果我们希望添加自定义的工具到窗口(window),我们可以使用 tools 属性。作为实例演示,我们添加两个工具到窗口(window):
$(‘#win‘).window({
        collapsible:false,
        minimizable:false,
        maximizable:false,
        tools:[{
            iconCls:‘icon-add‘,
            handler:function(){
                alert(‘add‘);
            }
        },{
            iconCls:‘icon-remove‘,
            handler:function(){
                alert(‘remove‘);
            }
        }]
});
3)创建对话框
对话框(Dialog)是一个特殊的窗口(window),可以包含在顶部的工具栏和在底部的按钮。默认情况下,对话框(Dialog)不能改变大小,但是用户可以设置 resizable 属性为 true,使其可以改变大小。
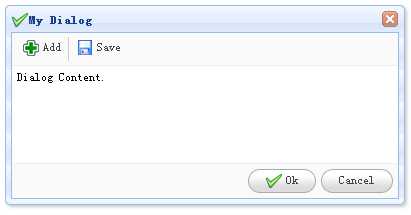
对话框(Dialog)非常简单,可以从 DIV 标记创建,如下所示:
<div id="dd" class="easyui-dialog" style="padding:5px;width:400px;height:200px;"
            title="My Dialog" iconCls="icon-ok"
            toolbar="#dlg-toolbar" buttons="#dlg-buttons">
        Dialog Content.
</div>
准备工具栏(Toolbar)和按钮(Button)
<div id="dlg-toolbar">
        <a href="#" class="easyui-linkbutton" iconCls="icon-add" plain="true" onclick="javascript:alert(‘Add‘)">Add</a>
        <a href="#" class="easyui-linkbutton" iconCls="icon-save" plain="true" onclick="javascript:alert(‘Save‘)">Save</a>
    </div>
    <div id="dlg-buttons">
        <a href="#" class="easyui-linkbutton" iconCls="icon-ok" onclick="javascript:alert(‘Ok‘)">Ok</a>
        <a href="#" class="easyui-linkbutton" iconCls="icon-cancel" onclick="javascript:$(‘#dd‘).dialog(‘close‘)">Cancel</a>
</div>
2EasyUI布局
1)为网页创建边框布局
边框布局(border layout)提供五个区域:east、west、north、south、center。以下是一些通常用法:
- north 区域可以用来显示网站的标语。
- south 区域可以用来显示版权以及一些说明。
- west 区域可以用来显示导航菜单。
- east 区域可以用来显示一些推广的项目。
- center 区域可以用来显示主要的内容。
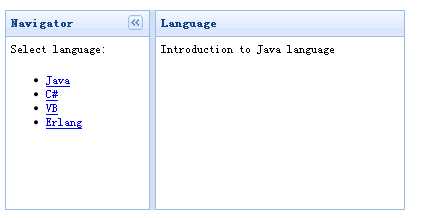
为了应用布局(layout),您应该确定一个布局(layout)容器,然后定义一些区域。布局(layout)必须至少需要一个 center 区域,以下是一个布局(layout)实例:
<div class="easyui-layout" style="width:400px;height:200px;">
    <div region="west" split="true" title="Navigator" style="width:150px;">
        <p style="padding:5px;margin:0;">Select language:</p>
        <ul>
            <li><a href="javascript:void(0)" onclick="showcontent(‘java‘)">Java</a></li>
            <li><a href="javascript:void(0)" onclick="showcontent(‘cshape‘)">C#</a></li>
            <li><a href="javascript:void(0)" onclick="showcontent(‘vb‘)">VB</a></li>
            <li><a href="javascript:void(0)" onclick="showcontent(‘erlang‘)">Erlang</a></li>
        </ul>
    </div>
    <div id="content" region="center" title="Language" style="padding:5px;">
    </div>
</div>
我们在一个<div> 容器中创建了一个边框布局(border layout),布局(layout)把容器切割为两个部分,左边是导航菜单,右边是主要内容。
最后我们写一个 onclick 事件处理函数来检索数据,‘showcontent‘ 函数非常简单:
function showcontent(language){
    $(‘#content‘).html(‘Introduction to ‘ + language + ‘ language‘);
}
2)在面板中创建复杂布局
面板(Panel)允许您创建用于多种用途的自定义布局。在本实例中,我们使用面板(panel)和布局(layout)插件来创建一个 msn 消息框。
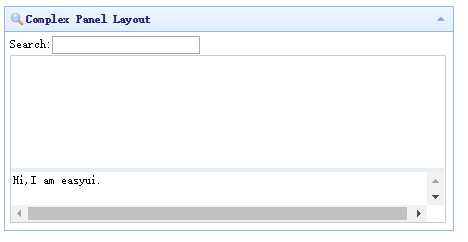
我们在区域面板中使用多个布局(layout)。在消息框的顶部我们放置一个查询输入框。在中间的区域我们通过设置 split 属性为 true,把这部分切割为两部分,允许用户改变区域面板的尺寸大小。
以下就是所有代码:
<div class="easyui-panel" title="Complex Panel Layout" iconCls="icon-search" collapsible="true" style="padding:5px;width:500px;height:250px;">
    <div class="easyui-layout" fit="true">
        <div region="north" border="false" class="p-search">
            <label>Search:</label><input></input>
        </div>
        <div region="center" border="false">
            <div class="easyui-layout" fit="true">
                <div region="east" border="false" class="p-right">
                    <img src="img/zxx.jpg"/>
                </div>
                <div region="center" border="false" style="border:1px solid #ccc;">
                    <div class="easyui-layout" fit="true">
                        <div region="south" split="true" border="false" style="height:60px;">
                            <textarea style="border:0;width:100%;height:100%;resize:none">Hi,I am easyui.</textarea>
                        </div>
                        <div region="center" border="false">
                        </div>
                    </div>
                </div>
            </div>
        </div>
    </div>
</div>
3)动态添加标签页
通过使用 jQuery EasyUI 可以很容易地添加 Tabs。您只需要调用 ‘add‘ 方法即可。
我们将使用 iframe 动态地添加显示在一个页面上的 Tabs。 当点击添加按钮,一个新的 tab 将被添加。如果 tab 已经存在,它将被激活。
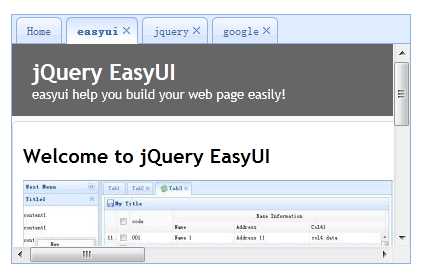
步骤 1:创建 Tabs
<div style="margin-bottom:10px">
    <a href="#" class="easyui-linkbutton" onclick="addTab(‘google‘,‘http://www.google.com‘)">google</a>
    <a href="#" class="easyui-linkbutton" onclick="addTab(‘jquery‘,‘http://jquery.com/‘)">jquery</a>
    <a href="#" class="easyui-linkbutton" onclick="addTab(‘easyui‘,‘http://jeasyui.com/‘)">easyui</a>
</div>
<div id="tt" class="easyui-tabs" style="width:400px;height:250px;">
    <div title="Home">
    </div>
</div>
步骤 2:实现 ‘addTab‘ 函数
function addTab(title, url){
    if ($(‘#tt‘).tabs(‘exists‘, title)){
        $(‘#tt‘).tabs(‘select‘, title);
    } else {
        var content = ‘<iframe scrolling="auto" frameborder="0"  src="‘+url+‘" style="width:100%;height:100%;"></iframe>‘;
        $(‘#tt‘).tabs(‘add‘,{
            title:title,
            content:content,
            closable:true
        });
    }
}
EasyUI还有很多很多好用的组件,包括强大的DataGrid,树网格,面板。用户可以使用他们一起,或者只是用一些组件,组合和构建他想要的跨浏览器的网页应用。

有很多教程和演示应用帮助你了解这个框架。本文全部内容引自EasyUI教程。所有组件内容解释的都非常详细易懂。
链接地址为http://www.jeasyui.net/tutorial/
希望你能从中得到帮助。
以上是关于一款非常推荐的用户界面插件----EasyUI的主要内容,如果未能解决你的问题,请参考以下文章