对比度与亮度调整
Posted terrypython
tags:
篇首语:本文由小常识网(cha138.com)小编为大家整理,主要介绍了对比度与亮度调整相关的知识,希望对你有一定的参考价值。
图像亮度与对比度的调整,是放在skimage包的exposure模块里面
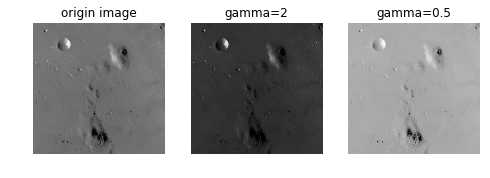
一 gamma调整
原理:I=Ig
对原图像的像素,进行幂运算,得到新的像素值。公式中的g就是gamma值。
如果gamma>1, 新图像比原图像暗
如果gamma<1,新图像比原图像亮
函数格式为:skimage.exposure.adjust_gamma(image, gamma=1)
gamma参数默认为1,原像不发生变化 。
from skimage import data, exposure, img_as_float
import matplotlib.pyplot as plt
image = img_as_float(data.moon())
gam1= exposure.adjust_gamma(image, 2)   #调暗
gam2= exposure.adjust_gamma(image, 0.5)  #调亮
plt.figure(‘adjust_gamma‘,figsize=(8,8))

plt.subplot(131)
plt.title(‘origin image‘)
plt.imshow(image,plt.cm.gray)
plt.axis(‘off‘)

plt.subplot(132)
plt.title(‘gamma=2‘)
plt.imshow(gam1,plt.cm.gray)
plt.axis(‘off‘)

plt.subplot(133)
plt.title(‘gamma=0.5‘)
plt.imshow(gam2,plt.cm.gray)
plt.axis(‘off‘)

plt.show()
结果如下图所示:

二 log对数调整
这个刚好和gamma相反
原理:I=log(I)
from skimage import data, exposure, img_as_float
import matplotlib.pyplot as plt
image = img_as_float(data.moon())
log= exposure.adjust_log(image)   #对数调整
plt.figure(‘adjust_log‘,figsize=(8,8))

plt.subplot(121)
plt.title(‘origin image‘)
plt.imshow(image,plt.cm.gray)
plt.axis(‘off‘)

plt.subplot(122)
plt.title(‘log‘)
plt.imshow(log,plt.cm.gray)
plt.axis(‘off‘)

plt.show()
结果如下图所示:

三 判断图像对比度是否偏低
函数:is_low_contrast(img)
返回一个bool型值
from skimage import data, exposure
image =data.moon()
result=exposure.is_low_contrast(image)
print(result)
结果如下所示:
False
四 调整强度
函数:skimage.exposure.rescale_intensity(image, in_range=‘image‘, out_range=‘dtype‘)
in_range 表示输入图片的强度范围,默认为‘image‘, 表示用图像的最大/最小像素值作为范围
out_range 表示输出图片的强度范围,默认为‘dype‘, 表示用图像的类型的最大/最小值作为范围
默认情况下,输入图片的[min,max]范围被拉伸到[dtype.min, dtype.max],如果dtype=uint8, 那么dtype.min=0, dtype.max=255
import numpy as np
from skimage import exposure
image = np.array([51, 102, 153], dtype=np.uint8)
mat=exposure.rescale_intensity(image)
print(mat)
结果为:
[ 0 127 255]
即像素最小值由51变为0,最大值由153变为255,整体进行了拉伸,但是数据类型没有变,还是uint8。前面我们讲过,可以通过img_as_float()函数将unit8类型转换为float型,实际上还有更简单的方法,就是乘以1.0。
import numpy as np
image = np.array([51, 102, 153], dtype=np.uint8)
print(image*1.0)
结果为:[ 51. 102. 153.]
而float类型的范围是[0,1],因此对float进行rescale_intensity 调整后,范围变为[0,1],而不是[0,255]
import numpy as np
from skimage import exposure
image = np.array([51, 102, 153], dtype=np.uint8)
tmp=image*1.0
mat=exposure.rescale_intensity(tmp)
print(mat)
结果为:[ 0. 0.5 1. ]
如果原始像素值不想被拉伸,只是等比例缩小,就使用in_range参数,如:
import numpy as np
from skimage import exposure
image = np.array([51, 102, 153], dtype=np.uint8)
tmp=image*1.0
mat=exposure.rescale_intensity(tmp,in_range=(0,255))
print(mat)
结果为:[ 0.2 0.4 0.6],即原像素值除以255。
如果参数in_range的[main,max]范围要比原始像素值的范围[min,max] 大或者小,那就进行裁剪,如:
mat=exposure.rescale_intensity(tmp,in_range=(0,102))
print(mat)
结果为:输出[ 0.5 1. 1. ],即原像素值除以102,超出1的变为1
如果一个数组里面有负数,现在想调整到正数,就使用out_range参数。如:
import numpy as np
from skimage import exposure
image = np.array([-10, 0, 10], dtype=np.int8)
mat=exposure.rescale_intensity(image, out_range=(0, 127))
print(mat)
结果为:[ 0 63 127]
以上是关于对比度与亮度调整的主要内容,如果未能解决你的问题,请参考以下文章