Git日常基础使用
Posted itzgr
tags:
篇首语:本文由小常识网(cha138.com)小编为大家整理,主要介绍了Git日常基础使用相关的知识,希望对你有一定的参考价值。
一 获取git仓库
1.1 初始化仓库
  1 [[email protected] ~]# cd /mystudy/
  2 [[email protected] mystudy]# git init
  3 [[email protected] mystudy]# git remote add origin https://gitee.com/imxhy/mystudy
1.2 克隆现有仓库
  1 [[email protected] mystudy]# git clone https://gitee.com/xiyouMc/pornhubbot
  2 [[email protected] mystudy]# git clone https://gitee.com/xiyouMc/pornhubbot mystudy    #clone项目,同时本地创建mystudy目录。
二 仓库相关
2.1 检查状态
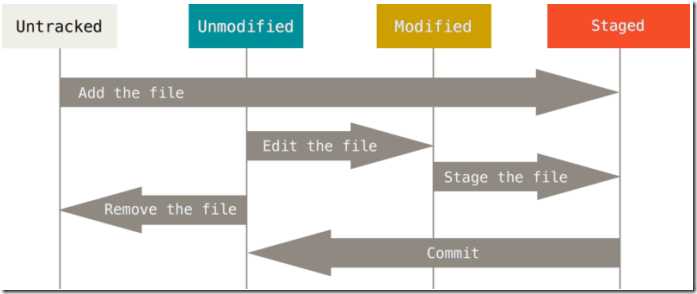
工作目录下的文件只有两种状态:已跟踪和未跟踪。
已跟踪:指文件在上一次快照中有对应的记录,当前状态可能处于未修改,已修改或已放入暂存区。
未跟踪:目录中的除已跟踪的其他文件都属于未跟踪文件,既不存在于上次快照的记录中,也没有放入暂存区。
未跟踪——>已跟踪未修改——>暂存区(修改后暂存)——>git仓库(提交更新)
  1 [[email protected] mystudy]# echo ‘My Project‘ > README
  2 [[email protected] mystudy]# git status
提示:Untracked files:未跟踪文件列表,即之前快照(提交)中没有此文件,git默认不会自动纳入跟踪范围。
2.2 跟踪新文件
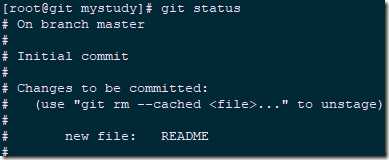
  1 [[email protected] mystudy]# git add README
  2 [[email protected] mystudy]# git status
提示:Changes to be committed:已暂存状态的文件。
2.3 暂存已修改文件
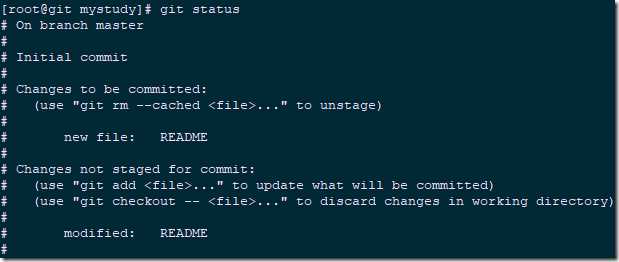
  1 [[email protected] mystudy]# echo "This is my test file">>README
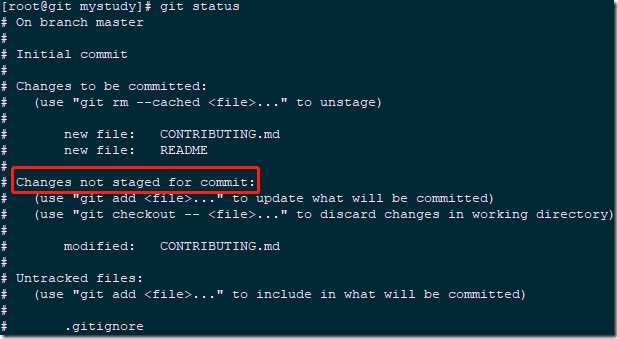
  2 [[email protected] mystudy]# git status
提示:Changes not staged for commit:跟踪的文件内容发生变化,此次变更未放入暂存区。
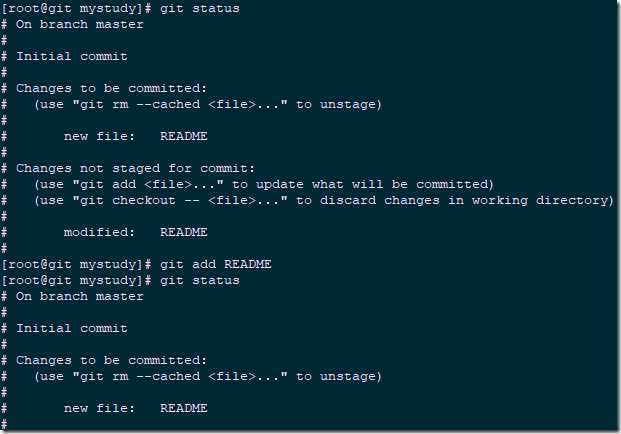
git add:此命令可以用它开始跟踪新文件,或者把已跟踪的文件放到暂存区,还能用于合并时把有冲突的文件标记为已解决状态等。即“添加内容到下一次提交中”,而不是“将一个文件添加到项目中”。
1 [[email protected] mystudy]# git add README #添加至暂存区
提示:若使用git add添加至暂存区之后再次进行修改,文件会处于暂存区和非暂存区。暂存区保存上一次add后的版本,非暂存区标记最后一次修改版本,建议进行提交之前add一次。
2.4 状态简览
1 [[email protected] mystudy]# git status -s
提示:
??:新添加暂未跟踪文件;
A:新添加到暂存区中的文件;
M:已修改过的文件,若出现在右边,则表示该文件被修改了但是还没放入暂存区,若出现在左边,则表示该文件被修改了并放入了暂存区。
2.5 忽略文件
1 [[email protected] mystudy]# cat .gitignore
*.[oa] #忽略所有以.o或.a结尾的文件;
*~ #忽略所有以波浪符结尾的文件;
*.log #忽略所有以.log结尾的文件。
附1:.gitignore 的格式规范如下:
- 所有空行或者以 # 开头的行都会被 Git 忽略。
- 可以使用标准的 glob 模式匹配,即简化正则表达式。
- 匹配模式可以以(/)开头防止递归。
- 匹配模式可以以(/)结尾指定目录。
- 要忽略指定模式以外的文件或目录,可以在模式前加上惊叹号(!)取反。
附2:简化正则表达式:
- 星号(*):匹配零个或多个任意字符;
- [abc] :匹配任何一个列在方括号中的字符;
- 问号(?):只匹配一个任意字符;
- [0-9]:匹配0至9范围内的任意数字;
- **: 使用两个星号(*) 表示匹配任意中间目录,比如`a/**/z` 可以匹配 a/z, a/b/z 或 `a/b/c/z`等。
2.6 查看已暂存和未暂存修改
  1 [[email protected] mystudy]# echo "Hello" > README
  2 [[email protected] mystudy]# echo "Hello" > CONTRIBUTING.md
  3 [[email protected] mystudy]# git add README
  4 [[email protected] mystudy]# git status
解释:修改以上两个问题,但对CONTRIBUTING.md文件未暂存,然后查看状态,是已修改未暂存。
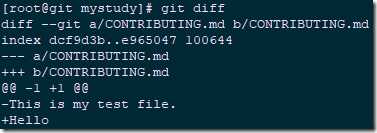
1 [[email protected] mystudy]# git diff #通过git diff查看具体做了哪些修改。
提示:git diff命令比较的是工作目录中当前文件和暂存区域快照之间的差异, 也就是修改之后还没有暂存起来的变化内容。
注意:git diff本身只显示尚未暂存的改动,而不是自上次提交以来所做的所有改动。
2.7 提交更新
1 [[email protected] mystudy]# git status
提示:提交之前建议检查是否所有需要提交的文件都已处于暂存区,否则提交的时候不会记录这些还没暂存起来的变化。
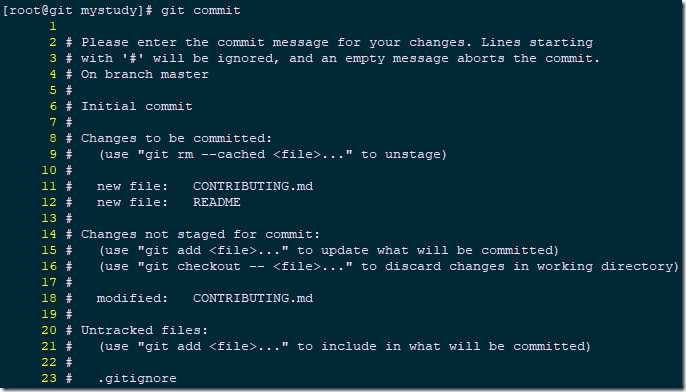
1 [[email protected] mystudy]# git commit
解释:此种方式会启动文本编辑器以便输入本次提交的说明,说明通常位于开头空行位置。
2.8 跳过暂存区
默认git只会将所有暂存区的文件进行提交,但可通过git commit -a选项,git会自动把所有已经跟踪过的文件暂存起来一并提交,从而跳过 git add 步骤。
2.9 移除文件
- 正常git删除操作:即从git移除同时从工作目录删除使用git rm。
- rm删除后的git移除:rm文件后,再使用git rm [文件]。
- 放入暂存区之后rm删除文件的git移除:git rm -f [文件]。
- 从git仓库删除但保留在本地目录:git rm --cached [文件]。
2.10 移动文件
1 [[email protected] mystudy]# git mv README README.md
相当于以下三条命令:
  1 $ mv README README.md
  2 $ git rm README
  3 $ git add README.md
三 查看提交历史
1 [[email protected] mystudy]# git log
四 撤销操作
4.1 重新提交
有时候我们提交完了才发现漏掉了几个文件没有添加,或者提交信息写错了。 此时,可以运行带有 --amend 选项的提交命令尝试重新提交。
  1 [[email protected] mystudy]# git commit -m ‘first commit‘
  2 [[email protected] mystudy]# echo "This is my test 3 file" > README3.md
  3 [[email protected] mystudy]# git add README3.md
  4 [[email protected] mystudy]# git commit --amend -m ‘second commit‘
解释:第一次提交后,发现我们需要再添加一个文件进行提交,可通过以上方式,会使用第二次提交代替第一次提交结果。
4.2 取消暂存区文件
  1 [[email protected] mystudy]# echo "This is my test 4 file" > README4.md
  2 [[email protected] mystudy]# echo "This is my test 5 file" > README5.md
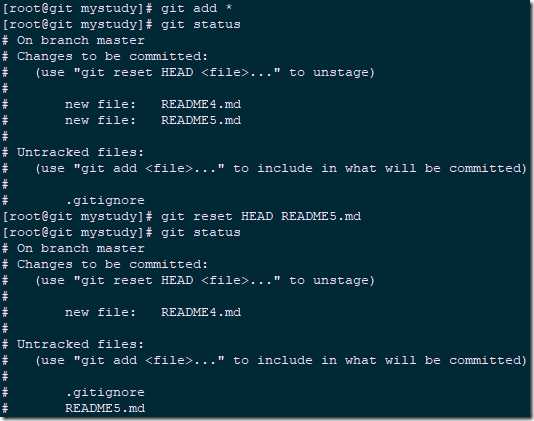
  3 [[email protected] mystudy]# git add *
  4 [[email protected] mystudy]# git status
  5 [[email protected] mystudy]# git reset HEAD README5.md	#从暂存区取消特定文件
4.3 撤销对文件的修改
  1 [[email protected] mystudy]# echo "version 1.1" > version.md
  2 [[email protected] mystudy]# git add version.md
  3 [[email protected] mystudy]# git commit -m ‘version commit‘
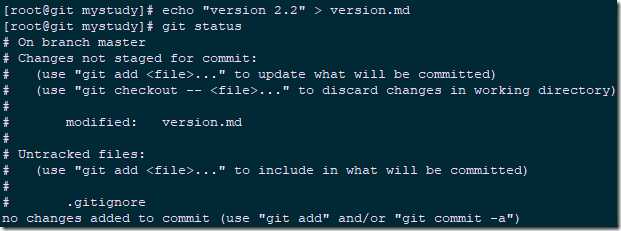
  4 [[email protected] mystudy]# echo "version 2.2" > version.md
  5 [[email protected] mystudy]# git status
  1 [[email protected] mystudy]# cat version.md
  2 version 2.2
  3 [[email protected] mystudy]# git checkout -- version.md
  4 [[email protected] mystudy]# git status
解释:创建一个文件,提交之后再次修改,然后撤销此次修改,回滚至上一次提交的版本。
五 远程仓库的使用
为了能在任意 Git 项目上协作,管理自己的远程仓库非要有必要。远程仓库是指托管在因特网或其他网络中的你的项目的版本库。通常有些仓库对你只读,有些则可以读写。与他人协作涉及管理远程仓库以及根据需要推送或拉取数据。管理远程仓库包括了解如何添加远程仓库、移除无效的远程仓库、管理不同的远程分支并定义它们是否被跟踪等等。
5.1 查看远程仓库
1 [[email protected] mystudy]# git remote -v
5.2 添加远程仓库
  1 [[email protected] mystudy]# mkdir /mystudy2
  2 [[email protected] mystudy]# cd /mystudy2
  3 [[email protected] mystudy2]# git init
  4 [[email protected] mystudy2]# git remote add mystudy2 https://gitee.com/imxhy/mystudy2
  5 [[email protected] mystudy2]# git fetch mystudy2		#使用别名拉取仓库存在但本地没有的文件
解释:git remote add <shortname> <url> 添加一个远程Git仓库,同时指定一个你可以轻松引用的简写。
5.3 从仓库抓取与拉取
git fetch [remote-name]:从仓库中拉取所有本地没有的数据。 执行完成后,你将会拥有那个远程仓库中所有分支的引用,可以随时合并或查看。
注意:必须注意 git fetch 命令会将数据拉取到你的本地仓库 - 它并不会自动合并或修改你当前的工作。
5.4 推送至远程仓库
1 [[email protected] mystudy2]# git push mystudy2 mystudy2/master
5.5 查看远程仓库
1 [[email protected] mystudy2]# git remote show mystudy2
解释:会列出远程仓库的URL与跟踪分支的信息。显示当前正处于master分支,并且如果运行git pull,则会抓取所有的远程引用,然后将远程master分支合并到本地master分支。它也会列出拉取到的所有远程引用。
5.6 远程仓库移除与重命名
  1 [[email protected] mystudy2]# git remote rename mystudy2 study2
  2 [[email protected] mystudy2]# git remote
  3 study2
提示:修改远程仓库名字后会同时修改分支名,如mystudy2/aaa会变味study2/aaa。
  1 [[email protected] mystudy2]# git remote rm study2
  2 [[email protected] mystudy2]# git remote
六 git别名
6.1 设置别名
  1 [[email protected] mystudy]# git config --global alias.co checkout
  2 [[email protected] mystudy]# git config --global alias.br branch
  3 [[email protected] mystudy]# git config --global alias.ci commit
  4 [[email protected] mystudy]# git config --global alias.st status
解释:如上所示,使用别名后,在执行git commit 时,只需要输入 git ci。
以上是关于Git日常基础使用的主要内容,如果未能解决你的问题,请参考以下文章
