Command模式(命令设计模式)
Posted dgwblog
tags:
篇首语:本文由小常识网(cha138.com)小编为大家整理,主要介绍了Command模式(命令设计模式)相关的知识,希望对你有一定的参考价值。
Command??
把方法的调用用一个类的实例来承载,要管理工作的历史记录,创建这些方法执行的命令的集合,只需管理这些实例的集合即可,而且还可以随时再次执行过去的命令,或是将多个过去的命令整合为一个新命令并执行。称之为Command设计模式
- 那里合适使用:
Command有时也被称为事件(event)。它与“事件驱动编程”中的“事件”是一样的意思。当发生点击鼠标、按下键盘按键等事件时,我们可以先将这些事件作成实例,然后按照发生顺序放入队列中。接着,再依次去处理它们。在GUI(graphical user interface)编程中,经常需要与“事件”打交道。即为在有多个命令,并且这些命令有一定的逻辑顺序,且可能需要保存的这些命令的数据,那么可以使用Command设计模式。
理清职责

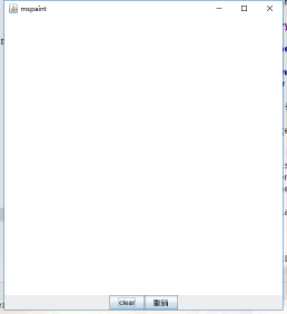
实现简单的画图板:
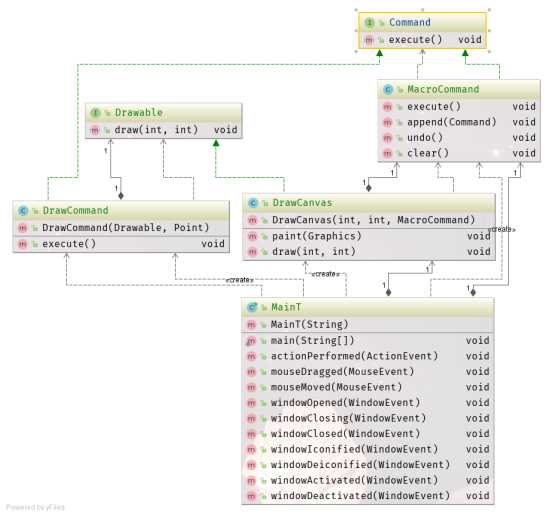
|包=======名字======说明
|command |command表示“命令”的接口
|command |Macrocommand |表示“由多条命令整合成的命令”的类
|drawer |Drawcommand |表示“绘制一个点的命令”的类
|drawer |Drawable|表示“绘制对象”的接口
|drawer |Drawcanvas实现“绘制对象”的类
|无名|MainT测试程序行为的类扩展命令:
只需要实现command,并且关联操作的属性类即可
ColorCommand implements Command {
private xxxAction xxxx;
private XxxArgs  xxxx;

xxxxAction....

}- 相关设计模式
- ◆Composite模式(第11章)有时会使用Composite模式实现宏命令(macrocommand)。
- ◆Memento模式(第18章)有时会使用Memento模式来保存Command角色的历史记录。
- ◆Protype模式(第6章)有时会使用Protype模式复制发生的事件(生成的命令)。
UML

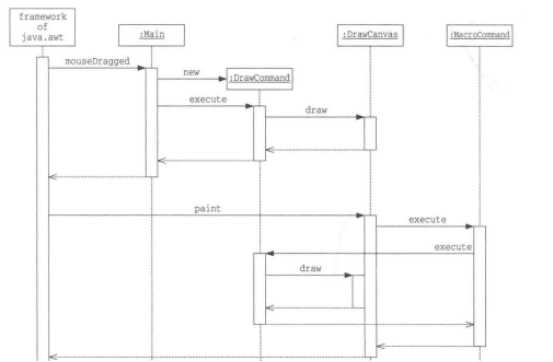
时序图:

Code
- Comamnd 包
public interface Command {

    void execute();
}

public class MacroCommand implements Command {

    //  命令集合 便于执行UNdo操作
    private Stack commands=new Stack();


    // 执行stack中所有命令
    @Override
    public void execute() {
        Iterator it = commands.iterator();
        while (it.hasNext()){
            Command o = ((Command) it.next());
            o.execute();
        }
    }

    public void append(Command command){
        if (command!=null){
            commands.add(command);
        }
    }
    // 移除末尾命令
    public void undo(){
        if(!commands.empty()){
            commands.pop();
        }
    }
    // 移除所有命令
    public void clear(){
        commands.clear();
    }
}
- Drawer 包
public interface Drawable {

    void draw(int x,int y);

    void setColor(Color color);
}

public class ColorCommand implements Command {

    private Drawable drawable;

    private Color color;

    public ColorCommand(Drawable drawable, Color color) {
        this.drawable = drawable;
        this.color = color;
    }

    @Override
    public void execute() {
        drawable.setColor(color);
    }
}

public class DrawCommand implements Command {

    // 绘制对象
    private Drawable drawable;

    // 绘制位置
    private Point point;

    public DrawCommand(Drawable drawable, Point point) {
        this.drawable = drawable;
        this.point = point;
    }

    @Override
    public void execute() {
        drawable.draw(point.x,point.y);
    }
}

public class DrawCanvas extends Canvas implements Drawable {


     //  defulat 颜色
    private  Color color=Color.red;

    private int radius=6;

    private MacroCommand history;
    private Graphics2D graphics;

    public DrawCanvas(int width,int height,MacroCommand history) {
            setSize(width,height);
            setBackground(Color.white);
            this.history=history;
    }

    // 重新绘制
    @Override
    public void paint(Graphics graphics){
            history.execute();
    }

    /**
     *  这里的实现的画点轨迹依据本身物理操作的手势的速度定型的,
     *  即为:手快 画点 手慢 画线
     * @param x
     * @param y
     */
    @Override
    public void draw(int x, int y) {
        graphics = (Graphics2D) getGraphics();
        graphics.fillOval(x-radius,y-radius,radius*2,radius*2);
        //graphics.drawOval(x-radius,y-radius,radius*2,radius*2);
    }

    @Override
    public void setColor(Color color) {
        graphics = (Graphics2D) getGraphics();
        graphics.setColor(color);
    }
}
- MainT
public class MainT extends JFrame implements ActionListener, MouseMotionListener, WindowListener {

    private MacroCommand history=new MacroCommand();

    private DrawCanvas canvas=new DrawCanvas(500,500,history);

    private JButton clearbtn=new JButton("clear");
    private JButton undobtn=new JButton("撤销");

    public MainT(String title) {
        super(title);
        setLocationRelativeTo(getComponentAt(-500,-500));

        this.addWindowListener(this);
        canvas.addMouseMotionListener(this);
        clearbtn.addActionListener(this);
        undobtn.addActionListener(this);

        Box btnbox=new Box(BoxLayout.X_AXIS);
        btnbox.add(clearbtn);
        btnbox.add(undobtn);

        Box mainbox=new Box(BoxLayout.Y_AXIS);
        mainbox.add(canvas);
        mainbox.add(btnbox);

        getContentPane().add(mainbox);

        pack();
        show();
    }

    public static void main(String[] args) {
            new MainT("mspaint");
    }

    @Override
    public void actionPerformed(ActionEvent e) {
            if(e.getSource()==clearbtn){
                    history.clear();
                    canvas.repaint();
            }else if(e.getSource()==undobtn){
                    history.undo();
                    canvas.repaint();
            }
    }

    @Override
    public void mouseDragged(MouseEvent e) {
        /**
         * DrawCommand实际命令的承载者 原来的历史得以在类中进行保存;
         * 如果构建新的命令xxxCommand的实现者,那么在原始记录中把新版的命令得以getXXx方法拿到,
         * 在进行的新的保存的,那么原始数据就可以在新的canvans中得以呈现。
         * (实际上canvas可以作为一个单例,在app中存在)
         */
        DrawCommand command = new DrawCommand(canvas, e.getPoint());
        ColorCommand colorCommand = new ColorCommand(canvas, Color.blue);

        history.append(colorCommand);
        history.append(command);

        colorCommand.execute();
        command.execute();
    }

    @Override
    public void mouseMoved(MouseEvent e) {

    }

    @Override
    public void windowOpened(WindowEvent e) {

    }

    @Override
    public void windowClosing(WindowEvent e) {
        System.exit(0);
    }

    @Override
    public void windowClosed(WindowEvent e) {

    }

    @Override
    public void windowIconified(WindowEvent e) {

    }

    @Override
    public void windowDeiconified(WindowEvent e) {

    }

    @Override
    public void windowActivated(WindowEvent e) {

    }

    @Override
    public void windowDeactivated(WindowEvent e) {

    }
}
以上是关于Command模式(命令设计模式)的主要内容,如果未能解决你的问题,请参考以下文章