requests 模块
Posted zhaoyunlong
tags:
篇首语:本文由小常识网(cha138.com)小编为大家整理,主要介绍了requests 模块相关的知识,希望对你有一定的参考价值。
补充小知识:
User-Agent
-
那么User-Agent到底是什么呢? User-Agent会告诉网站服务器,访问者是通过什么工具来请求的,如果是爬虫请求,一般会拒绝,如果是用户浏览器,就会应答
常用的爬虫模块有urlib2和requests模块 但是 urlib2有的功能requests都有 所以现在大部分用的额模块都是requests模块了
requests模块是一个可以模拟浏览器发送请求的模块
#1、请求方式:
    常用的请求方式:GET,POST
    其他请求方式:HEAD,PUT,DELETE,OPTHONS

    ps:用浏览器演示get与post的区别,(用登录演示post)

    post与get请求最终都会拼接成这种形式:k1=xxx&k2=yyy&k3=zzz
    post请求的参数放在请求体内:
        可用浏览器查看,存放于form data内
    get请求的参数直接放在url后

#2、请求url
    url全称统一资源定位符,如一个网页文档,一张图片
    一个视频等都可以用url唯一来确定

    url编码
    https://www.baidu.com/s?wd=图片
    图片会被编码(看示例代码)


    网页的加载过程是:
    加载一个网页,通常都是先加载document文档,
    在解析document文档的时候,遇到链接,则针对超链接发起下载图片的请求

#3、请求头
    User-agent:请求头中如果没有user-agent客户端配置,
    服务端可能将你当做一个非法用户
    host
    cookies:cookie用来保存登录信息

    一般做爬虫都会加上请求头


#4、请求体
    如果是get方式,请求体没有内容
    如果是post方式,请求体是format data

    ps:
    1、登录窗口,文件上传等,信息都会被附加到请求体内
    2、登录,输入错误的用户名密码,然后提交,就可以看到post,正确登录后页面通常会跳转,无法捕捉到post
requests模块支持的请求:
|
1
2
3
4
5
6
7
|
import requestsrequests.get("http://httpbin.org/get")requests.post("http://httpbin.org/post")requests.put("http://httpbin.org/put")requests.delete("http://httpbin.org/delete")requests.head("http://httpbin.org/get")requests.options("http://httpbin.org/get") |
一般请求参数:
import requests

response = requests.get(‘https://www.jd.com/‘,)  # 用requests模拟浏览器发送请求,得到的是这个网站的一个响应对象

print(response.status_code)  # 200  得到的是你的影响对象的状态码

print(response.url) # https://www.jd.com/ 请求的url

print(response.content)  # 源数据(字节流)

print(response.text) # 得到的是对你的数据进行编码后的 数据都是字符串

print(type(response.text)) # <class ‘str‘>
print(response.encoding)  # 得到你的响应体的编码格式
requests模块中 content和text的区别:
-
content 和text都是爬取的html内容 不过text是以字符串显示的content是以字节流显示的
把你读取的内容写入到文件内存储起来:
with open("res.html","w")as f:
    f.write(response.text)


这个时候会报错:

UnicodeEncodeError: ‘gbk‘ codec can‘t encode character ‘ue600‘ in position 79298: illegal multibyte sequence
上面的错误是因为你的读取的内容是gbk的这个时候你存储的时候需要进行转码,转化为可以识别的utf8
with open("res.html","w",encoding="utf8")as f:
    f.write(response.text)  # 直接把响应体对象转化过后的字符串存储起来
get请求:
1、基本请求
|
1
2
3
4
5
|
import requestsresponse=requests.get(‘https://www.jd.com/‘,)with open("jd.html","wb") as f: f.write(response.content) |
2、带参数的GET请求->params

#在请求头内将自己伪装成浏览器,否则百度不会正常返回页面内容
import requests
response=requests.get(‘https://www.baidu.com/s?wd=python&pn=1‘,
                      headers={
                        ‘User-Agent‘:‘Mozilla/5.0 (Windows NT 6.1; WOW64) AppleWebKit/537.36 (KHTML, like Gecko) Chrome/62.0.3202.75 Safari/537.36‘,
                      })
print(response.text)


#如果查询关键词是中文或者有其他特殊符号,则不得不进行url编码
from urllib.parse import urlencode
wd=‘egon老师‘
encode_res=urlencode({‘k‘:wd},encoding=‘utf-8‘)
keyword=encode_res.split(‘=‘)[1]
print(keyword)
# 然后拼接成url
url=‘https://www.baidu.com/s?wd=%s&pn=1‘ %keyword

response=requests.get(url,
                      headers={
                        ‘User-Agent‘:‘Mozilla/5.0 (Windows NT 6.1; WOW64) AppleWebKit/537.36 (KHTML, like Gecko) Chrome/62.0.3202.75 Safari/537.36‘,
                      })
res1=response.text
一般的get请求的参数都是以键值对的形式 用params给传递过去
import requests
response = requests.get("https://www.taobao.com/",params = {"q":"妹子"})  # 携带的参数需要写在params内
with open("taobao.html","wb")as f:  # 如果写的时候使用的是源字节流就需要以wb的形式写入
    f.write(response.content)
3、带参数的GET请求->headers
#通常我们在发送请求时都需要带上请求头,请求头是将自身伪装成浏览器的关键,常见的有用的请求头如下
Host
Referer #大型网站通常都会根据该参数判断请求的来源
User-Agent #客户端 此信息是比较重要的
Cookie #Cookie信息虽然包含在请求头里,但requests模块有单独的参数来处理他,headers={}内就不要放它了
为什么要给requests模拟的请求设置一个headers呢? 因为你这个是模拟浏览器毕竟不是真正的浏览器所以呢,因为有很多服务器都是为了防止攻击就拒绝这种模拟请求,因此你需要告诉你请求的服务器我这是一个浏览器,就需要加上headers 就类似于你的浏览器的发送请求的请求头
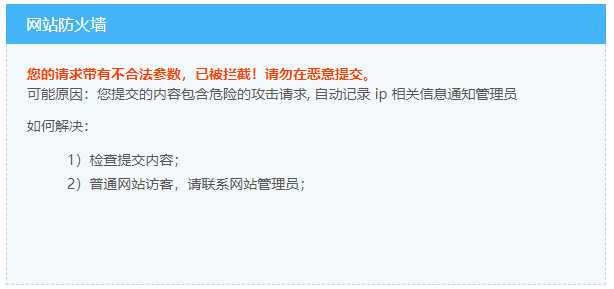
如果不携带就是;

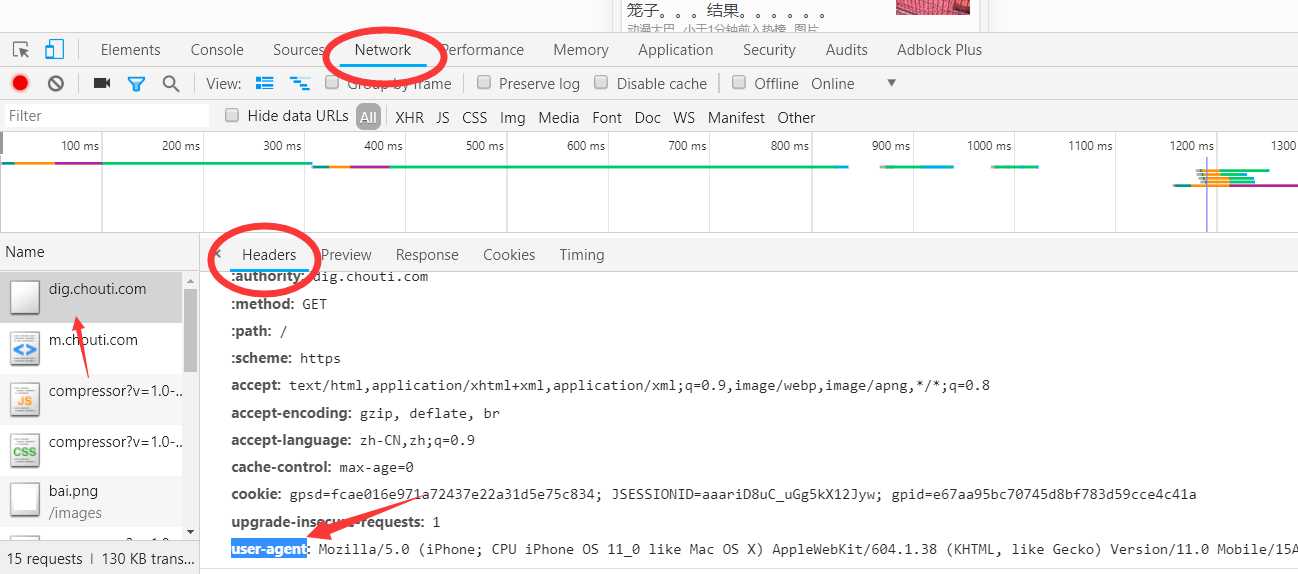
response = requests.get("https://dig.chouti.com",headers={"user-agent":"Mozilla/5.0 (iPhone; CPU iPhone OS 11_0 like Mac OS X) AppleWebKit/604.1.38 (KHTML, like Gecko) Version/11.0 Mobile/15A372 Safari/604.1"})  #在请求头中设置我们在浏览器上找到的user-agent

with open ("chouti.html","wb")as f:
    f.write(response.content)
user-agent 是在浏览器的这个部位

#添加headers(浏览器会识别请求头,不加可能会被拒绝访问,比如访问https://www.zhihu.com/explore)
import requests
response=requests.get(‘https://www.zhihu.com/explore‘)
response.status_code #500


#自己定制headers
headers={
    ‘User-Agent‘:‘Mozilla/5.0 (Linux; android 6.0; Nexus 5 Build/MRA58N) AppleWebKit/537.36 (KHTML, like Gecko) Chrome/46.0.2490.76 Mobile Safari/537.36‘,

}
respone=requests.get(‘https://www.zhihu.com/explore‘,
                     headers=headers)
print(respone.status_code) #200
4、带参数的GET请求->cookies
#登录github,然后从浏览器中获取cookies,以后就可以直接拿着cookie登录了,无需输入用户名密码
#邮箱[email protected]

cookies = {"user-session":"6bDV-sAisPyptStNavkqcHKgBMo6S_SslnBvDiEXqp8riirm"}

res = requests.get("https://github.com/settings/emails",cookies = cookies)
print(res.status_code) # 200 #github对请求头没有什么限制,我们无需定制user-agent,对于其他网站可能还需要定制
print(‘[email protected]‘in res.text) # True
也可以用一个测试网址:http://httpbin.org/get 这个网址 无论你输入什么都按照请求格式输出
# url = ‘http://httpbin.org/get‘
#
# res = requests.get(url)
# print(res.text)

# url = ‘http://httpbin.org/cookies‘
#
# cookies = {"sbid":str(uuid.uuid4()),"token":"123"}
#
# res = requests.get(url,cookies=cookies)
# print(res.text)
可以携带多个cookies
5、携带session
可能你想访问c网页 但是必须要先访问A网页和B网页 那么你就要先经过A和B网页如果每一个网页的cookie都有几十个的话 那么你就需要把这个几十个都写入cookie中携带吗?太麻烦了
我们可以直接用session请求来携带所有的cookie
import requests
session = requests.session()  #创建session的对象
res1 = session.get("https://www.zhihu.com/explore") # 这个时候的session就携带了所有的cookie
session请求就是先创建一个请求的session对象 然后这个对象就携带了所有的请求中的cookie
基于POST请求
1、介绍
GET请求
HTTP默认的请求方法就是GET
     * 没有请求体
     * 数据必须在1K之内!
     * GET请求数据会暴露在浏览器的地址栏中

GET请求常用的操作:
       1. 在浏览器的地址栏中直接给出URL,那么就一定是GET请求
       2. 点击页面上的超链接也一定是GET请求
       3. 提交表单时,表单默认使用GET请求,但可以设置为POST


#POST请求
(1). 数据不会出现在地址栏中
(2). 数据的大小没有上限
(3). 有请求体
(4). 请求体中如果存在中文,会使用URL编码!


#!!!requests.post()用法与requests.get()完全一致,特殊的是requests.post()有一个data参数,用来存放请求体数据
2、 data参数
get请求的参数是放在params内 那么post的请求的参数肯定也有固定的放置 那就是data中
如果post请求中也携带了params 那么发送的时候会变为是atrgs中的内容
res = requests.post("http://httpbin.org/post",headers = { },cookies = { },params = {"name":"laowang"}, data = {"age":"18"})  #没有指定请求头,#默认的请求头:application/x-www-form-urlencoed
print(res.text)

得到参数:
{
"args": {
"name": "laowang"
},
"data": "",
"files": {},
"form": {
"age": "18"
},
"headers": {
"Accept": "*/*",
"Accept-Encoding": "gzip, deflate",
"Connection": "close",
"Content-Length": "6",
"Content-Type": "application/x-www-form-urlencoded",
"Host": "httpbin.org",
"User-Agent": "python-requests/2.19.1"
},
"json": null,
"origin": "36.62.41.154",
"url": "http://httpbin.org/post?name=laowang"
}
由上可以得到参数在form中 为什么呢 这就是请求参数的类型了 :
如果是post请求 请求体的数据可以放在data中,但是data中的数据默认是以 application/x-www-form-urlencoed 格式的 请求体中会在form中存放 如果想放在data中就以json格式发送
3、json类型参数
res = requests.post("http://httpbin.org/post",headers = { },cookies = { },params = {"name":"laowang"}, data = {"age":"18"})  #没有指定请求头,#默认的请求头:application/x-www-form-urlencoed
print(res.text)
res = requests.post("http://httpbin.org/post",headers = { },cookies = { },params = {"name":"laowang"}, json = {"age":"18"}) #求头:application/json)
print(res.text)
4、发送post请求,模拟浏览器的登录行为
#对于登录来说,应该输错用户名或密码然后分析抓包流程,用脑子想一想,输对了浏览器就跳转了,还分析个毛线,累死你也找不到包

import requests
import re

session=requests.session()
#第一次请求
r1=session.get(‘https://github.com/login‘)
authenticity_token=re.findall(r‘name="authenticity_token".*?value="(.*?)"‘,r1.text)[0] #从页面中拿到CSRF TOKEN

#第二次请求
data={
    ‘commit‘:‘Sign in‘,
    ‘utf8‘:‘?‘,
    ‘authenticity_token‘:authenticity_token,
    ‘login‘:‘[email protected]‘,
    ‘password‘:‘alex3714‘
}
r2=session.post(‘https://github.com/session‘,
             data=data,
             )

#第三次请求
r3=session.get(‘https://github.com/settings/emails‘)

print(‘[email protected]‘ in r3.text) #True
响应Response
1、response属性
import requests
respone=requests.get(‘http://www.jianshu.com‘)
# respone属性
print(respone.text)
print(respone.content)

print(respone.status_code)
print(respone.headers)
print(respone.cookies)
print(respone.cookies.get_dict())
print(respone.cookies.items())

print(respone.url)
print(respone.history)

print(respone.encoding)

#关闭:response.close()
from contextlib import closing
with closing(requests.get(‘xxx‘,stream=True)) as response:
    for line in response.iter_content():
    pass
2、 编码问题
|
1
2
3
4
5
|
import requestsresponse=requests.get(‘http://www.autohome.com/news‘)response.encoding=‘gbk‘ #汽车之家网站返回的页面内容为gb2312编码的,而requests的默认编码为ISO-8859-1,如果不设置成gbk则中文乱码with open("res.html","w") as f: f.write(response.text) |
爬取的信息可能由于编码的问题 导致内容出错 然后我们就设置下 爬取对象.encoding = "gbk" 或者直接以content存储 字节流 以wb存起来
3、 下载二进制文件(图片,视频,音频)
因为可能你的读取的信息过大 我们一次性写入对内存的需求要求要大 那么我们可以把得到的信息转化为迭代器 然后一行一行写入 读取
import requests
response = requests.get(‘http://bangimg1.dahe.cn/forum/201612/10/200447p36yk96im76vatyk.jpg‘)
with open("res.png","wb")as f:

    # 把你定得到的信息转化为课迭代对象
    for line in response.iter_content():
        f.write(line)
4、解析json数据
可以直接对你的响应对象进行反序列化
|
1
2
3
4
5
6
7
|
import requestsimport jsonresponse=requests.get(‘http://httpbin.org/get‘)res1=json.loads(response.text) #太麻烦res2=response.json() #直接获取json数据print(res1==res2) |
5、 Redirection and History
默认情况下,除了 HEAD, Requests 会自动处理所有重定向。可以使用响应对象的 history 方法来追踪重定向。Response.history 是一个 Response 对象的列表,为了完成请求而创建了这些对象。这个对象列表按照从最老到最近的请求进行排序。
|
1
2
3
4
5
6
7
|
>>> r = requests.get(‘http://github.com‘)>>> r.url‘https://github.com/‘>>> r.status_code200>>> r.history[<Response [301]>] |
另外,还可以通过 allow_redirects = False参数禁用重定向处理:
|
1
2
3
4
5
|
>>> r = requests.get(‘http://github.com‘, allow_redirects=False)>>> r.status_code301>>> r.history[] |
requests请求的对象的history
-
就是你的请求的历史 这个有可能你访问一个网页的时候 会给你重定向 这个得到的是你的最初的请求记录 就是以前的请求历史 比如你请求的是一个https的网页但是输入的是http 那么history得到的就是你的http请求的对象
应用案例
1、模拟GitHub登录,获取登录信息
这个模拟就是知道你的登陆的三个url的方式 然后通过每一个的需要的参数 就携带好 然后就可以抓取到信息了

‘‘‘
一 目标站点分析
    浏览器输入https://github.com/login
    然后输入错误的账号密码,抓包
    发现登录行为是post提交到:https://github.com/session
    而且请求头包含cookie
    而且请求体包含:
        commit:Sign in
        utf8:?
        authenticity_token:lbI8IJCwGslZS8qJPnof5e7ZkCoSoMn6jmDTsL1r/m06NLyIbw7vCrpwrFAPzHMep3Tmf/TSJVoXWrvDZaVwxQ==
        login:egonlin
        password:123


二 流程分析
    先GET:https://github.com/login拿到初始cookie与authenticity_token
    返回POST:https://github.com/session, 带上初始cookie,带上请求体(authenticity_token,用户名,密码等)
    最后拿到登录cookie

    ps:如果密码时密文形式,则可以先输错账号,输对密码,然后到浏览器中拿到加密后的密码,github的密码是明文
‘‘‘


import requests
import re

session = requests.session()

# 第一次请求:获取 authenticity_token
# 因为只有你login登陆成功之后才可以进行下面的操作 所以要先拿到login的cookie 模拟login登陆操作
ret1=session.get("https://github.com/login")
authenticity_token = re.findall(r‘name="authenticity_token".*?value="(.*?)"‘,ret1.text)[0]  # 利用正则表达式来匹配login登陆后的我们需要的authenticity_token的value


#第二次请求:模拟登陆,成功重定向

header = {
    "Referer": "https://github.com/login",  # Referer是代表你从哪个地址过来的
    "User-Agent":"Mozilla/5.0 (Windows NT 10.0; WOW64) AppleWebKit/537.36 (KHTML, like Gecko) Chrome/69.0.3497.100 Safari/537.36"
}


data = { # 请求要携带的参数在网页上可以找到FormData中
    "commit": "Sign in",
    "utf8": "?",
    "authenticity_token": authenticity_token,
    "login": "[email protected]",
    "password": "zy-66"
}
ret = session.post("https://github.com/session",headers = header,data = data)

with open("git.html","wb") as f:
    f.write(ret.content)

import requests
import re

#第一次请求
r1=requests.get(‘https://github.com/login‘)
r1_cookie=r1.cookies.get_dict() #拿到初始cookie(未被授权)
authenticity_token=re.findall(r‘name="authenticity_token".*?value="(.*?)"‘,r1.text)[0] #从页面中拿到CSRF TOKEN

#第二次请求:带着初始cookie和TOKEN发送POST请求给登录页面,带上账号密码
data={
    ‘commit‘:‘Sign in‘,
    ‘utf8‘:‘?‘,
    ‘authenticity_token‘:authenticity_token,
    ‘login‘:‘[email protected]‘,
    ‘password‘:‘alex3714‘
}
r2=requests.post(‘https://github.com/session‘,
             data=data,
             cookies=r1_cookie
             )


login_cookie=r2.cookies.get_dict()


#第三次请求:以后的登录,拿着login_cookie就可以,比如访问一些个人配置
r3=requests.get(‘https://github.com/settings/emails‘,
                cookies=login_cookie)

print(‘[email protected]‘ in r3.text) #True
以上是关于requests 模块的主要内容,如果未能解决你的问题,请参考以下文章
