设计模式之门面模式与装饰器模式详解和应用
Posted 赵广陆
tags:
篇首语:本文由小常识网(cha138.com)小编为大家整理,主要介绍了设计模式之门面模式与装饰器模式详解和应用相关的知识,希望对你有一定的参考价值。
目录
1 门面模式定义
门面模式(Facade Pattern)又叫外观模式,提供了一个统一的接口,用来访问子系统中的一群接 口。其主要特征是定义了一个高层接口,让子系统更容易使用,属于结构性模式。
原文: Provide a unified interface to a set of interfaces in a subsystem.Facade defines a higher-level interface that makes the subsystem easier to use. 解释:要求一个子系统的外部与其内部的通信必须通过一个同一的对象进行。门面模式提供一个高层次的接口,使得 子系统更易于使用。
其实,在我们日常的编码工作中,我们都在有意无意地大量使用门面模式,但凡只要高层模块需要 调度多个子系统(2个以上类对象),我们都会自觉地创建一个新类封装这些子系统,提供精简接口, 让高层模块可以更加容易间接调用这些子系统的功能。尤其是现阶段各种第三方SDK,各种开源类库, 很大概率都会使用门面模式。尤其是你觉得调用越方便的,门面模式使用的一般更多。
1.1 门面模式的应用场景
1、子系统越来越复杂,增加门面模式提供简单接口
2、构建多层系统结构,利用门面对象作为每层的入口,简化层间调用。
1.2 门面模式的通用写法
首先来看门面模式的UML类图:

门面模式主要包含2种角色:
外观角色(Facade):也称门面角色,系统对外的统一接口;
子系统角色(SubSystem):可以同时有一个或多个 SubSystem。每个 SubSytem 都不是一个单独 的类,而是一个类的集合。 SubSystem 并不知道 Facade 的存在,对于 SubSystem 而言, Facade 只 是另一个客户端而已(即 Facade 对 SubSystem 透明)。
下面是门面模式的通用代码,首先分别创建3个子系统的业务逻辑SubSystemA、SubSystemB、 SubSystemC,代码很简单:
// 子系统
public class SubSystemA
    public void doA()
        System.out.println("doing A stuff");
复制
// 子系统
public class SubSystemB
    public void doB()
        System.out.println("doing B stuff");
复制
// 子系统
public class SubSystemC
    public void doC()
        System.out.println("doing C stuff");
复制
来看客户端代码:
// 外观角色 Facade
public class Facade
    private SubSystemA a = new SubSystemA();
    private SubSystemB b = new SubSystemB();
    private SubSystemC c = new SubSystemC();

    // 对外接口
    public void doA()
        this.a.doA();


    // 对外接口
    public void doB()
        this.b.doB();


    // 对外接口
    public void doC()
        this.c.doC();
1.3 门面模式业务场景实例
Gper社区上线了一个积分兑换礼品的商城,这礼品商城中的大部分功能并不是全部重新开发的,而是要去对接已有的各个子系统(如下图所示):

这些子系统可能涉及到积分系统、支付系统、物流系统的接口调用。如果所有的接口调用全部由前 端发送网络请求去调用现有接口的话,一则会增加前端开发人员的难度,二则会增加一些网络请求影响 页面性能。这个时候就可以发挥门面模式的优势了。将所有现成的接口全部整合到一个类中,由后端提 供统一的接口给前端调用,这样前端开发人员就不需要关心各接口的业务关系,只需要把精力集中在页 面交互上。下面我们用代码来模拟一下这个场景。
首先,创建礼品的实体类GiftInfo:
public class GiftInfo

    private String name;

    public GiftInfo(String name)
        this.name = name;


    public String getName()
        return name;
然后,编写各个子系统的业务逻辑代码,分别创建积分系统QualifyService类:
public class QualifyService

    public boolean isAvailable(GiftInfo giftInfo)
        System.out.println("校验" +giftInfo.getName() + "积分通过,库存通过。");
        return true;
支付系统PaymentService类:
public class PaymentService

    public boolean pay(GiftInfo giftInfo)
        System.out.println("扣减" + giftInfo.getName() + " 积分成功");
        return true;
物流系统ShippingService类:
public class ShippingService
    public String delivery(GiftInfo giftInfo)
        System.out.println(giftInfo.getName() + "进入物流系统");
        String shippingNo = "666";
        return shippingNo;
然后创建外观角色GiftFacdeService 类,对外只开放一个兑换礼物的exchange()方法,在 exchange() 方法内部整合3个子系统的所有功能。
public class FacadeService
    private QualifyService qualifyService = new QualifyService();
    private PaymentService paymentService = new PaymentService();
    private ShippingService shippingService = new ShippingService();

    //兑换
    public void exchange(GiftInfo giftInfo)
        //资格校验通过
        if(qualifyService.isAvailable(giftInfo))
            //如果支付积分成功
            if(paymentService.pay(giftInfo))
                String shippingNo = shippingService.delivery(giftInfo);
                System.out.println("物流系统下单成功,物流单号是:" + shippingNo);
最后,来看客户端代码:
public class Test
    public static void main(String[] args)
        FacadeService facadeService = new FacadeService();
        GiftInfo giftInfo = new GiftInfo("《Spring 5核心原理》");
        facadeService.exchange(giftInfo);
运行结果如下:
校验《Spring 5核心原理》积分通过,库存通过。
扣减《Spring 5核心原理》 积分成功
《Spring 5核心原理》进入物流系统
物流系统下单成功,物流单号是:666
通过这样一个案例对比之后,相信大家对门面模式的印象非常深刻了。
1.4 门面模式在源码中的应用
下面我们来门面模式在源码中的应用,先来看Spring JDBC模块下的JdbcUtils类,它封装了和 JDBC相关的所有操作,它一个代码片段:
public abstract class JdbcUtils

	/**
	 * Constant that indicates an unknown (or unspecified) SQL type.
	 * @see java.sql.Types
	 */
	public static final int TYPE_UNKNOWN = Integer.MIN_VALUE;


	private static final Log logger = LogFactory.getLog(JdbcUtils.class);


	/**
	 * Close the given JDBC Connection and ignore any thrown exception.
	 * This is useful for typical finally blocks in manual JDBC code.
	 * @param con the JDBC Connection to close (may be @code null)
	 */
	public static void closeConnection(Connection con)
		if (con != null)
			try
				con.close();

			catch (SQLException ex)
				logger.debug("Could not close JDBC Connection", ex);

			catch (Throwable ex)
				// We don't trust the JDBC driver: It might throw RuntimeException or Error.
				logger.debug("Unexpected exception on closing JDBC Connection", ex);


	/**
	 * Close the given JDBC Statement and ignore any thrown exception.
	 * This is useful for typical finally blocks in manual JDBC code.
	 * @param stmt the JDBC Statement to close (may be @code null)
	 */
	public static void closeStatement(Statement stmt)
		if (stmt != null)
			try
				stmt.close();

			catch (SQLException ex)
				logger.trace("Could not close JDBC Statement", ex);

			catch (Throwable ex)
				// We don't trust the JDBC driver: It might throw RuntimeException or Error.
				logger.trace("Unexpected exception on closing JDBC Statement", ex);


	/**
	 * Close the given JDBC ResultSet and ignore any thrown exception.
	 * This is useful for typical finally blocks in manual JDBC code.
	 * @param rs the JDBC ResultSet to close (may be @code null)
	 */
	public static void closeResultSet(ResultSet rs)
		if (rs != null)
			try
				rs.close();

			catch (SQLException ex)
				logger.trace("Could not close JDBC ResultSet", ex);

			catch (Throwable ex)
				// We don't trust the JDBC driver: It might throw RuntimeException or Error.
				logger.trace("Unexpected exception on closing JDBC ResultSet", ex);


    ...
其他更多的操作,看它的结构就非常清楚了:

再来看一个MyBatis中的Configuration类。它其中有很多new开头的方法,来看一下源代码:
public MetaObject newMetaObject(Object object)
  return MetaObject.forObject(object, objectFactory, objectWrapperFactory, reflectorFactory);


public ParameterHandler newParameterHandler(MappedStatement mappedStatement, Object parameterObject, BoundSql boundSql)
  ParameterHandler parameterHandler = mappedStatement.getLang().createParameterHandler(mappedStatement, parameterObject, boundSql);
  parameterHandler = (ParameterHandler) interceptorChain.pluginAll(parameterHandler);
  return parameterHandler;


public ResultSetHandler newResultSetHandler(Executor executor, MappedStatement mappedStatement, RowBounds rowBounds, ParameterHandler parameterHandler,
    ResultHandler resultHandler, BoundSql boundSql)
  ResultSetHandler resultSetHandler = new DefaultResultSetHandler(executor, mappedStatement, parameterHandler, resultHandler, boundSql, rowBounds);
  resultSetHandler = (ResultSetHandler) interceptorChain.pluginAll(resultSetHandler);
  return resultSetHandler;


public StatementHandler newStatementHandler(Executor executor, MappedStatement mappedStatement, Object parameterObject, RowBounds rowBounds, ResultHandler resultHandler, BoundSql boundSql)
  StatementHandler statementHandler = new RoutingStatementHandler(executor, mappedStatement, parameterObject, rowBounds, resultHandler, boundSql);
  statementHandler = (StatementHandler) interceptorChain.pluginAll(statementHandler);
  return statementHandler;


public Executor newExecutor(Transaction transaction)
  return newExecutor(transaction, defaultExecutorType);
上面的这些方法都是对JDBC中关键组件操作的封装。另外地在Tomcat的源码中也有体现,也非常的 有意思。举个例子RequestFacade类,来看源码:
@SuppressWarnings("deprecation")
public class RequestFacade implements HttpServletRequest
	...
    @Override
    public String getContentType()

        if (request == null)
            throw new IllegalStateException(
                            sm.getString("requestFacade.nullRequest"));


        return request.getContentType();


    @Override
    public ServletInputStream getInputStream() throws IOException

        if (request == null)
            throw new IllegalStateException(
                            sm.getString("requestFacade.nullRequest"));


        return request.getInputStream();


    @Override
    public String getParameter(String name)

        if (request == null)
            throw new IllegalStateException(
                            sm.getString("requestFacade.nullRequest"));


        if (Globals.IS_SECURITY_ENABLED)
            return AccessController.doPrivileged(
                new GetParameterPrivilegedAction(name));
         else
            return request.getParameter(name);


    ...
我们看名字就知道它用了门面模式。它封装了非常多的request的操作,也整合了很多servlet-api以 外的一些内容,给用户使用提供了很大便捷。同样,Tomcat对Response和Session当也封装了 ResponseFacade和StandardSessionFacade类,感兴趣的小伙伴可以去深入了解一下。
1.5 门面模式的优缺点
优点:
1、简化了调用过程,无需深入了解子系统,以防给子系统带来风险。
2、减少系统依赖、松散耦合
3、更好地划分访问层次,提高了安全性
4、遵循迪米特法则,即最少知道原则。
缺点:
1、当增加子系统和扩展子系统行为时,可能容易带来未知风险
2、不符合开闭原则
3、某些情况下可能违背单一职责原则。
2 装饰器模式
2.1 装饰器模式定义
装饰器模式(Decorator Pattern),也称为包装模式(Wrapper Pattern)是指在不改变原有对象 的基础之上,将功能附加到对象上,提供了比继承更有弹性的替代方案(扩展原有对象的功能),属于 结构型模式。
原文:Attach additional responsibilities to an object dynamically keeping the same interface. Decorators provide a flexible alternative to subclassing for extending functionality. 解释:动态地给一个对象添加一些额外的职责。就增加功能来说,装饰器模式相比生成子类更为灵活。
装饰器模式的核心是功能扩展。使用装饰器模式可以透明且动态地扩展类的功能。
装饰器模式主要用于透明且动态地扩展类的功能。其实现原理为:让装饰器实现被包装类(Concrete Component)相同的接口(Component)(使得装饰器与被扩展类类型一致),并在构造函数中传入 该接口(Component)对象,然后就可以在接口需要实现的方法中在被包装类对象的现有功能上添加 新功能了。而且由于装饰器与被包装类属于同一类型(均为Component),且构造函数的参数为其实 现接口类(Component),因此装饰器模式具备嵌套扩展功能,这样我们就能使用装饰器模式一层一 层的对最底层被包装类进行功能扩展了。
首先看下装饰器模式的通用UML类图:
从 UML 类图中,我们可以看到,装饰器模式 主要包含四种角色:
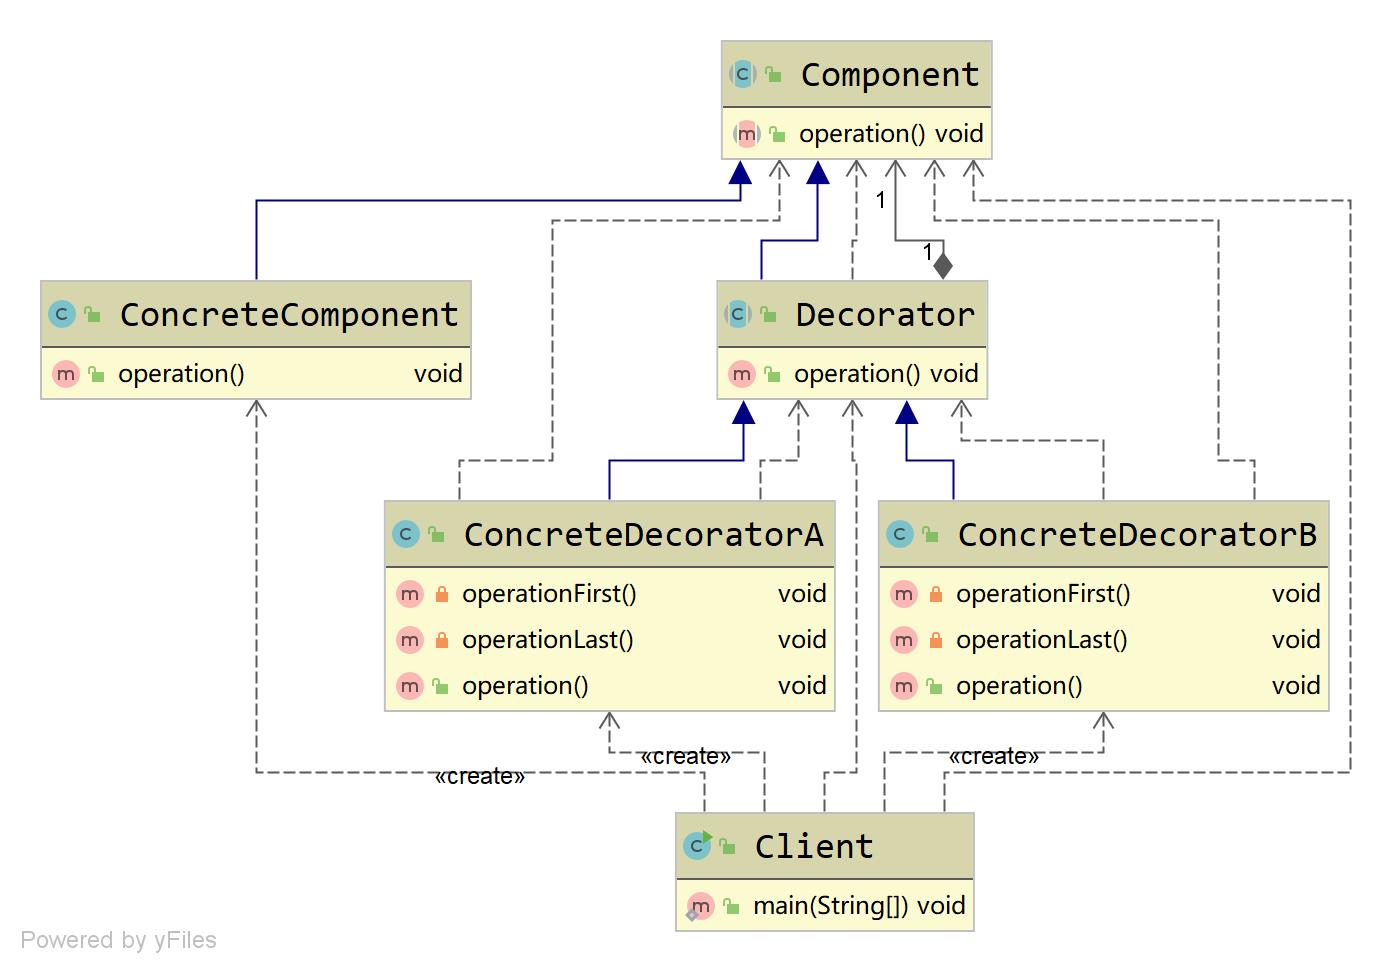
抽象组件(Component):可以是一个接口或者抽象类,其充当被装饰类的原始对象,规定了被 装饰对象的行为;
具体组件(ConcreteComponent):实现/继承Component的一个具体对象,也即被装饰对象;
抽象装饰器(Decorator):通用的装饰ConcreteComponent的装饰器,其内部必然有一个属性 指向 Component抽象组件;其实现一般是一个抽象类,主要是为了让其子类按照其构造形式传入一 个 Component 抽象组件,这是强制的通用行为(当然,如果系统中装饰逻辑单一,并不需要实现许 多装饰器,那么我们可以直接省略该类,而直接实现一个具体装饰器(ConcreteDecorator)即可);
具体装饰器(ConcreteDecorator):Decorator 的具体实现类,理论上,每个 ConcreteDecorator 都扩展了Component对象的一种功能;
总结:装饰器模式角色分配符合设计模式里氏替换原则,依赖倒置原则,从而使得其具备很强的扩展性,最终满足开 闭原则。
2.2 装饰器模式的应用场景
装饰器模式在我们生活中应用也比较多如给煎饼加鸡蛋;给蛋糕加上一些水果;给房子装修等,为对象扩展一些额外的职责。装饰器在代码程序中适用于以下场景:
1、用于扩展一个类的功能或给一个类添加附加职责。
2、动态的给一个对象添加功能,这些功能可以再动态的撤销。
3、需要为一批的兄弟类进行改装或加装功能。
来看一个这样的场景,上班族白领其实大多有睡懒觉的习惯,每天早上上班都是踩点,于是很多小 伙伴为了多赖一会儿床都不吃早餐。那么,也有些小伙伴可能在上班路上碰到卖煎饼的路边摊,都会顺 带一个到公司茶水间吃早餐。卖煎饼的大姐可以给你的煎饼加鸡蛋,也可以加香肠(如下图,PS:我买 煎饼一般都要求不加生菜)。

下面我们用代码还原一下码农的生活。首先创建一个煎饼Battercake类:
public class Battercake

    protected String getMsg() return "煎饼";

    public int getPrice() return 5;
创建一个加鸡蛋的煎饼BattercakeWithEgg类:
public class BattercakeWithEgg extends Battercake
	@Override
    protected String getMsg() return super.getMsg() + "+1个鸡蛋";

    @Override
    //加一个鸡蛋加 1 块钱
    public int getPrice() return super.getPrice() + 1;
再创建一个既加鸡蛋又加香肠的BattercakeWithEggAndSausage类:
public class BattercakeWithEggAndSauage extends BattercakeWithEgg
    @Override
    protected String getMsg() return super.getMsg() + "+1根香肠";

    @Override
    //加一个香肠加 2 块钱
    public int getPrice() return super.getPrice() + 2;
编写客户端测试代码:
public class Test
    public static void main(String[] args)
        Battercake battercake = new Battercake();
        System.out.println(battercake.getMsg() + ",总价:" + battercake.getPrice());

        BattercakeWithEgg battercakeWithEgg = new BattercakeWithEgg();
        System.out.println(battercakeWithEgg.getMsg() + ",总价:" + battercakeWithEgg.getPrice());

        BattercakeWithEggAndSauage battercakeWithEggAndSauage = new BattercakeWithEggAndSauage();
        System.out.println(battercakeWithEggAndSauage.getMsg() + ",总价:" + battercakeWithEggAndSauage.getPrice());
运行结果:
煎饼,总价:5
煎饼+1个鸡蛋,总价:6
煎饼+1个鸡蛋+1根香肠,总价:8
运行结果没有问题。
但是,如果用户需要一个加2个鸡蛋加1根香肠的煎饼,那么用我们现在的类 结构是创建不出来的,也无法自动计算出价格,除非再创建一个类做定制。如果需求再变,一直加定制 显然是不科学的。那么下面我们就用装饰器模式来解决上面的问题。
首先创建一个建煎饼的抽象 Battercake类:
public abstract class Battercake

    protected abstract String getMsg();

    protected abstract int getPrice();
创建一个基本的煎饼(或者叫基础套餐)BaseBattercake:
public class BaseBattercake extends Battercake

    protected String getMsg() return "煎饼";

    public int getPrice() return 5;
然后,再创建一个扩展套餐的抽象装饰器BattercakeDecotator类:
public class BattercakeDecorator extends Battercake
    //静态代理,委派
    private Battercake battercake;

    public BattercakeDecorator(Battercake battercake)
        this.battercake = battercake;


	@Override
    protected String getMsg() return this.battercake.getMsg();

	@Override
    public int getPrice() return this.battercake.getPrice();
然后,创建鸡蛋装饰器EggDecorator类:
public class EggDecorator extends BattercakeDecorator
public EggDecorator(Battercake battercake)
super(battercake);
@Override
protected String getMsg() return super.getMsg() + "1个鸡蛋";
@Override
public int getPrice