WPF钟表效果实现
Posted lonelyxmas
tags:
篇首语:本文由小常识网(cha138.com)小编为大家整理,主要介绍了WPF钟表效果实现相关的知识,希望对你有一定的参考价值。
原文:WPF钟表效果实现WPF在样式定义和UI动画上面相对于以前的技术有了不少的提升,下面给出WPF技术实现钟表的效果:
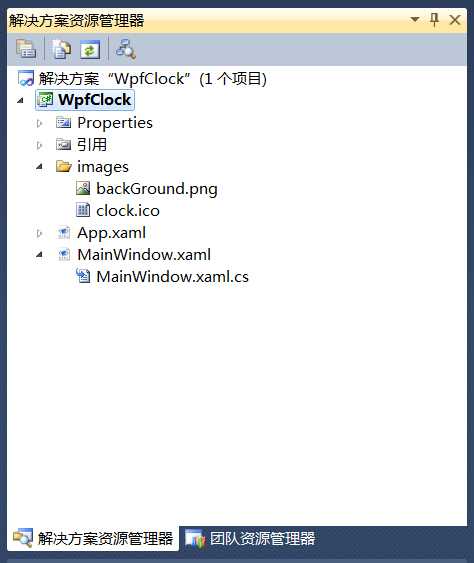
1、Visual Studio新建一个WPF应用程序,命名为WpfClock,新建一个images文件夹,并准备一个钟表的背景图片和程序图标素材。

2、编辑MainWindow.xaml文件,对UI进行定制,代码如下(指针都是用Rectangle实现的,当然可以用图片代替):
 1 <Window x:Class="WpfClock.MainWindow"
 2         xmlns="http://schemas.microsoft.com/winfx/2006/xaml/presentation"
 3         xmlns:x="http://schemas.microsoft.com/winfx/2006/xaml"
 4         Title="MainWindow" Margin="2" Height="327" Width="311" AllowsTransparency="True"
 5         WindowStyle="None" Background="Transparent" WindowStartupLocation="CenterScreen"
 6         Icon="images/clock.ico"
 7         ResizeMode="NoResize" Topmost="False" Opacity="1">
 8         <Grid Width="300" Height="300" MouseLeftButtonDown="Grid_MouseLeftButtonDown">
 9         <Image Source="images/backGround.png"></Image>
10
11         <Label Name="lab商标" Foreground="White" Margin="0,0,0,211" HorizontalAlignment="Center" VerticalAlignment="Bottom" Height="Auto" Width="Auto" FontSize="13" >JackMoon</Label>
12         <Label Name="lab创建时间" Foreground="White" Margin="0,91,0,0" HorizontalAlignment="Center" VerticalAlignment="Top" Height="Auto" Width="Auto">1987</Label>
13
14         <!-- 秒针定义  -->
15         <Rectangle Margin="150,0,149,150" Name="rectangleSecond" Stroke="White" Height="120" VerticalAlignment="Bottom" Width="1">
16             <Rectangle.RenderTransform>
17                 <RotateTransform x:Name="secondPointer" CenterX="0" CenterY="120" Angle="0" />
18             </Rectangle.RenderTransform>
19         </Rectangle>
20         <!-- -->
21
22         <!-- 分钟定义  -->
23         <Rectangle Margin="150,49,149,151" Name="rectangleMinute" Stroke="LightGreen" Width="1">
24             <Rectangle.RenderTransform>
25                 <RotateTransform x:Name="minutePointer" CenterX="0" CenterY="100" Angle="45" />
26             </Rectangle.RenderTransform>
27         </Rectangle>
28         <!-- -->
29
30         <!-- 时针定义  -->
31         <Rectangle Margin="150,80,149,150" Name="rectangleHour" Stroke="LightYellow" Width="1">
32             <Rectangle.RenderTransform>
33                 <RotateTransform x:Name="hourPointer" CenterX="0" CenterY="70" Angle="90" />
34             </Rectangle.RenderTransform>
35         </Rectangle>
36         <!---->
37          <Label Content="08:08:08" FontSize="16" Foreground="White" Height="Auto" HorizontalAlignment="Center" Margin="114,0,113,86" Name="labTime" VerticalAlignment="Bottom" Width="Auto" />
38
39     </Grid>
40 </Window>
3、编辑MainWindow.xaml.CS文件,对后台逻辑进行定制,代码如下:
 1 using System;
 2 using System.Collections.Generic;
 3 using System.Linq;
 4 using System.Text;
 5 using System.Windows;
 6 using System.Windows.Controls;
 7 using System.Windows.Data;
 8 using System.Windows.Documents;
 9 using System.Windows.Input;
10 using System.Windows.Media;
11 using System.Windows.Media.Imaging;
12 using System.Windows.Navigation;
13 using System.Windows.Shapes;
14 namespace WpfClock
15 {
16     using System.Threading;
17     using System.Windows.Threading;
18     /// <summary>
19     /// MainWindow.xaml 的交互逻辑
20     /// </summary>
21     public partial class MainWindow : Window
22     {
23         //计时器
24         System.Timers.Timer timer = new System.Timers.Timer(1000);
25         public MainWindow()
26         {
27             InitializeComponent();
28             #region 初始化时间
29             secondPointer.Angle = DateTime.Now.Second * 6;
30             minutePointer.Angle = DateTime.Now.Minute * 6;
31             hourPointer.Angle = (DateTime.Now.Hour * 30) + (DateTime.Now.Minute * 0.5);
32             this.labTime.Content = DateTime.Now.ToString("HH:mm:ss");
33             #endregion
34             timer.Elapsed += new System.Timers.ElapsedEventHandler(timer_Elapsed);
35             timer.Enabled = true;
36         }
37
38         private void Grid_MouseLeftButtonDown(object sender, MouseButtonEventArgs e)
39         {
40             //进行拖放移动
41             this.DragMove();
42         }
43        private void timer_Elapsed(object sender, System.Timers.ElapsedEventArgs e)
44         {
45            //UI异步更新
46             this.Dispatcher.Invoke(DispatcherPriority.Normal, (Action)(() =>
47             {
48                 //秒针转动,秒针绕一圈360度,共60秒,所以1秒转动6度
49                 secondPointer.Angle = DateTime.Now.Second * 6;
50                 //分针转动,分针绕一圈360度,共60分,所以1分转动6度
51                 minutePointer.Angle = DateTime.Now.Minute * 6;
52                 //时针转动,时针绕一圈360度,共12时,所以1时转动30度。
53                 //另外同一个小时内,随着分钟数的变化(绕一圈60分钟),时针也在缓慢变化(转动30度,30/60=0.5)
54                 hourPointer.Angle = (DateTime.Now.Hour * 30)+ (DateTime.Now.Minute * 0.5);
55                 //更新时间值
56                 this.labTime.Content = DateTime.Now.ToString("HH:mm:ss");
57             }));
58         }
59
60     }
61 }
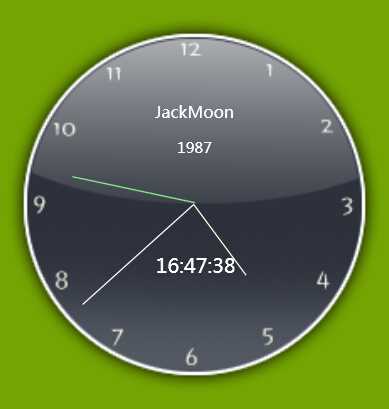
4、编译运行,如果运气不错的话,应该能显示如下效果:

5、总结
WPF可以用RotateTransform中的Angle进行旋转,可以指定中心点(CenterX,CenterY)
 <Rectangle.RenderTransform>
       <RotateTransform x:Name="hourPointer" CenterX="0" CenterY="70" Angle="90" />
  </Rectangle.RenderTransform>
以上是关于WPF钟表效果实现的主要内容,如果未能解决你的问题,请参考以下文章