UnderTow 核心配置
Posted OkidoGreen
tags:
篇首语:本文由小常识网(cha138.com)小编为大家整理,主要介绍了UnderTow 核心配置相关的知识,希望对你有一定的参考价值。
本系列代码地址:https://github.com/HashZhang/spring-cloud-scaffold/tree/master/spring-cloud-iiford

Undertow 的配置可以参考 Undertow 的 Builder,并且其中也有一些默认的配置参数:
private Builder()
    ioThreads = Math.max(Runtime.getRuntime().availableProcessors(), 2);
    workerThreads = ioThreads * 8;
    long maxMemory = Runtime.getRuntime().maxMemory();
    //smaller than 64mb of ram we use 512b buffers
    if (maxMemory < 64 * 1024 * 1024)
        //use 512b buffers
        directBuffers = false;
        bufferSize = 512;
     else if (maxMemory < 128 * 1024 * 1024)
        //use 1k buffers
        directBuffers = true;
        bufferSize = 1024;
     else
        //use 16k buffers for best performance
        //as 16k is generally the max amount of data that can be sent in a single write() call
        directBuffers = true;
        bufferSize = 1024 * 16 - 20; //the 20 is to allow some space for protocol headers, see UNDERTOW-1209
- ioThreads 大小为可用 CPU 数量 * 2,即 Undertow 的 XNIO 的读线程个数为可用 CPU 数量,写线程个数也为可用 CPU 数量。
- workerThreads 大小为 ioThreads 数量 * 8.
- 如果内存大小小于 64 MB,则不使用直接内存,bufferSize 为 512 字节
- 如果内存大小大于 64 MB 小于 128 MB,则使用直接内存,bufferSize 为 1024 字节
- 如果内存大小大于 128 MB,则使用直接内存,bufferSize 为 16 KB 减去 20 字节,这 20 字节用于协议头。

public DefaultByteBufferPool(boolean direct, int bufferSize, int maximumPoolSize, int threadLocalCacheSize, int leakDecetionPercent)
    this.direct = direct;
    this.bufferSize = bufferSize;
    this.maximumPoolSize = maximumPoolSize;
    this.threadLocalCacheSize = threadLocalCacheSize;
    this.leakDectionPercent = leakDecetionPercent;
    if(direct)
        arrayBackedPool = new DefaultByteBufferPool(false, bufferSize, maximumPoolSize, 0, leakDecetionPercent);
     else
        arrayBackedPool = this;
其中:
- direct:是否使用直接内存,我们需要设置为 true,来使用直接内存。
- bufferSize:每次申请的 buffer 大小,我们主要要考虑这个大小
- maximumPoolSize:buffer 池最大大小,一般不用修改
- threadLocalCacheSize:线程本地 buffer 池大小,一般不用修改
- leakDecetionPercent:内存泄漏检查百分比,目前没啥卵用
对于 bufferSize,最好和你系统的 TCP Socket Buffer 配置一样。在我们的容器中,我们将微服务实例的容器内的 TCP Socket Buffer 的读写 buffer 大小成一模一样的配置(因为微服务之间调用,发送的请求也是另一个微服务接受,所以调整所有微服务容器的读写 buffer 大小一致,来优化性能,默认是根据系统内存来自动计算出来的)。
查看 Linux 系统 TCP Socket Buffer 的大小:
/proc/sys/net/ipv4/tcp_rmem(对于读取)/proc/sys/net/ipv4/tcp_wmem(对于写入)
在我们的容器中,分别是:
bash-4.2# cat /proc/sys/net/ipv4/tcp_rmem
4096    16384   4194304
bash-4.2# cat /proc/sys/net/ipv4/tcp_wmem
4096    16384   4194304
从左到右三个值分别为:每个 TCP Socket 的读 Buffer 与写 Buffer 的大小的 最小值,默认值和最大值,单位是字节。
我们设置我们 Undertow 的 buffer size 为 TCP Socket Buffer 的默认值,即 16 KB。Undertow 的 Builder 里面,如果内存大于 128 MB,buffer size 为 16 KB 减去 20 字节(为协议头预留)。所以,我们使用默认的即可。
application.yml 配置:
server.undertow:
    # 是否分配的直接内存(NIO直接分配的堆外内存),这里开启,所以java启动参数需要配置下直接内存大小,减少不必要的GC
    # 在内存大于 128 MB 时,默认就是使用直接内存的
    directBuffers: true
    # 以下的配置会影响buffer,这些buffer会用于服务器连接的IO操作
    # 如果每次需要 ByteBuffer 的时候都去申请,对于堆内存的 ByteBuffer 需要走 JVM 内存分配流程(TLAB -> 堆),对于直接内存则需要走系统调用,这样效率是很低下的。
    # 所以,一般都会引入内存池。在这里就是 `BufferPool`。
    # 目前,UnderTow 中只有一种 `DefaultByteBufferPool`,其他的实现目前没有用。
    # 这个 DefaultByteBufferPool 相对于 netty 的 ByteBufArena 来说,非常简单,类似于 JVM TLAB 的机制
    # 对于 bufferSize,最好和你系统的 TCP Socket Buffer 配置一样
    # `/proc/sys/net/ipv4/tcp_rmem` (对于读取)
    # `/proc/sys/net/ipv4/tcp_wmem` (对于写入)
    # 在内存大于 128 MB 时,bufferSize 为 16 KB 减去 20 字节,这 20 字节用于协议头
    buffer-size: 16384 - 20

Worker 配置其实就是 XNIO 的核心配置,主要需要配置的即 io 线程池以及 worker 线程池大小。
默认情况下,io 线程大小为可用 CPU 数量 * 2,即读线程个数为可用 CPU 数量,写线程个数也为可用 CPU 数量。worker 线程池大小为 io 线程大小 * 8.
微服务应用由于涉及的阻塞操作比较多,所以可以将 worker 线程池大小调大一些。我们的应用设置为 io 线程大小 * 32.
application.yml 配置:
server.undertow.threads:
    # 设置IO线程数, 它主要执行非阻塞的任务,它们会负责多个连接, 默认设置每个CPU核心一个读线程和一个写线程
    io: 16
    # 阻塞任务线程池, 当执行类似servlet请求阻塞IO操作, undertow会从这个线程池中取得线程
    # 它的值设置取决于系统线程执行任务的阻塞系数,默认值是IO线程数*8
    worker: 128

Spring Boot 中对于 Undertow 相关配置的抽象是 ServerProperties 这个类。目前 Undertow 涉及的所有配置以及说明如下(不包括 accesslog 相关的,accesslog 会在下一节详细分析):
server:
  undertow:
    # 以下的配置会影响buffer,这些buffer会用于服务器连接的IO操作
    # 如果每次需要 ByteBuffer 的时候都去申请,对于堆内存的 ByteBuffer 需要走 JVM 内存分配流程(TLAB -> 堆),对于直接内存则需要走系统调用,这样效率是很低下的。
    # 所以,一般都会引入内存池。在这里就是 `BufferPool`。
    # 目前,UnderTow 中只有一种 `DefaultByteBufferPool`,其他的实现目前没有用。
    # 这个 DefaultByteBufferPool 相对于 netty 的 ByteBufArena 来说,非常简单,类似于 JVM TLAB 的机制
    # 对于 bufferSize,最好和你系统的 TCP Socket Buffer 配置一样
    # `/proc/sys/net/ipv4/tcp_rmem` (对于读取)
    # `/proc/sys/net/ipv4/tcp_wmem` (对于写入)
    # 在内存大于 128 MB 时,bufferSize 为 16 KB 减去 20 字节,这 20 字节用于协议头
    buffer-size: 16364
    # 是否分配的直接内存(NIO直接分配的堆外内存),这里开启,所以java启动参数需要配置下直接内存大小,减少不必要的GC
    # 在内存大于 128 MB 时,默认就是使用直接内存的
    directBuffers: true
    threads:
      # 设置IO线程数, 它主要执行非阻塞的任务,它们会负责多个连接, 默认设置每个CPU核心一个读线程和一个写线程
      io: 4
      # 阻塞任务线程池, 当执行类似servlet请求阻塞IO操作, undertow会从这个线程池中取得线程
      # 它的值设置取决于系统线程执行任务的阻塞系数,默认值是IO线程数*8
      worker: 128
    # http post body 大小,默认为 -1B ,即不限制
    max-http-post-size: -1B
    # 是否在启动时创建 filter,默认为 true,不用修改
    eager-filter-init: true
    # 限制路径参数数量,默认为 1000
    max-parameters: 1000
    # 限制 http header 数量,默认为 200
    max-headers: 200
    # 限制 http header 中 cookies 的键值对数量,默认为 200
    max-cookies: 200
    # 是否允许 / 与 %2F 转义。/ 是 URL 保留字,除非你的应用明确需要,否则不要开启这个转义,默认为 false
    allow-encoded-slash: false
    # 是否允许 URL 解码,默认为 true,除了 %2F 其他的都会处理
    decode-url: true
    # url 字符编码集,默认是 utf-8
    url-charset: utf-8
    # 响应的 http header 是否会加上 'Connection: keep-alive',默认为 true
    always-set-keep-alive: true
    # 请求超时,默认是不超时,我们的微服务因为可能有长时间的定时任务,所以不做服务端超时,都用客户端超时,所以我们保持这个默认配置
    no-request-timeout: -1
    # 是否在跳转的时候保持 path,默认是关闭的,一般不用配置
    preserve-path-on-forward: false
    options:
      # spring boot 没有抽象的 xnio 相关配置在这里配置,对应 org.xnio.Options 类
      socket:
        SSL_ENABLED: false
      # spring boot 没有抽象的 undertow 相关配置在这里配置,对应 io.undertow.UndertowOptions 类
      server:
        ALLOW_UNKNOWN_PROTOCOLS: false
Spring Boot 并没有将所有的 Undertow 与 XNIO 配置进行抽象,如果你想自定义一些相关配置,可以通过上面配置最后的 server.undertow.options 进行配置。server.undertow.options.socket 对应 XNIO 的相关配置,配置类是 org.xnio.Options;server.undertow.options.server 对应 Undertow 的相关配置,配置类是 io.undertow.UndertowOptions。

我们这一节详细介绍了 Undertow 的核心配置,主要包括线程池以及 buffer 配置,以及关于 http 协议的一些配置。并且我们还介绍了这些配置在 spring boot 下该如何配置。下一节,我们将详细介绍如何配置 Undertow 的 accesslog。

server:
  undertow:
    # access log相关配置
    accesslog:
      # 存放目录,默认为 logs
      dir: ./log
      # 是否开启
      enabled: true
      # 格式,各种占位符后面会详细说明
      pattern: '
                  "transportProtocol":"%TRANSPORT_PROTOCOL",
                  "scheme":"%SCHEME",
                  "protocol":"%PROTOCOL",
                  "method":"%METHOD",
                  "reqHeaderUserAgent":"%i,User-Agent",
                  "cookieUserId": "%c,userId",
                  "queryTest": "%q,test",
                  "queryString": "%q",
                  "relativePath": "%R, %REQUEST_PATH, %RESOLVED_PATH",
                  "requestLine": "%r",
                  "uri": "%U",
                  "thread": "%I",
                  "hostPort": "%HOST_AND_PORT",
                  "localIp": "%A",
                  "localPort": "%p",
                  "localServerName": "%v",
                  "remoteIp": "%a",
                  "remoteHost": "%h",
                  "bytesSent": "%b",
                  "time":"%time,yyyy-MM-dd HH:mm:ss.S",
                  "status":"%s",
                  "reason":"%RESPONSE_REASON_PHRASE",
                  "respHeaderUserSession":"%o,userSession",
                  "respCookieUserId":"%resp-cookie,userId",
                  "timeUsed":"%Dms, %Ts, %RESPONSE_TIMEms, %RESPONSE_TIME_MICROS us, %RESPONSE_TIME_NANOS ns",
                '
      # 文件前缀,默认为 access_log
      prefix: access.
      # 文件后缀,默认为 log
      suffix: log
      # 是否另起日志文件写 access log,默认为 true
      # 目前只能按照日期进行 rotate,一天一个日志文件
      rotate: true
Undertow 的 accesslog 处理核心类抽象是 io.undertow.server.handlers.accesslog.AccesslogReceiver。由于目前 Undertow 的 AccesslogReceiver只有一种实现在使用,也就是 io.undertow.server.handlers.accesslog.DefaultAccessLogReceiver。
查看 DefaultAccessLogReceiver 的 rotate 时机:
/**
 * 计算 rotate 时间点
 */
private void calculateChangeOverPoint()
    Calendar calendar = Calendar.getInstance();
    calendar.set(Calendar.SECOND, 0);
    calendar.set(Calendar.MINUTE, 0);
    calendar.set(Calendar.HOUR_OF_DAY, 0);
    //当前时间日期 + 1,即下一天
    calendar.add(Calendar.DATE, 1);
    SimpleDateFormat df = new SimpleDateFormat("yyyy-MM-dd", Locale.US);
    currentDateString = df.format(new Date());
    // if there is an existing default log file, use the date last modified instead of the current date
    if (Files.exists(defaultLogFile))
        try
            currentDateString = df.format(new Date(Files.getLastModifiedTime(defaultLogFile).toMillis()));
         catch(IOException e)
            // ignore. use the current date if exception happens.


    //rotate 时机是下一天的 0 点
    changeOverPoint = calendar.getTimeInMillis();

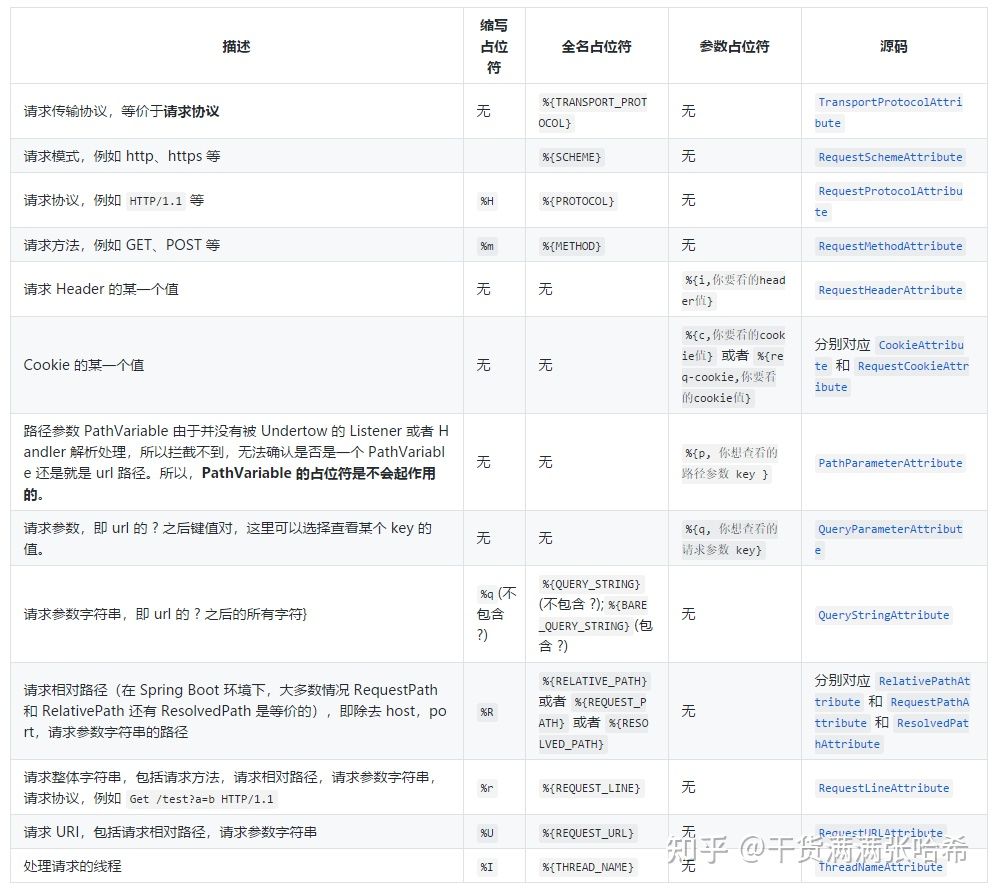
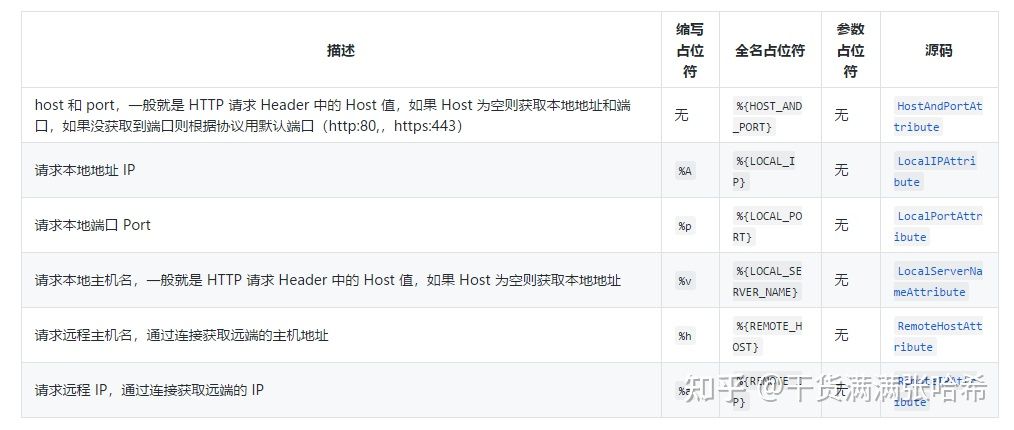
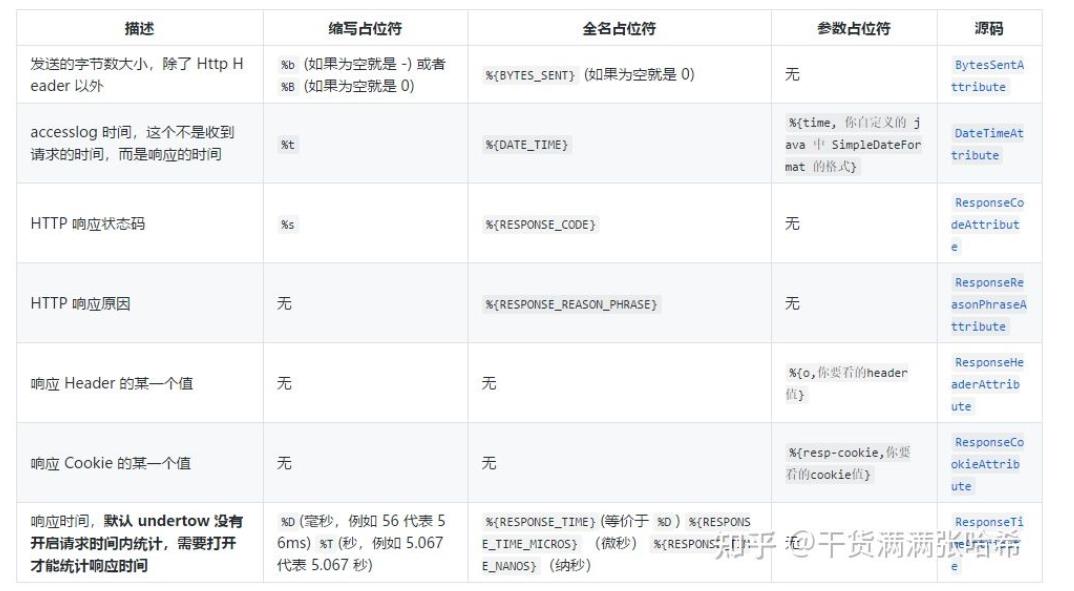
其实 Undertow 中的 accesslog 占位符,就是之前我们提到的 Undertow Listener 解析请求后抽象的 HTTP server exchange 的属性。
官网文档的表格并不是最全的,并且注意点并没有说明,例如某些占位符必须打开某些 Undertow 特性才能使用等等。这里我们列出下。
首先先提出一个注意点,参数占位符,例如 %i,你要看的header值 查看 header 的某个 key 的值。逗号后面注意不要有空格,因为这个空格会算入 key 里面导致拿不到你想要的 key。
请求相关属性

注意:
- 路径参数 PathVariable 由于并没有被 Undertow 的 Listener 或者 Handler 解析处理,所以拦截不到,无法确认是否是一个 PathVariable 还是就是 url 路径。所以,PathVariable 的占位符是不会起作用的。
请求地址相关

注意:
- 请求的远程地址我们一般不从请求连接获取,而是通过 Http Header 里面的
X-forwarded-for或者X-real-ip等获取,因为现在请求都是通过各种 VPN,负载均衡器发上来的。
响应相关属性

注意:默认 undertow 没有开启请求时间内统计,需要打开才能统计响应时间,如何开启呢?通过注册一个 WebServerFactoryCustomizer 到 Spring ApplicationContext 中即可。请看下面的代码(项目地址:https://github.com/HashZhang/spring-cloud-scaffold/blob/master/spring-cloud-iiford/):
# AutoConfiguration
org.springframework.boot.autoconfigure.EnableAutoConfiguration=\\
com.github.hashjang.spring.cloud.iiford.service.common.auto.UndertowAutoConfiguration//设置proxyBeanMethods=false,因为没有 @Bean 的方法互相调用需要每次返回同一个 Bean,没必要代理,关闭增加启动速度
@Configuration(proxyBeanMethods = false)
@Import(WebServerConfiguration.class)
public class UndertowAutoConfiguration
//设置proxyBeanMethods=false,因为没有 @Bean 的方法互相调用需要每次返回同一个 Bean,没必要代理,关闭增加启动速度
@Configuration(proxyBeanMethods = false)
public class WebServerConfiguration
    @Bean
    public WebServerFactoryCustomizer<ConfigurableUndertowWebServerFactory> undertowWebServerAccessLogTimingEnabler(ServerProperties serverProperties)
        return new DefaultWebServerFactoryCustomizer(serverProperties);
DefaultWebServerFactoryCustomizer
public class DefaultWebServerFactoryCustomizer implements WebServerFactoryCustomizer<ConfigurableUndertowWebServerFactory>
    private final ServerProperties serverProperties;
    public DefaultWebServerFactoryCustomizer(ServerProperties serverProperties)
        this.serverProperties = serverProperties;

    @Override
    public void customize(ConfigurableUndertowWebServerFactory factory)
        String pattern = serverProperties.getUndertow().getAccesslog().getPattern();
        // 如果 accesslog 配置中打印了响应时间,则打开记录请求开始时间配置
        if (logRequestProcessingTiming(pattern))
            factory.addBuilderCustomizers(builder -> builder.setServerOption(UndertowOptions.RECORD_REQUEST_START_TIME, true));


    private boolean logRequestProcessingTiming(String pattern)
        if (StringUtils.isBlank(pattern))
            return false;

        //判断 accesslog 是否配置了查看响应时间
        return pattern.contains(ResponseTimeAttribute.RESPONSE_TIME_MICROS)
                || pattern.contains(ResponseTimeAttribute.RESPONSE_TIME_MILLIS)
                || pattern.contains(ResponseTimeAttribute.RESPONSE_TIME_NANOS)
                || pattern.contains(ResponseTimeAttribute.RESPONSE_TIME_MILLIS_SHORT)
                || pattern.contains(ResponseTimeAttribute.RESPONSE_TIME_SECONDS_SHORT);
其他
还有安全相关的属性(SSL 相关,登录认证 Authentication 相关),微服务内部调用一般用不到,我们这里就不赘述了。 其它内置的属性,在 Spring Boot 环境下一般用不到,我们这里就不讨论了。
举例
我们最开始配置的 accesslog 的例子请求返回如下( JSON 格式化之后的结果):
    "transportProtocol": "http/1.1",
    "scheme": "http",
    "protocol": "HTTP/1.1",
    "method": "GET",
    "reqHeaderUserAgent": "PostmanRuntime/7.26.10",
    "cookieUserId": "testRequestCookieUserId",
    "queryTest": "1",
    "queryString": "?test=1&query=2",
    "relativePath": "/test, /test, -",
    "requestLine": "GET /test?test=1&query=2 HTTP/1.1",
    "uri": "/test",
    "thread": "XNIO-2 task-1",
    "hostPort": "127.0.0.1:8102",
    "localIp": "127.0.0.1",
    "localPort": "8102",
    "localServerName": "127.0.0.1",
    "remoteIp": "127.0.0.1",
    "remoteHost": "127.0.0.1",
    "bytesSent": "26",
    "time": "2021-04-08 00:07:50.410",
    "status": "200",
    "reason": "OK",
    "respHeaderUserSession": "testResponseHeaderUserSession",
    "respCookieUserId": "testResponseCookieUserId",
    "timeUsed": "3683ms, 3.683s, 3683ms, 3683149 us, 3683149200 ns",

我们这一节详细介绍了如何配置 Undertow 的 accesslog,将 accesslog 各种占位符都罗列了出来,用户可以根据这些信息配置出自己想要的 accesslog 信息以及格式。下一节,我们将详细介绍我们框架中针对 Undertow 的定制代码
以上是关于UnderTow 核心配置的主要内容,如果未能解决你的问题,请参考以下文章