个人技术博客(1/2)android布局技巧
Posted
tags:
篇首语:本文由小常识网(cha138.com)小编为大家整理,主要介绍了个人技术博客(1/2)android布局技巧相关的知识,希望对你有一定的参考价值。
(1)weight属性的合理应用
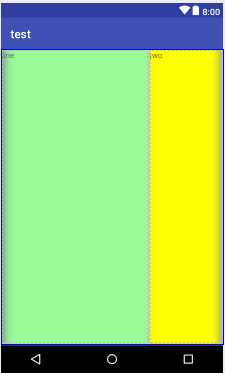
当使用match_parent(fill_parent)时,需要经过计算,否则会出现如下情况
代码:
<LinearLayout xmlns:android="http://schemas.android.com/apk/res/android"
    xmlns:tools="http://schemas.android.com/tools"
    android:id="@+id/LinearLayout1"
    android:layout_width="match_parent"
    android:layout_height="match_parent" >

    <TextView
        android:layout_weight="1"
        android:layout_width="fill_parent"
        android:layout_height="fill_parent"
        android:text="one"
        android:background="#98FB98"
        />
    <TextView
        android:layout_weight="2"
        android:layout_width="fill_parent"
        android:layout_height="fill_parent"
        android:text="two"
        android:background="#FFFF00"
        />
    <TextView
        android:layout_weight="3"
        android:layout_width="fill_parent"
        android:layout_height="fill_parent"
        android:text="three"
        android:background="#FF00FF"
        />

</LinearLayout>
效果如下

这个时候发现一个问题,three不见了?代码里面明明有 three的,还设置了3,而1和2的比例也不对,1:2:3变成了2:1:0,为什么会这样?查阅资料后我发现其实没那么简单的,这是需要计算的,网上给出的算法有几种 step 1:个个都是fill_parent,但是屏幕只有一个,那么1 - 3 = - 2 fill_parent step 2:依次比例是1/6,2/6,3/6 step 3:先到先得,先分给one,计算: 1 - 2 * (1/6) = 2/3 fill_parent 接着到two,计算: 1 - 2 * (2/6) = 1/3 fill_parent 最后到three,计算 1 - 2 * (3/6) = 0 fill_parent step 4:所以最后的结果是:one占了两份,two占了一份,three什么都没有。这就是为什么three没有出现的原因了。
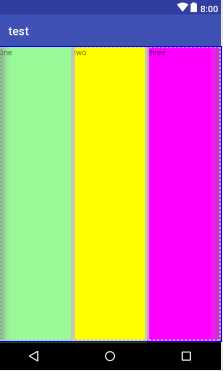
若比例为1:1:1,效果如下

按照上面的计算方法算一次,结果是:1/3 1/3 1/3,没错
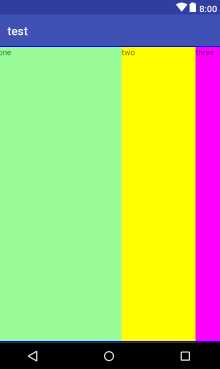
若比例为2:3:4,效果如下

计算结果:5/9 3/9 1/9,对比效果图,5:3:1,也没错
(2)margin与padding的区别
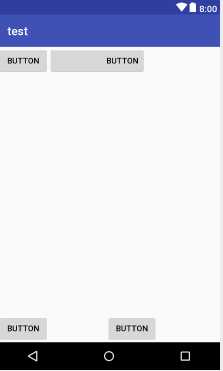
对于这两个属性可能会有一点混淆,首先margin代表的是偏移,比如marginleft = "5dp"表示组件离容器左边缘偏移5dp; 而padding代表的则是填充,而填充的对象针对的是组件中的元素,比如TextView中的文字 比如为TextView设置paddingleft = "5dp",则是在组件里的元素的左边填充5dp的空间。margin针对的是容器中的组件,而padding针对的是组件中的元素。 下面通过简单的代码演示两者的区别:
<RelativeLayout xmlns:android="http://schemas.android.com/apk/res/android"
    xmlns:tools="http://schemas.android.com/tools"
    android:layout_width="match_parent"
    android:layout_height="match_parent"
    android:paddingBottom="@dimen/activity_vertical_margin"
    android:paddingLeft="@dimen/activity_horizontal_margin"
    android:paddingRight="@dimen/activity_horizontal_margin"
    android:paddingTop="@dimen/activity_vertical_margin"
    tools:context=".MainActivity" >

    <Button
        android:id="@+id/btn1"
        android:layout_height="wrap_content"
        android:layout_width="wrap_content"
        android:text="Button"/>
    <Button
        android:paddingLeft="100dp"
        android:layout_height="wrap_content"
        android:layout_width="wrap_content"
        android:text="Button"
        android:layout_toRightOf="@id/btn1"/>

    <Button
        android:id="@+id/btn2"
        android:layout_height="wrap_content"
        android:layout_width="wrap_content"
        android:text="Button"
        android:layout_alignParentBottom="true"/>
    <Button
        android:layout_marginLeft="100dp"
        android:layout_height="wrap_content"
        android:layout_width="wrap_content"
        android:text="Button"
        android:layout_toRightOf="@id/btn2"
        android:layout_alignParentBottom="true"/>

</RelativeLayout>
效果如下

另外,margin可以设置为负数,比如进入软件后,弹出广告 页面的,右上角的cancle按钮的margin则是使用负数的,代码如下
    <ImageView
        android:id="@+id/imgBack"
        android:layout_width="200dp"
        android:layout_height="200dp"
        android:layout_centerInParent="true"
        android:background="@drawable/myicon" />

    <ImageView
        android:id="@+id/imgCancle"
        android:layout_width="28dp"
        android:layout_height="28dp"
        android:layout_alignRight="@id/imgBack"
        android:layout_alignTop="@id/imgBack"
        android:background="@drawable/cancel"
        android:layout_marginTop="-15dp"  //cancle按钮的margin使用负数
        android:layout_marginRight="-10dp" />
这是我在安卓布局中总结出的一些小技巧,比较low,仅供参考哈哈哈~
以上是关于个人技术博客(1/2)android布局技巧的主要内容,如果未能解决你的问题,请参考以下文章