26opencv入门轮廓查找与绘制——正外接矩形
Posted long-w
tags:
篇首语:本文由小常识网(cha138.com)小编为大家整理,主要介绍了26opencv入门轮廓查找与绘制——正外接矩形相关的知识,希望对你有一定的参考价值。
一、简介
1、使用特定形状的轮廓包围
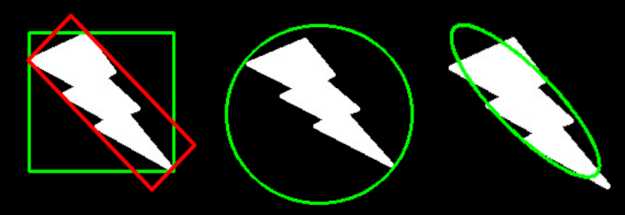
在实际应用中, 经常会有将检测到的轮廓用多边形表示出来的需求, 提取包围轮廓的多边形也方便我们做进一步分析, 轮廓包围主要有一下几种: 轮廓外接矩形、轮廓最小外接矩形(旋转)、轮廓最小包围圆形、轮廓拟合椭圆、轮廓逼近多边形曲线

2、轮廓外接矩形 --- boundingRect()
1 CV_EXPORTS_W Rect boundingRect(InputArray points);
points: 输入的二维点集, 可以填Mat类型或std::vector
返回值: Rect类矩形对象
示例:
 1 vector<Rect> boundRect(contours.size());//定义外接矩形集合
 2 int x0 = 0, y0 = 0, w0 = 0, h0 = 0;
 3 for(int i = 0; i < contours.size(); i++)
 4 {
 5     drawContours(dstImg, contours, i, Scalar(0, 0, 255), 2, 8);
 6     boundRect[i] = boundingRect(Mat(contours[i]));
 7     x0 = boundRect[i].x;
 8     y0 = boundRect[i].y;
 9     w0 = boundRect[i].width;
10     h0 = boundRect[i].height;
11
12     rectangle(dstImg, Point(x0, y0), Point(x0 + w0, y0 + h0), Scalar(0, 255, 0), 2, 8);
13 }
二、外接矩形的查找绘制
 1 //外接矩形的查找绘制
 2 #include "opencv2/opencv.hpp"
 3
 4 using namespace cv;
 5
 6 int main()
 7 {
 8     //外接矩形的查找绘制
 9     Mat srcImg =imread("2.jpg");
10     imshow("src",srcImg);
11     Mat dstImg = srcImg.clone();  //原图备份
12     cvtColor(srcImg, srcImg, CV_BGR2GRAY); //转为灰度图
13     threshold(srcImg, srcImg, 100, 255, CV_THRESH_BINARY); //二值化
14
15     vector<vector<Point>> contours;
16     vector<Vec4i> hierarcy;
17     findContours(srcImg, contours, hierarcy, CV_RETR_EXTERNAL, CHAIN_APPROX_NONE); //查找轮廓
18     vector<Rect> boundRect(contours.size()); //定义外接矩形集合
19     //drawContours(dstImg, contours, -1, Scalar(0, 0, 255), 2, 8);  //绘制轮廓
20     int x0=0, y0=0, w0=0, h0=0;
21     for(int i=0; i<contours.size(); i++)
22     {
23         boundRect[i] = boundingRect((Mat)contours[i]); //查找每个轮廓的外接矩形
24         drawContours(dstImg, contours, i, Scalar(0, 0, 255), 2, 8);  //绘制轮廓
25         x0 = boundRect[i].x;  //获得第i个外接矩形的左上角的x坐标
26         y0 = boundRect[i].y; //获得第i个外接矩形的左上角的y坐标
27         w0 = boundRect[i].width; //获得第i个外接矩形的宽度
28         h0 = boundRect[i].height; //获得第i个外接矩形的高度
29         rectangle(dstImg, Point(x0, y0), Point(x0+w0, y0+h0), Scalar(0, 255, 0), 2, 8); //绘制第i个外接矩形
30     }
31     imshow("boundRect", dstImg);
32     waitKey(0);
33     return 0;
34 }
三、分割硬币轮廓并计数
 1 //分割硬币轮廓并计数
 2 #include "opencv2/opencv.hpp"
 3 #include<iostream>
 4
 5 using namespace cv;
 6 using namespace std;
 7
 8 int main()
 9 {
10     //分割硬币轮廓
11     Mat srcImg =imread("3.png");
12     imshow("src", srcImg);
13     Mat dstImg = srcImg.clone();  //原图备份
14     cvtColor(srcImg, srcImg, CV_BGR2GRAY); //转为灰度图
15     threshold(srcImg, srcImg, 100, 255, CV_THRESH_BINARY); //二值化
16     Mat element = getStructuringElement(MORPH_RECT, Size(3, 3), Point(-1, -1)); //获得结构元素
17     dilate(srcImg, srcImg, element); //膨胀操作
18     imshow("dilate",srcImg);
19
20     vector<vector<Point>> contours;
21     vector<Vec4i> hierarcy;
22     findContours(srcImg, contours, hierarcy, CV_RETR_EXTERNAL, CHAIN_APPROX_NONE); //查找轮廓
23     vector<Rect> boundRect(contours.size()); //定义外接矩形集合
24     int x0=0, y0=0, w0=0, h0=0,num=0;
25     for(int i=0; i<contours.size(); i++)
26     {
27         boundRect[i] = boundingRect((Mat)contours[i]); //查找每个轮廓的外接矩形
28         drawContours(dstImg, contours, i, Scalar(0, 0, 255), 2, 8);  //绘制轮廓
29         x0 = boundRect[i].x;
30         y0 = boundRect[i].y;
31         w0 = boundRect[i].width;
32         h0 = boundRect[i].height;
33         if(w0>30 && h0>30)//筛选
34         {
35             rectangle(dstImg, Point(x0, y0), Point(x0+w0, y0+h0), Scalar(0, 255, 0), 2, 8); //绘制第i个外接矩形
36             num++;
37         }
38     }
39     cout<<"硬币数量:"<<num;
40     imshow("boundRect", dstImg);
41     waitKey(0);
42     return 0;
43 }
四、简单车牌字符分隔
 1 //简单车牌字符分割
 2 #include "opencv2/opencv.hpp"
 3
 4 using namespace cv;
 5
 6 int main()
 7 {
 8     //---简单车牌字符分隔
 9     Mat srcImg =imread("12.jpg");
10     Mat dstImg = srcImg.clone();  //原图备份
11     medianBlur(srcImg, srcImg, 5);  //中值滤波
12     cvtColor(srcImg, srcImg, CV_BGR2GRAY); //转为灰度图
13     threshold(srcImg, srcImg, 100, 255, CV_THRESH_BINARY); //二值化
14     imshow("threshold", srcImg);
15     imwrite("F://car0.jpg", srcImg);
16
17     vector<vector<Point>> contours;
18     vector<Vec4i> hierarcy;
19     findContours(srcImg, contours, hierarcy, CV_RETR_TREE, CHAIN_APPROX_NONE); //查找所有轮廓
20     vector<Rect> boundRect(contours.size()); //定义外接矩形集合
21     int x0=0, y0=0, w0=0, h0=0;
22     for(int i=0; i<contours.size(); i++)
23     {
24         boundRect[i] = boundingRect((Mat)contours[i]); //查找每个轮廓的外接矩形
25         x0 = boundRect[i].x;
26         y0 = boundRect[i].y;
27         w0 = boundRect[i].width;
28         h0 = boundRect[i].height;
29         if(w0>srcImg.cols/12 && w0<srcImg.cols/5 && h0>srcImg.rows/6 && h0<srcImg.rows*5/6)
30         {
31             char pic_name[10];
32             sprintf(pic_name, "F:\\%d.bmp", i);
33             Mat ROI = dstImg(Rect(x0, y0, w0, h0));
34             imwrite(pic_name, ROI);
35             rectangle(dstImg, Point(x0, y0), Point(x0+w0, y0+h0), Scalar(0, 255, 0), 2, 8); //绘制第i个外接矩形
36         }
37     }
38     imshow("boundRect", dstImg);
39     waitKey(0);
40     return 0;
41 }
以上是关于26opencv入门轮廓查找与绘制——正外接矩形的主要内容,如果未能解决你的问题,请参考以下文章