服务发现 consul cluster 的搭建
Posted 2woods
tags:
篇首语:本文由小常识网(cha138.com)小编为大家整理,主要介绍了服务发现 consul cluster 的搭建相关的知识,希望对你有一定的参考价值。
consul cluster setup
- 介绍和指南:
consul用于服务发现.当底层服务发生变化时,能及时更新正确的mysql服务IP. 并提供给业务查询.但需要自行编写脚本,监测数据库状态和切断故障服务器的对外提供服务.
https://www.consul.io/intro/getting-started/install.html
环境:
consul cluster node
node1:192.168.99.183
node1:192.168.99.184
node1:192.168.99.185
agent(client)/安装在mysql服务器上
agent1:192.168.99.210(mysql master)
agent2:192.168.99.211(mysql slave1)
agent3:192.168.99.212(mysql slave2)
安装:
cd /opt
wget https://releases.hashicorp.com/consul/1.2.2/consul_1.2.2_linux_amd64.zip
unzip consul_1.2.2_linux_amd64.zip
cd /usr/bin/
ln -s /opt/consul consul
mkdir /data/consul/ /etc/consul.d/

\\安装完成:
#consul
Usage: consul [--version] [--help] <command> [<args>]

Available commands are:
    agent          Runs a Consul agent
    catalog        Interact with the catalog
    connect        Interact with Consul Connect
    event          Fire a new event
    exec           Executes a command on Consul nodes
    force-leave    Forces a member of the cluster to enter the "left" state
    info           Provides debugging information for operators.
    intention      Interact with Connect service intentions
    join           Tell Consul agent to join cluster
    keygen         Generates a new encryption key
    keyring        Manages gossip layer encryption keys
    kv             Interact with the key-value store
    leave          Gracefully leaves the Consul cluster and shuts down
    lock           Execute a command holding a lock
    maint          Controls node or service maintenance mode
    members        Lists the members of a Consul cluster
    monitor        Stream logs from a Consul agent
    operator       Provides cluster-level tools for Consul operators
    reload         Triggers the agent to reload configuration files
    rtt            Estimates network round trip time between nodes
    snapshot       Saves, restores and inspects snapshots of Consul server state
    validate       Validate config files/directories
    version        Prints the Consul version
    watch          Watch for changes in Consul

[[email protected]_09:38:25 /data/consul/script]
#consul --version
Consul v1.2.2
Protocol 2 spoken by default, understands 2 to 3 (agent will automatically use protocol >2 when speaking to compatible agents)
集群配置
三个节点配置基本一样,只需要修改bind_addr、client_addr为当前服务器IP.
重要参数:
-bootstrap-expect:在一个datacenter中期望提供的server节点数目,当大于或等这个数量的server成功上线群集才对外提供服务,该标记不能和bootstrap同时存在,推荐使用bootstrap-expect方式.
#cd /etc/consul.d/
#ll
-rwxr-xr-x. 1 root root 403 Aug 29 10:21 server.json \\如果没有x属性,使用:chmod +x server.json
[[email protected]_09:44:18 /etc/consul.d]
#cat server.json
{
 "data_dir": "/data/consul",
      "datacenter": "dc1",
      "log_level": "INFO",
      "server": true,
      "bootstrap_expect": 2,     \\第一个节点需要此配置
      "bind_addr": "192.168.99.185",
      "client_addr": "192.168.99.185",
      "ports":{
      "dns":53
      },
      "ui":true,
      "retry_join": ["192.168.99.183","192.168.99.184","192.168.99.185"],
      "retry_interval":"3s",
      "raft_protocol":3,
      "rejoin_after_leave":true
}
集群启动
先启动带 "bootstrap_expect": 2,标签的server。启动命令:
[[email protected]_11:10:21 /etc/consul.d]
#consul agent --config-dir=/etc/consul.d >/data/consul/consul.log 2>&1 &
查看集群成员
[[email protected]_09:52:27 /etc/consul.d]                              用执着守候成功
#consul members --http-addr=192.168.99.183:8500
Node   Address              Status  Type    Build  Protocol  DC   Segment
db3    192.168.99.183:8301  alive   server  1.2.2  2         dc1  <all>
db4    192.168.99.184:8301  alive   server  1.2.2  2         dc1  <all>
db5    192.168.99.185:8301  alive   server  1.2.2  2         dc1  <all>
此种状态就可以添加服务器的注册了.
Client节点配置
配置分为三部分:
1.注册client配置,用于与consul集群serrver通信,配置文件:/etc/consul.d/agent.json
2.注册应用服务(mysql)的配置,配置文件:/etc/consul.d/r_db3308.json(slave的只读服务),w_db3308.json(master 服务)
3.检测master或slave是否健康的python脚本,配置文件:/data/consul/script/check_mysql.py
- agent.json部分:
#cd /etc/consul.d/
[[email protected]_10:16:22 /etc/consul.d]
#ll
total 12
-rwxr-xr-x 1 root root 316 Aug 29 10:41 agent.json
-rwxr-xr-x 1 root root 349 Sep  1 22:10 r_db3308.json
-rwxr-xr-x 1 root root 350 Sep  1 22:13 w_db3308.json
[[email protected]_10:16:23 /etc/consul.d]
#cat agent.json
{
      "data_dir": "/data/consul",
          "enable_script_checks": true,
          "bind_addr": "192.168.99.210",
      "retry_join": ["192.168.99.183","192.168.99.184","192.168.99.185"],
      "retry_interval": "30s",
      "rejoin_after_leave": true,
      "start_join": ["192.168.99.183","192.168.99.184","192.168.99.185"]
}
[[email protected]_10:19:50 /etc/consul.d]
此部分内容和群集server注册内容差不多.- r_db3308.json和cat w_db3308.json部分 :
[[email protected]_10:16:22 /etc/consul.d]
#ll
total 12
-rwxr-xr-x 1 root root 316 Aug 29 10:41 agent.json
-rwxr-xr-x 1 root root 349 Sep  1 22:10 r_db3308.json
-rwxr-xr-x 1 root root 350 Sep  1 22:13 w_db3308.json
[[email protected]_10:19:50 /etc/consul.d]
#cat r_db3308.json
{
"service":
       {
           "name":"r_db3508",
           "tags":[
               "zstdb3508"
               ],
           "address":"192.168.99.210",
           "port":3508,
           "check":
           {
                  "args":[
                  "/data/consul/script/check_mysql.py",
                      "slave"

                  ],
              "interval":"5s"


           }
        }

}
[[email protected]_10:22:18 /etc/consul.d]
#cat w_db3308.json
{
"service":
       {
           "name":"w_db3508",
           "tags":[
               "zstdb3508"
               ],
           "address":"192.168.99.210",
           "port":3508,
           "check":
           {
                  "args":[
                  "/data/consul/script/check_mysql.py",
                      "master"

                  ],
              "interval":"5s"


           }
        }

}
- check_mysql.py(检查主从节点状态脚本)
[[email protected]_11:40:41 /data/consul/script]
#cat check_mysql.py
#!/usr/bin/env python2
#-*- coding: utf-8 -*-
# Script Name: mysql_check.py
# Description: check mysql servers status
# Author: Wenyz
# Create Date: 2018/08/29
import os,sys
import time
import datetime
import MySQLdb
import getpass
check_item=sys.argv[1]
print (datetime.datetime.now().strftime(‘%Y-%m-%d %H:%M:%S‘))
print "check_item:%s"%check_item
#check_item="master"
host=‘127.0.0.1‘
user=‘wyz‘
password=‘*****‘
port = 3508
database=‘wenyz‘
def mysql_connect():
    try:
        conn = MySQLdb.connect(host = host, user = user ,passwd = password,port = port, db = database)
        return conn.cursor()
    except MySQLdb.Error,e:
        try:
            print "Error %d:%s"%(e.args[0],e.args[1])
        except IndexError:
           print "MySQL Error:%s" % str(e)
        sys.exit(1)
def validate_select():
    try:
        cursor = mysql_connect()
        cursor.execute(‘use wenyz;‘)
        cursor.execute(‘select * from t2 limit 2;‘)
        result_set=cursor.fetchall()
        if result_set[0][0] == 4079861: #id
            print "the frist rowid is %s"%result_set[0][0]
            print ‘Successfully query data!‘
        else:
            print "the vaule is %s"%result_set[0][0]
        return ‘successfully‘
    except MySQLdb.Error,e:
        print "Error %d:%s"%(e.args[0],e.args[1])
        print "MySQL Error:%s" % str(e)
        print "Query data failed"
        return ‘failed‘
    cursor.close()
    conn.close()
#validate_select()

def check_mysql_variable(var_key):
    try:
       cursor = mysql_connect()
       sql="show global variables like ‘%s‘"%var_key
       cursor.execute(sql)
       variable_set=cursor.fetchall()
       show_var={}
       for r in variable_set:
           show_var[r[0]]=r[1]
       return show_var[var_key]
    except MySQLdb.Error,e:
        try:
            print "Error %d:%s"%(e.args[0],e.args[1])
        except IndexError:
            print "MySQL Error:%s" % str(e)
            sys.exit(1)
    cursor.close()
    conn.close()
def set_var(key_name,key_value):
    try:
        cursor = mysql_connect()
        sql="set global %s=%s"%(key_name,key_value)
        cursor.execute(sql)
    except MySQLdb.Error,e:
        try:
            print "Error %d:%s"%(e.args[0],e.args[1])
        except IndexError:
            print "MySQL Error:%s" % str(e)
            sys.exit(2)
    cursor.close()


def isslave():
    try:
        conn = MySQLdb.connect(host = host, user = user ,passwd = password,port = port, db = database)
        cursor=conn.cursor(cursorclass=MySQLdb.cursors.DictCursor)
        cursor.execute("show slave status")
        slave_status = cursor.fetchone()
        va_slave_status={}

        if slave_status !=None:
            if slave_status[‘Slave_IO_Running‘]==‘Yes‘ and slave_status[‘Slave_SQL_Running‘]==‘Yes‘:
                print "This is a slave & Slave_SQL_Running and Slave_IO_Running are both YES"
                return ‘Yes‘
            else:
                print "This is a slave,but Slave_SQL_Running or  Slave_IO_Running is not YES"
                return ‘yes‘
        else:
        #    print type(slave_status)
            print "show slave status:%s"%slave_status
            print "Slave replication setup error or this is master"
            return ‘no‘
    except IndexError:
        print "show slave failed,%s"%str(e)
        sys.exit(2)
if check_item==‘master‘:
    try:
        vs=validate_select()
        isslave=isslave()
        c_read_only=check_mysql_variable("read_only")
        c_super_read_only=check_mysql_variable("super_read_only")
        if vs==‘successfully‘ and isslave==‘no‘ and c_read_only==‘OFF‘ and c_super_read_only==‘OFF‘:
            print "It‘s a healthy master,select t2:%s,isslave:%s ,read_only:%s,super_read_only:%s"%(vs,isslave,c_read_only,c_super_read_only)
            sys.exit(0)
        else:
            print "It‘s not a healthy master,select t2:%s,isslave:%s ,read_only:%s,super_read_only:%s"%(vs,isslave,c_read_only,c_super_read_only)
            sys.exit(2)
    except IndexError:
        print "show slave failed,%s"%str(e)
        sys.exit(2)
elif check_item==‘slave‘:
    try:
        vs=validate_select()
        isslave=isslave()
        c_read_only=check_mysql_variable("read_only")
        c_super_read_only=check_mysql_variable("super_read_only")
        #  print slave_status,type(slave_status)
        #print "Isslave is yes but read_only is off,will set to on %s,%s,%s"%(isslave,c_read_only,c_super_read_only)
        if isslave=="Yes" and (c_read_only=="OFF" or c_super_read_only=="OFF"):
            print "Isslave () is true, but read_only or super_read_only is OFF, seting this parameter to on.read_only:%s,super_read_only:%s"%(c_read_only,c_super_read_only)
            set_var("read_only","ON")
            set_var("super_read_only","ON")
        if vs==‘successfully‘ and isslave==‘Yes‘ and c_read_only==‘ON‘ and c_super_read_only==‘ON‘:
            print "It‘s a healthy slave,select t2:%s,isslave:%s ,read_only:%s,super_read_only:%s"%(vs,isslave,c_read_only,c_super_read_only)
            sys.exit(0)
        else:
            print "It‘s not a healthy slave,select t2:%s,isslave:%s ,read_only:%s,super_read_only:%s"%(vs,isslave,c_read_only,c_super_read_only)
            sys.exit(2)
    except IndexError:
        print "show slave failed,%s"% str(e)
        sys.exit(2)
else:
    print ‘The parameter is not "master" or "slave"‘
    sys.exit(2)
#isslave()
Client节点启动并查看状态
consul agent --config-dir=/etc/consul.d/ > /data/consul/consul.log 2>&1 &
[[email protected]_11:52:35 /data/consul/script]
#consul members --http-addr=192.168.99.183:8500
Node   Address              Status  Type    Build  Protocol  DC   Segment
db3    192.168.99.183:8301  alive   server  1.2.2  2         dc1  <all>
db4    192.168.99.184:8301  alive   server  1.2.2  2         dc1  <all>
db5    192.168.99.185:8301  alive   server  1.2.2  2         dc1  <all>
db210  192.168.99.210:8301  alive   client  1.2.2  2         dc1  <default>
db211  192.168.99.211:8301  alive   client  1.2.2  2         dc1  <default>
db212  192.168.99.212:8301  alive   client  1.2.2  2         dc1  <default>
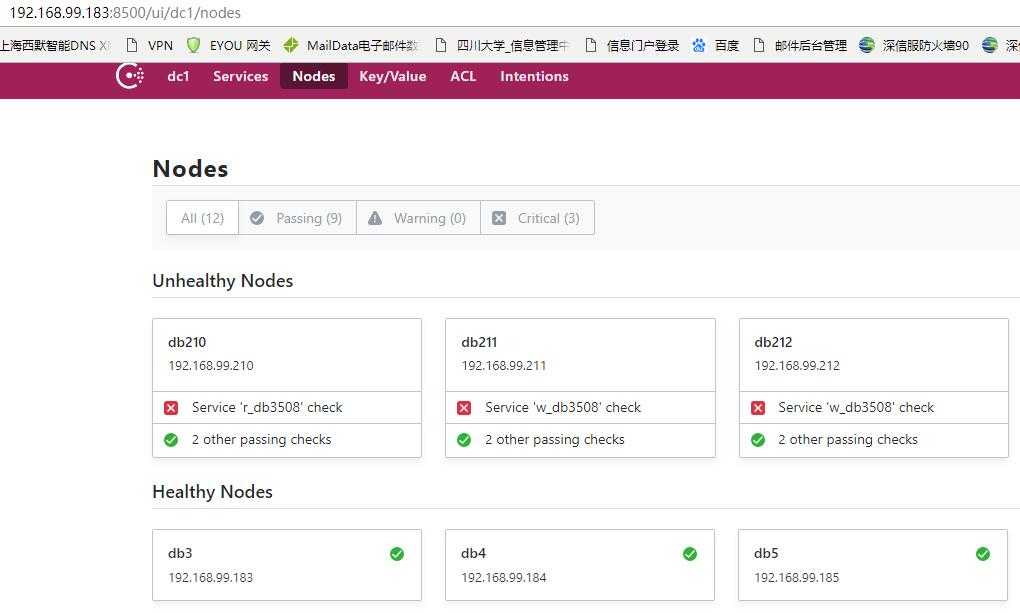
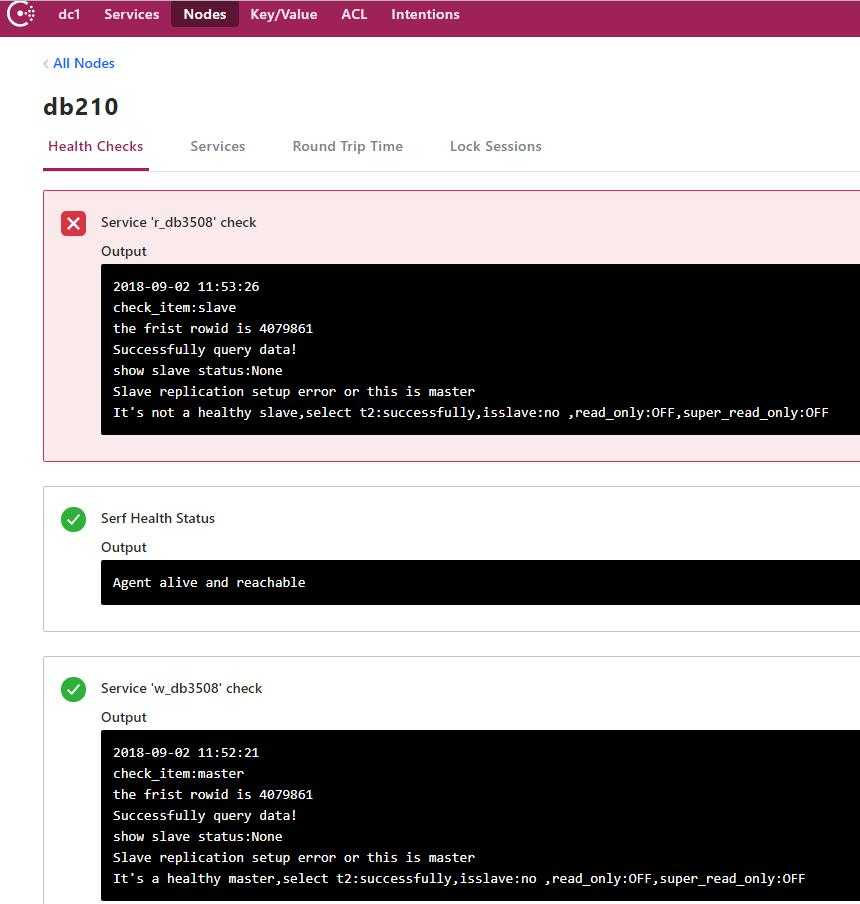
启动后可以通过看web方式查看服务,并通过DNS查询核实服务是否注册成功:
[[email protected]_11:52:56 /data/consul/script]
#nslookup
> server 192.168.99.183
Default server: 192.168.99.183
Address: 192.168.99.183#53
> w_db3508.service.consul.
Server:     192.168.99.183
Address:    192.168.99.183#53

Name:   w_db3508.service.consul
Address: 192.168.99.210
> r_db3508.service.consul.
Server:     192.168.99.183
Address:    192.168.99.183#53

Name:   r_db3508.service.consul
Address: 192.168.99.211
Name:   r_db3508.service.consul
Address: 192.168.99.212
>


以上是关于服务发现 consul cluster 的搭建的主要内容,如果未能解决你的问题,请参考以下文章