Django底层原理简介与安装
Posted yangzhizong
tags:
篇首语:本文由小常识网(cha138.com)小编为大家整理,主要介绍了Django底层原理简介与安装相关的知识,希望对你有一定的参考价值。
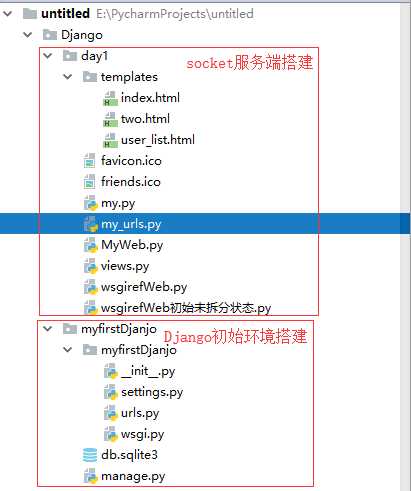
Django环境目录搭建一栏:

利用wsgiref模块封装好的socket搭建服务端:
#利用wsgiref模块封装好的socket演示操作(例如accept
ecv)
#也可以实现socket服务端的功能

from wsgiref.simple_server import make_server
#拆分开之后需要导入关联相应表格
import my_urls
from views import *

#分到views里面
# def index(response):
#     return ‘ok‘
#
# def time(response):
#     return ‘time‘
#
# def error(response):
#     return ‘404‘

#分到my_urls里面
# urls=[
#     (‘/index‘,index),
#     (‘/time‘,time),
#
# ]

def my_server(environ,start_response):
    #这里就不需要再accept、recv了,因为封装好了,只需要对接收数据进行处理就好
    #environ是个字典:把请求头里所有的东西都切割出来了,不用再手动进行处理
    #start_response是个函数:响应头信息HTTP/1.1 200 OK
Content-Type:text/html


    #取请求的地址:
    # print(environ[‘PATH_INFO‘])  # ‘PATH_INFO‘: ‘/ ‘,默认是空 类似于:GET /index HTTP/1.1 访问时输入什么就会返回什么

    # conn.send(b‘HTTP/1.1 200 OK
Content-Type:text/html

‘)类似于这个功能
    start_response(‘200 OK‘,[(‘Content-Type‘,‘text/html‘)])
    # return [b‘Hello wsgiref_socket‘]  #到这里就可以模拟MyWeb.py里面的socket服务端功能了


    func=None
    #遍历取出路由列表里面的各个元组值
    # for url in urls:
    for url in my_urls.urls:

        #判断用户请求的地址是不是写在路由里面的地址
        if url[0] == environ[‘PATH_INFO‘]:
            func=url[1]  #相当与 func=index 或者 func=time
            break
    #判断是否为空
    if func:
        response=func(environ)  #即 index(environ)
    else:
        response=error(environ)

        #wsgiref规定返回值就是要写在列表里面
    return [response,]


if __name__ == ‘__main__‘:
    my=make_server(‘127.0.0.1‘,8002,my_server)
    print(‘监听8002端口‘)
    my.serve_forever()
my_urls路由配置:
import views

urls=[
    (‘/index‘,views.index),
    (‘/time‘,views.time),
    (‘/user_list‘,views.user_list),
    (‘/favicon.ico‘,views.favicon)

]
templates渲染html模板(和路由层对应):
1.index.html
<!DOCTYPE html>
<html lang="en">
<head>
    <meta charset="UTF-8">
    <title>index界面</title>
</head>
<body>
    <img src="https://goss.veer.com/creative/vcg/veer/1600water/veer-136737644.jpg" alt="index">
</body>
</html>
2.time.html
<!DOCTYPE html>
<html lang="en">
<head>
    <meta charset="UTF-8">
    <title>Title</title>
</head>
<body>
    @@[email protected]@
</body>
</html>
3.user_list.html
<!DOCTYPE html>
<html lang="en">
<head>
    <meta charset="UTF-8">
    <title>用户列表</title>
    <style>
        th {
            background: gray;
        }
        td {

            border: 1px solid  black;
            width: 200px;
            height: 50px;
            text-align: center;
        }
        th {
            border: 1px solid  black;
            width: 200px;
            height: 50px;
            text-align: center;
        }
    </style>
</head>
<body>
    <table style="border: 1px solid black;border-collapse: collapse;">
        <thead>
        <tr>
            <th>id</th>
            <th>用户名</th>
            <th>密码</th>

        </tr>
        </thead>
        <tbody>
            {% for user in user_list %}
            <tr>
                <td>{{user.id}}</td>
                <td>{{user.name}}</td>
                <td>{{user.password}}</td>
            </tr>

            {%endfor%}
        </tbody>

    </table>
</body>
</html>
views视图配置:
import pymysql
#jinja2是模板渲染(用于去渲染user_list.html中的文件)
from jinja2 import  Template


#把wsgiref里面的time index error 函数拆分过来

def index(response):
    # return ‘ok‘
    #从template里面调取网页(里面设定要响应返回给客户端的内容)
    with open(‘templates/index.html‘,‘r‘,encoding=‘utf-8‘) as f:
        data=f.read()
    return  data.encode(‘utf-8‘)


def time(response):
    # return ‘time‘
    import datetime
    now = datetime.datetime.now().strftime(‘%Y-%m-%d %X‘)
    with open(‘templates/two.html‘, ‘r‘, encoding=‘utf-8‘) as f:
        data = f.read()
    data = data.replace(‘@@[email protected]@‘,now)
    return data.encode(‘utf-8‘)

def error(response):
    return ‘404‘.encode(‘utf-8‘)

def favicon(request):
    with open(‘favicon.ico‘,‘rb‘) as f:
        data=f.read()
    return data


def user_list(response):
    conn=pymysql.connect(
        host=‘127.0.0.1‘,
        port=3306,
        user=‘root‘,
        password=‘root‘,
        database=‘test‘

    )

    #不传参拿到是元组,传参之后得到的是字典
    cursor=conn.cursor(cursor=pymysql.cursors.DictCursor)
    cursor.execute(‘select * from user‘)
    user_list=cursor.fetchall()
    print(user_list)  #user_list列表[{‘id‘:1,‘name‘:yangzhizong,‘password‘:123},{...}]

    #取到user_list.html模板
    with open(‘templates/user_list.html‘,‘r‘,encoding=‘utf-8‘) as f:
        data=f.read()

    #jinja2的应用,生成一个模板对象,需要传字符串
    template=Template(data)   #template是个对象,就是user_list.html
    data=template.render(user_list=user_list)  #调用对象的render方法,传入参数完成对html文件的渲染
    return data.encode(‘utf-8‘)
待完善。。。
以上是关于Django底层原理简介与安装的主要内容,如果未能解决你的问题,请参考以下文章