LinkedHashMap源码详解
Posted
tags:
篇首语:本文由小常识网(cha138.com)小编为大家整理,主要介绍了LinkedHashMap源码详解相关的知识,希望对你有一定的参考价值。
序言
本来是不打算先讲map的,但是随着对set集合的认识,发现如果不先搞懂各种map,是无法理解set的。因为set集合很多的底层就是用map来存储的。比如HashSet就是用HashMap,LinkedHashSet就是用LinkedHashMap。所以打算把map讲完把。
---WH
一、LinkedHashMap
先来说说它的特点,然后在一一通过分析源码来验证其实现原理
1、能够保证插入元素的顺序。深入一点讲,有两种迭代元素的方式,一种是按照插入元素时的顺序迭代,比如,插入A,B,C,那么迭代也是A,B,C,另一种是按照访问顺序,比如,在迭代前,访问了B,那么迭代的顺序就是A,C,B,比如在迭代前,访问了B,接着又访问了A,那么迭代顺序为C,B,A,比如,在迭代前访问了B,接着又访问了B,然后在访问了A,迭代顺序还是C,B,A。要说明的意思就是不是近期访问的次数最多,就放最后面迭代,而是看迭代前被访问的时间长短决定。
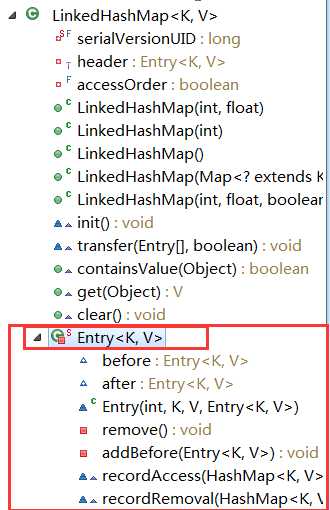
3、内部存储的元素的模型。entry是下面这样的,相比HashMap,多了两个属性,一个before,一个after。next和after有时候会指向同一个entry,有时候next指向null,而after指向entry。这个具体后面分析。

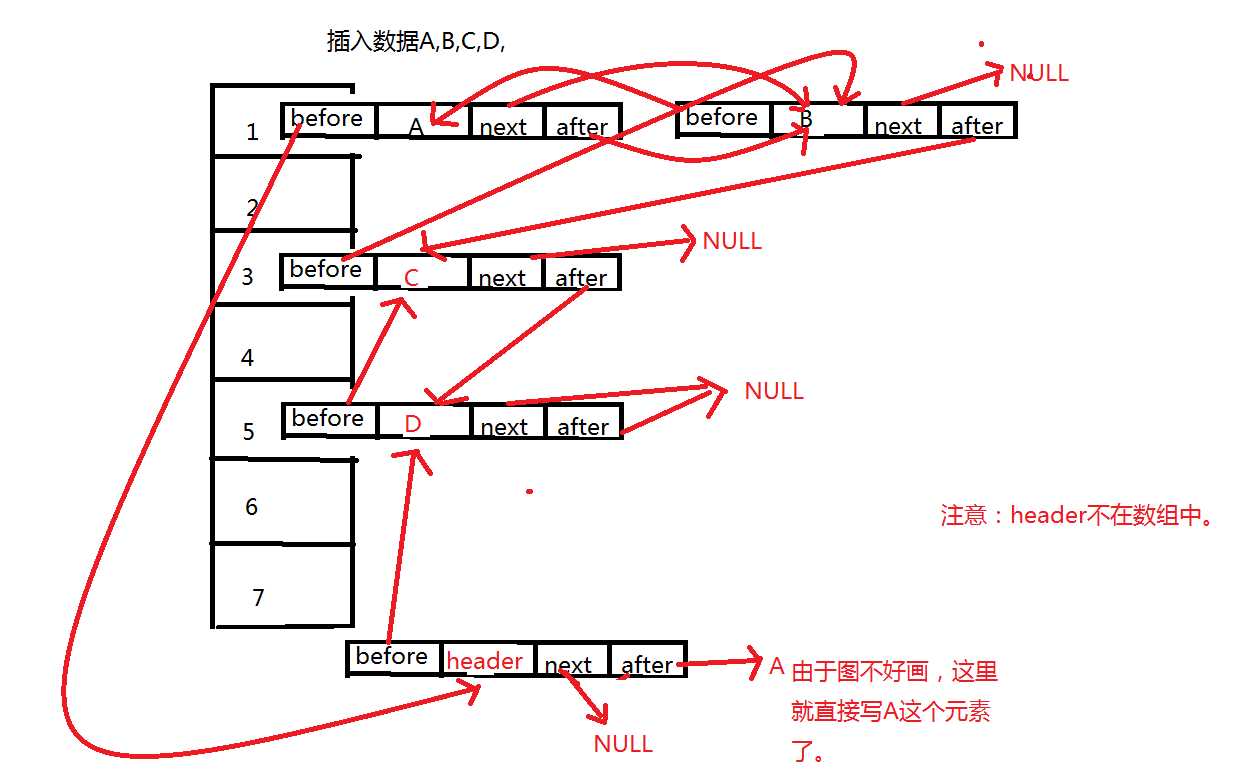
4、linkedHashMap和HashMap在存储操作上是一样的,但是LinkedHashMap多的东西是会记住在此之前插入的元素,这些元素不一定是在一个桶中,画个图。

也就是说,对于linkedHashMap的基本操作还是和HashMap一样,在其上面加了两个属性,也就是为了记录前一个插入的元素和记录后一个插入的元素。也就是只要和hashmap一样进行操作之后把这两个属性的值设置好,就OK了。注意一点,会有一个header的实体,目的是为了记录第一个插入的元素是谁,在遍历的时候能够找到第一个元素。
实际上存储的样子就像上面这个图一样,这里要分清楚哦。实际上的存储方式是和hashMap一样,但是同时增加了一个新的东西就是 双向循环链表。就是因为有了这个双向循环链表,LinkedHashMap才和HashMap不一样。
5、其他一些比如如何实现的循环双向链表,插入顺序和访问顺序如何实现的就看下面的详细讲解了。
二、源码分析
2.1、内部存储元素的存储结构源码和理解LinkedHashMap双向循环链表,

//LinkedHashMap的entry继承自HashMap的Entry。
    private static class Entry<K,V> extends HashMap.Entry<K,V> {
        // These fields comprise the doubly linked list used for iteration.
    //通过上面这句源码的解释,我们可以知道这两个字段,是用来给迭代时使用的,相当于一个双向链表,实际上用的时候,操作LinkedHashMap的entry和操作HashMap的Entry是一样的,只操作相同的四个属性,这两个字段是由linkedHashMap中一些方法所操作。所以LinkedHashMap的很多方法度是直接继承自HashMap。
//before:指向前一个entry元素。after:指向后一个entry元素
        Entry<K,V> before, after;
    //使用的是HashMap的Entry构造
        Entry(int hash, K key, V value, HashMap.Entry<K,V> next) {
            super(hash, key, value, next);
        }

//下面是维护这个双向循环链表的一些操作。在HashMap中没有这些操作,因为HashMap不需要维护,
        /**
         * Removes this entry from the linked list.
         */
//我们知道在双向循环链表时移除一个元素需要进行哪些操作把,比如有A,B,C,将B移除,那么A.next要指向c,c.before要指向A。下面就是进行这样的操作,但是会有点绕,他省略了一些东西。
//有的人会问,要是删除的是最后一个元素呢,那这个方法还适用吗?有这个疑问的人应该注意一下这个是双向循环链表,双向,删除哪个度适用。
        private void remove() {
      //this.before.after = this.after;
      //this.after.before = this.before; 这样看可能会更好理解,this指的就是要删除的哪个元素。

            before.after = after;
            after.before = before;
        }

        /**
         * Inserts this entry before the specified existing entry in the list.
         */
//插入一个元素之后做的一些操作,就是将第一个元素,和最后一个元素的一些指向改变。传进来的existingEntry就是header。

        private void addBefore(Entry<K,V> existingEntry) {
            after  = existingEntry;
            before = existingEntry.before;
            before.after = this;
            after.before = this;
        }

        /**
         * This method is invoked by the superclass whenever the value
         * of a pre-existing entry is read by Map.get or modified by Map.set.
         * If the enclosing Map is access-ordered, it moves the entry
         * to the end of the list; otherwise, it does nothing.
         */
//这个方法就是我们一开始说的,accessOrder为true时,就是使用的访问顺序,访问次数最少到访问次数最多,此时要做特殊处理。处理机制就是访问了一次,就将自己往后移一位,这里就是先将自己删除了,然后在把自己添加,
//这样,近期访问的少的就在链表的开始,最近访问的元素就会在链表的末尾。如果为false。那么默认就是插入顺序,直接通过链表的特点就能依次找到插入元素,不用做特殊处理。

        void recordAccess(HashMap<K,V> m) {
            LinkedHashMap<K,V> lm = (LinkedHashMap<K,V>)m;
            if (lm.accessOrder) {
                lm.modCount++;
                remove();
                addBefore(lm.header);
            }
        }

        void recordRemoval(HashMap<K,V> m) {
            remove();
        }
    }
通过查看LinkedHashMap的entry,就验证了我们上面说的特性3.
2.2、构造方法
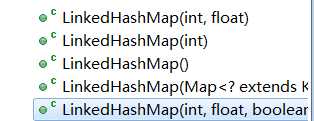
有五个构造方法。

 1 //使用父类中的构造,初始化容量和加载因子,该初始化容量是指数组大小。
 2     public LinkedHashMap(int initialCapacity, float loadFactor) {
 3         super(initialCapacity, loadFactor);
 4         accessOrder = false;
 5     }
 6 //一个参数的构造
 7     public LinkedHashMap(int initialCapacity) {
 8         super(initialCapacity);
 9         accessOrder = false;
10     }
11 //无参构造
12     public LinkedHashMap() {
13         super();
14         accessOrder = false;
15     }
16 //这个不用多说,用来接受map类型的值转换为LinkedHashMap
17     public LinkedHashMap(Map<? extends K, ? extends V> m) {
18         super(m);
19         accessOrder = false;
20     }
21 //真正有点特殊的就是这个,多了一个参数accessOrder。存储顺序,LinkedHashMap关键的参数之一就在这个,
  //true:指定迭代的顺序是按照访问顺序(近期访问最少到近期访问最多的元素)来迭代的。 false:指定迭代的顺序是按照插入顺序迭代,也就是通过插入元素的顺序来迭代所有元素
//如果你想指定访问顺序,那么就只能使用该构造方法,其他三个构造方法默认使用插入顺序。

22     public LinkedHashMap(int initialCapacity,
23                          float loadFactor,
24                          boolean accessOrder) {
25         super(initialCapacity, loadFactor);
26         this.accessOrder = accessOrder;
27     }
2.3、验证header的存在
//linkedHashMap中的init()方法,就使用header,hash值为-1,其他度为null,也就是说这个header不放在数组中,就是用来指示开始元素和标志结束元素的。
    void init() {
        header = new Entry<>(-1, null, null, null);
//一开始是自己指向自己,没有任何元素。HashMap中也有init()方法是个空的,所以这里的init()方法就是为LinkedHashMap而写的。
        header.before = header.after = header;
    }
//在HashMap的构造方法中就会使用到init(),
    public HashMap(int initialCapacity, float loadFactor) {
        if (initialCapacity < 0)
            throw new IllegalArgumentException("Illegal initial capacity: " +
                                               initialCapacity);
        if (initialCapacity > MAXIMUM_CAPACITY)
            initialCapacity = MAXIMUM_CAPACITY;
        if (loadFactor <= 0 || Float.isNaN(loadFactor))
            throw new IllegalArgumentException("Illegal load factor: " +
                                               loadFactor);

        this.loadFactor = loadFactor;
        threshold = initialCapacity;
        init();
    }
2.4、LinkedHashMap是如何和其父类HashMap共享一些方法的。比如,put操作等。
1、LinkedHashMap构造方法完成后,调用put往其中添加元素,查看父类中的put源码
put
 1 //这个方法应该挺熟悉的,如果看了HashMap的解析的话
 2    public V put(K key, V value) {
 3     //刚开始其存储空间啥也没有,在这里初始化
 4         if (table == EMPTY_TABLE) {
 5             inflateTable(threshold);
 6         }
 7 //key为null的情况
 8         if (key == null)
 9             return putForNullKey(value);
10 //通过key算hash,进而算出在数组中的位置,也就是在第几个桶中
11         int hash = hash(key);
12         int i = indexFor(hash, table.length);
13 //查看桶中是否有相同的key值,如果有就直接用新植替换旧值,而不用在创建新的entry了
14         for (Entry<K,V> e = table[i]; e != null; e = e.next) {
15             Object k;
16             if (e.hash == hash && ((k = e.key) == key || key.equals(k))) {
17                 V oldValue = e.value;
18                 e.value = value;
19                 e.recordAccess(this);
20                 return oldValue;
21             }
22         }
23
24         modCount++;
25 //上面度是熟悉的东西,最重要的地方来了,就是这个方法,LinkedHashMap执行到这里,addEntry()方法不会执行HashMap中的方法,而是执行自己类中的addEntry方法,这里就要
  提一下LinkedHashMap重写HashMap中两个个关键的方法了。看下面的分析。
26         addEntry(hash, key, value, i);
27         return null;
28     }
重写了void addEntry(int hash, K key, V value, int bucketIndex) 和void createEntry(int hash, K key, V value, int bucketIndex)
//重写的addEntry。其中还是会调用父类中的addEntry方法,但是此外会增加额外的功能,
   void addEntry(int hash, K key, V value, int bucketIndex) {
        super.addEntry(hash, key, value, bucketIndex);

        // Remove eldest entry if instructed
        Entry<K,V> eldest = header.after;
        if (removeEldestEntry(eldest)) {
            removeEntryForKey(eldest.key);
        }
    }

//HashMap的addEntry,就是在将元素加入桶中前判断桶中的大小或者数组的大小是否合适,总之就是做一些数组容量上的判断和hash值的问题。
    void addEntry(int hash, K key, V value, int bucketIndex) {
        if ((size >= threshold) && (null != table[bucketIndex])) {
            resize(2 * table.length);
            hash = (null != key) ? hash(key) : 0;
            bucketIndex = indexFor(hash, table.length);
        }
//这里就是真正创建entry的时候了。也被LinkedHashMap重写了。
        createEntry(hash, key, value, bucketIndex);
    }

//重写的createEntry,这里要注意的是,新元素放桶中,是放第一位,而不是往后追加,所以下面方法中前面三行应该知道了
    void createEntry(int hash, K key, V value, int bucketIndex) {
        HashMap.Entry<K,V> old = table[bucketIndex];
        Entry<K,V> e = new Entry<>(hash, key, value, old);
        table[bucketIndex] = e;
//这个方法的作用就是将e放在双向循环链表的末尾,需要将一些指向进行修改的操作。。
        e.addBefore(header);
        size++;
    }
到这里,应该就对LinkedHashMap的存储过程有一定的了解了。并且也应该知道是如何存储的了。存储时有何特殊之处。
2.5、来看看迭代器的使用。对双向循环链表的遍历操作。但是这个迭代器是abstract的,不能直接被对象所用,但是能够间接使用,就是通过keySet().interator(),就是使用的这个迭代器
//这个也非常简单,无非就是对双向循环链表进行遍历。
    private abstract class LinkedHashIterator<T> implements Iterator<T> {
    //先拿到header的after指向的元素,也就是第一个元素。
        Entry<K,V> nextEntry    = header.after;
    //记录前一个元素是谁,因为刚到第一个元素,第一个元素之前的元素理论上就是null。实际上是指向最后一个元素的。知道就行。
        Entry<K,V> lastReturned = null;

        /**
         * The modCount value that the iterator believes that the backing
         * List should have.  If this expectation is violated, the iterator
         * has detected concurrent modification.
         */
        int expectedModCount = modCount;

    //判断有没有到循环链表的末尾,就看元素的下一个是不是header。
        public boolean hasNext() {
            return nextEntry != header;
        }
    //移除操作,也就一些指向问题
        public void remove() {
            if (lastReturned == null)
                throw new IllegalStateException();
            if (modCount != expectedModCount)
                throw new ConcurrentModificationException();

            LinkedHashMap.this.remove(lastReturned.key);
            lastReturned = null;
            expectedModCount = modCount;
        }
//下一个元素。一些指向问题,度是双向循环链表中的操作。
        Entry<K,V> nextEntry() {
            if (modCount != expectedModCount)
                throw new ConcurrentModificationException();
            if (nextEntry == header)
                throw new NoSuchElementException();

            Entry<K,V> e = lastReturned = nextEntry;
            nextEntry = e.after;
            return e;
        }
    }
keySet()是如何间接使用了LinkedHashIterator的
hashMap中的keySet()

找到newKeyIterator()
![]()
是LinkedHashMap对象调用的,而LinkedHashMap中重写了KeyIterator方法,所以就这样间接的使用了LinkedHashIterator迭代器

2.6、看看迭代时使用访问顺序如何实现的,其实关键也就是在哪个recordAccess方法,来看看流程
linkedHashMap中有get方法,不会使用父类中的get方法
    public V get(Object key) {
        Entry<K,V> e = (Entry<K,V>)getEntry(key);
        if (e == null)
            return null;
//关键的就是这个方法
        e.recordAccess(this);
        return e.value;
    }
//这个方法在上面已经分析过了,如果accessOrder为true,那么就会用访问顺序。if条件下的语句会执行,作用就是将最近访问的元素放链表的末尾。
        void recordAccess(HashMap<K,V> m) {
            LinkedHashMap<K,V> lm = (LinkedHashMap<K,V>)m;
            if (lm.accessOrder) {
                lm.modCount++;
                remove();
                addBefore(lm.header);
            }
        }
2.7、使用默认的插入顺序就不用多分析了,也就是上面这个if下的代码不生效,就会使用插入顺序。
三、验证LinkedHashMap的功能
注意、map是不能够只能拿到迭代器的,只能够拿到keySet().iterator(); 也就是说迭代器是不能够迭代map的,到时能够间接的使用迭代器。就比如先拿到key的迭代器,然后在通过key找到对应的value值,或者直接用values()方法,拿到所有的map的value。values()方法的底层也是使用的迭代器。
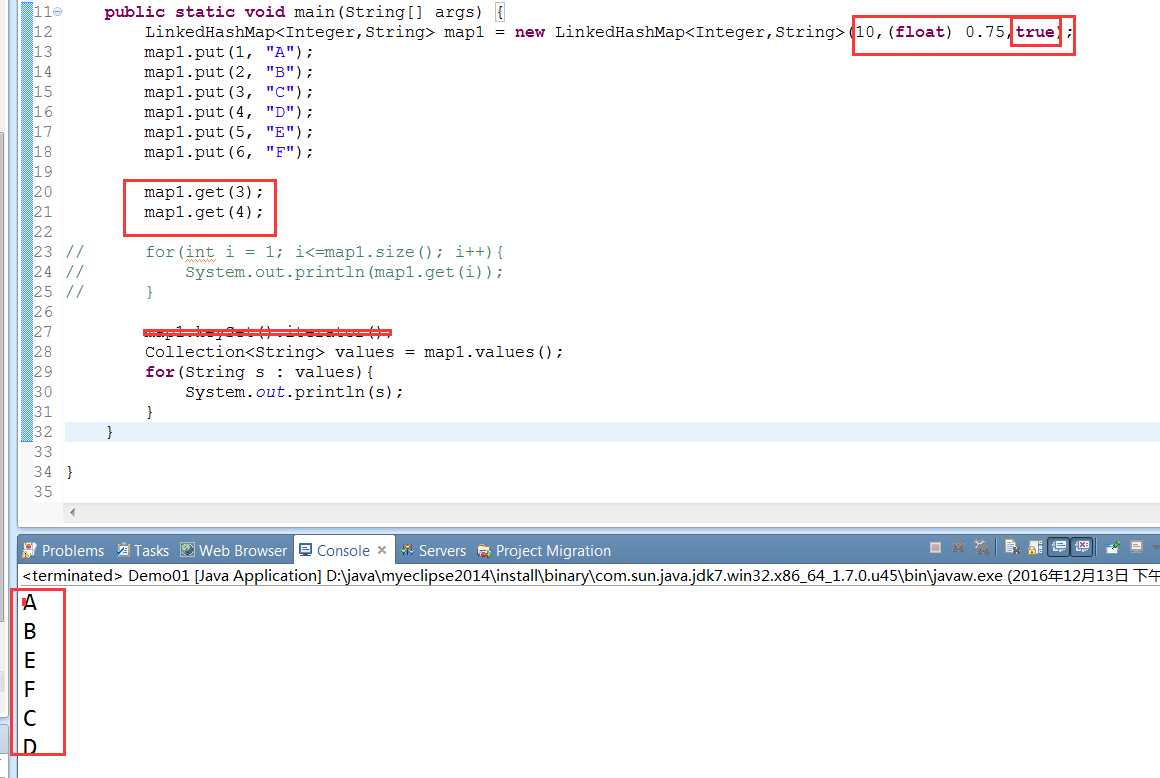
1、使用访问顺序,结果确实是如我们所预期那样

注意:如果使用for循环来遍历,肯定就不是这个结果了,原因是for循环是按照key值的顺序来查找的呀,从1到6,这里如果需要验证访问顺序,就必须使用迭代器,而map使用迭代器有两种方式,一种就是我上面所用的使values(),另一种是使用keySet().Iterator();自己可以尝试一下。
四、总结
1、知道LinkedHashMap的实现原理。
1.1、实现原理,跟HashMap一模一样。HashMap有的特性,LinkedHashMap基本上都有。
1.2、具体的存储实现,就看一开始的那两张图。虽然第二张画得比较乱,但是仔细去看,就能够弄懂其中的道理。
2、知道LinkedHashMap迭代的访问顺序和插入顺序
2.1、关键属性accessOrder
2.2、关键方法recordAccess
3、知道LinekdHashMap和HashMap的区别。
3.1、LinkedHashMap是HashMap的子类,实现的原理跟HashMap差不多,唯一的区别就是LinkedHashMap多了一个双向循环链表。
3.2、因为有双向循环列表,所以LinkedHashMap能够记录插入元素的顺序,而HashMap不能,
4、map使用迭代的两种方式,知道其内部是如何使用迭代器的。
keySet().iterator()
values()
以上是关于LinkedHashMap源码详解的主要内容,如果未能解决你的问题,请参考以下文章
