前后端分离之mockjs实战demo
Posted raind
tags:
篇首语:本文由小常识网(cha138.com)小编为大家整理,主要介绍了前后端分离之mockjs实战demo相关的知识,希望对你有一定的参考价值。
基于vue-cli+webpack的demo
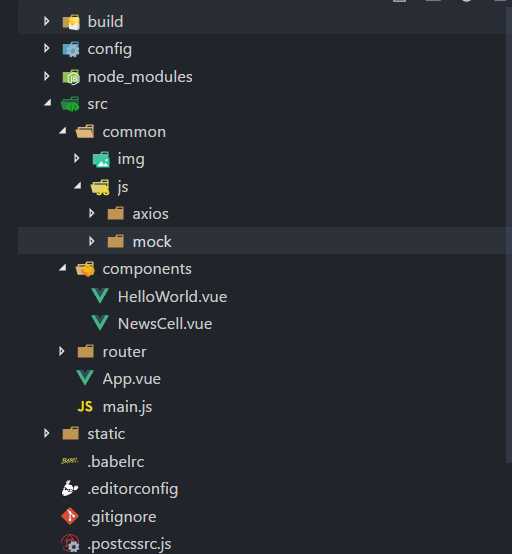
项目结构

axios文件夹用来创建axios相关配置:
import axios from ‘axios‘
import vue from ‘vue‘

axios.defaults.headers.post[‘Content-Type‘] = ‘application/x-www-form-urlencoded‘

// 请求拦截器
axios.interceptors.request.use(function(config) {
    return config;
  }, function(error) {
    return Promise.reject(error);
  })
  // 响应拦截器
axios.interceptors.response.use(function(response) {
  return response;
}, function(error) {
  return Promise.reject(error);
})

// 封装axios的post请求
export function fetch(url, params) {
  return new Promise((resolve, reject) => {
    axios.post(url, params)
      .then(response => {
        resolve(response.data);
      })
      .catch((error) => {
        reject(error);
      })
  })
}

export default {
  JH_news(url, params) {
    return fetch(url, params);
  }
}
mock文件夹建立mock数据,配置mock请求:
// 引入mockjs
const Mock = require(‘mockjs‘);
// 获取 mock.Random 对象
const Random = Mock.Random;
// mock一组数据
const produceNewsData = function() {
    let articles = [];
    for (let i = 0; i < 10; i++) {
        let newArticleObject = {
            title: Random.csentence(5, 30), //  Random.csentence( min, max )
            thumbnail_pic_s: Random.dataImage(‘300x250‘, ‘mock的图片‘), // Random.dataImage( size, text ) 生成一段随机的 Base64 图片编码
            author_name: Random.cname(), // Random.cname() 随机生成一个常见的中文姓名
            date: Random.date()  // Random.date()指示生成的日期字符串的格式,默认为yyyy-MM-dd;
        }
        articles.push(newArticleObject)
    }

    return {
        articles: articles
    }
}

// Mock.mock( url, post/get , 返回的数据);
Mock.mock(‘/news/index‘, ‘post‘, produceNewsData);
HelloWorld.vue页面首页:
<template>
  <div class="index">
    <div v-for="(item, key) in newsListShow" :key="key">
      <news-cell
      :newsDate="item"
      ></news-cell>
    </div>
  </div>
</template>

<script>
import api from ‘js/axios/config‘
import NewsCell from ‘./NewsCell.vue‘

export default {
  name: ‘index‘,
  data () {
    return {
      newsListShow: [],
    }
  },
  components: {
    NewsCell
  },
  created() {
    this.setNewsApi();
  },
  methods:{
    setNewsApi: function() {
      api.JH_news(‘/news/index‘, ‘type=top&key=123456‘)
      .then(res => {
        console.log(res);
        this.newsListShow = res.articles;
      });
    },
  }
}
</script>

<!-- Add "scoped" attribute to limit CSS to this component only -->
<style scoped>

</style>
NewsCell.vue组件渲染数据:
<template>
  <div class="wrap">
    <div class="wrap-top">
      <h1>{{newsDate.title}}</h1>
      <span class="date">{{newsDate.date}}</span>
    </div>
    <div class="wrap-bottom">
      <span class="name">{{newsDate.author_name}}</span>
      <img :src="newsDate.thumbnail_pic_s" >
    </div>
  </div>
</template>

<script>
export default {
  name: ‘NewsCell‘,
  props: {
    newsDate: Object
  },
  data () {
    return {
    }
  },
  computed: {
  },
  methods: {
    jumpPage: function () {
      window.location.href = this.newsDate.url
    }
  }
}
</script>

<style scoped>
  .wrap{
    width: 100%;
    font-size: 0.3rem;
  }
  .wrap-top,.wrap-bottom{
    display: flex;
    align-items: center;
    justify-content:space-between;
  }
  h1{
    width: 6rem;
    text-align: left;
    white-space: nowrap;
    text-overflow: ellipsis;
    overflow: hidden;
  }
  .date{
    width: 4rem;
  }
  .name{
    flex: 1;
  }
  img{
    width: 10rem;
  }
</style>
main.js入口文件:
// The Vue build version to load with the `import` command
// (runtime-only or standalone) has been set in webpack.base.conf with an alias.
import Vue from ‘vue‘
import App from ‘./App‘
import router from ‘./router‘
// 引入mockjs
require(‘js/mock/mock.js‘)
Vue.config.productionTip = false

/* eslint-disable no-new */
new Vue({
  el: ‘#app‘,
  router,
  components: { App },
  template: ‘<App/>‘
})
运行结果

更为详细的介绍:
Mock.js简易教程,脱离后端独立开发,实现增删改查功能
以上是关于前后端分离之mockjs实战demo的主要内容,如果未能解决你的问题,请参考以下文章