UI自动化测试AutoIT工具使用和robot对象模拟键盘按键操作
Posted
tags:
篇首语:本文由小常识网(cha138.com)小编为大家整理,主要介绍了UI自动化测试AutoIT工具使用和robot对象模拟键盘按键操作相关的知识,希望对你有一定的参考价值。
AutoIT简介
AutoIt 目前最新是v3版本,这是一个使用类似BASIC脚本语言的免费软件,它设计用于Windows GUI(图形用户界面)中进行自动化操作。它利用模拟键盘按键,鼠标移动和窗口/控件的组合来实现自动化任务。而这是其它语言不可能做到或无可靠方法实现的(例如VBScript和SendKeys)。
实现原理:
使用AutoIT下的工具去定位页面外的元素属性值,其次再利用AutoIT下的工具编写合适的脚本,然后将脚本编译成可执行文件,最后在自动化实现时,直接调用此脚本实现文件的上传、下载等操作。
备注:定位元素、编写脚本和编译,需要借助AutoIT提供的工具,但是脚本编译成可执行文件后,可以直接使用。
AutoIT的下载及安装
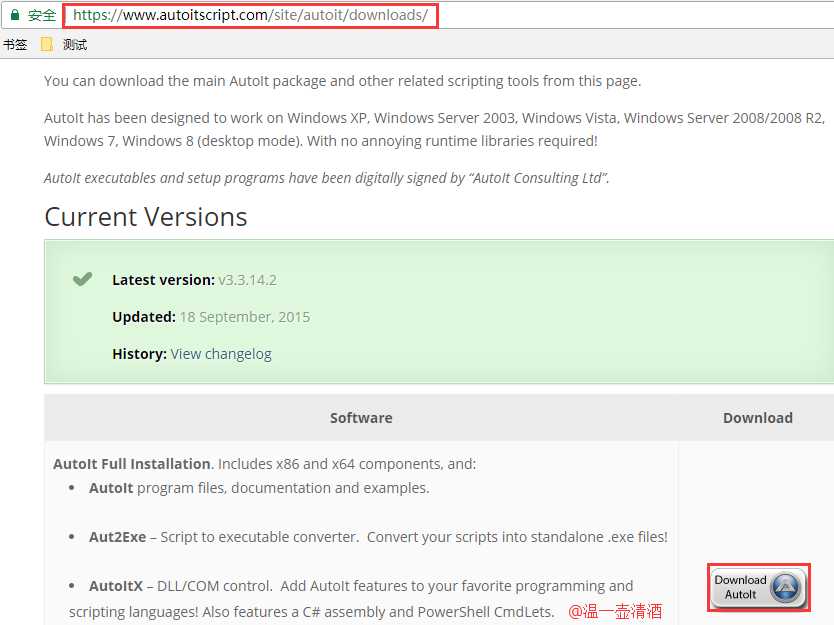
下载地址:https://www.autoitscript.com/site/autoit/downloads/
打开网页,点击如下图所示按钮,即可下载:
AutoIT的安装
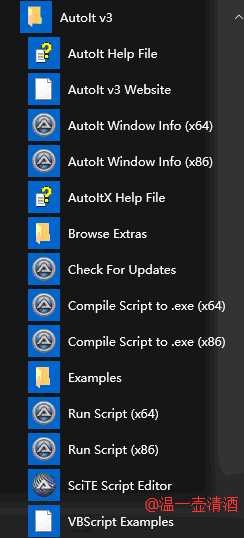
安装很简单,一路默认路径就好,安装成功后,在开始菜单可看到如下图所示界面:
使用AutoIT工具的步骤
1.AutoIT Window Info用来识别Windows控件,根据识别的控件信息编写脚本;x86为32位
2.SciTE Script Editor用来写脚本,并保存为au3格式
3.Complie Script to .exe, 将刚编写的脚本,编译成可执行文件;
4.编译后在java代码中中调用
想必介绍到这,或多或少有所了解了,对AutoIT工具下的功能点也清楚了,Run Script是运行脚本的,我们是要到java代码中调用,所以此处就略过了。
实例一
接下来就用一个实例来讲解下AutoIT工具的具体使用,实例功能是:把百度首页中的百度图片另存为到本地或任意磁盘
在做这个事情的时候,我们要知道,步骤是先要选中图片,并右击,选择另存为,然后输入文件名以及保存的位置,最后点击保存。人工操作鼠标很简单,但现在是要使用代码来实现该功能,可细化分为三步,如下:
1.使用Selenium功能弹出右键菜单
2.利用robot选择相关菜单
3.调用AutoIT实现另存为操作
4.到java代码中调用
实现第一步,在浏览器中定位到图片元素,代码如下:
WebElement img = driver.findElement(By.cssSelector("div#lg img"));
Actions action = new Actions(driver);
action.contextClick().perform();
实现第二步,模拟键盘操作,鼠标移到另存为处,使用robot对象,代码如下:
Robot robot = new Robot();
robot.keyPress(KeyEvent.VK_DOWN);
Thread.sleep(1000);
robot.keyPress(KeyEvent.VK_DOWN);
VK_DWON是操作按钮向下按一下的意思,因为另存为在右键菜单中的第二行,所以需要向下按两下实现
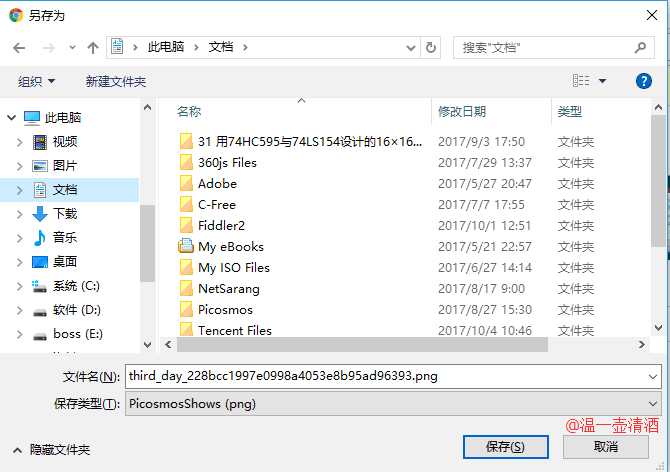
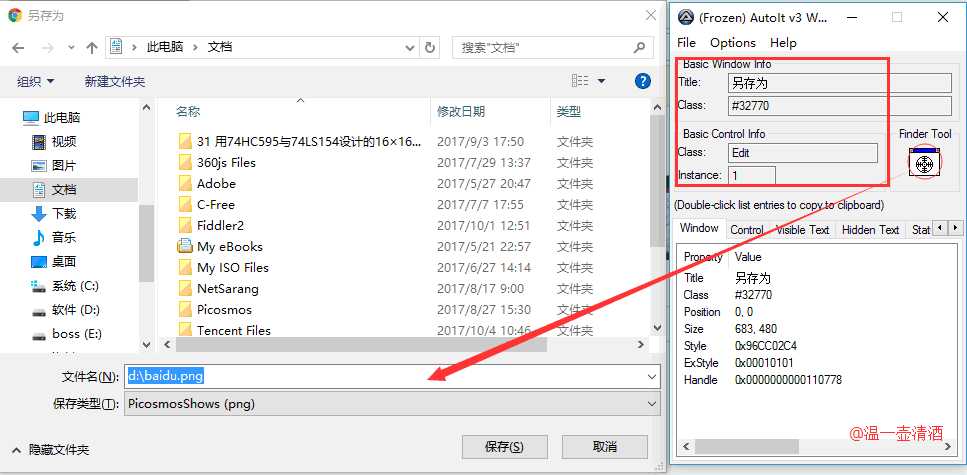
实现上述两步代码后,会弹出如下所示框,让输入文件名以及保存路径,该对话框已经是页面外的元素了,使用普通的定位时定不到了,所以就需要使用AutoIT工具来实现。
实现第三步,操作如下:
①打开autoit工具包下的AutoIT Window Info(x64)工具,版本按自己电脑系统来,界面如下所示:
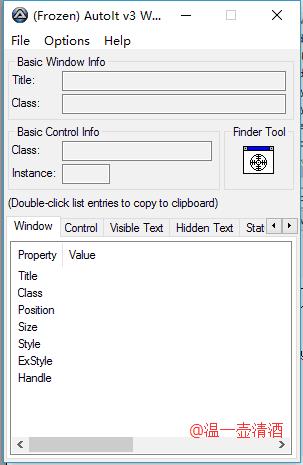
1.1鼠标点中Finder Tool并拖动到输入文件名处,操作如下所示,得到下图结果
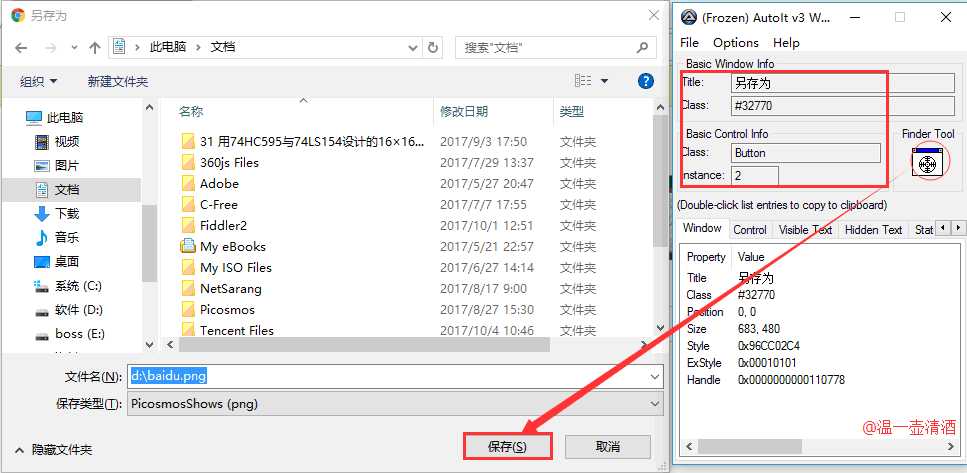
1.2重复上述定位步骤,定位保存按钮,结果如下图所示
②元素定位到了,接下来就是使用AutoIT工具包下的SciTE Script Editor写脚本,并保存为au3格式,注意:此工具中;表注释
根据定位到的参数值,写如下脚本:
ControlFocus("另存为", "","Edit1")
WinWait("[CLASS:#32770]","",10)
;文件路径
ControlSetText("另存为", "", "Edit1", "d:\\baidu.png")
Sleep(2000)
ControlClick("另存为", "","Button2")
代码解释:
第一行:ControlFocus ( "title", "窗口文本", controlID) 设置输入焦点到指定窗口的某个控件上;
第二行:WinWait ( "title题" , "窗口文本" , 超时时间 ) 暂停脚本的执行直至指定窗口存在(出现) 为止;
第三行:;表注释
第四行:ControlSetText ( "title", "窗口文本", controlID, "新文本" ) 修改指定控件的文本;
第五行:Sleep ( 延迟 ) 使脚本暂停指定时间段;
第六行:ControlClick ( "title", "窗口文本", 控件ID , 按钮 , 点击次数 ) 向指定控件发送鼠标点击命令;
其中, title即AutoIt Window Info识别出的Title字段, controlID即AutoItWindow Info识别出的Class和Instance的拼接, 如上图拼接后的结果应为:Button2。
③使用AutoIT工具包下的Complie Script to .exe工具把刚编写的脚本编译成可执行文件,操作如下:
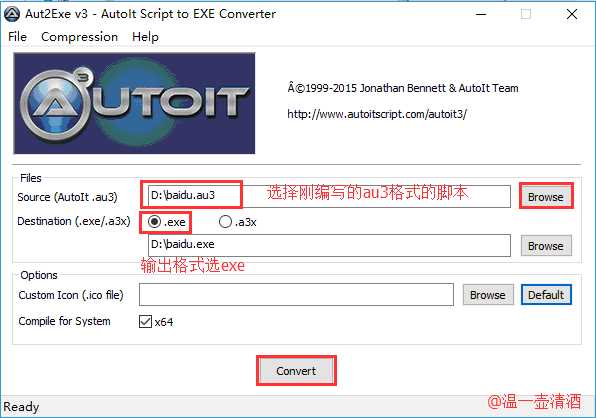
执行上步骤后,会出现baidu.exe可执行文件
第四步,到java代码中调用该可执行文件,操作代码如下:
Runtime.getRuntime().exec("d:/baidu.exe");
运行java代码,在定义的路径下会看到已保存的百度图片,如下所示:

整体代码实现如下,仅供参考:
 1 package com.ui.day1;
 2
 3 import java.awt.AWTException;
 4 import java.awt.Robot;
 5 import java.awt.event.KeyEvent;
 6
 7 import org.openqa.selenium.By;
 8 import org.openqa.selenium.WebDriver;
 9 import org.openqa.selenium.WebElement;
10 import org.openqa.selenium.chrome.ChromeDriver;
11 import org.openqa.selenium.interactions.Actions;
12
13 public class test_demo_autoit {
14
15     public static void main(String[] args) throws Exception {
16         System.setProperty("webdriver.chrome.driver", "C:\\\\Program Files (x86)\\\\Google\\\\Chrome\\\\Application\\\\chromedriver.exe");
17         WebDriver driver=new ChromeDriver();
18         driver.get("https://www.baidu.com/");
19         driver.manage().window().maximize();
20
21         WebElement move = driver.findElement(By.cssSelector("div#lg img"));
22         Actions action = new Actions(driver);
23         action.contextClick(move).perform();
24         Thread.sleep(2000);
25         Robot robot = new Robot();
26         robot.keyPress(KeyEvent.VK_DOWN);
27         Thread.sleep(1000);
28         robot.keyPress(KeyEvent.VK_DOWN);
29         Thread.sleep(1000);
30         robot.keyPress(KeyEvent.VK_ENTER);
31
32         Runtime.getRuntime().exec("d:/baidu.exe");
33
34
35
36     }
37
38 }
将百度首页中的图片另存为还有一个实现方法,不用robot对象,直接在AutoIT编写脚本中发送个V,因为选择另存为和按V是一样的作用,AutoIT编写脚本代码如下:
send("v")
Sleep(1000)
ControlFocus("另存为", "","Edit1")
WinWait("[CLASS:#32770]","",10)
ControlSetText("另存为", "", "Edit1", "d:\\baidu.png")
Sleep(2000)
ControlClick("另存为", "","Button2")
在java代码中实现如下,仅供参考:
 1 package com.ui.day1;
 2 import org.openqa.selenium.By;
 3 import org.openqa.selenium.WebDriver;
 4 import org.openqa.selenium.WebElement;
 5 import org.openqa.selenium.chrome.ChromeDriver;
 6 import org.openqa.selenium.interactions.Actions;
 7
 8 public class yihuqingjiu_test_demo_autoit1 {
 9
10     public static void main(String[] args) throws Exception {
11         System.setProperty("webdriver.chrome.driver", "C:\\\\Program Files (x86)\\\\Google\\\\Chrome\\\\Application\\\\chromedriver.exe");
12         WebDriver driver=new ChromeDriver();
13         driver.get("https://www.baidu.com/");
14         driver.manage().window().maximize();
15
16         WebElement move = driver.findElement(By.cssSelector("div#lg img"));
17         Actions action = new Actions(driver);
18         action.contextClick(move).perform();
19         Thread.sleep(2000);
20         Runtime.getRuntime().exec("d:/baidu.exe");
21
22     }
23
24 }
实例二
在禅道中上传附件,从实例一中已明白整个操作过程,因而在该实例中便只介绍下页面外元素定位以及java代码实现。
页面外元素定位,编写脚本代码如下所示:
ControlFocus("打开", "","Edit1")
WinWait("[CLASS:#32770]","",10)
ControlSetText("打开", "", "Edit1", "F:\\new\\UI\\测试.pdf")
Sleep(2000)
ControlClick("打开", "","Button1")
java代码实现如下,仅供参考:
 1 package com.ui.day1;
 2
 3 import org.openqa.selenium.By;
 4 import org.openqa.selenium.WebDriver;
 5 import org.openqa.selenium.chrome.ChromeDriver;
 6
 7 public class yihuqingjiu_test_demo_au {
 8
 9     public static void main(String[] args) throws Exception {
10         System.setProperty("webdriver.chrome.driver", "C:\\\\Program Files (x86)\\\\Google\\\\Chrome\\\\Application\\\\chromedriver.exe");
11         WebDriver driver=new ChromeDriver();
12         driver.get("http://127.0.0.1/zentao/my/");
13         driver.manage().window().maximize();
14         driver.findElement(By.id("account")).sendKeys("admin");
15         Thread.sleep(1000);
16         driver.findElement(By.name("password")).sendKeys("123456");
17         Thread.sleep(1000);
18         //点击登录
19         driver.findElement(By.xpath("//button[@id=‘submit‘]")).click();
20         Thread.sleep(2000);
21         //点击测试
22         driver.findElement(By.linkText("测试")).click();
23         Thread.sleep(1000);
24         //点击Bug
25         driver.findElement(By.linkText("Bug")).click();
26         Thread.sleep(1000);
27         //点击提交Bug
28         driver.findElement(By.xpath("//a[@href=‘/zentao/bug-create-5-0-moduleID=0.html‘]")).click();
29         Thread.sleep(1000);
30
31         //调用AutoIT工具
32         Runtime.getRuntime().exec("d:/chandao/chandao.exe");
33         Thread.sleep(5000);
34
35     }
36
37 }
需要注意的是,使用AutoIT工具时进行自动化脚本运行时,要把杀毒软件关掉,不然会影响,误判是病毒
robot对象模拟键盘按键操作
在前一篇中说到的键盘事件,是使用Actions类,但实现效果不明显,所以用Robot类,创建robot对象来实现,效果很好,话不多说,直接上代码。
代码实现如下,仅供参考:
 1 package com.ui.day1;
 2
 3 import java.awt.Robot;
 4 import java.awt.event.KeyEvent;
 5
 6 import org.openqa.selenium.By;
 7 import org.openqa.selenium.WebDriver;
 8 import org.openqa.selenium.WebElement;
 9 import org.openqa.selenium.chrome.ChromeDriver;
10
11 public class yihuqingjiu_test_robot_mouse {
12
13     public static void main(String[] args) throws Exception {
14         System.setProperty("webdriver.chrome.driver", "C:\\\\Program Files (x86)\\\\Google\\\\Chrome\\\\Application\\\\chromedriver.exe");
15         WebDriver driver=new ChromeDriver();
16         //浏览器要加载的url
17         driver.get("https://www.baidu.com");
18         //窗口最大化
19         driver.manage().window().maximize();
20
21         WebElement ctr1=driver.findElement(By.cssSelector("#kw"));
22         ctr1.sendKeys("12306");
23         Thread.sleep(1000);
24
25         //按下ctrl+F4
26         Robot robot = new Robot();
27         robot.keyPress(KeyEvent.VK_ALT);
28         robot.keyPress(KeyEvent.VK_F4);
29         robot.keyRelease(KeyEvent.VK_ALT);
30
31         //按下ctrl+shift+delete
32         Robot robot1 = new Robot();
33         robot1.keyPress(KeyEvent.VK_CONTROL);
34         robot1.keyPress(KeyEvent.VK_SHIFT);
35         robot1.keyPress(KeyEvent.VK_DELETE);
36         robot1.keyRelease(KeyEvent.VK_CONTROL);
37         robot1.keyRelease(KeyEvent.VK_SHIFT);
38         robot1.keyRelease(KeyEvent.VK_DELETE);//delete键可不释放,但ctrl+shift键必须释放
39
40     }
41
42 }
键盘事件实现时,需要值得注意的是,ctrl,shift、alt键需要释放,不然会影响后者操作。
按下操作的关键字是keyPress(),按键释放关键字是keyRelease()
本文仅代表作者观点,系作者@温一壶清酒发表。转载请注明出处:http://www.cnblogs.com/hong-fithing/
以上是关于UI自动化测试AutoIT工具使用和robot对象模拟键盘按键操作的主要内容,如果未能解决你的问题,请参考以下文章
Robot Framework作者建议怎么选择自动化测试框架