高可用OpenStack(Queen版)集群-16.Nova集成Ceph
Posted netonline
tags:
篇首语:本文由小常识网(cha138.com)小编为大家整理,主要介绍了高可用OpenStack(Queen版)集群-16.Nova集成Ceph相关的知识,希望对你有一定的参考价值。
参考文档:
- Install-guide:https://docs.openstack.org/install-guide/
- OpenStack High Availability Guide:https://docs.openstack.org/ha-guide/index.html
- 理解Pacemaker:http://www.cnblogs.com/sammyliu/p/5025362.html
二十.Nova集成Ceph
1. 配置ceph.conf
# 如果需要从ceph rbd中启动虚拟机,必须将ceph配置为nova的临时后端;
# 推荐在计算节点的配置文件中启用rbd cache功能;
# 为了便于故障排查,配置admin socket参数,这样每个使用ceph rbd的虚拟机都有1个socket将有利于虚拟机性能分析与故障解决;
# 相关配置只涉及全部计算节点ceph.conf文件的[client]与[client.cinder]字段,以compute01节点为例
[[email protected] ~]# vim /etc/ceph/ceph.conf
[client]
rbd cache = true
rbd cache writethrough until flush = true
admin socket = /var/run/ceph/guests/$cluster-$type.$id.$pid.$cctid.asok
log file = /var/log/qemu/qemu-guest-$pid.log
rbd concurrent management ops = 20

[client.cinder]
keyring = /etc/ceph/ceph.client.cinder.keyring

# 创建ceph.conf文件中指定的socker与log相关的目录,并更改属主
[[email protected] ~]# mkdir -p /var/run/ceph/guests/ /var/log/qemu/
[[email protected] ~]# chown qemu:libvirt /var/run/ceph/guests/ /var/log/qemu/
2. 配置nova.conf
# 在全部计算节点配置nova后端使用ceph集群的vms池,以compute01节点为例
[[email protected] ~]# vim /etc/nova/nova.conf
[libvirt]
images_type = rbd
images_rbd_pool = vms
images_rbd_ceph_conf = /etc/ceph/ceph.conf
rbd_user = cinder
# uuid前后一致
rbd_secret_uuid = 10744136-583f-4a9c-ae30-9bfb3515526b
disk_cachemodes="network=writeback"
live_migration_flag="VIR_MIGRATE_UNDEFINE_SOURCE,VIR_MIGRATE_PEER2PEER,VIR_MIGRATE_LIVE,VIR_MIGRATE_PERSIST_DEST,VIR_MIGRATE_TUNNELLED"
# 禁用文件注入
inject_password = false
inject_key = false
inject_partition = -2
# 虚拟机临时root磁盘discard功能,”unmap”参数在scsi接口类型磁盘释放后可立即释放空间
hw_disk_discard = unmap
# 原有配置
virt_type=kvm

# 变更配置文件,重启计算服务
[[email protected] ~]# systemctl restart libvirtd.service openstack-nova-compute.service
[[email protected] ~]# systemctl status libvirtd.service openstack-nova-compute.service
3. 配置live-migration
1)修改/etc/libvirt/libvirtd.conf
# 在全部计算节点操作,以compute01节点为例;
# 以下给出libvirtd.conf文件的修改处所在的行num
[[email protected] ~]# egrep -vn "^$|^#" /etc/libvirt/libvirtd.conf
# 取消以下三行的注释
22:listen_tls = 0
33:listen_tcp = 1
45:tcp_port = "16509"
# 取消注释,并修改监听端口
55:listen_addr = "172.30.200.41"
# 取消注释,同时取消认证
158:auth_tcp = "none"
2)修改/etc/sysconfig/libvirtd
# 在全部计算节点操作,以compute01节点为例;
# 以下给出libvirtd文件的修改处所在的行num
[[email protected] ~]# egrep -vn "^$|^#" /etc/sysconfig/libvirtd
# 取消注释
9:LIBVIRTD_ARGS="--listen"
3)设置iptables
# live-migration时,源计算节点主动连接目的计算节点tcp16509端口,可以使用”virsh -c qemu+tcp://{node_ip or node_name}/system”连接目的计算节点测试;
# 迁移前后,在源目计算节点上的被迁移instance使用tcp49152~49161端口做临时通信;
# 因虚拟机已经启用iptables相关规则,此时切忌随意重启iptables服务,尽量使用插入的方式添加规则;
# 同时以修改配置文件的方式写入相关规则,切忌使用”iptables saved”命令;
# 在全部计算节点操作,以compute01节点为例
[[email protected] ~]# iptables -I INPUT -p tcp -m state --state NEW -m tcp --dport 16509 -j ACCEPT
[[email protected] ~]# iptables -I INPUT -p tcp -m state --state NEW -m tcp --dport 49152:49161 -j ACCEPT
4)重启服务
# libvirtd与nova-compute服务都需要重启
[[email protected] ~]# systemctl restart libvirtd.service openstack-nova-compute.service

# 查看服务
[[email protected] ~]# netstat -tunlp | grep 16509

4. 验证
如果使用ceph提供的volume做启动盘,即虚拟机运行镜像文件存放在共享存储上,此时可以方便地进行live-migration。
1)创建基于ceph存储的bootable存储卷
# 当nova从rbd启动instance时,镜像格式必须是raw格式,否则虚拟机在启动时glance-api与cinder均会报错;
# 首先进行格式转换,将*.img文件转换为*.raw文件
[[email protected] ~]# qemu-img convert -f qcow2 -O raw ~/cirros-0.3.5-x86_64-disk.img ~/cirros-0.3.5-x86_64-disk.raw

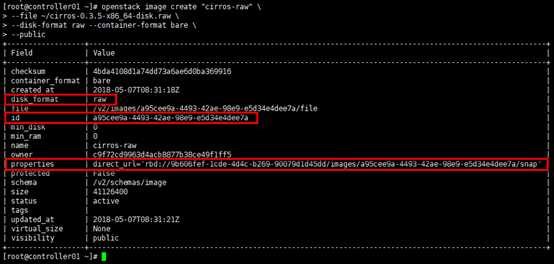
# 生成raw格式镜像
[[email protected] ~]# openstack image create "cirros-raw"
--file ~/cirros-0.3.5-x86_64-disk.raw --disk-format raw --container-format bare --public

# 使用新镜像创建bootable卷
[[email protected] ~]# cinder create --image-id a95cee9a-4493-42ae-98e9-e5d34e4dee7a --volume-type ceph --name ceph-bootable1 2

# 查看新创建的bootable卷
[[email protected] ~]# cinder list

# 从基于ceph后端的volumes新建实例;
# “--boot-volume”指定具有”bootable”属性的卷,启动后,虚拟机运行在volumes卷
[[email protected] ~]# nova boot --flavor m1.tiny
 --boot-volume db0f83c0-14f7-4548-8807-4b1f593630a4  --nic net-id=91e78b9c-cfcd-4af2-851a-a27839edf571  --security-group default  cirros-cephvolumes-instance1
2)从ceph rbd启动虚拟机
# --nic:net-id指网络id,非subnet-id;
# 最后“cirros-cephrbd-instance1”为instance名
[[email protected] ~]# nova boot --flavor m1.tiny --image cirros-raw --nic net-id=91e78b9c-cfcd-4af2-851a-a27839edf571 --security-group default cirros-cephrbd-instance1

# 查询生成的instance
[[email protected] ~]# nova list

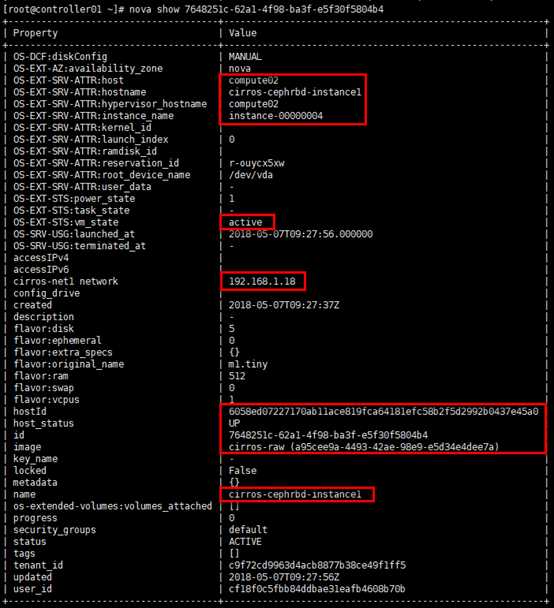
# 查看生成的instance的详细信息
[[email protected] ~]# nova show 7648251c-62a1-4f98-ba3f-e5f30f5804b4

# 验证是否从ceph rbd启动
[[email protected] ~]# rbd ls vms

3)对rbd启动的虚拟机进行live-migration
# 使用”nova show 7648251c-62a1-4f98-ba3f-e5f30f5804b4”得知从rbd启动的instance在迁移前位于compute02节点;
# 或使用”nova hypervisor-servers compute02”进行验证;
[[email protected] ~]# nova live-migration cirros-cephrbd-instance1 compute01

# 迁移过程中可查看状态
[[email protected] ~]# nova list

# 迁移完成后,查看instacn所在节点;
# 或使用”nova show 7648251c-62a1-4f98-ba3f-e5f30f5804b4”命令查看”hypervisor_hostname”
[[email protected] ~]# nova hypervisor-servers compute02
[[email protected] ~]# nova hypervisor-servers compute01

以上是关于高可用OpenStack(Queen版)集群-16.Nova集成Ceph的主要内容,如果未能解决你的问题,请参考以下文章