每天学点Shiro-登录功能demo
Posted
tags:
篇首语:本文由小常识网(cha138.com)小编为大家整理,主要介绍了每天学点Shiro-登录功能demo相关的知识,希望对你有一定的参考价值。
1. 用shiro实现登录和登出的接口
@RequestMapping(value = "/login.do",method = RequestMethod.POST)
    public String login(@RequestParam("username") String username,
                        @RequestParam("password") String password){

        Subject subject = SecurityUtils.getSubject();
        if(!subject.isAuthenticated()){
            AuthenticationToken token = new UsernamePasswordToken(username,password) ;
            try {
                subject.login(token);
            } catch (AuthenticationException e) {
                e.printStackTrace();
                System.out.println("登录失败:" + e.getMessage());
            }
        }

        return "redirect:/page/index.do" ;
    }

    @RequestMapping("/logout.do")
    public String logout(){
        Subject subject = SecurityUtils.getSubject();
        subject.logout();
        return "redirect:/login.jsp" ;
    }
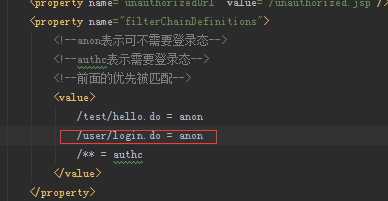
2. 在shiro配置中添加对登录接口的匿名访问

3. 自定义realm对象
3.1 继承AuthenticatingRealm 对象
3.2 模拟从db中读取的凭证为"123456"
public class MyRealm extends AuthenticatingRealm {

    @Override
    protected AuthenticationInfo doGetAuthenticationInfo(AuthenticationToken authenticationToken)
            throws AuthenticationException {

        System.out.println("=========>MyRealm doGetAuthenticationInfo");
        UsernamePasswordToken token = (UsernamePasswordToken) authenticationToken;
        String username = token.getUsername() ;

        if("unknown".equals(username)){
            throw new UnknownAccountException("用户名不存在") ;
        }

        Object principal = username ;
        Object credentials= "123456" ;
        String realmName = getName() ;

        AuthenticationInfo authenticationInfo = new SimpleAuthenticationInfo(principal,credentials,realmName) ;

        return authenticationInfo;
    }
}
4. 大概验证流程总结
4.1 由接口获取到用户提交过来的用户名和密码,并产生token对象
4.2 由realm根据token对象中的用户名获取到db中保存的该对象的数据,并将该数据返回给shiro
4.3 由shiro对上面两个步骤分别得到的数据进行比对
4.4 返回比对结果
以上是关于每天学点Shiro-登录功能demo的主要内容,如果未能解决你的问题,请参考以下文章