unity Lighting总结
Posted
tags:
篇首语:本文由小常识网(cha138.com)小编为大家整理,主要介绍了unity Lighting总结相关的知识,希望对你有一定的参考价值。
上一篇博客已经详细的介绍GI了,接下来我们讲点实际的,怎么烘焙场景及注意事项。
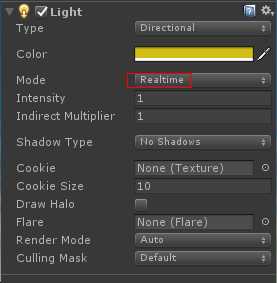
一、Light
| Property: | Function: |
|---|---|
| Type | 当前灯光的类型。有四种类型:Directional, Point, Spot and Area。 |
| Range | 灯光照射的距离 (只有Point和Spot光源有这个属性). |
| Spot Angle | 聚光灯照射范围所张开的角度(Spot light only). |
| Color | 光的颜色 |
| Mode | 指定光的模式. 三种模式 Realtime, Mixed and Baked。 |
| Intensity | 光照强度 |
| Indirect Multiplier | 改变间接光的强度,间接光光线从一个对象反弹到另一个对象。如果值大于1则反射光将变得更亮,小于1反射光暗淡 |
| Shadow Type | 阴影类型:Hard Shadows, Soft Shadows, or no shadows 。 |
| Baked Shadow Angle | 烘焙时,软化边缘阴影,让他们看起来更自然。(Directional ) |
| Baked Shadow Radius | 烘焙时,软化边缘阴影,让他们看起来更自然。(Point or Spot) |
| Realtime Shadows | 实时阴影。 |
| Strength | Use the slider to control how dark the shadows cast by this Light are, represented by a value between 0 and 1. This is set to 1 by default. |
| Resolution | Control the rendered resolution of shadow maps. A higher resolution increases the fidelity of shadows, but requires more GPU time and memory usage. |
| Bias | Use the slider to control the distance at which shadows are pushed away from the light, defined as a value between 0 and 2. This is useful for avoiding false self-shadowing artifacts. See Shadow mapping and the bias property for more information. This is set to 0.05 by default. |
| Normal Bias | Use the slider to control distance at which the shadow casting surfaces are shrunk along the surface normal, defined as a value between 0 and 3. This is useful for avoiding false self-shadowing artifacts. See documentation on Shadow mapping and the bias property for more information. This is set to 0.4 by default. |
| Near Plane | Use the slider to control the value for the near clip plane when rendering shadows, defined as a value between 0.1 and 10. This value is clamped to 0.1 units or 1% of the light’s Range property, whichever is lower. This is set to 0.2 by default. |
| Cookie | Specify a Texture mask through which shadows are cast (for example, to create silhouettes, or patterned illumination for the Light). |
| Draw Halo | Tick this box to draw a spherical Halo of light with a diameter equal to the Range value. You can also use the Halo component to achieve this. Note that the Halo component is drawn in addition to the halo from the Light component, and that the Halo component’s Size parameter determines its radius, not its diameter. |
| Flare | If you want to set a Flare to be rendered at the Light’s position, place an Asset in this field to be used as its source. |
| Render Mode | Use this drop-down to set the rendering priority of the selected Light. This can affect lighting fidelity and performance (see Performance Considerations, below). |
| Auto | The rendering method is determined at run time, depending on the brightness of nearby lights and the current Quality Settings. |
| Important | The light is always rendered at per-pixel quality. Use Important mode only for the most noticeable visual effects (for example, the headlights of a player’s car). |
| Not Important | The light is always rendered in a faster, vertex/object light mode. |
| Culling Mask | Use this to selectively exclude groups of objects from being affected by the Light. For more information, see Layers. |

以上是关于unity Lighting总结的主要内容,如果未能解决你的问题,请参考以下文章
Unity Lighting - Lighting overview 照明概述
Unity Lighting - Light Probes 光照探针
unity 中Deferred Lighting (延迟光照)