数据结构第二部分:视图
Posted wpengch1
tags:
篇首语:本文由小常识网(cha138.com)小编为大家整理,主要介绍了数据结构第二部分:视图相关的知识,希望对你有一定的参考价值。
注:学习使用,禁止转载
构建我们的视图:ChatApp顶层组件
让我们将目光转向我们的引用,并实现视图组件。
:fa-info-circle:为了清晰和节省空间,在接下来的代码中我们不会包含import语句、css和其他一些样例代码。如果你关注这些细节,打开我们的示例代码,里面包含了运行应用程序的一切。
第一件事情就是去创建一个叫chat-app的顶层组件。
就像我们在前面讨论的那样,这个页面可以分解为三个顶层组件。
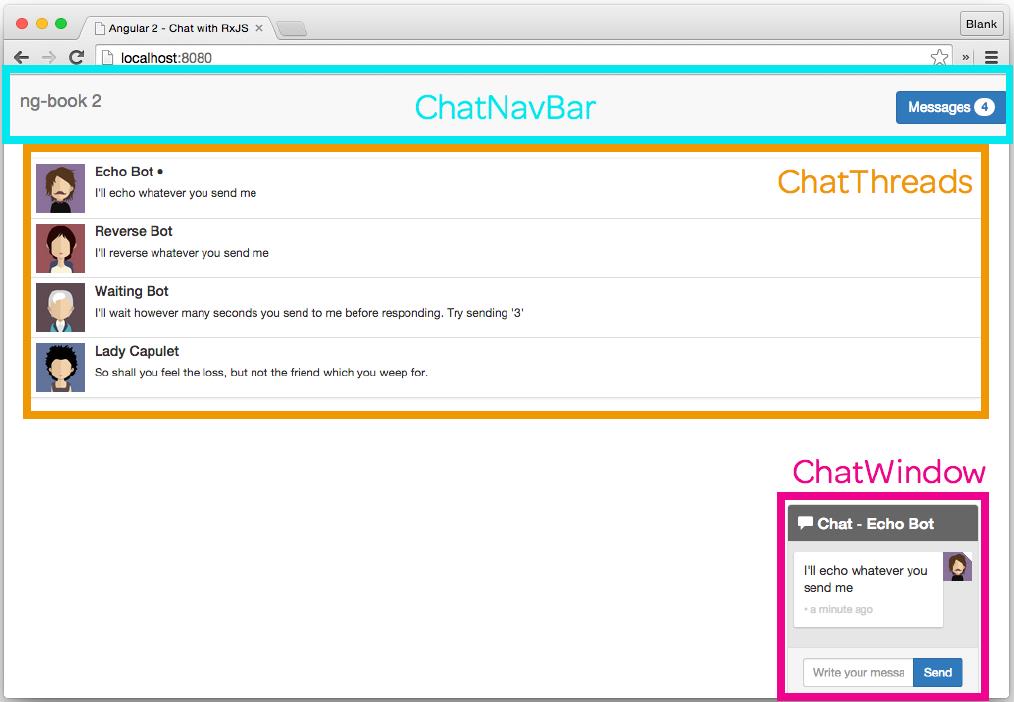
- ChatNavBar:包含未读消息数
- ChatThreads:展示一个thread的列表,信息为头像和最近的消息。
- ChatWindow:展示跟当前thread聊天的消息列表和输入框
这是我们组件的样例代码:
code/rxjs/chat/app/ts/app.ts
/**
 * Created by wpc17 on 2016-6-1-0001.
 */
@Component(
    selector: 'chat-app',
    directives: [ChatNavBar,
        ChatThreads,
        ChatWindow],
    template: `
 <div>
 <nav-bar></nav-bar>
 <div class="container">
 <chat-threads></chat-threads>
 <chat-window></chat-window>
 </div>
 </div>
 `
)
class ChatApp
    constructor(public messagesService:MessagesService,
                public threadsService:ThreadsService,
                public userService:UserService)
        ChatExampleData.init(messagesService, threadsService, userService);


bootstrap(ChatApp, [servicesInjectables, utilInjectables]);
看构造器,我们注入了三个服务,MessagesService、ThreadsService和UserService。我们将会使用这三个服务初始化我们的应用程序。
ChatThreads组件
接下来,让我们构建我们的thread列表,ChatThreads组件。
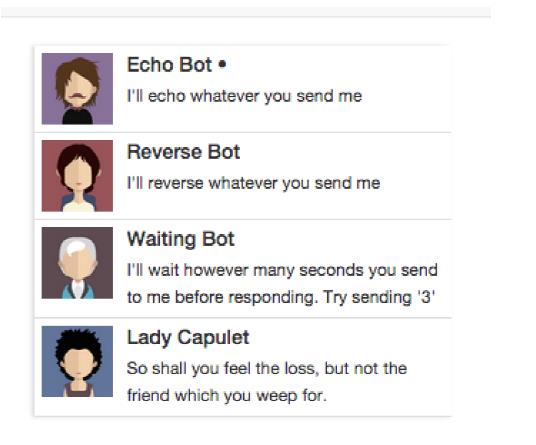
我们的selector是很容易理解,就叫chat-threads
code/rxjs/chat/app/ts/components/ChatThreads.ts
@Component(
   selector: 'chat-threads',
ChatThreads控制器
让我们看看ChatThreads控制器。
code/rxjs/chat/app/ts/components/ChatThreads.ts
class ChatThread implements OnInit
  thread: Thread;

  constructor(public threadsService: ThreadsService)
        this.thread = threadsService.orderedThreads;
这里,我们注入了ThreadsService,并且将其orderedThreads保存了下来。
ChatThreads的模板
让我们看看ChatThreads的模板和它的配置。
code/rxjs/chat/app/ts/components/ChatThreads.ts
@Component(
    selector: 'chat-threads',
    directives: [ChatThread],
    changeDetection: ChangeDetectionStrategy.OnPush,
    template: `
    <!-- conversations -->
    <div class="row">
        <div class="conversation-wrap">

            <chat-thread
            *ngFor="let thread of threads | async"
            [thread]="thread">
            </chat-thread>

        </div>
    </div>
`
)
这里有三个事情需要注意:异步ngFor,ChangeDetectionStrategy和ChatThread。
ChatThread是一个指令,用于显示一个单一的thread,我们接下来会定义。
NgFor迭代threads,并且传输thread给ChatThread。但是你可能注意到了async 管道。
async是用AsyncPipe实现的,它让我们在view中使用RxJS Observable。异步的意义在于,它可以使我们使用异步模式就像使用同步模式一样。这个真的特别方便并且真正的酷。
在我们的组件中,我们标注了特定的changeDetection.。angular2有一个灵活和高效脏检查系统。这个好处之一就是当我们组件有一个不可变数据或者可观察的数据的时候,我们可以给脏检测提示,这个使得我们的应用程序非常高效。
在这个例子中,angular订阅了threads而不是去观察Threads,当更新的时候,会发射一个事件。
下面是我们的ChatThreads完整代码:
code/rxjs/chat/app/ts/components/ChatThreads.ts
@Component(
  selector: 'chat-threads',
  directives: [ChatThread],
  changeDetection: ChangeDetectionStrategy.OnPush,
  template: `
    <!-- conversations -->
    <div class="row">
      <div class="conversation-wrap">

        <chat-thread
             *ngFor="let thread of threads | async"
             [thread]="thread">
        </chat-thread>

      </div>
    </div>
  `
)
export class ChatThreads
  threads: Observable<any>;

  constructor(public threadsService: ThreadsService)
    this.threads = threadsService.orderedThreads;
单个ChatThread组件
让我们看看ChatThread组件,它用于显示单个的thread。
code/rxjs/chat/app/ts/components/ChatThreads.ts
@Component(
   inputs: ['thread'],
   selector: 'chat-thread',
我们会回来看模板,但是先让我们看看组件类。
ChatThread控制器和ngOninit
code/rxjs/chat/app/ts/components/ChatThreads.ts
class ChatThread implements OnInit
  thread: Thread;
  selected: boolean = false;

  constructor(public threadsService: ThreadsService)


  ngOnInit(): void
    this.threadsService.currentThread
      .subscribe( (currentThread: Thread) =>
        this.selected = currentThread &&
          this.thread &&
          (currentThread.id === this.thread.id);
      );


  clicked(event: any): void
    this.threadsService.setCurrentThread(this.thread);
    event.preventDefault();
注意,这里我们实现了一个新的接口:OnInit。angular组件可以监听组件的特定生命周期事件。更多内容参见组件一章。
在这个例子中,因为我们实现了OnInit。当组件第一次检查到变化的时候ngOnInit会被调用。
我们使用ngInit的关键原因是thread属性在我们的构造器中不可用。
就像你可到的,上面的ngOnInit中我们订阅了threadService.currentThread,如果currentThread匹配该组件的thread属性,就将selected设置为true,相反,设置为false。
我们也添加一个事件处理函数:clicked。这个就是当选择当前thread的时候调用的。在我们下面的template中,我们会绑定clicked事件。如果我们接收到clicked事件,我们会告诉threadService,我们想要设置该组件的thread为current thread。
ChatThread模板
下面是我们的ChatThread模板
code/rxjs/chat/app/ts/components/ChatThreads.ts
@Component(
inputs: ['thread'],
selector: 'chat-thread',
template: `
<div class="media conversation">
<div class="pull-left">
<img class="media-object avatar"
src="thread.avatarSrc">
</div>
<div class="media-body">
<h5 class="media-heading contact-name">thread.name
<span *ngIf="selected">•</span>
</h5>
<small class="message-preview">thread.lastMessage.text</small>
</div>
<a (click)="clicked($event)" class="div-link">Select</a>
</div>
`
)需要注意的是,我们绑定了(click)事件去调用我们定义的clicked,并且传递了$event参数进去,这个angular提供的特殊对象,它描述event对象的内容。我们在clicked中调用event.preventDefault(),它阻止事件的继续传递。
ChatThread完整代码
code/rxjs/chat/app/ts/components/ChatThreads.ts
@Component(
inputs: ['thread'],
selector: 'chat-thread',
template: `
<div class="media conversation">
<div class="pull-left">
<img class="media-object avatar"
src="thread.avatarSrc">
</div>
<div class="media-body">
<h5 class="media-heading contact-name">thread.name
<span *ngIf="selected">•</span>
</h5>
<small class="message-preview">thread.lastMessage.text</small>
</div>
<a (click)="clicked($event)" class="div-link">Select</a>
</div>
`
)
class ChatThread implements OnInit
thread: Thread;
selected: boolean = false;
constructor(public threadsService: ThreadsService)
ngOnInit(): void
this.threadsService.currentThread
.subscribe( (currentThread: Thread) =>
this.selected = currentThread &&
this.thread &&
(currentThread.id === this.thread.id);
);
clicked(event: any): void
this.threadsService.setCurrentThread(this.thread);
event.preventDefault();
ChatWindow组件
在我们的应用程序中,ChatWindow组件是最复杂的。
我们先从配置开始。
code/rxjs/chat/app/ts/components/ChatWindow.ts
@Component(
  selector: 'chat-window',
  directives: [ChatMessage,
               FORM_DIRECTIVES],
  changeDetection: ChangeDetectionStrategy.OnPush,
ChatWindow组件类属性
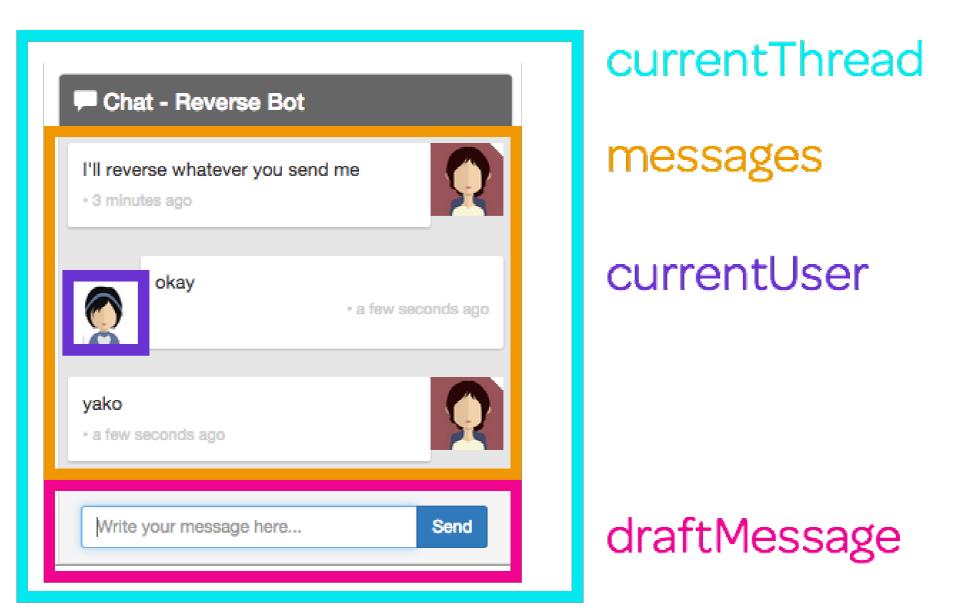
ChatWindow组件类有四个属性
code/rxjs/chat/app/ts/components/ChatWindow.ts
export class ChatWindow implements OnInit
  messages: Observable<any>;
  currentThread: Thread;
  draftMessage: Message;
  currentUser: User;
下面是每一个属性使用的地方:
在我们的构造器中会注入四个东西:
code/rxjs/chat/app/ts/components/ChatWindow.ts
constructor(public messagesService: MessagesService,
              public threadsService: ThreadsService,
              public userService: UserService,
              public el: ElementRef)
前面三个是我们的服务,第四个el是一个ElementRef。它让我们可以去访问host的DOM元素。当我们接收或者发送新的消息的时候,它让我们可以滚动到底部。
:fa-info-circle:记住,当我们使用public messagesService的时候,它不只是传递了一个参数进来,而且在我们的类中定义了一个变量,这个变量名字就是messageService,在这个类中,我们可以使用this.messageService访问它。
ChatWindow的ngOnInit
我们将会在ngOnInit中初始化我们的组件,主要的事情就是去订阅会影响我们属性的observables。
code/rxjs/chat/app/ts/components/ChatWindow.ts
ngOnInit(): void
    this.messages = this.threadsService.currentThreadMessages;

    this.draftMessage = new Message();
首先,我们将threadsService.currentThreadMessages保存到messages中,接着创建一个默认的message-draftMessage。
当我们发送一个新的message的时候,我们要确保Message保存了发送thread的ID。发送的thread总是currentThread,所以让我们保存一个当前线程的引用。
code/rxjs/chat/app/ts/components/ChatWindow.ts
this.threadsService.currentThread.subscribe(
      (thread: Thread) =>
        this.currentThread = thread;
      );
我们也希望发送新消息来自于当前用户,所以,我们保存一个当前用户。
code/rxjs/chat/app/ts/components/ChatWindow.ts
this.userService.currentUser
      .subscribe(
        (user: User) =>
          this.currentUser = user;
        );
ChatWindow发送消息
让我们实现一个sendMessage方法,它会发送一个新的消息。
code/rxjs/chat/app/ts/components/ChatWindow.ts
sendMessage(): void
    let m: Message = this.draftMessage;
    m.author = this.currentUser;
    m.thread = this.currentThread;
    m.isRead = true;
    this.messagesService.addMessage(m);
    this.draftMessage = new Message();
sendMessage中,我们首先获取空白的draftMessage。然后设置author和thread,由于是我们自己发送出去的,所以这个消息总是已经读了的,所以isRead为true。
注意,这里并没有设置draftMessage的text,这是因为我们在我们的view中已经绑定了。
然后我们将更新的message添加到messagesService中去,重新分配一个空白message给draftMessage。
ChatWindow的onEnter
在我们的app中,我们希望用两种方式去发送消息:
- 用户点击send按钮
- 用户单击回车键(enter键)
让我们定义一个函数去处理这个事件:
code/rxjs/chat/app/ts/components/ChatWindow.ts
onEnter(event: any): void
    this.sendMessage();
    event.preventDefault();
注意,也调用了event.preventDefault(),阻止事件继续传递。
ChatWindow的scrollToBottom函数
当我们发送一个消息或者有一个新的消息来的时候,我们希望ChatWindow滚动到底部,以便能够看到最新的消息。为了做到这一点,我们设置我们host元素的scrollTop属性。
code/rxjs/chat/app/ts/components/ChatWindow.ts
scrollToBottom(): void
    let scrollPane: any = this.el
      .nativeElement.querySelector('.msg-container-base');
    scrollPane.scrollTop = scrollPane.scrollHeight;
现在,我们已经有了一个滚动到底部的函数了,接下来就是在合适的时候调用它。回到ngOnInit,让我们订阅currentThreadMessages,当currentThreadMessages更新的时候,调用scrollToBottom。
code/rxjs/chat/app/ts/components/ChatWindow.ts
this.messages
      .subscribe(
        (messages: Array<Message>) =>
          setTimeout(() =>
            this.scrollToBottom();
          );
        );
:fa-question:为什么要调用setTImeout呢?如果我们立即调用scrollToBottom,这个时候新的message还没有渲染,导致看不到效果。setTimeout的意思是完成当前的队列之后再执行。也就是前面的操作会完成之后再调用scrollToBottom,也就保证了message已经渲染完成。
ChatWindow的模板
code/rxjs/chat/app/ts/components/ChatWindow.ts
@Component(
  selector: 'chat-window',
  directives: [ChatMessage,
               FORM_DIRECTIVES],
  changeDetection: ChangeDetectionStrategy.OnPush,
  template: `
    <div class="chat-window-container">
      <div class="chat-window">
        <div class="panel-container">
          <div class="panel panel-default">

            <div class="panel-heading top-bar">
              <div class="panel-title-container">
                <h3 class="panel-title">
                  <span class="glyphicon glyphicon-comment"></span>
                  Chat - currentThread.name
                </h3>
              </div>
              <div class="panel-buttons-container">
                <!-- you could put minimize or close buttons here -->
              </div>
            </div>
上面定义了头部,接下来显示message列表。
code/rxjs/chat/app/ts/components/ChatWindow.ts
<div class="panel-body msg-container-base">
              <chat-message
                   *ngFor="let message of messages | async"
                   [message]="message">
              </chat-message>
            </div>
最后,定义输入框和关闭按钮
code/rxjs/chat/app/ts/components/ChatWindow.ts
<div class="panel-footer">
              <div class="input-group">
                <input type="text"
                       class="chat-input"
                       placeholder="Write your message here..."
                       (keydown.enter)="onEnter($event)"
                       [(ngModel)]="draftMessage.text" />
                <span class="input-group-btn">
                  <button class="btn-chat"
                     (click)="onEnter($event)"
                     >Send</button>
                </span>
              </div>
            </div>

          </div>
        </div>
      </div>
    </div>
我们对输入框的两个部分有兴趣,1. keydown.enter 和2.[(ngModel)]
处理键盘事件
angular提供了一个直接的方式去处理键盘事件,直接绑定事件处理函数到相应的事件上。(keydown.keys)=”function($event)”的方式。
code/rxjs/chat/app/ts/components/ChatWindow.ts
<input type="text"
                       class="chat-input"
                       placeholder="Write your message here..."
                       (keydown.enter)="onEnter($event)"
                       [(ngModel)]="draftMessage.text" />
使用ngModel
正如我们前面讲到的,angular没有一个双向绑定的通用模型,但是在视图与组件类属性保存同步是非常有用的。只要副作用保持在组件内部,这个对于同步属性与视图是非常好的。
在这个例子中,我们利用了input的值与draftMessage.text保持一个同步,意思就是说,当输入到input中时,draftMessage.text会跟着改变,同理,当我们更新draftMessage.text时,input也会改变。
code/rxjs/chat/app/ts/components/ChatWindow.ts
<input type="text"
                       class="chat-input"
                       placeholder="Write your message here..."
                       (keydown.enter)="onEnter($event)"
                       [(ngModel)]="draftMessage.text" />
点击send
当点击send的时候,发送消息:
code/rxjs/chat/app/ts/components/ChatWindow.ts
<span class="input-group-btn">
                  <button class="btn-chat"
                     (click)="onEnter($event)"
                     >Send</button>
                </span>
ChatWindow全部代码
code/rxjs/chat/app/ts/components/ChatWindow.ts
@Component(
    selector: 'chat-window',
    directives: [ChatMessage,
        FORM_DIRECTIVES],
    changeDetection: ChangeDetectionStrategy.OnPush,
    template: `
    <div class="chat-window-container">
      <div class="chat-window">
        <div class="panel-container">
          <div class="panel panel-default">

            <div class="panel-heading top-bar">
              <div class="panel-title-container">
                <h3 class="panel-title">
                  <span class="glyphicon glyphicon-comment"></span>
                  Chat - currentThread.name
                </h3>
              </div>
              <div class="panel-buttons-container">
                <!-- you could put minimize or close buttons here -->
              </div>
            </div>

            <div class="panel-body msg-container-base">
              <chat-message
                   *ngFor="let message of messages | async"
                   [message]="message">
              </chat-message>
            </div>

            <div class="panel-footer">
              <div class="input-group">
                <input type="text"
                       class="chat-input"
                       placeholder="Write your message here..."
                       (keydown.enter)="onEnter($event)"
                       [(ngModel)]="draftMessage.text" />
                <span class="input-group-btn">
                  <button class="btn-chat"
                     (click)="onEnter($event)"
                     >Send</button>
                </span>
              </div>
            </div>

          </div>
        </div>
      </div>
    </div>
  `
)
export class ChatWindow implements OnInit
    messages:Observable<any>;
    currentThread:Thread;
    draftMessage:Message;
    currentUser:User;

    constructor(public messagesService:MessagesService,
                public threadsService:ThreadsService,
                public userService:UserService,
                public el:ElementRef)


    ngOnInit():void
        this.messages = this.threadsService.currentThreadMessages;

        this.draftMessage = new Message();

        this.threadsService.currentThread.subscribe(
            (thread:Thread) =>
                this.currentThread = thread;
            );

        this.userService.currentUser
            .subscribe(
                (user:User) =>
                    this.currentUser = user;
                );

        this.messages
            .subscribe(
                (messages:Array<Message>) =>
                    setTimeout(() =>
                        this.scrollToBottom();
                    );
                );


    onEnter(event:any):void
        this.sendMessage();
        event.preventDefault();


    sendMessage():void
        let m:Message = this.draftMessage;
        m.author = this.currentUser;
        m.thread = this.currentThread;
        m.isRead = true;
        this.messagesService.addMessage(m);
        this.draftMessage = new Message();


    scrollToBottom():void
        let scrollPane:any = this.el
            .nativeElement.querySelector('.msg-container-base');
        scrollPane.scrollTop = scrollPane.scrollHeight;
ChatMessage组件
ChatMessage渲染一条信息
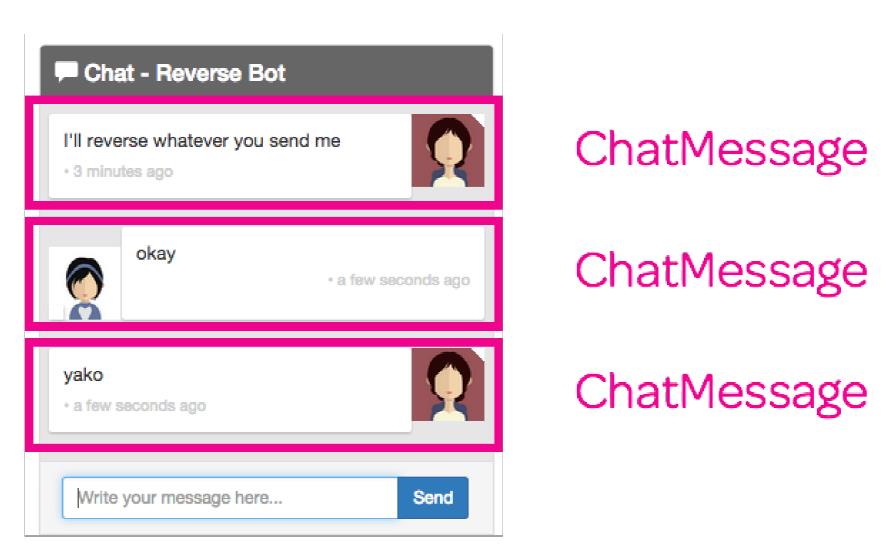
这个组件容易理解。这里的主要逻辑就是根据消息的来源绘制视图。
我们从@Component开始
code/rxjs/chat/app/ts/components/ChatWindow.ts
@Component(
    inputs: ['message'],
    selector: 'chat-message',
    pipes: [FromNowPipe],
设置incoming
记住,每一个ChatMessage都属于一个Message,所以在ngOnInit中我们订阅currentUser,并且如果不是被当前用户发送的设置为incoming。
code/rxjs/chat/app/ts/components/ChatWindow.ts
export class ChatMessage implements OnInit
    message:Message;
    currentUser:User;
    incoming:boolean;

    constructor(public userService:UserService)


    ngOnInit():void
        this.userService.currentUser
            .subscribe(
                (user:User) =>
                    this.currentUser = user;
                    if (this.message.author && user)
                        this.incoming = this.message.author.id !== user.id;

                );
ChatMessage的模板
在模板中有两个有趣的东西:
- FromNowPipe
- [ngClass]
下面是代码
code/rxjs/chat/app/ts/components/ChatWindow.ts
@Component(
    inputs: ['message'],
    selector: 'chat-message',
    pipes: [FromNowPipe],
    template: `
  <div class="msg-container"
       [ngClass]="'base-sent': !incoming, 'base-receive': incoming">

    <div class="avatar"
         *ngIf="!incoming">
      <img src="message.author.avatarSrc">
    </div>

    <div class="messages"
      [ngClass]="'msg-sent': !incoming, 'msg-receive': incoming">
      <p>message.text</p>
      <time>message.sender • message.sentAt | fromNow</time>
    </div>

    <div class="avatar"
         *ngIf="incoming">
      <img src="message.author.avatarSrc">
    </div>
  </div>
  `
)
FromNowPipe是一个管道,它将我们的发送时间变成几分钟前的表述模式,更易读。
我们同时使用ngClass去根据条件选择不一样的CSS类。
[ngClass]="'msg-sent': !incoming, 'msg-receive': incoming"ChatMessage完整代码
code/rxjs/chat/app/ts/components/ChatWindow.ts
@Component(
    inputs: ['message'],
    selector: 'chat-message',
    pipes: [FromNowPipe],
    template: `
  <div class="msg-container"
       [ngClass]="'base-sent': !incoming, 'base-receive': incoming">

    <div class="avatar"
         *ngIf="!incoming">
      <img src="message.author.avatarSrc">
    </div>

    <div class="messages"
      [ngClass]="'msg-sent': !incoming, 'msg-receive': incoming">
      <p>message.text</p>
      <time>message.sender • message.sentAt | fromNow</time>
    </div>

    <div class="avatar"
         *ngIf="incoming">
      <img src="message.author.avatarSrc">
    </div>
  </div>
  `
)
export class ChatMessage implements OnInit
    message:Message;
    currentUser:User;
    incoming:boolean;

    constructor(public userService:UserService)


    ngOnInit():void
        this.userService.currentUser
            .subscribe(
                (user:User) =>
                    this.currentUser = user;
                    if (this.message.author && user)
                        this.incoming = this.message.author.id !== user.id;

                );
ChatNavBar组件
我们要讲的最后一个组件是ChatNavBar.它在导航栏那里显示未读消息的数目。
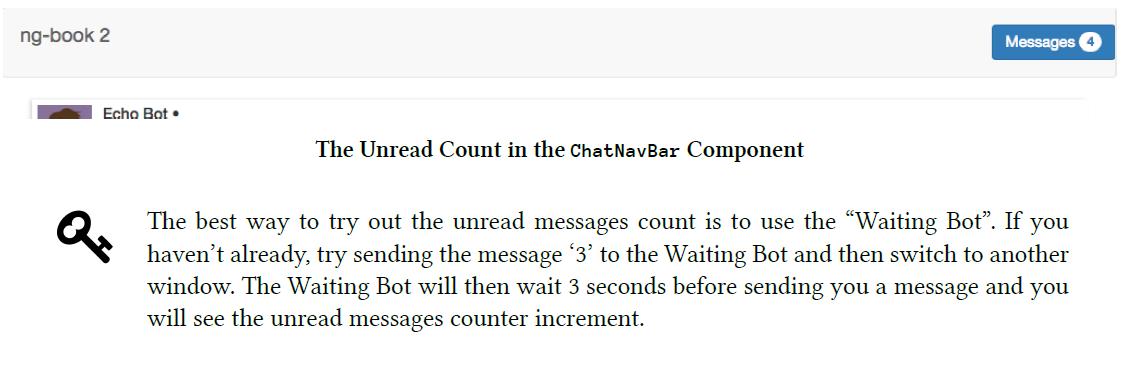
ChatNavBar的@Component
code/rxjs/chat/app/ts/components/ChatNavBar.ts
selector: 'nav-bar',这里写代码片ChatNavBar控制器
ChatNavBar控制器的唯一任务就是跟踪unreadMessagesCount。这个比表面看起来要复杂。
最简单的方式就是监听messagesService.messages,并且求出其isRead为false的消息个数。这个对于当前thread来说是没有问题的。但是不能保证,在当前thread标记read的时候获取通知。
最安全的方式就是将messages和currentThreadcombine起来,我们使用combineLatest操作做这个事情。前面讲解过。
code/rxjs/chat/app/ts/components/ChatNavBar.ts
export class ChatNavBar implements OnInit
  unreadMessagesCount: number;

  constructor(public messagesService: MessagesService,
              public threadsService: ThreadsService)


  ngOnInit(): void
    this.messagesService.messages
      .combineLatest(
        this.threadsService.currentThread,
        (messages: Message[], currentThread: Thread) =>
          [currentThread, messages] )

      .subscribe(([currentThread, messages]: [Thread, Message[]]) =>
        this.unreadMessagesCount =
          _.reduce(
            messages,
            (sum: number, m: Message) =>
              let messageIsInCurrentThread: boolean = m.thread &&
                currentThread &&
                (currentThread.id === m.thread.id);
              if (m && !m.isRead && !messageIsInCurrentThread)
                sum = sum + 1;

              return sum;
            ,
            0);
      );
如果你对Typescript不太熟悉,可能上面的代码有点难以理解,我们返回currentThread和message数组作为他的两个元素。
然后我们订阅这个流,并在接下来的函数调用中去解构这个对象。接下来我们浏览消息并计算未读数量。
ChatNavBar模板
在视图中,ChatNavBar唯一做的事情就是在右边显示未读消息数量。
code/rxjs/chat/app/ts/components/ChatNavBar.ts
@Component(
  selector: 'nav-bar',
  template: `
  <nav class="navbar navbar-default">
    <div class="container-fluid">
      <div class="navbar-header">
        <a class="navbar-brand" href="https://ng-book.com/2">
          <img src="$require('images/logos/ng-book-2-minibook.png')"/>
           ng-book 2
        </a>
      </div>
      <p class="navbar-text navbar-right">
        <button class="btn btn-primary" type="button">
          Messages <span class="badge">unreadMessagesCount</span>
        </button>
      </p>
    </div>
  </nav>
  `
)
ChatNavBar的完整代码
code/rxjs/chat/app/ts/components/ChatNavBar.ts
import Component, OnInit from '@angular/core';
import MessagesService, ThreadsService from '../services/services';
import Message, Thread from '../models';
import * as _ from 'underscore';

@Component(
  selector: 'nav-bar',
  template: `
  <nav class="navbar navbar-default">
    <div class="container-fluid">
      <div class="navbar-header">
        <a class="navbar-brand" href="https://ng-book.com/2">
          <img src="$require('images/logos/ng-book-2-minibook.png')"/>
           ng-book 2
        </a>
      </div>
      <p class="navbar-text navbar-right">
        <button class="btn btn-primary" type="button">
          Messages <span class="badge">unreadMessagesCount</span>
        </button>
      </p>
    </div>
  </nav>
  `
)
export class ChatNavBar implements OnInit
  unreadMessagesCount: number;

  constructor(public messagesService: MessagesService,
              public threadsService: ThreadsService)


  ngOnInit(): void
    this.messagesService.messages
      .combineLatest(
        this.threadsService.currentThread,
        (messages: Message[], currentThread: Thread) =>
          [currentThread, messages] )

      .subscribe(([currentThread, messages]: [Thread, Message[]]) =>
        this.unreadMessagesCount =
          _.reduce(
            messages,
            (sum: number, m: Message) =>
              let messageIsInCurrentThread: boolean = m.thread &&
                currentThread &&
                (currentThread.id === m.thread.id);
              if (m && !m.isRead && !messageIsInCurrentThread)
                sum = sum + 1;

              return sum;
            ,
            0);
      );
总结
现在,如果我们将这些放在一起,就是一个全功能的聊天app了。
以上是关于数据结构第二部分:视图的主要内容,如果未能解决你的问题,请参考以下文章