Django1.11搭建图书管理系统
Posted scaven-01
tags:
篇首语:本文由小常识网(cha138.com)小编为大家整理,主要介绍了Django1.11搭建图书管理系统相关的知识,希望对你有一定的参考价值。
1.准备工作:
1.1 项目目录
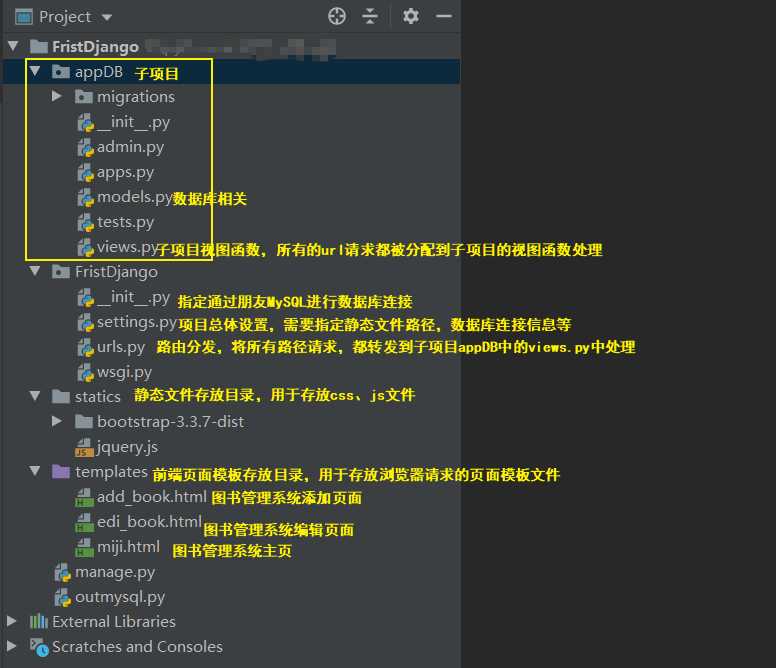
1.2 项目setting.py文件修改
INSTALLED_APPS = [
    ‘django.contrib.admin‘,
    ‘django.contrib.auth‘,
    ‘django.contrib.contenttypes‘,
    ‘django.contrib.sessions‘,
    ‘django.contrib.messages‘,
    ‘django.contrib.staticfiles‘,
    ‘appDB‘,   # 添加子项目名称,注意以逗号结尾
]

TEMPLATES = [
    {
        ‘BACKEND‘: ‘django.template.backends.django.DjangoTemplates‘,
        ‘DIRS‘: [os.path.join(BASE_DIR, ‘templates‘)],   # 新建项目后,此处默认为空列表,将模板渲染目录添加到此处
        ‘APP_DIRS‘: True,
        ‘OPTIONS‘: {
            ‘context_processors‘: [
                ‘django.template.context_processors.debug‘,
                ‘django.template.context_processors.request‘,
                ‘django.contrib.auth.context_processors.auth‘,
                ‘django.contrib.messages.context_processors.messages‘,
            ],
        },
    },
]

# 修改数据库连接信息
DATABASES = {
    ‘default‘: {
        ‘ENGINE‘: ‘django.db.backends.mysql‘,
        ‘NAME‘: ‘wulin‘,  # 上文中新建的库名称
        ‘USER‘: ‘root‘,   # 用户
        ‘PASSWORD‘: ‘2048‘,  # 用户密码
        ‘HOST‘: ‘127.0.0.1‘,  #数据库IP地址
        ‘PORT‘: 3306      # 数据库端口
    }
}

STATIC_URL = ‘/static/‘  # 指定了静态文件别名,后期引用静态文件可以使用该别名

STATICFILES_DIRS = [
    os.path.join(BASE_DIR, ‘statics‘),  # 指定静态文件目录名称,主要用户存放css和js文件
]
1.2 安装MySQL数据库
1.2.1 MySQL5.6数据库安装
1.2.2 登录MySQL数据库建立wulin库
C:WINDOWSsystem32> mysql -u root -p
mysql> create database wulin; # 建库
mysql> q;
1.3 连接数据库
1.3.1 指定通过pymysql连接数据库
通过Django主项目中的__init__.py指定连接数据库的客户端,前提是已经按照了pymysql,若未安装请通过pip install pymysql安装
import pymysql
pymysql.install_as_MySQLdb()
1.3.2 建表文件
将建表语句写在appDB目录中的models.py文件中
from django.db import models

class wlmj(models.Model):   # 新建wlmj表,以下是表结构和约束条件
    id = models.AutoField(primary_key=True)
    title = models.CharField(max_length=32)
    pub_date = models.DateField()
    price = models.DecimalField(max_digits=8, decimal_places=2)
    publish = models.CharField(max_length=32)
1.3.3 建表
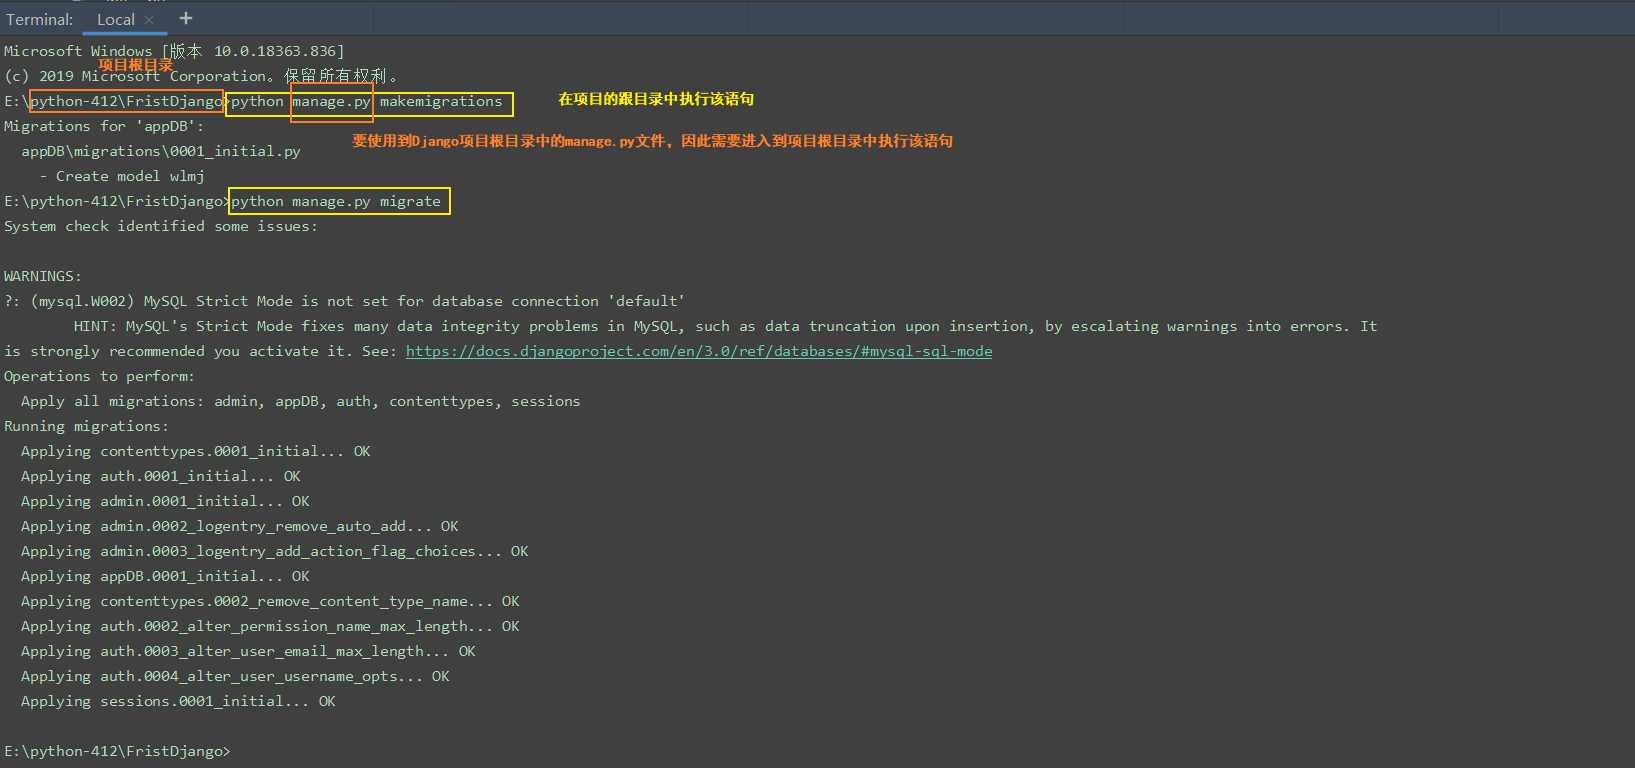
E:python-412FristDjango> python manage.py makemigrations
生成记录,每次修改了models里面的内容或者添加了新的app,新的app里面写了models里面的内容,都要执行这两条
E:python-412FristDjango> python manage.py migrate
执行上面这个语句的记录来创建表,生成的表名字前面会自带应用的名字,例如:你的book表在mysql里面叫做app01_book表
执行成功如下:
如果执行上述命令的过程中出错,若报错如下:
raise ImproperlyConfigured(‘mysqlclient 1.3.13 or newer is required; you have %s.‘ % Database.__version__)
django.core.exceptions.ImproperlyConfigured: mysqlclient 1.3.13 or newer is required; you have 0.9.3.
请注释掉图中指定文件中的内容,再重新执行上述的两个命令

完成上述步骤后,就能再数据库wuli中查看到新建的表信息了,值得注意的是,表名是以子项目名称+‘表名’(上文models.py文件中的表名)命名的
1.3.4 通过外部文件插入数据到表中
在项目任意目录下新建该文件--outmysql.py,并执行文件,执行完成后,可以查看到数据库中已经插入了文件中的书籍信息
import os

if __name__ == ‘__main__‘:
    os.environ.setdefault("DJANGO_SETTINGS_MODULE", "FristDjango.settings")
    import django
    django.setup()

    from appDB import models

    obj_list = []
    books = [‘九阳神功‘, ‘乾坤大挪移‘, ‘易筋经‘, ‘僻邪剑谱‘, ‘葵花宝典‘, ‘降龙十八掌‘, ‘六脉神剑‘, ‘北冥神功‘, ‘独孤九剑‘, ‘太极拳‘]
    for i in range(10):
        obj = models.wlmj(title=books[i],
                        pub_date=‘2000-01-11‘ if i < 3 else ‘2008-09-11‘,
                        price=200 + i * i,
                        publish=‘金庸出版社‘ if i < 5 else ‘丐帮出版社‘,
                        )
        obj_list.append(obj)
    models.wlmj.objects.bulk_create(obj_list)
2.url分发
from django.conf.urls import url
from appDB import views

urlpatterns = [
    url(r‘^miji/‘, views.wlmj, name=‘books‘),   # 图书系统主页,对应的视图函数,以及别名
    url(r‘^add_book/‘, views.add_book, name=‘add_books‘),         # 添加图书页面
    url(r‘^del_book/(d+)/‘, views.del_book, name="del_books"),   # 删除图书页面
    url(r‘^edi_book/(d+)/‘, views.edi_book, name="edi_books"),   # 编辑图书页面
3.视图函数views.py
from django.shortcuts import render,HttpResponse, redirect
from appDB import models
from django.urls import reverse

def  wlmj(request):
      # 图书主页对应的视图函数,实现从数据库中查询图书,并通过miji.html模板将内容返回给浏览器
    all_objs = models.wlmj.objects.all()
    return render(request, ‘miji.html‘, {‘all_objs‘: all_objs})

def  add_book(request):
      # 添加图书按钮url对应的视图函数,实现将用户添加的图书信息添加到数据库中
    if request.method == ‘GET‘:
        # 判断用户请求,如果是GET请求,就将添加图书的页面返回给用户
        return render(request, ‘add_book.html‘)
    else:
        # 如果用户请求时POST,则捕获用户输入,并将用户输入添加进数据库,并返回添加过后的主页页面
        title = request.POST.get(‘book_title‘)
        price = request.POST.get(‘book_price‘)
        date = request.POST.get(‘book_date‘)
        publish = request.POST.get(‘book_publish‘)
       models.wlmj.objects.create(
            title=title,
            price=price,
            pub_date=date,
            publish=publish
        )
        return redirect(reverse(‘books‘))

def del_book(request, book_id):
    # 删除按钮url对应的视图函数,捕获到用户将要删除书籍的ID信息,通过filter过滤,直接删除书籍
    models.wlmj.objects.filter(id=book_id).delete()
    return redirect(reverse(‘books‘))  # 此处用到反向地址解析,books是在urls.py中定义的别名

def edi_book(request, book_id):
    # 编辑按钮url对应的视图函数,也要进行GET和POST方法的判断,然后分别进行处理
    if request.method == ‘GET‘:
        edi_obj = models.wlmj.objects.filter(id=book_id)
        # 如果请求是GET,将编辑界面返回给用户,并且编辑界面中对应的数据应该一并返回给用户
        return render(request, ‘edi_book.html‘, {‘edi_obj‘: edi_obj})
    else:
        # 如果请求为POST,则先捕获用户输入,然后通过数据ID进行数据更新操作
        title = request.POST.get(‘book_title‘)
        price = request.POST.get(‘book_price‘)
        date = request.POST.get(‘book_date‘)
        publish = request.POST.get(‘book_publish‘)
        models.wlmj.objects.filter(id=book_id).update(
             title=title,
             price=price,
             pub_date=date,
             publish=publish
         )
        return redirect(reverse(‘books‘))
4.模板渲染
4.1 书籍主页页面--miji.html
<!DOCTYPE html>
<html lang="en">
<head>
    <meta charset="UTF-8">
    <title>Title</title>
    {% load static %}
    <link rel="stylesheet" href="{% static ‘bootstrap-3.3.7-dist/css/bootstrap.min.css‘ %}">
</head>
<body>
    <h1 class="text-center">查看图书</h1>
    <div class="container">
        <div class="row">
            <div class="col-md-8 col-md-offset-2"></div>
            <div>
                <a href="{% url ‘add_books‘ %}" class="btn btn-primary btn-sm">添加书籍</a>
            </div>

            <table class="table table-hover table-striped">
                <thead>
                    <tr>
                        <th>编号</th>
                        <th>书籍名称</th>
                        <th>价格</th>
                        <th>出版日期</th>
                        <th>出版社</th>
                        <th>操作</th>
                    </tr>
                </thead>
                <tbody>
                    {% for book in all_objs %}
                    <tr>
                        <td>{{ forloop.counter }}</td>
                        <td>{{ book.title }}</td>
                        <td>{{ book.price }}</td>
                        <td>{{ book.pub_date|date:‘Y-m-d‘ }}</td>
                        <td>{{ book.publish }}</td>
                        <td>
                            <a href="{% url ‘edi_books‘ book.id %}" class="btn btn-warning btn-sm">编辑</a>
                            <a href="{% url ‘del_books‘ book.id %}" class="btn btn-warning btn-sm">删除</a>
                        </td>
                    </tr>
                    {% endfor %}
                </tbody>
            </table>
        </div>
    </div>
</body>
</html>
4.2 添加按钮页面--add_book.html
<!DOCTYPE html>
<html lang="en">
<head>
    <meta charset="UTF-8">
    <title>Title</title>
        {% load static %}
    <link rel="stylesheet" href="{% static ‘bootstrap-3.3.7-dist/css/bootstrap.min.css‘ %}">
</head>
<body>
    <h1 class="text-center">添加书籍</h1>
    <div class="container">
        <div class="row">
            <div class="col-md-8 col-md-offset-2">

                <form action="" method="post" novalidate>
                    {% csrf_token %}
                    <div class="form-group">
                        <label for="title">书籍名称</label>
                        <input type="text" class="form-control" id="title" placeholder="书名" name="book_title">
                    </div>

                    <div class="form-group">
                        <label for="price">价格</label>
                        <input type="number" class="form-control" id="price" placeholder="价格" name="book_price">
                    </div>

                    <div class="form-group">
                        <label for="date">出版日期</label>
                        <input type="date" class="form-control" id="date" placeholder="日期" name="book_date">
                    </div>

                    <div class="form-group">
                        <label for="publish">出版社</label>
                        <input type="text" class="form-control" id="publish" placeholder="出版社" name="book_publish">
                    </div>
                    <input type="submit" class="btn pull-right btn-success">
                </form>


            </div>

        </div>

    </div>
</body>
</html>
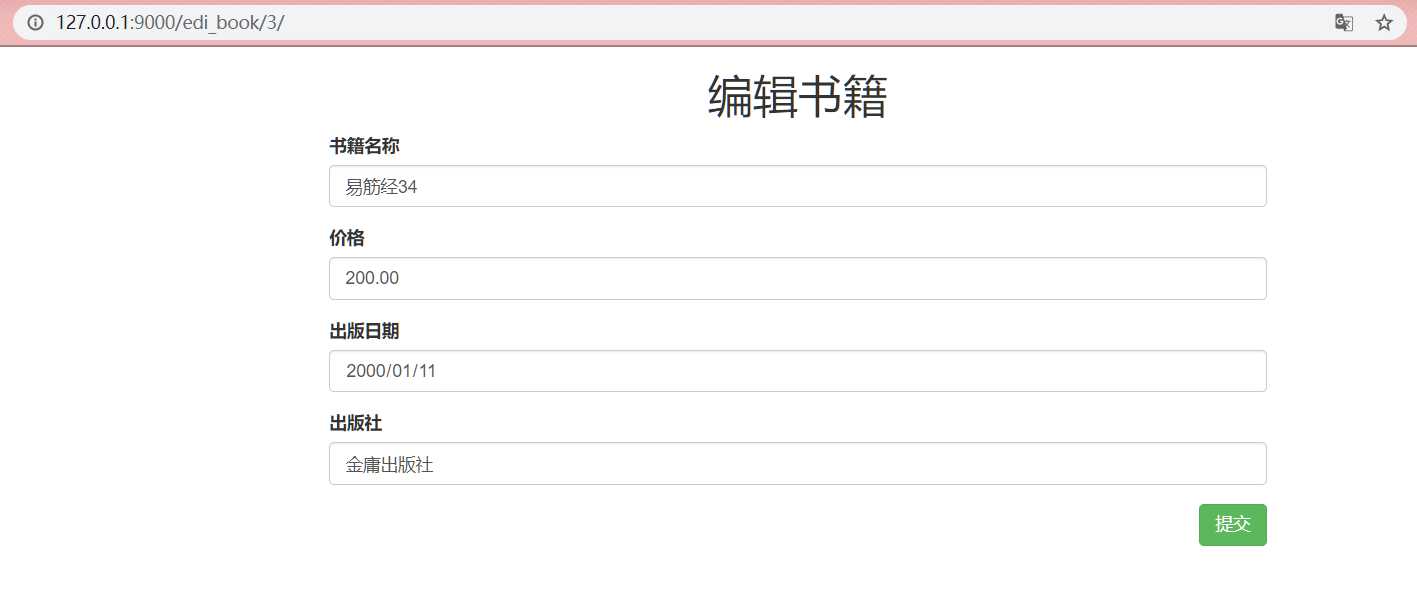
4.3 编辑按钮页面--edi_book.html
<!DOCTYPE html>
<html lang="en">
<head>
    <meta charset="UTF-8">
    <title>Title</title>
        {% load static %}
    <link rel="stylesheet" href="{% static ‘bootstrap-3.3.7-dist/css/bootstrap.min.css‘ %}">
</head>
<body>
    <h1 class="text-center">编辑书籍</h1>
    <div class="container">
        <div class="row">
            <div class="col-md-8 col-md-offset-2">

                <form action="" method="post" novalidate>
                    {% csrf_token %}
                    <div class="form-group">
                        <label for="title">书籍名称</label>
                        <input type="text" class="form-control" id="title" placeholder="书名" name="book_title" value="{{ edi_obj.title }}">
                    </div>

                    <div class="form-group">
                        <label for="price">价格</label>
                        <input type="number" class="form-control" id="price" placeholder="价格" name="book_price" value="{{ edi_obj.price }}">
                    </div>

                    <div class="form-group">
                        <label for="date">出版日期</label>
                        <input type="date" class="form-control" id="date" placeholder="日期" name="book_date" value="{{ edi_obj.pub_date|date:‘Y-m-d‘ }}">
                    </div>

                    <div class="form-group">
                        <label for="publish">出版社</label>
                        <input type="text" class="form-control" id="publish" placeholder="出版社" name="book_publish" value="{{ edi_obj.publish }}">
                    </div>
                    <input type="submit" class="btn pull-right btn-success">
                </form>
            </div>
        </div>
    </div>
</body>
</html>
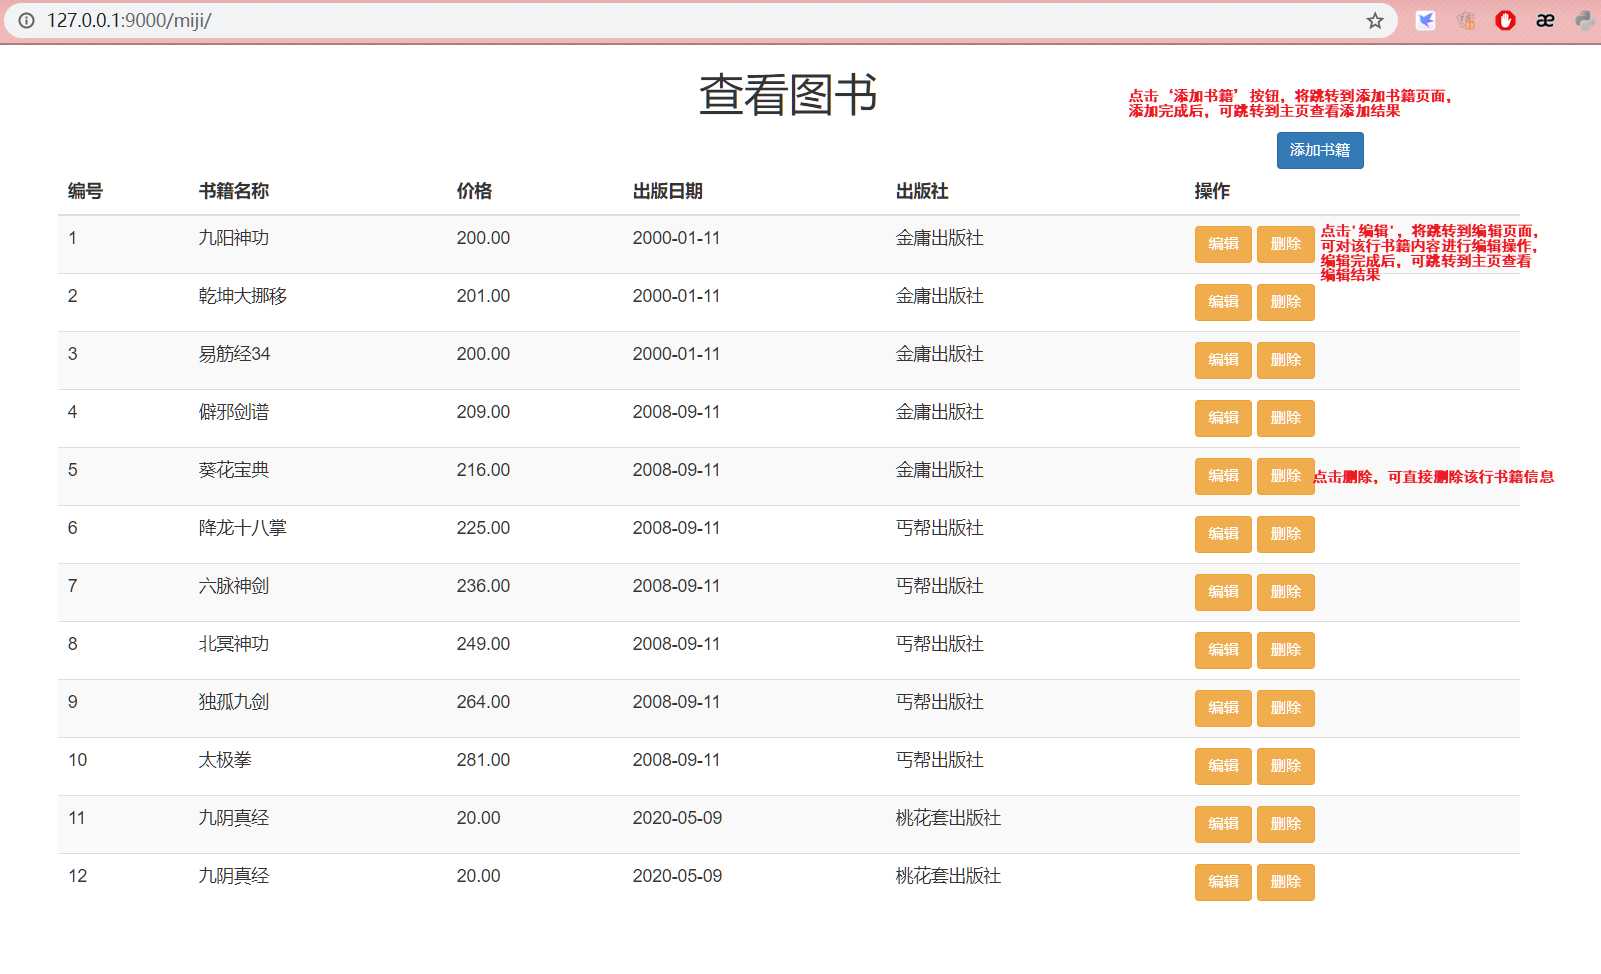
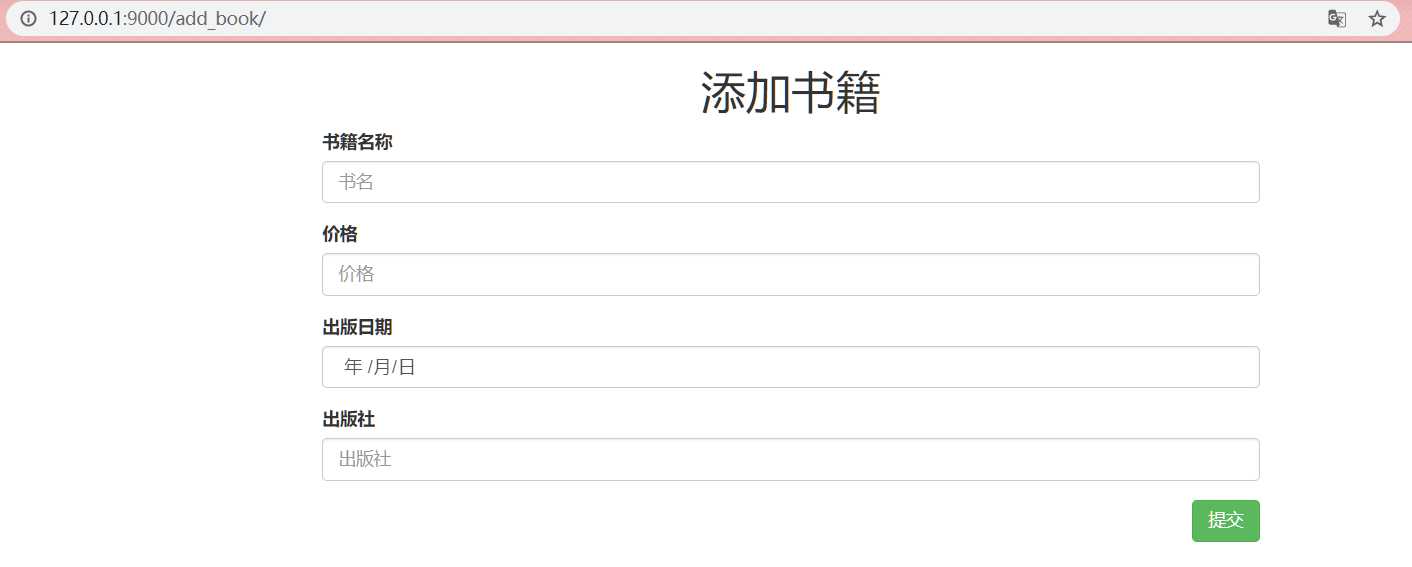
- 效果图:
主页:
添加页面:
修改页面:
以上是关于Django1.11搭建图书管理系统的主要内容,如果未能解决你的问题,请参考以下文章