在Jcenter上快速共享你的Android 项目(Java or Kotlin)
Posted 思忆(GeorgeQin)
tags:
篇首语:本文由小常识网(cha138.com)小编为大家整理,主要介绍了在Jcenter上快速共享你的Android 项目(Java or Kotlin)相关的知识,希望对你有一定的参考价值。
背景
开发过程中,如果你写了一个工具类,想给其他项目使用的话,通常都是将它抽到lib目录供其他项目使用:
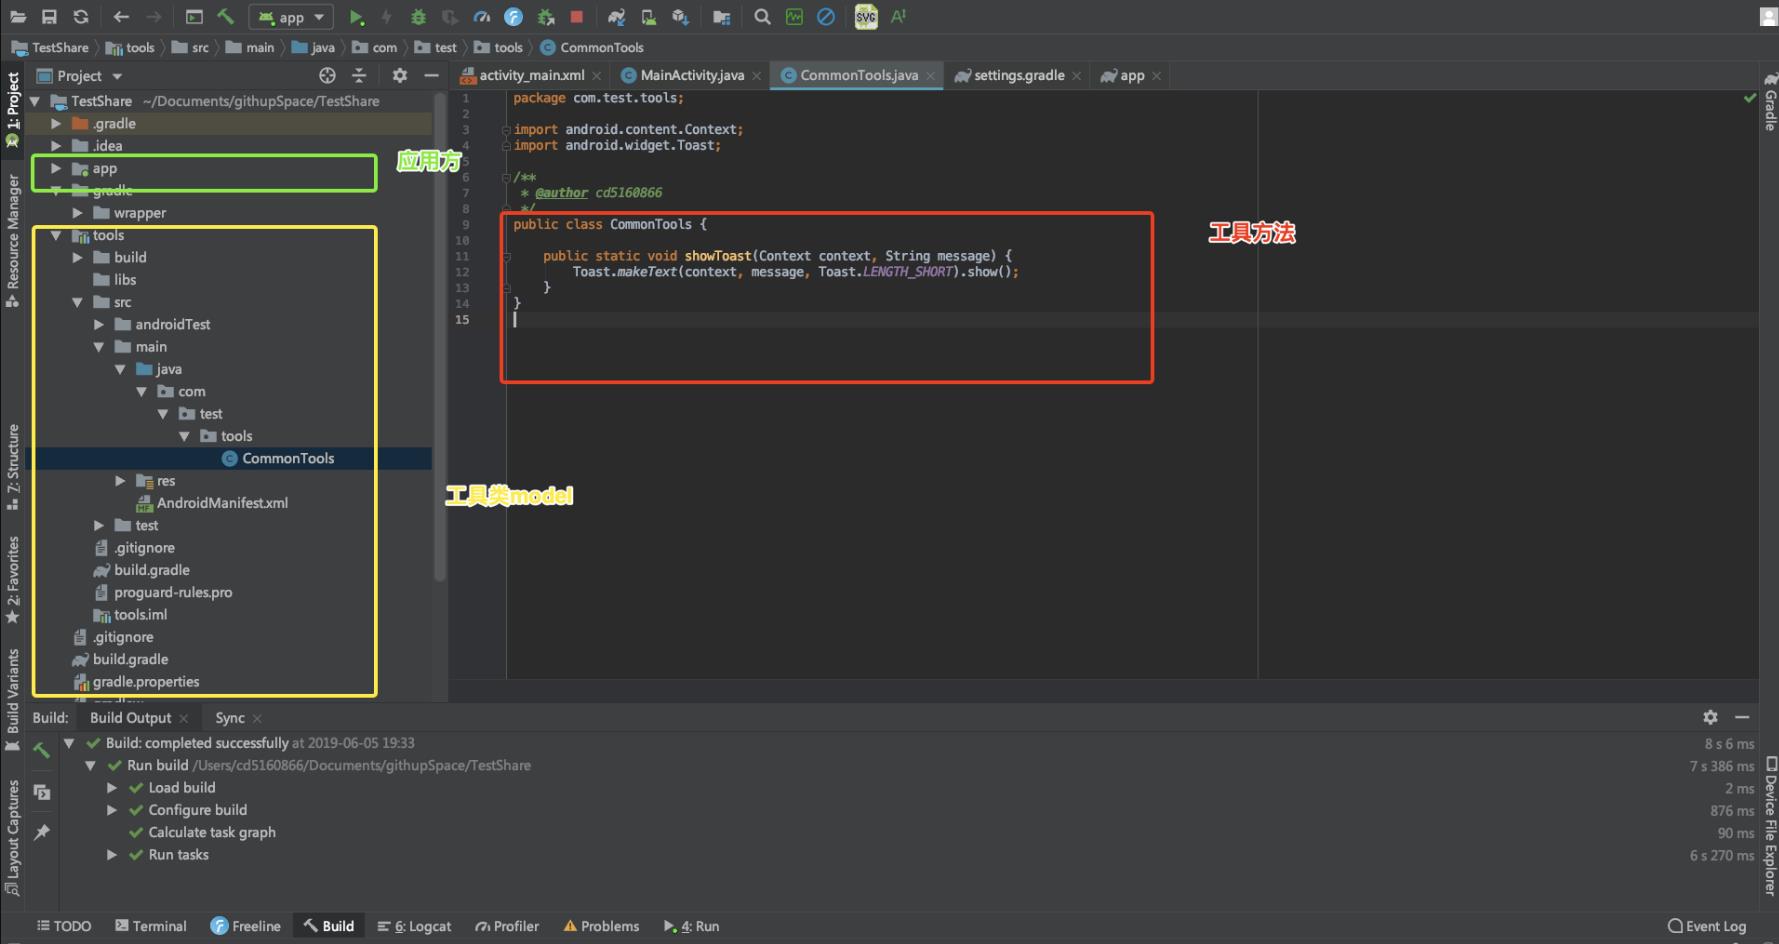
然后在调用项目下引入相关的Lib:

问题
那如果想使用的项目和我们公用的lib不在一个目录呢?按照以前老的方式,譬如拷贝文件,打包jar的方式虽然又不是不能用,但是不仅便于维护和修改,如果每次改动,每个地方都要操作造作一遍,而且如果有资源文件就更麻烦了,那么能不能跟第三方开源库一样:一个地方完成修改,引用到的地方一行代码就能解决?
像这样:
implementation "io.reactivex.rxjava2:rxjava:2.x.y"
方案当然是有的,网上也有很多现成方案,我这边精简和整理了一下,今天就给大家一个步骤模板,方便大家快速发布和共享自己的代码,少踩坑和走弯路。
上传Java 代码到 Jcenter
主要步骤(全程推荐在代理下完成,不然会很慢或者不成功、带框部分是重点项):
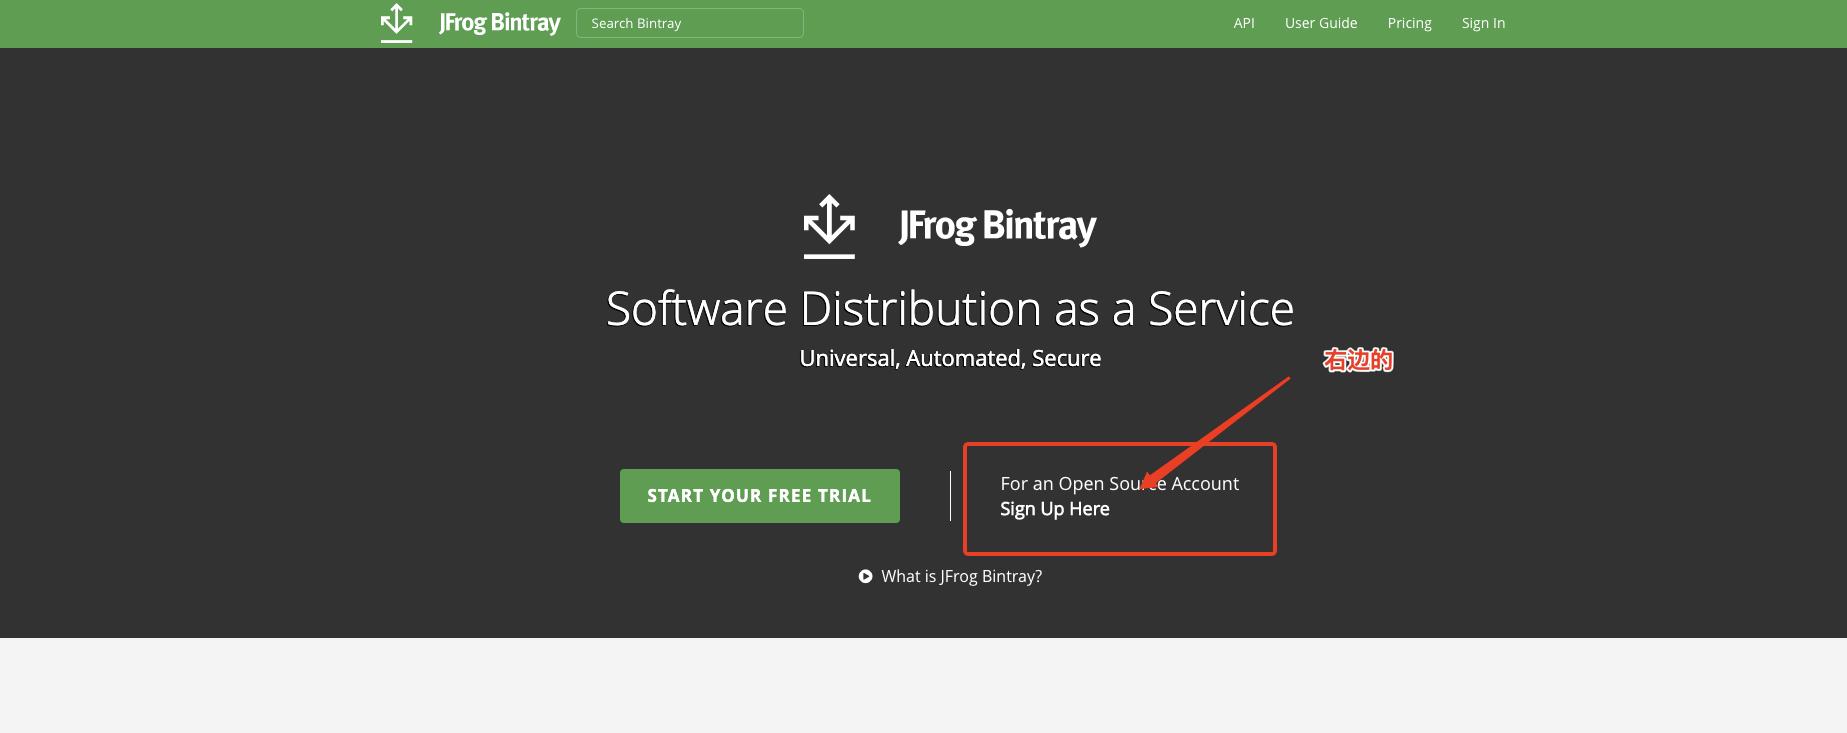
- 注册JFrog Bintray账号
这里注意要注册右边的开源账号,千万注意不要注册成左边的绿色按钮了,后面会很麻烦。
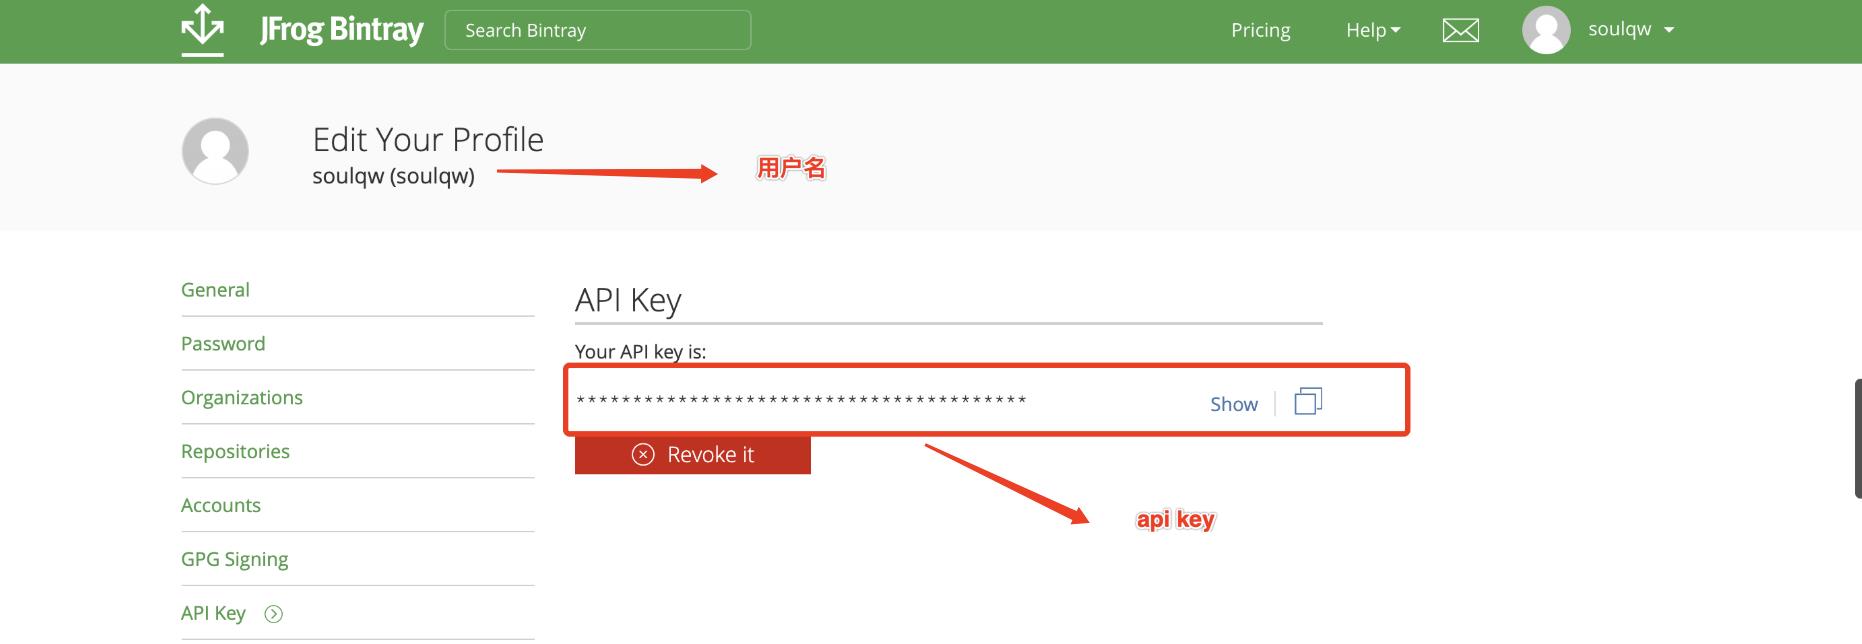
- 注册成功之后,在自己的Profile中记住自己的Api key,待会上传要用:
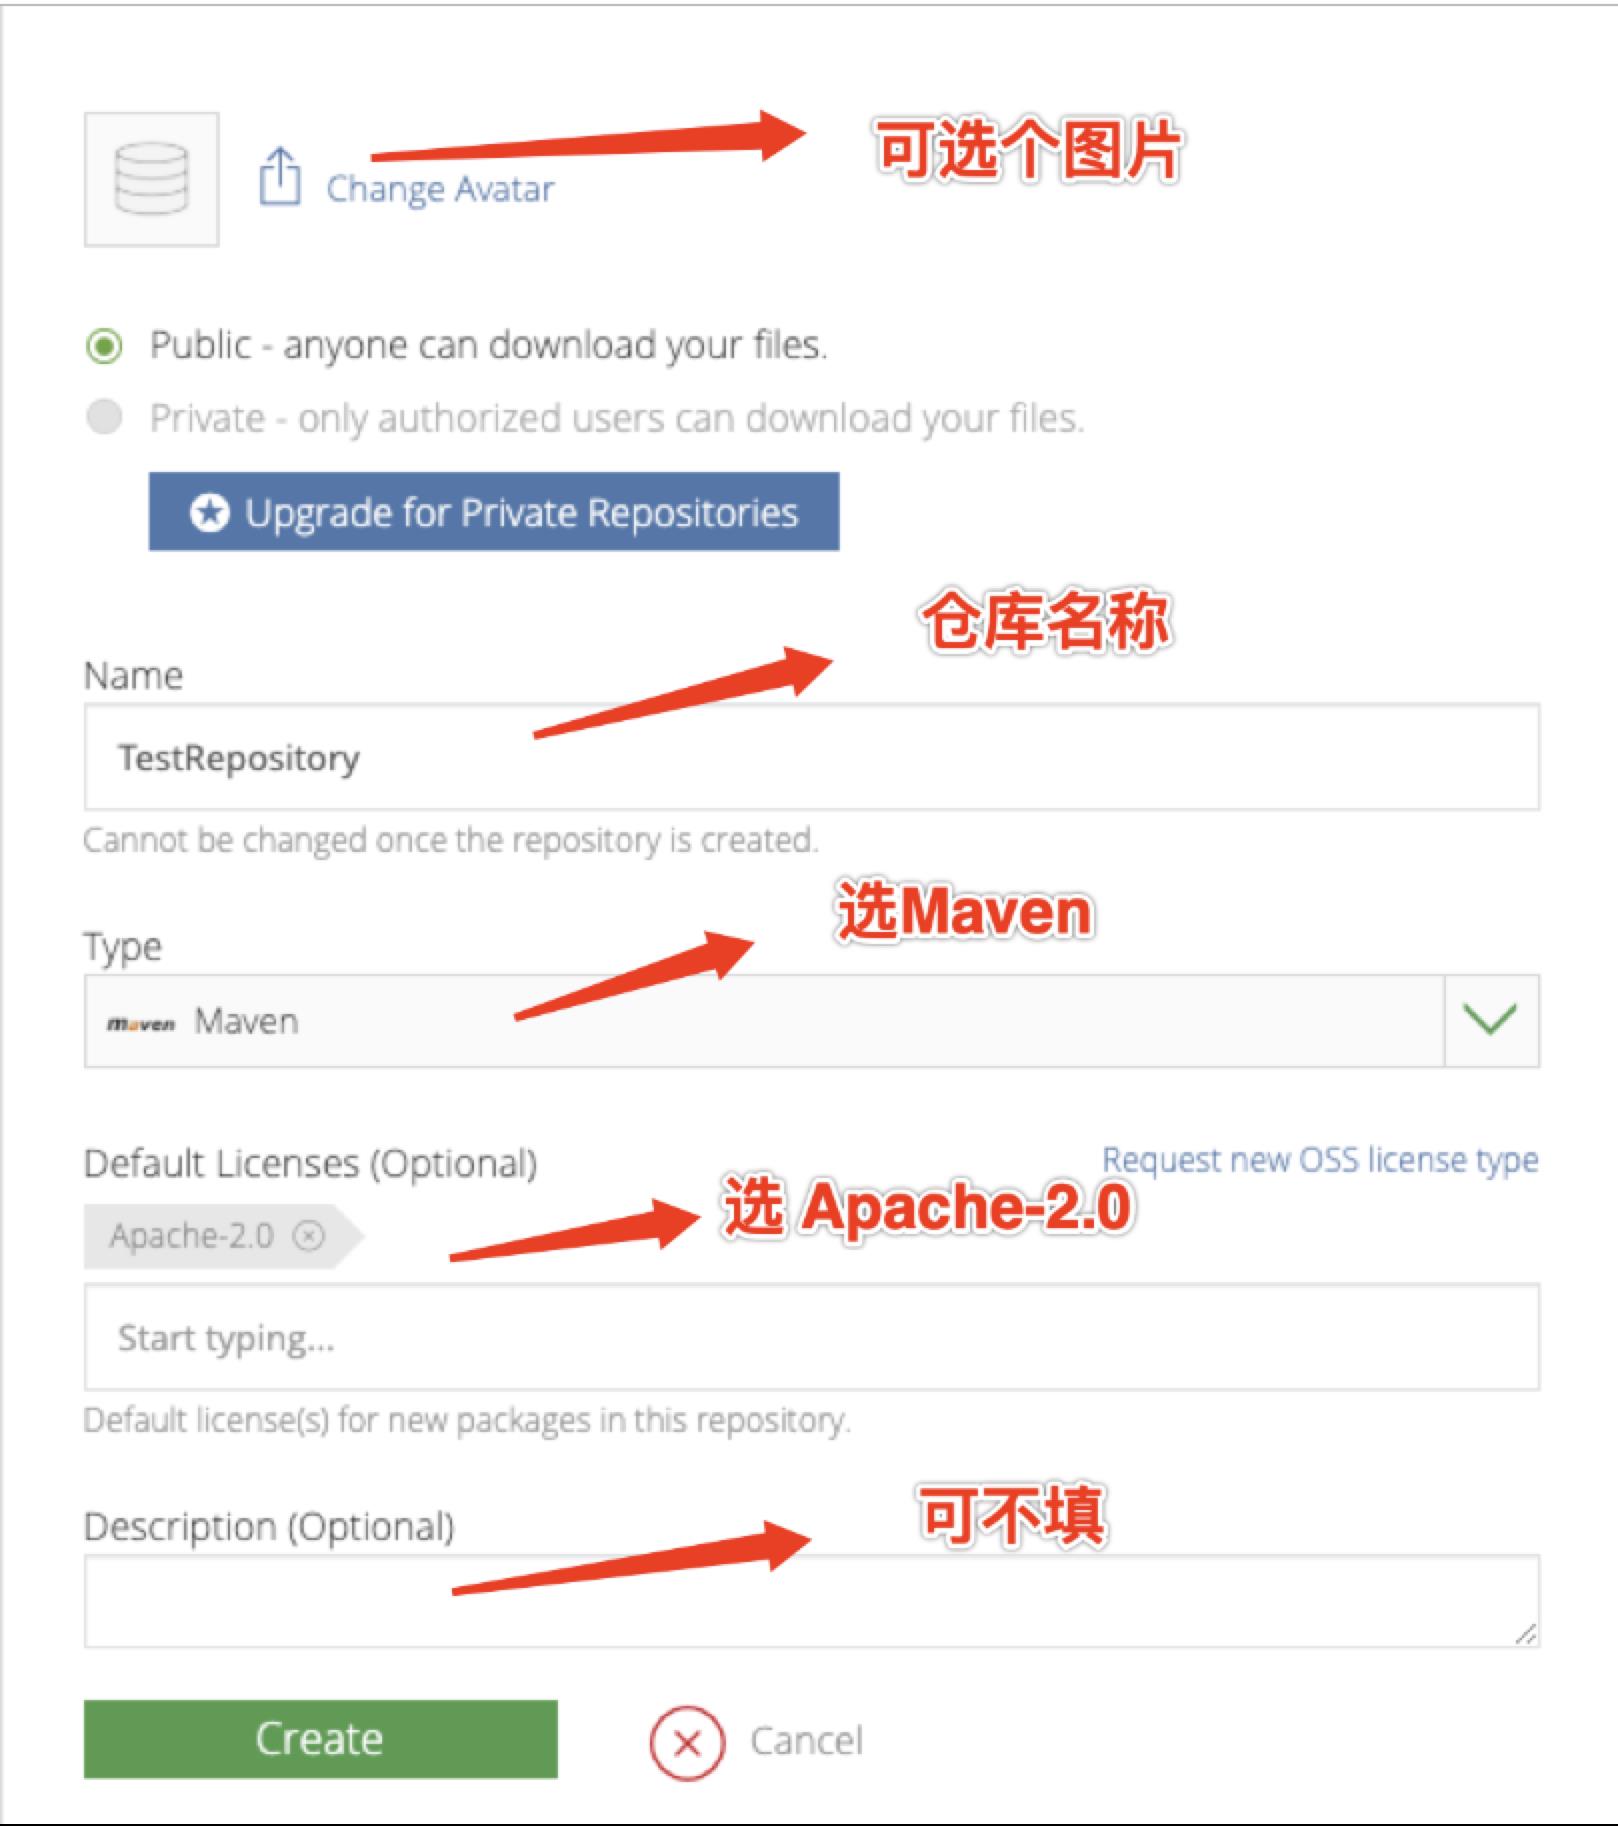
- 新建一个仓库,这个仓库就是我们托管代码的地方
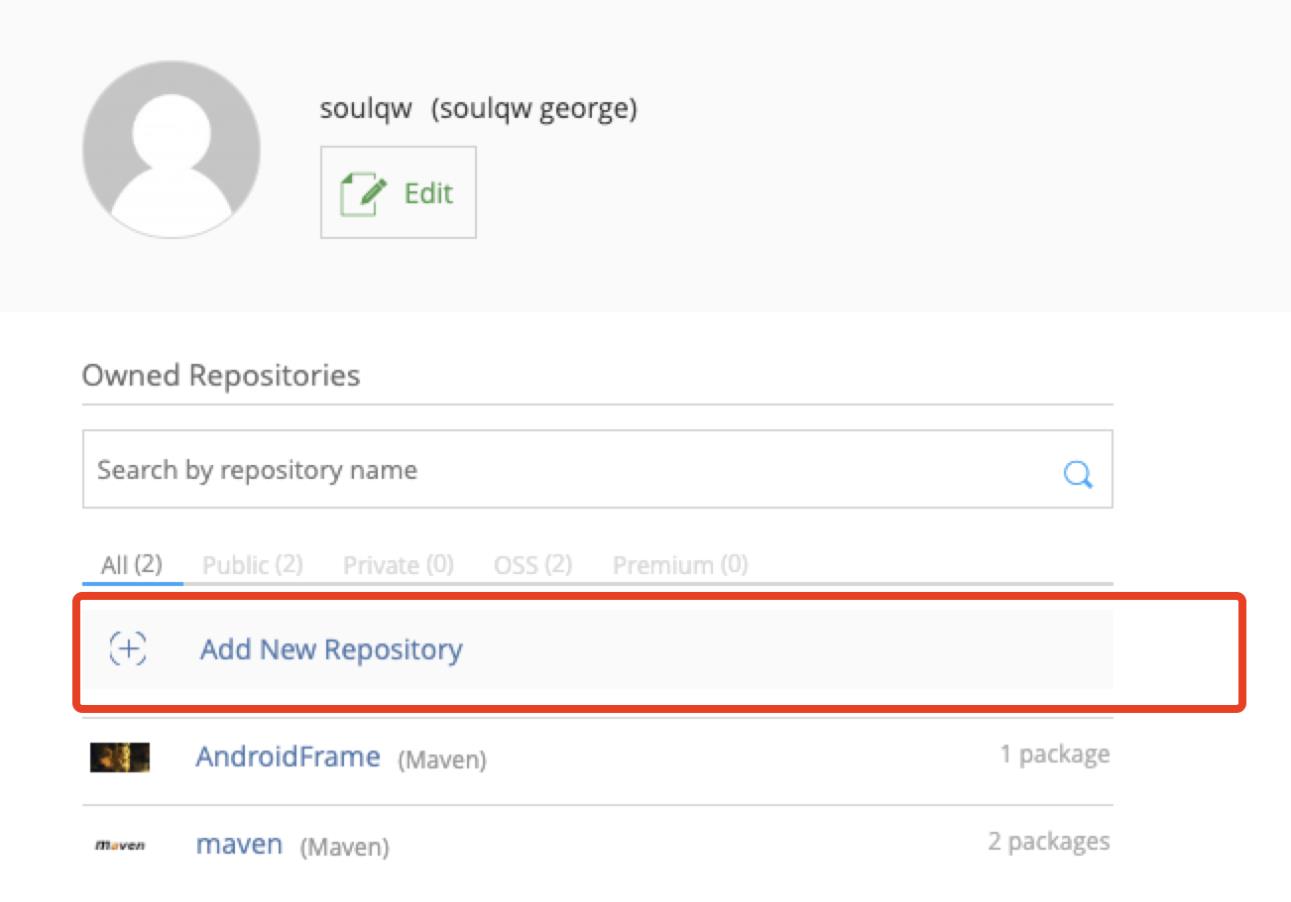
2.
- 在刚刚的仓库(Respository)继续创建一个包(Packge),比如我现在准备把项目中tools里面的代码传到这个包中,我就这么创建:
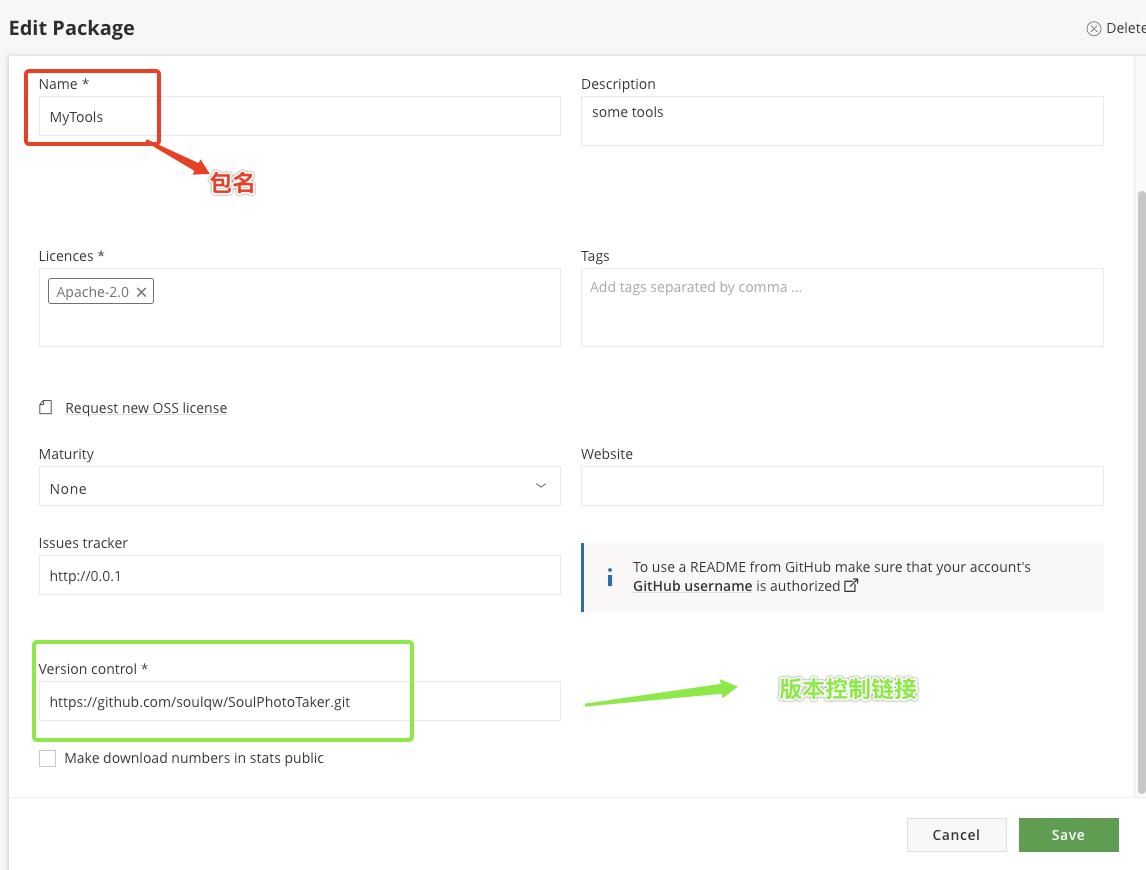
versionControl尽量写一个git结尾的链接,否则容易审核失败
到目前为止,我的准备工作已经基本到位,回顾一下几个关键信息:
- 仓库名:TestRepository
- 包名: MyTools
- 用户名: soulqw (届时替换为你自己的)
- Api key:xxxxxxxx (届时替换为你自己的)
- 回到我们的项目做一些模板配置
- 在我们的项目的根部 gradle文件中添加如下配置:
  dependencies
        classpath 'com.github.dcendents:android-maven-gradle-plugin:1.5'
        classpath 'com.jfrog.bintray.gradle:gradle-bintray-plugin:1.7.3'
- 回到我们需要传的目录,这里即我们的tools目录,在它的gradle文件中添加如下:
apply plugin: 'com.github.dcendents.android-maven'
apply plugin: 'com.jfrog.bintray'

def siteUrl = 'https://www.google.com/' //可选 如果有的话

def gitUrl = 'https://www.google.com/' //可选 如果有的话

group = "com.share"  //路径
version = "0.0.2.release" //版本名称, 不要用beta,否则容易审核不通过
//以上两个配合项目目录名最终上传上去引用就是   compile 'com.share:tools:0.0.2.release'

task sourcesJar(type: Jar)
    from android.sourceSets.main.java.srcDirs
    classifier = 'sources'


task javadoc(type: Javadoc)
    source = android.sourceSets.main.java.srcDirs
    classpath += project.files(android.getBootClasspath().join(File.pathSeparator))


task javadocJar(type: Jar, dependsOn: javadoc)
    classifier = 'javadoc'
    from javadoc.destinationDir


task copyDoc(type: Copy)
    from "$buildDir/docs/"
    into "docs"


artifacts
    archives javadocJar
    archives sourcesJar


install
    repositories.mavenInstaller
        // This generates POM.xml with proper parameters
        pom
            project
                packaging 'aar'
                name 'is permission tool for android'
                url siteUrl
                licenses
                    license
                        name 'The Apache Software License, Version 2.0'
                        url 'http://www.apache.org/licenses/LICENSE-2.0.txt'


                developers
                    developer
                        id 'soulqw' //用户名
                        name 'qinwei' //姓名
                        email 'cd5160866@126.com' //邮箱


                scm
                    connection gitUrl
                    developerConnection gitUrl
                    url siteUrl


Properties properties = new Properties()
properties.load(project.rootProject.file('local.properties').newDataInputStream())

bintray
    //关键信息我们从localProperties文件中读取
    user = properties.getProperty("bintray.user")
    key = properties.getProperty("bintray.apikey")
    configurations = ['archives']
    pkg
        repo = "TestRepository" // 仓库名
        name = "MyTools"// 包名
        desc = 'just tools'
        websiteUrl = siteUrl
        vcsUrl = gitUrl
        licenses = ["Apache-2.0"]
        publish = true


javadoc
    options
        encoding "UTF-8"
        charSet 'UTF-8'
        author true
        version true
        links "http://docs.oracle.com/javase/7/docs/api"
上面填入了我们需要传项目的版本号,其中group、version、和项目目录合并起来的终样式规则如下:

最后后在localProperties文件中填入我们的用户名和ApiKey:

完成以上步骤以后,打开终端到项目目录下,输入:
./gradlew install bintrayUpload
然后成功如下:

再来看看我们传上去的库
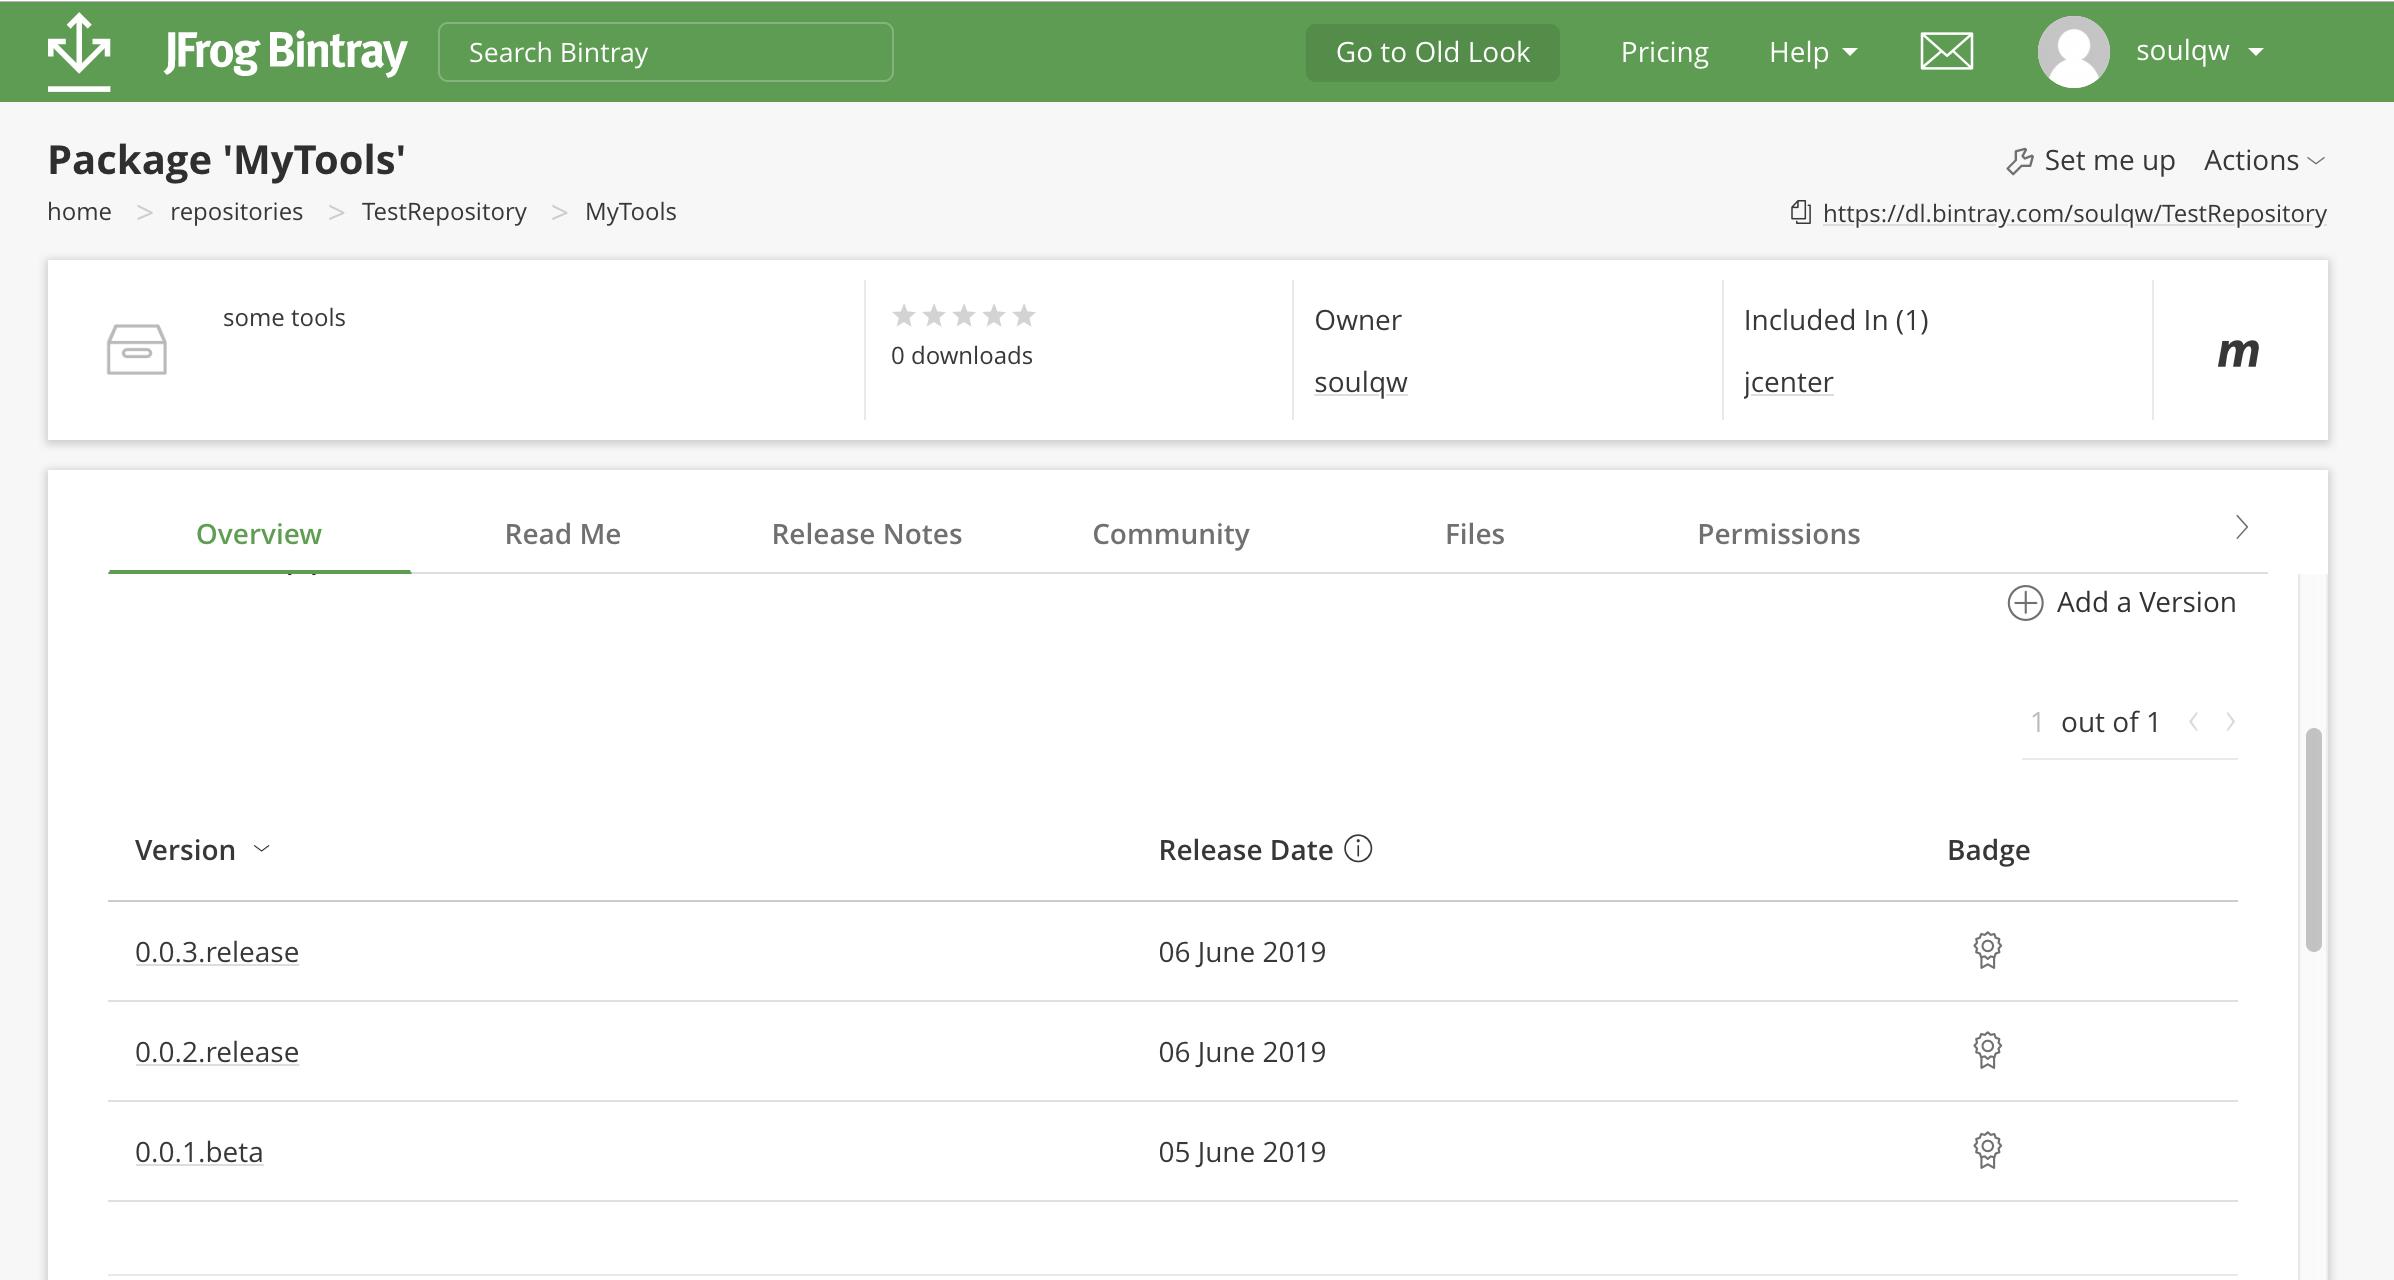
那么我们最终的引用方式就是:
dependencies
//    implementation project(':tools')
    implementation 'com.share:tools:0.0.2.release'
注意:
- 一定要在全局代理下完成整个上传过程
- 一个版本被成功传上去以后,就不能再更改,如果需要改的话,修改代码重新改版本名称即可重新上传,如0.0.2.release,(尽量使用realease或者纯版本号,否则容易审核被拒)
- 现在传上去以后还不能被直接引用,需要Add to Jcenter ,审核通过后即可
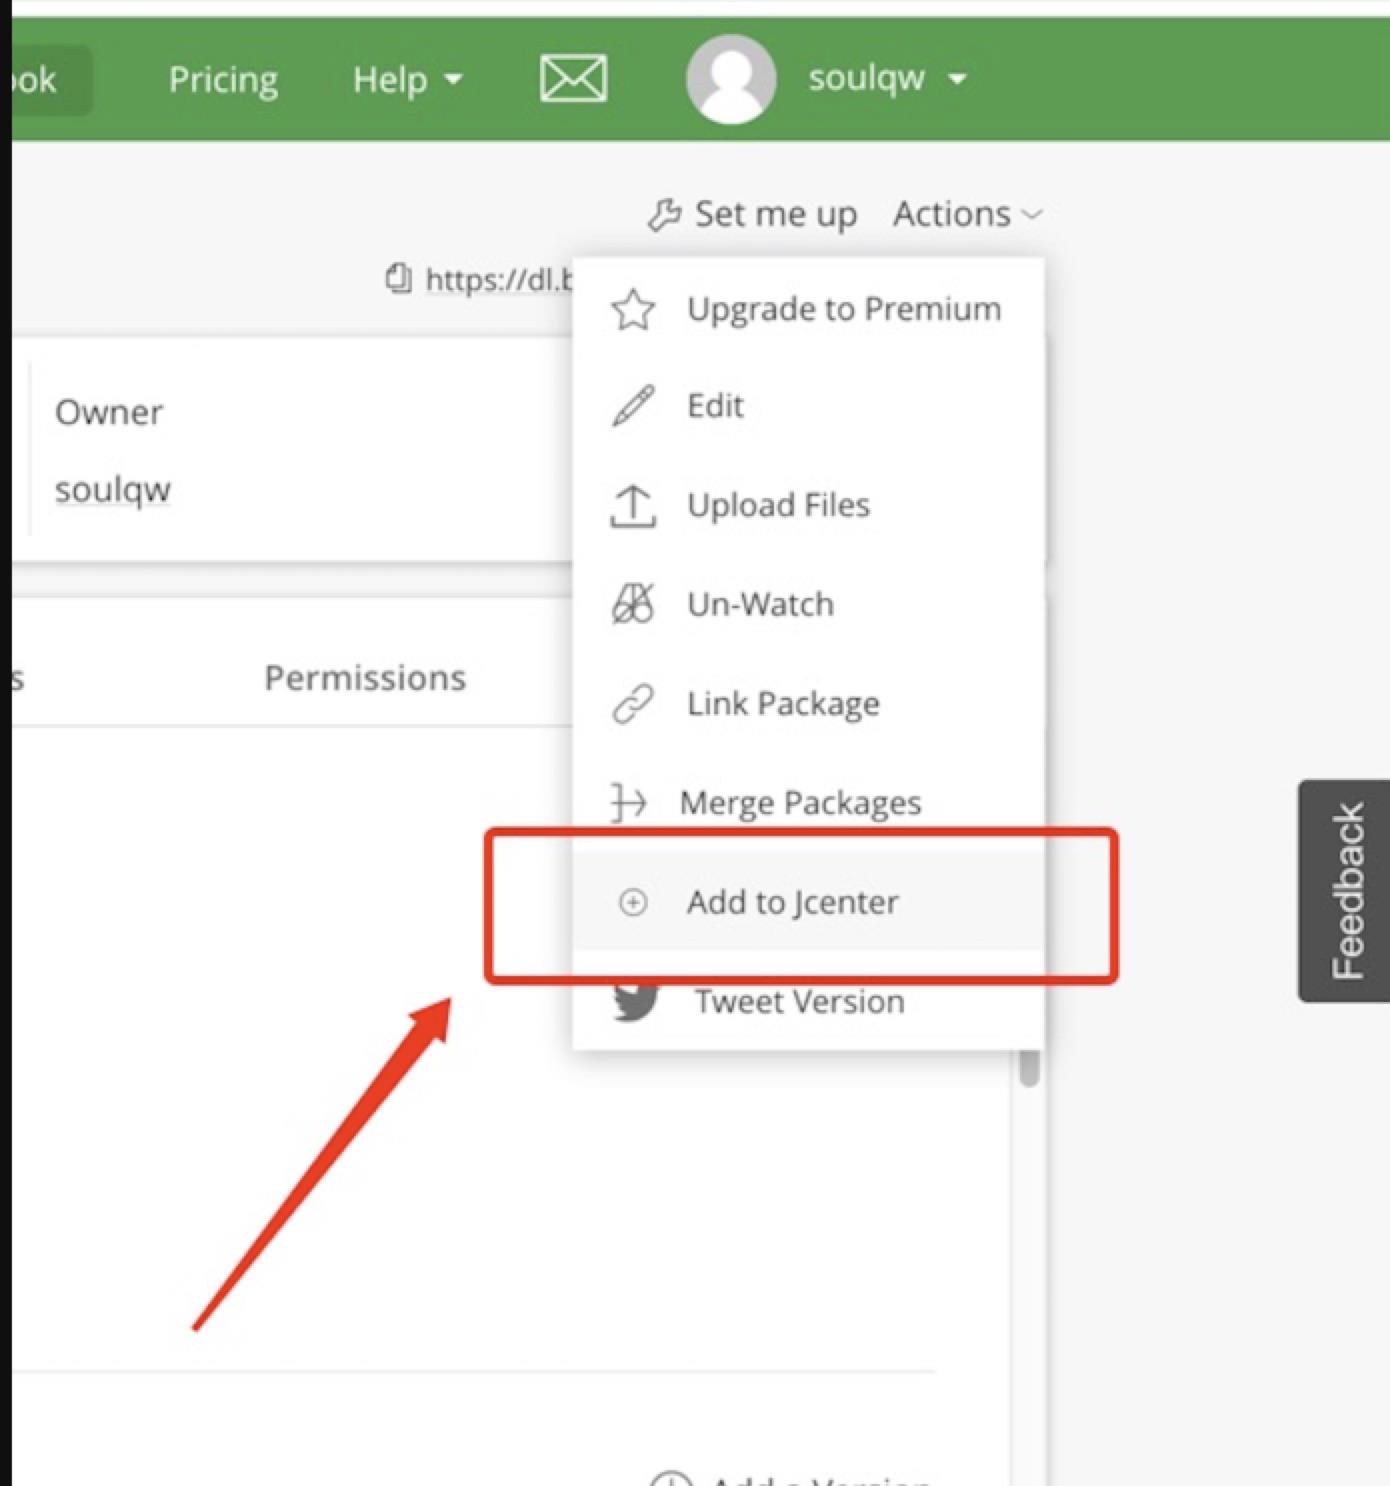
描述尽量填写就好,一般几个小时到一两天就审核通过可用了。
如果审核被拒绝,会跟你描述为何被拒绝,按照他的要求再次修改并回复邮件,即可重新审核:
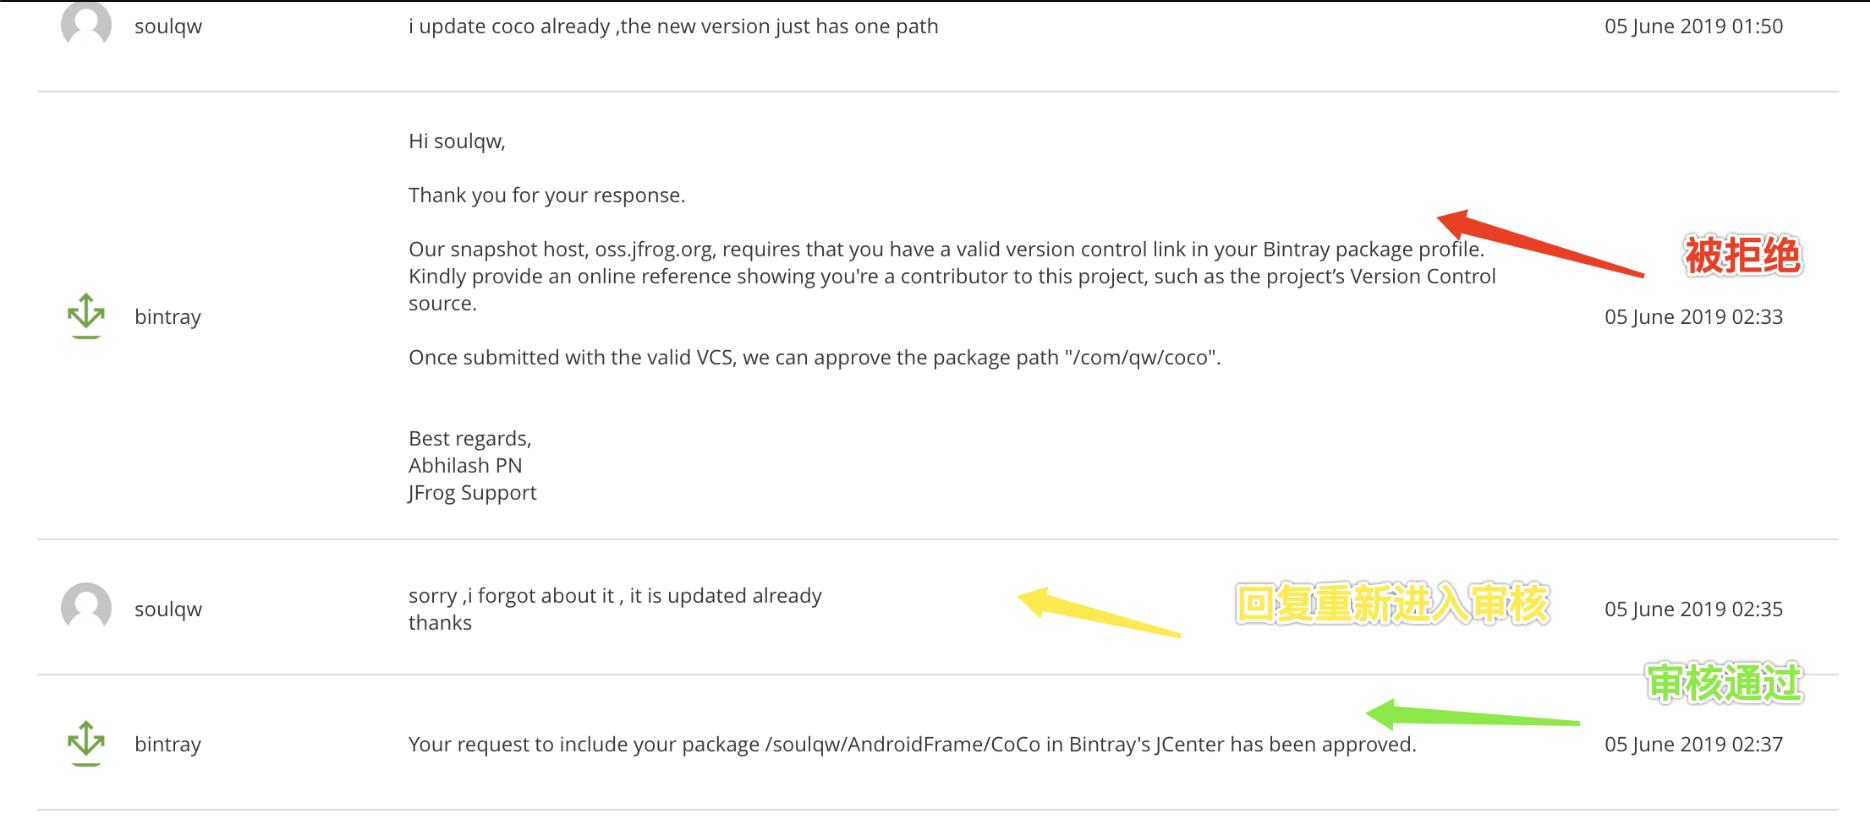
一旦审核通过,后续只要修改版本名称的迭代都不需要再次审核了
- 如果你的Lib自己项目中依赖了某个库,比如Android Support库
dependencies
    implementation 'com.android.support:appcompat-v7:28.0.0'
而你应用的项目也使用了这个库,但是它们各自所依赖的版本号不一致,这样应用项目在引入这个lib时候编辑就容易因版本号不一致而报错,正确的姿势就是讲lib对 相应库的依赖由 implementation 改为 compileOnly 或者由 compile 改为 provided
dependencies
    //这样引用容易引发冲突,改为compileOnly 仅仅lib内可用
//    implementation 'com.android.support:appcompat-v7:28.0.0'
    compileOnly 'com.android.support:appcompat-v7:28.0.0'
以下是几个gradle中新老配置的变化对照表:
| 新配置 | 老配置 | 行为 |
|---|---|---|
| implementation | compile | 依赖项在编译时对模块可用,并且仅在运行时对模块的消费者可用。 对于大型多项目构建,使用 implementation 而不是 api/compile 可以显著缩短构建时间,因为它可以减少构建系统需要重新编译的项目量。 大多数应用和测试模块都应使用此配置。 |
| api | compile | 依赖项在编译时对模块可用,并且在编译时和运行时还对模块的消费者可用。 此配置的行为类似于 compile(现在已弃用),一般情况下,您应当仅在库模块中使用它。 应用模块应使用 implementation,除非您想要将其 API 公开给单独的测试模块。 |
| compileOnly | provided | 依赖项仅在编译时对模块可用,并且在编译或运行时对其消费者不可用。 此配置的行为类似于 provided(现在已弃用)。 |
| runtimeOnly | apk | 依赖项仅在运行时对模块及其消费者可用。 此配置的行为类似于 apk(现在已弃用)。 |
引子:
后来随着项目的发展,我们的项目慢慢迁移到了kotlin,后来又出现了以Kotlin做为工具的类:
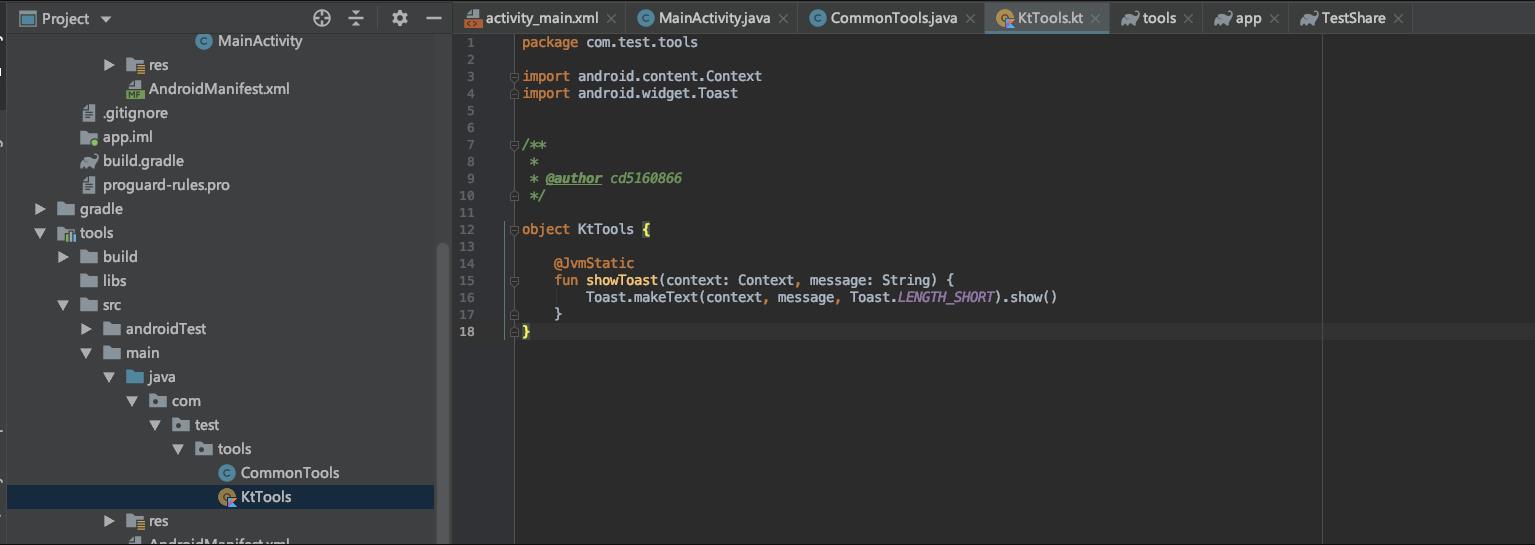
更新了方法、
版本号++、
upLoad、
然后。。。


原来kotlin文件生成javadoc文档默认会报错,查阅了相关资料,只要在gradle文件添加一些配置就好了,so:
支持上传Kotlin代码
- 回到项目层级的gradle文件加上:
classpath "org.jetbrains.dokka:dokka-gradle-plugin:0.9.18"
那么完整的文件就应该是这样:
// Top-level build file where you can add configuration options common to all sub-projects/modules.

buildscript
    ext.kotlin_version = '1.3.10'
    repositories
        google()
        jcenter()


    dependencies
        classpath 'com.android.tools.build:gradle:3.4.0'
        //upload
        classpath 'com.github.dcendents:android-maven-gradle-plugin:1.5'
        classpath 'com.jfrog.bintray.gradle:gradle-bintray-plugin:1.7.3'
        //kotlin
        classpath "org.jetbrains.kotlin:kotlin-gradle-plugin:$kotlin_version"
        //for kotlin upload
        classpath "org.jetbrains.dokka:dokka-gradle-plugin:0.9.18"


allprojects
    repositories
        google()
        jcenter()


task clean(type: Delete)
    delete rootProject.buildDir
再回到我们tools的gradle文件,补上:
//for kotlin upload
apply plugin: 'org.jetbrains.dokka'
//同时添加三个方法 for kotlin
task dokkaJavadoc(type: org.jetbrains.dokka.gradle.DokkaTask)
    outputFormat = 'javadoc'
    outputDirectory = javadoc.destinationDir

task generateJavadoc(type: Jar, dependsOn: dokkaJavadoc)
    group = 'jar'
    classifier = 'javadoc'
    from javadoc.destinationDir

task generateSourcesJar(type: Jar)
    group = 'jar'
    from android.sourceSets.main.java.srcDirs
    classifier = 'sources'
artifacts 中替换为:
artifacts
    archives generateJavadoc //javadocJar
    archives generateSourcesJar //sourcesJar
那么这么下来上传java 又能上传kotlin的最终模版就是:
apply plugin: 'com.android.library'
apply plugin: 'kotlin-android'
//for upload
apply plugin: 'com.github.dcendents.android-maven'
apply plugin: 'com.jfrog.bintray'
//for kotlin upload
apply plugin: 'org.jetbrains.dokka'

android
    compileSdkVersion 28
    defaultConfig
        minSdkVersion 14
        targetSdkVersion 28
        versionCode 2
        versionName "0.0.3"

        testInstrumentationRunner "android.support.test.runner.AndroidJUnitRunner"


    buildTypes
        release
            minifyEnabled false
            proguardFiles getDefaultProguardFile('proguard-android-optimize.txt'), 'proguard-rules.pro'


dependencies
    //这样引用容易引发冲突,改为compileOnly 仅仅lib内可用
//    implementation 'com.android.support:appcompat-v7:28.0.0'
    compileOnly 'com.android.support:appcompat-v7:28.0.0'
    compileOnly "org.jetbrains.kotlin:kotlin-stdlib-jdk7:$kotlin_version"


def siteUrl = 'https://www.google.com/' //可选 如果有的话
def gitUrl = 'https://www.google.com/' //可选 如果有的话

group = "com.share"  //路径
version = "0.0.3.release" //版本名称, 不要用beta,否则容易审核不通过
//以上两个配合项目目录名最终上传上去引用就是   compile 'com.share:tools:0.0.2.release'

task sourcesJar(type: Jar)
    from android.sourceSets.main.java.srcDirs
    classifier = 'sources'


task javadoc(type: Javadoc)
    source = android.sourceSets.main.java.srcDirs
    classpath += project.files(android.getBootClasspath().join(File.pathSeparator))


task javadocJar(type: Jar, dependsOn: javadoc)
    classifier = 'javadoc'
    from javadoc.destinationDir

//同时添加三个方法 for kotlin
task dokkaJavadoc(type: org.jetbrains.dokka.gradle.DokkaTask)
    outputFormat = 'javadoc'
    outputDirectory = javadoc.destinationDir

task generateJavadoc(type: Jar, dependsOn: dokkaJavadoc)
    group = 'jar'
    classifier = 'javadoc'
    from javadoc.destinationDir

task generateSourcesJar(type: Jar)
    group = 'jar'
    from android.sourceSets.main.java.srcDirs
    classifier = 'sources'


task copyDoc(type: Copy)
    from "$buildDir/docs/"
    into "docs"


//for java only
//artifacts
//    archives javadocJar
//    archives sourcesJar
//
//for kotlin
artifacts
    archives generateJavadoc //javadocJar
    archives generateSourcesJar //sourcesJar


install
    repositories.mavenInstaller
        // This generates POM.xml with proper parameters
        pom
            project
                packaging 'aar'
                name 'is permission tool for android'
                url siteUrl
                licenses
                    license
                        name 'The Apache Software License, Version 2.0'
                        url 'http://www.apache.org/licenses/LICENSE-2.0.txt'


                developers
                    developer
                        id 'soulqw' //用户名
                        name 'qinwei' //姓名
                        email 'cd5160866@126.com' //邮箱


                scm
                    connection gitUrl
                    developerConnection gitUrl
                    url siteUrl


Properties properties = new Properties()
properties.load(project.rootProject.file('local.properties').newDataInputStream())

bintray
    //关键信息我们从localProperties文件中读取
    user = properties.getProperty("bintray.user")
    key = properties.getProperty("bintray.apikey")
    configurations = ['archives']
    pkg
        repo = "TestRepository" // 仓库名
        name = "MyTools"// 包名
        desc = 'just tools'
        websiteUrl = siteUrl
        vcsUrl = gitUrl
        licenses = ["Apache-2.0"]
        publish = true


javadoc
    options
        encoding "UTF-8"
        charSet 'UTF-8'
        author true
        version true
        links "http://docs.oracle.com/javase/7/docs/api"
再输入上传命令,就可以了:

总结
基本上按照完整的以上流程,就不会有什么上传的问题,一般都能通过
最后留意下localproperties文件的配置即可
以上是关于在Jcenter上快速共享你的Android 项目(Java or Kotlin)的主要内容,如果未能解决你的问题,请参考以下文章